
Grow Kalamansi in Pots and transform your patio, balcony, or even sunny windowsill into a citrus paradise! Have you ever dreamed of plucking fresh, tangy kalamansi right from your own plant to brighten up your drinks, dishes, and desserts? Well, dream no more! This DIY guide is your passport to cultivating these delightful little citrus gems, no matter how limited your space might be.
Kalamansi, also known as calamondin or Philippine lime, holds a special place in Southeast Asian cuisine and culture. For generations, it’s been a staple ingredient, adding a unique zesty flavor to everything from marinades and sauces to refreshing beverages. Imagine the satisfaction of sharing homemade kalamansi juice with friends and family, using fruit you nurtured yourself!
But why should you bother with growing your own? In today’s world, where access to fresh, quality produce can sometimes be a challenge, having your own kalamansi plant offers a fantastic solution. Not only will you have a readily available supply of these flavorful fruits, but you’ll also enjoy the therapeutic benefits of gardening. Plus, let’s be honest, there’s something incredibly rewarding about nurturing a plant from a tiny seedling to a thriving, fruit-bearing beauty. This DIY guide will provide you with all the essential tips and tricks you need to successfully grow Kalamansi in Pots, even if you’re a complete beginner. So, grab your gardening gloves, and let’s get started on this exciting citrus adventure!
Grow Your Own Kalamansi Tree in Pots: A Step-by-Step Guide
Hey there, fellow gardening enthusiasts! Have you ever dreamed of having your own little citrus orchard, even if you only have a balcony or a small patio? Well, I’m here to tell you that it’s totally possible, and one of the easiest and most rewarding citrus trees to grow in pots is the Kalamansi! These little powerhouses of flavor are perfect for adding a zesty kick to your cooking and drinks. Plus, they’re just beautiful to look at. So, let’s dive into how you can grow your very own Kalamansi tree in a pot.
Choosing the Right Kalamansi Tree
Before we get our hands dirty, let’s talk about selecting the right Kalamansi tree. You have a couple of options here:
* Seedling: Growing from seed is definitely the most budget-friendly option, but it takes the longest. Be prepared to wait several years before you see any fruit. Plus, the fruit quality might not be exactly what you expect.
* Grafted Tree: This is the way to go if you want faster results and guaranteed fruit quality. Grafted trees are essentially a Kalamansi variety (the scion) attached to a strong rootstock. This means you’ll get fruit much sooner, usually within a year or two. Look for grafted trees at your local nurseries or online.
What to look for when buying a Kalamansi tree:
* Healthy Leaves: Make sure the leaves are a vibrant green and free from any spots, discoloration, or pests.
* Strong Trunk: The trunk should be sturdy and upright, not leaning or damaged.
* Well-Developed Root System: If possible, gently check the root system. You want to see healthy, white roots, not a tangled mess of brown ones.
* Size: Consider the size of your pot and the space you have available. Kalamansi trees can grow to be quite large, so choose a size that’s manageable for your situation.
Gathering Your Supplies
Okay, now that we’ve chosen our tree, let’s gather everything we need. Here’s a checklist:
* A Large Pot: Choose a pot that’s at least 18-24 inches in diameter. Make sure it has drainage holes! Good drainage is crucial for Kalamansi trees. Terracotta or plastic pots both work well.
* Well-Draining Potting Mix: Citrus trees need a well-draining potting mix to prevent root rot. You can buy a citrus-specific mix or create your own by combining equal parts potting soil, perlite, and compost.
* Slow-Release Citrus Fertilizer: This will provide your tree with the nutrients it needs to thrive.
* Watering Can or Hose: For watering your tree.
* Pruning Shears: For trimming and shaping your tree.
* Gloves: To protect your hands.
* Optional: A layer of mulch (like wood chips or straw) to help retain moisture and suppress weeds.
Planting Your Kalamansi Tree
Alright, let’s get planting!
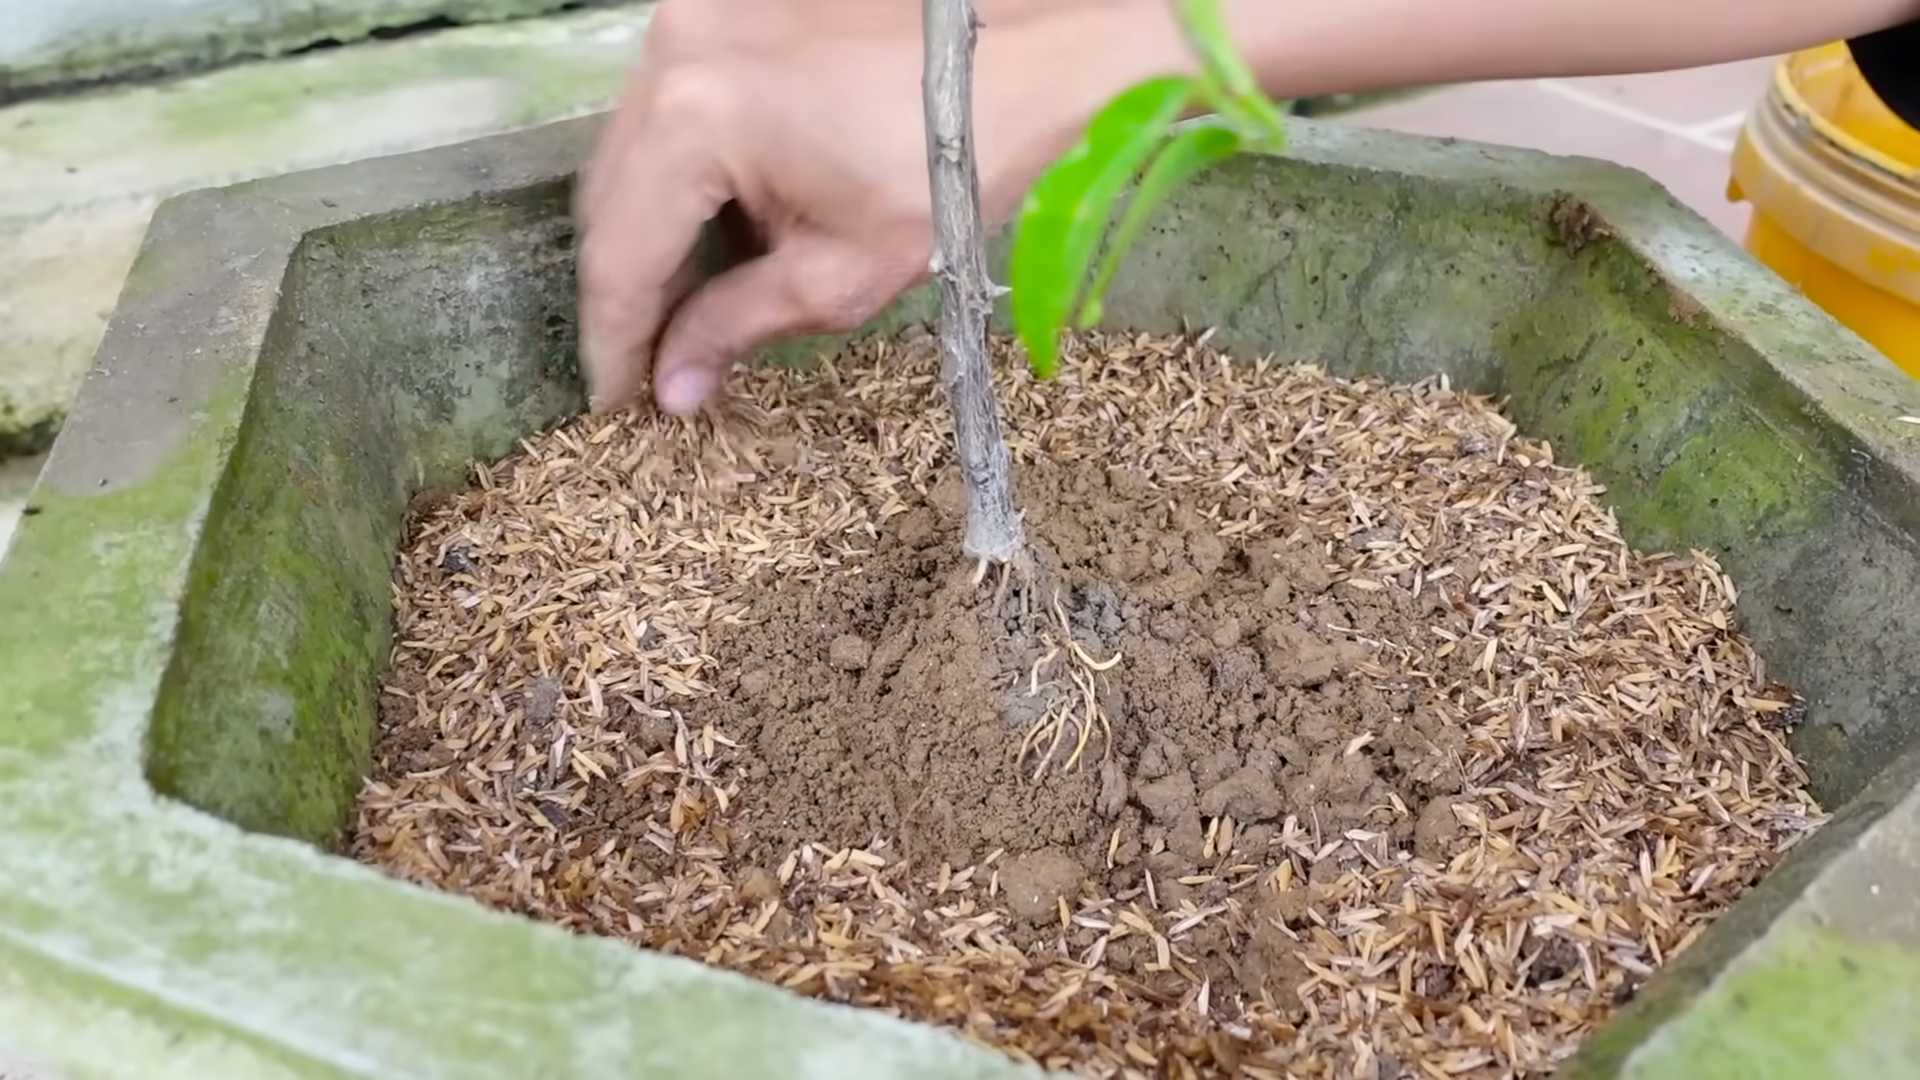
1. Prepare the Pot: Place a layer of gravel or broken pottery at the bottom of the pot to improve drainage. This is especially important if your pot only has a few drainage holes.
2. Add Potting Mix: Fill the pot about one-third full with your well-draining potting mix.
3. Remove the Tree from its Container: Gently remove the Kalamansi tree from its nursery container. If the roots are tightly bound, carefully loosen them with your fingers.
4. Position the Tree: Place the tree in the center of the pot, making sure the top of the root ball is level with the top of the pot.
5. Fill with Potting Mix: Fill the remaining space around the root ball with potting mix, gently pressing down to eliminate air pockets.
6. Water Thoroughly: Water the tree thoroughly until water drains out of the drainage holes. This will help settle the soil and hydrate the roots.
7. Add Fertilizer: Sprinkle a slow-release citrus fertilizer around the base of the tree, following the instructions on the fertilizer package.
8. Mulch (Optional): Add a layer of mulch around the base of the tree to help retain moisture and suppress weeds. Be sure to keep the mulch a few inches away from the trunk to prevent rot.
Caring for Your Kalamansi Tree
Now that your Kalamansi tree is planted, it’s time to learn how to care for it. Here’s what you need to know:
Sunlight
Kalamansi trees need plenty of sunlight to thrive. Aim for at least 6-8 hours of direct sunlight per day. If you live in a particularly hot climate, you might want to provide some afternoon shade to prevent the leaves from scorching.
Watering
Water your Kalamansi tree regularly, especially during the growing season (spring and summer). The soil should be kept consistently moist, but not soggy. Allow the top inch or two of soil to dry out between waterings. Overwatering can lead to root rot, so be careful not to overdo it.
How to tell if you’re watering correctly:
* Too little water: The leaves will start to droop and turn yellow.
* Too much water: The leaves will turn yellow and may drop off. The soil will also be constantly wet.
Fertilizing
Kalamansi trees are heavy feeders, so regular fertilization is essential. Use a slow-release citrus fertilizer according to the package instructions. You can also supplement with liquid fertilizer every few weeks during the growing season.
Pruning
Pruning helps to maintain the shape of your tree, encourage fruit production, and remove any dead or diseased branches. Prune your Kalamansi tree in late winter or early spring, before new growth begins.
Tips for pruning:
* Remove any dead, damaged, or crossing branches.
* Prune to maintain a balanced shape.
* Thin out the canopy to allow for better air circulation and sunlight penetration.
* Remove any suckers (shoots that grow from the base of the tree).
Pest and Disease Control
Kalamansi trees can be susceptible to pests like aphids, scale, and spider mites. Regularly inspect your tree for any signs of infestation. If you find pests, you can treat them with insecticidal soap or neem oil.
Common Kalamansi tree problems and solutions:
* Yellowing leaves: Could be caused by overwatering, underwatering, nutrient deficiency, or pest infestation.
* Leaf drop: Could be caused by stress, such as sudden changes in temperature or watering.
* Lack of fruit: Could be caused by insufficient sunlight, lack of pollination, or nutrient deficiency.
Overwintering
If you live in a climate with cold winters, you’ll need to bring your Kalamansi tree indoors. Before bringing it inside, inspect it for pests and diseases. Place it in a sunny location, such as near a south-facing window. Water sparingly during the winter months, as the tree will not be actively growing.
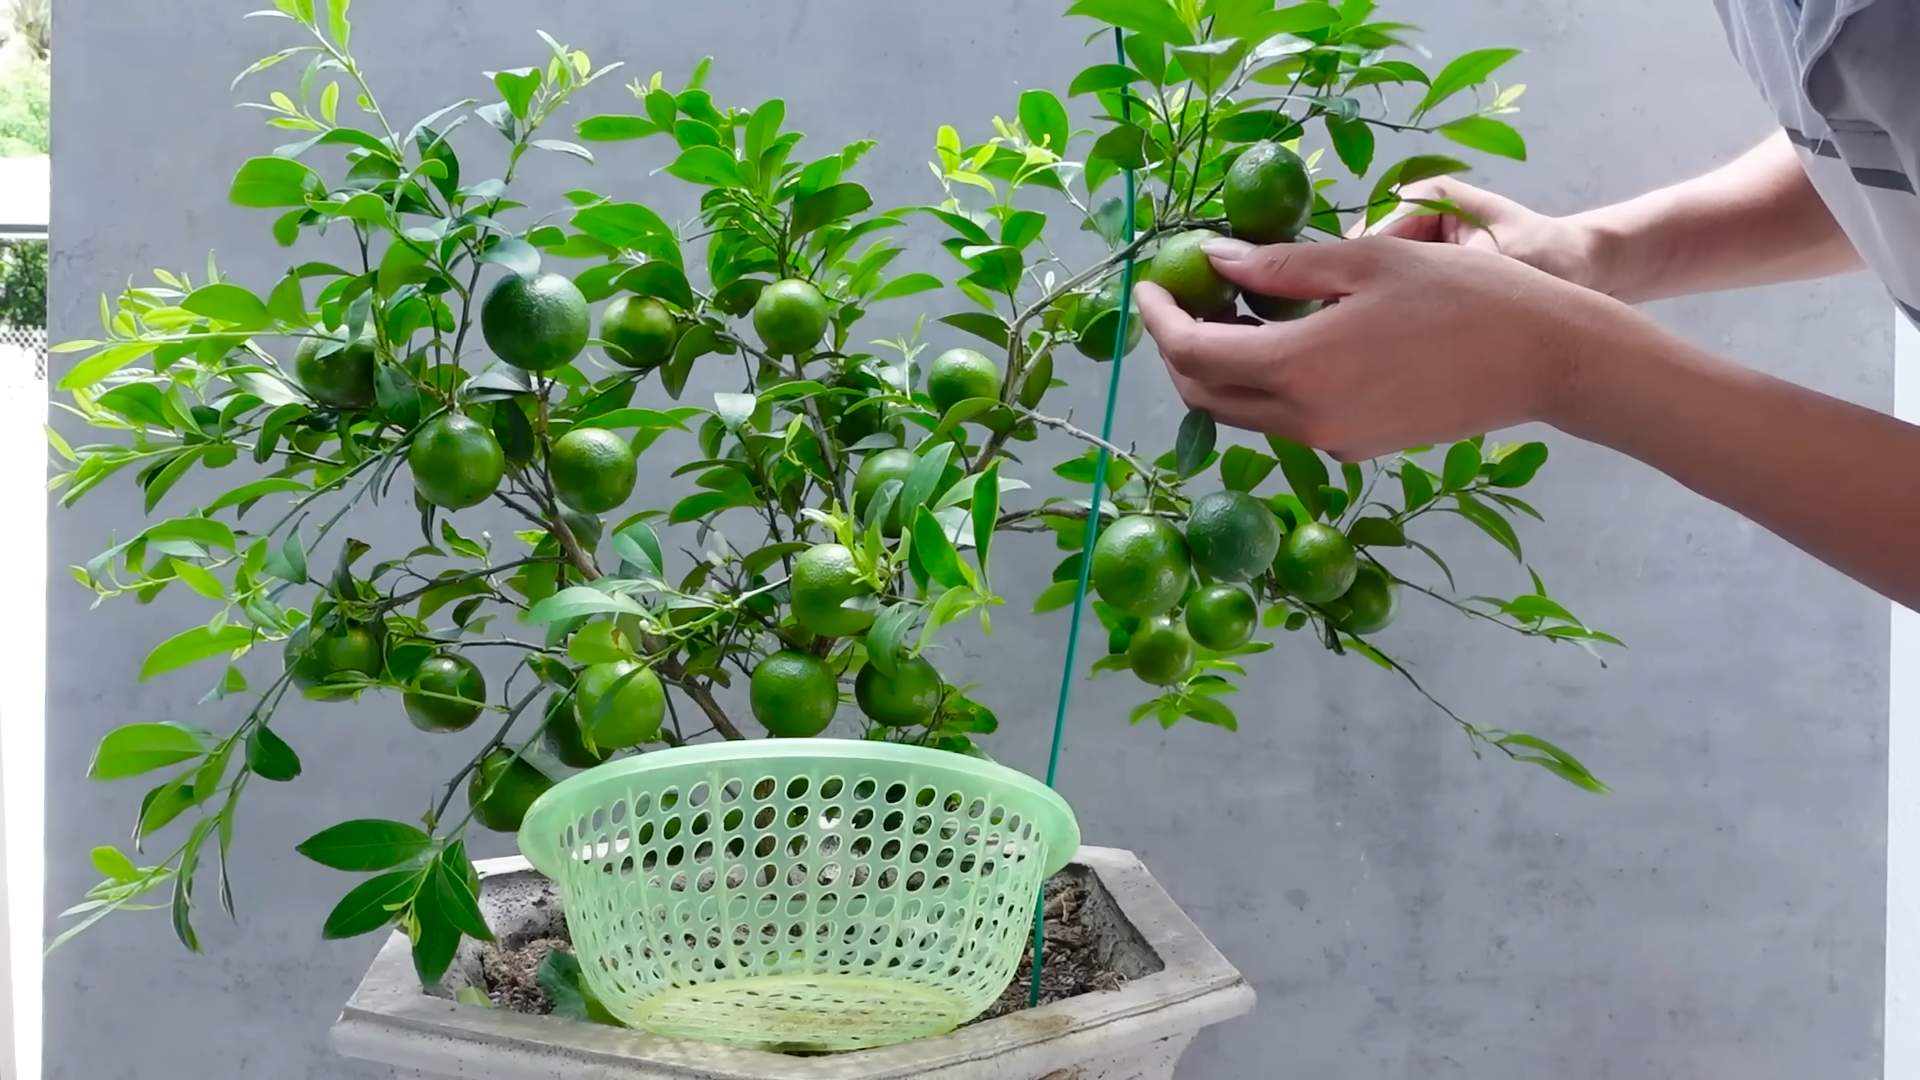
Harvesting Your Kalamansi
The moment you’ve been waiting for! Kalamansi fruits are typically ready to harvest when they turn from green to orange. They should be slightly soft to the touch. To harvest, simply clip the fruit from the tree with pruning shears.
Tips for harvesting:
* Harvest the fruits when they are fully ripe for the best flavor.
* Use pruning shears to avoid damaging the tree.
* Store the harvested fruits in the refrigerator for up to a week.
Enjoying Your Kalamansi
Now that you’ve harvested your Kalamansi, it’s time to enjoy the fruits of your labor! Kalamansi juice is incredibly versatile and can be used in a variety of ways:
* Drinks: Add it to lemonade, iced tea, or cocktails.
* Cooking: Use it to marinate meats, make sauces, or add a zesty flavor to desserts.
* Baking: Add it to cakes, pies, or cookies.
* Preserves: Make Kalamansi marmalade or jam.
Growing your own Kalamansi tree in a pot is a rewarding experience that will provide you with fresh, flavorful fruit for years to come. With a little care and attention, you can enjoy the taste of the tropics right in your own backyard! Happy gardening!
Conclusion
So, there you have it! Growing your own calamansi in pots isn’t just a gardening project; it’s an investment in fresh, flavorful citrus that you can enjoy year-round. We’ve walked you through the essential steps, from selecting the right pot and soil to providing the necessary sunlight and care. But why is this DIY trick a must-try?
Firstly, the unparalleled freshness. Imagine stepping outside and picking a perfectly ripe calamansi, bursting with tangy juice, ready to elevate your favorite dishes and drinks. Store-bought citrus simply can’t compare to the vibrant flavor of homegrown fruit. Secondly, the sheer satisfaction of nurturing a plant from seedling to fruiting tree is incredibly rewarding. It’s a tangible connection to nature and a testament to your green thumb. Thirdly, growing calamansi in pots offers flexibility. Whether you have a sprawling garden or a small balcony, you can enjoy the benefits of this citrus gem. And finally, it’s a cost-effective way to enjoy fresh calamansi, especially if you use it frequently.
But the beauty of this DIY project lies in its adaptability. Feel free to experiment with different soil mixes to find what works best for your climate. Consider adding companion plants like basil or marigolds to deter pests naturally. You can also explore different calamansi varieties, such as the variegated calamansi, for a touch of visual interest. For those in colder climates, consider investing in a grow light to supplement sunlight during the winter months. You can even try grafting your calamansi onto a more cold-hardy citrus rootstock for increased resilience.
Don’t be intimidated by the prospect of growing your own citrus. With a little patience and attention, you’ll be harvesting your own calamansi in no time. The key is to provide consistent care, monitor your plant for any signs of distress, and adjust your approach as needed. Remember, every plant is unique, and what works for one may not work for another.
We wholeheartedly encourage you to embark on this rewarding journey of growing calamansi in pots. It’s a simple yet profound way to connect with nature, enhance your culinary creations, and add a touch of tropical zest to your life. We are confident that you will find the process enjoyable and the results delicious.
Now, we want to hear from you! Have you tried growing calamansi in pots? What challenges did you face, and what tips would you share with fellow gardeners? Share your experiences, photos, and questions in the comments below. Let’s create a community of calamansi enthusiasts and learn from each other’s successes and failures. Your insights could be invaluable to someone just starting out. So, grab your gardening gloves, get your hands dirty, and let’s grow some calamansi! We can’t wait to see what you create.
Frequently Asked Questions (FAQ)
1. What is the best type of pot for growing calamansi?
The ideal pot for growing calamansi should be large enough to accommodate the root system and provide adequate drainage. A pot that is at least 12-16 inches in diameter and depth is a good starting point. As the tree grows, you may need to repot it into a larger container. Terracotta pots are a good choice because they allow for good air circulation and drainage, but plastic pots are also suitable and tend to retain moisture better. Regardless of the material, ensure the pot has drainage holes to prevent waterlogging, which can lead to root rot.
2. What kind of soil should I use for my calamansi tree?
Calamansi trees thrive in well-draining, slightly acidic soil. A good potting mix for calamansi is a blend of equal parts potting soil, perlite, and compost. The potting soil provides nutrients, the perlite improves drainage, and the compost adds organic matter. Avoid using garden soil, as it can be too heavy and compact, hindering root growth. You can also purchase citrus-specific potting mixes, which are formulated to meet the specific needs of citrus trees.
3. How much sunlight does a calamansi tree need?
Calamansi trees require at least 6-8 hours of direct sunlight per day to thrive and produce fruit. If you live in a region with limited sunlight, consider supplementing with a grow light, especially during the winter months. Place your potted calamansi tree in a sunny location, such as a south-facing window or balcony. If you’re moving your tree outdoors after it has been indoors, gradually acclimate it to the sunlight to prevent sunburn.
4. How often should I water my calamansi tree?
Water your calamansi tree when the top inch of soil feels dry to the touch. The frequency of watering will depend on factors such as the weather, the size of the pot, and the type of soil. In general, you may need to water more frequently during the hot summer months and less frequently during the cooler winter months. When watering, water deeply until water drains out of the drainage holes. Avoid overwatering, as this can lead to root rot.
5. How do I fertilize my calamansi tree?
Calamansi trees are heavy feeders and require regular fertilization to produce abundant fruit. Fertilize your tree every 4-6 weeks during the growing season (spring and summer) with a citrus-specific fertilizer. Follow the instructions on the fertilizer label for application rates. You can also use organic fertilizers, such as compost tea or fish emulsion. Avoid fertilizing during the dormant season (fall and winter).
6. How do I prune my calamansi tree?
Pruning helps to maintain the shape of your calamansi tree, improve air circulation, and encourage fruit production. Prune your tree in late winter or early spring, before new growth begins. Remove any dead, damaged, or crossing branches. You can also prune to shape the tree and remove any suckers that grow from the base of the trunk. Avoid pruning too heavily, as this can reduce fruit production.
7. What are some common pests and diseases that affect calamansi trees?
Common pests that can affect calamansi trees include aphids, scale, mealybugs, and spider mites. These pests can be controlled with insecticidal soap or neem oil. Common diseases include root rot, citrus canker, and greasy spot. Root rot can be prevented by ensuring good drainage and avoiding overwatering. Citrus canker and greasy spot can be treated with copper-based fungicides. Regularly inspect your tree for any signs of pests or diseases and take action promptly.
8. How long does it take for a calamansi tree to produce fruit?
A calamansi tree grown from seed can take several years to produce fruit. However, a grafted calamansi tree can start producing fruit within 1-2 years. The time it takes for a tree to fruit will also depend on factors such as the variety, the growing conditions, and the overall health of the tree.
9. Can I grow calamansi indoors?
Yes, you can grow calamansi indoors, but it requires providing the right conditions. Ensure your tree receives at least 6-8 hours of direct sunlight per day, or supplement with a grow light. Maintain a consistent temperature and humidity level. Water regularly and fertilize as needed. You may also need to hand-pollinate the flowers to ensure fruit production.
10. How do I overwinter my calamansi tree in cold climates?
If you live in a cold climate, you will need to overwinter your calamansi tree indoors. Before the first frost, bring your tree indoors and place it in a sunny location. Reduce watering and fertilization during the winter months. You may also need to provide supplemental humidity, as indoor air can be dry during the winter. Once the weather warms up in the spring, gradually acclimate your tree to the outdoors before placing it back in its permanent location.
11. My calamansi tree is dropping leaves. What could be the reason?
Leaf drop in calamansi trees can be caused by several factors, including overwatering, underwatering, nutrient deficiencies, temperature stress, pest infestations, or diseases. Check the soil moisture level to ensure you are not overwatering or underwatering. Inspect the tree for any signs of pests or diseases. Ensure the tree is receiving adequate sunlight and is not exposed to extreme temperatures. If the leaf drop is severe, consider repotting the tree with fresh potting mix and fertilizing it with a citrus-specific fertilizer.
12. How do I encourage my calamansi tree to produce more fruit?
To encourage your calamansi tree to produce more fruit, ensure it is receiving adequate sunlight, water, and nutrients. Fertilize regularly with a citrus-specific fertilizer. Prune the tree to improve air circulation and remove any dead or damaged branches. You can also try hand-pollinating the flowers to increase fruit set. Avoid overwatering, as this can lead to root rot and reduce fruit production. Finally, be patient, as it may take some time for your tree to mature and produce abundant fruit.
Leave a Comment