
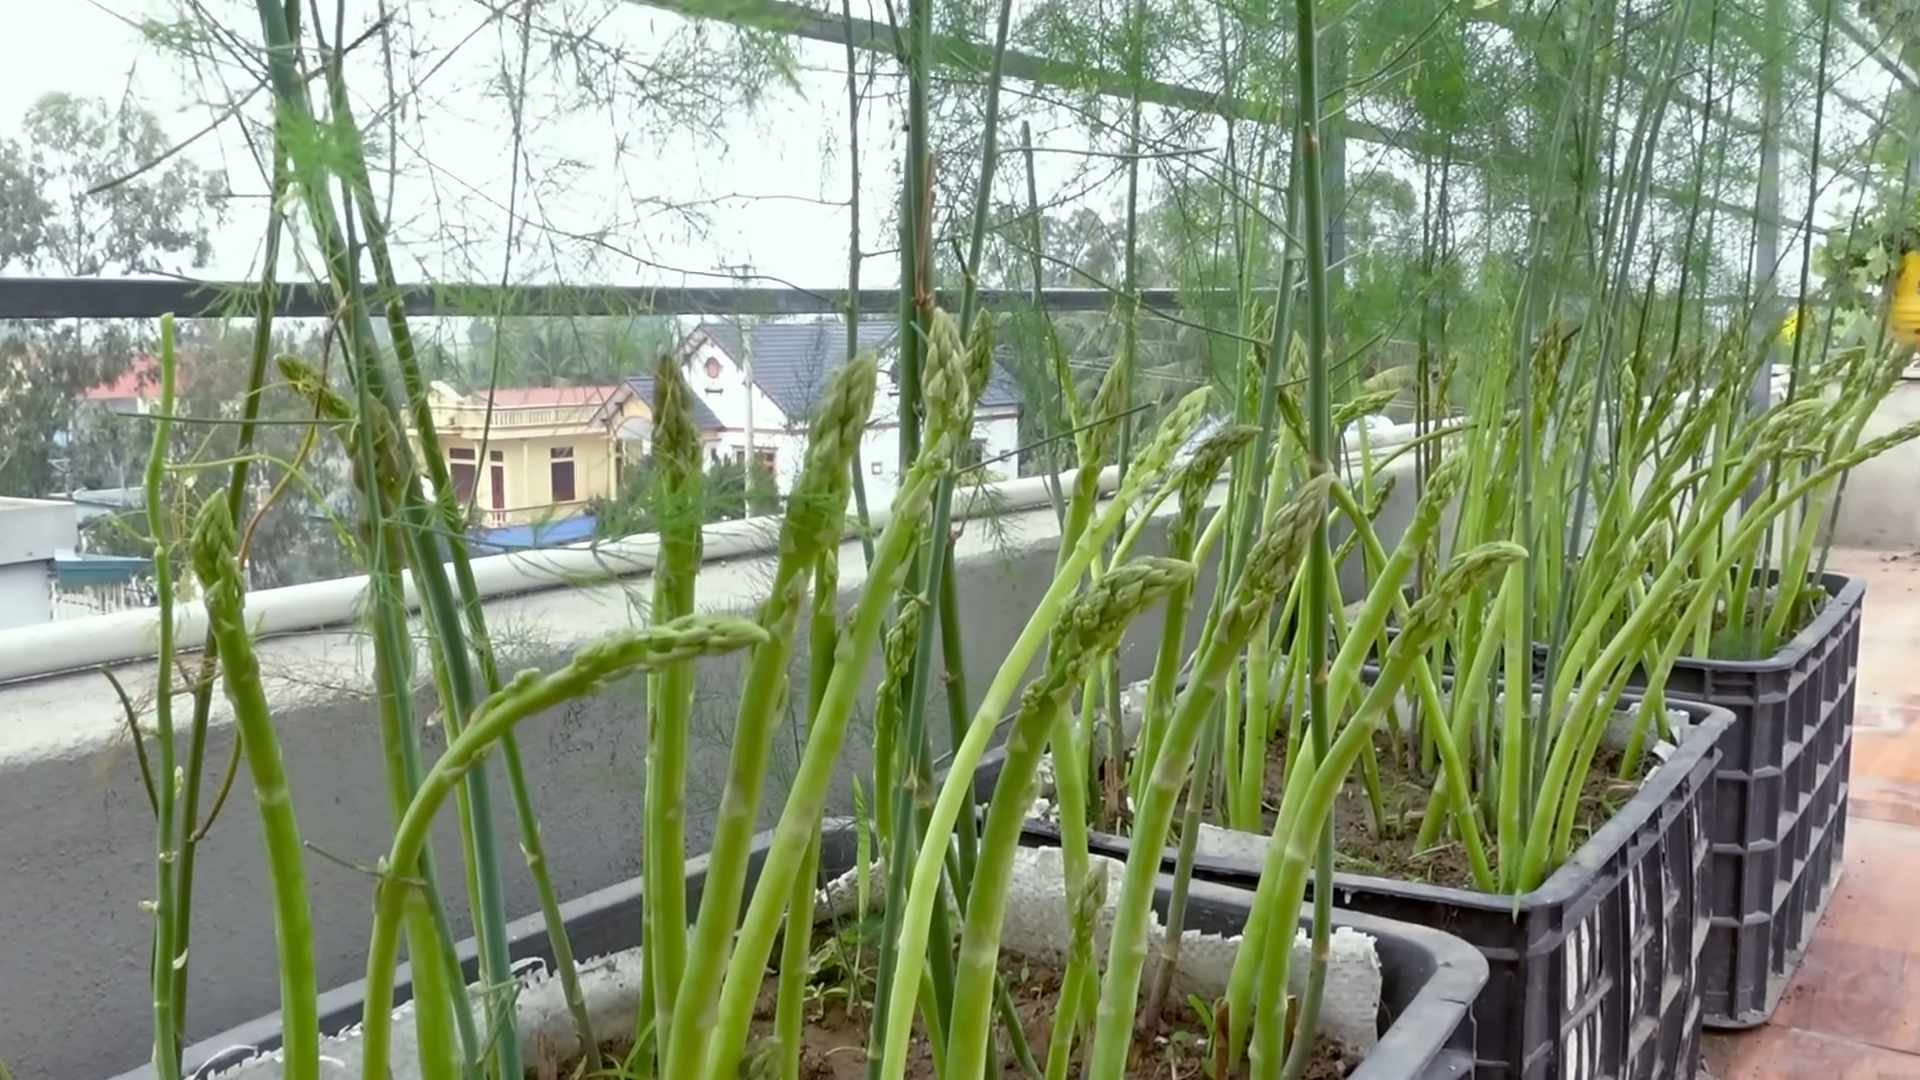
Growing Asparagus in Planters might seem like a challenge, but trust me, it’s totally achievable and incredibly rewarding! Have you ever dreamed of snipping fresh, tender asparagus spears right from your own patio? Imagine the delicious meals you could create, knowing exactly where your food comes from. This isn’t just about gardening; it’s about bringing a touch of spring’s vibrant energy right to your doorstep.
Asparagus has a rich history, enjoyed since ancient Roman times for its delicate flavor and purported medicinal properties. For centuries, it was a delicacy reserved for the elite. Now, thanks to modern gardening techniques, we can all enjoy this springtime treat, even without a sprawling garden.
Many people shy away from growing asparagus because they think it requires a large garden bed. But that’s simply not true! Growing Asparagus in Planters is a fantastic solution for apartment dwellers, balcony gardeners, or anyone with limited space. Plus, it allows you to control the soil conditions and protect your precious plants from pests and diseases more easily. In this article, I’m going to share my favorite DIY tricks and hacks to help you successfully cultivate this delicious vegetable in containers, ensuring a bountiful harvest for years to come. Get ready to roll up your sleeves and let’s get planting!
Growing Asparagus in Planters: A Complete DIY Guide
Hey there, fellow gardening enthusiasts! Asparagus, that delicious and elegant spring vegetable, might seem like something you can only get from a farm or a well-established garden. But guess what? You can absolutely grow asparagus in planters, even if you’re short on space! I’ve been doing it for a few years now, and I’m excited to share my secrets to success with you. It takes patience, but the reward of fresh, homegrown asparagus is totally worth it.
Choosing the Right Asparagus Variety
First things first, let’s talk about asparagus varieties. Not all asparagus is created equal, and some are better suited for container growing than others.
* ‘Jersey Knight’: This is a popular, all-male variety known for its high yields and disease resistance. All-male varieties are great because they don’t produce seeds, meaning the plant puts all its energy into spear production.
* ‘Jersey Giant’: Similar to ‘Jersey Knight,’ this is another excellent all-male option with good disease resistance and high yields.
* ‘Purple Passion’: If you’re looking for something a little different, ‘Purple Passion’ offers beautiful purple spears that turn green when cooked. It’s also known for being sweeter and more tender than green varieties.
* ‘Mary Washington’: An older heirloom variety, ‘Mary Washington’ is reliable and produces good yields, but it’s not an all-male variety, so you might get some seedlings popping up.
I personally recommend starting with ‘Jersey Knight’ or ‘Jersey Giant’ for beginners. They’re reliable and easy to grow.
Selecting the Perfect Planter
The size of your planter is crucial for asparagus. These plants have deep roots, so you’ll need a container that can accommodate them.
* Size Matters: Aim for a planter that’s at least 12 inches deep and 12 inches wide per crown. A larger planter is always better, as it gives the roots more room to spread out. I’ve found that a half-barrel planter (around 25 gallons) works well for 2-3 crowns.
* Material: You can use plastic, terracotta, or even wooden planters. Just make sure the planter has good drainage holes. Asparagus doesn’t like soggy roots.
* Drainage is Key: Proper drainage is non-negotiable. If your planter doesn’t have enough drainage holes, drill some more. You can also add a layer of gravel or broken pottery at the bottom of the planter to improve drainage.
I prefer using plastic planters because they’re lightweight and retain moisture better than terracotta. However, terracotta looks beautiful and can be a good option if you live in a humid climate.
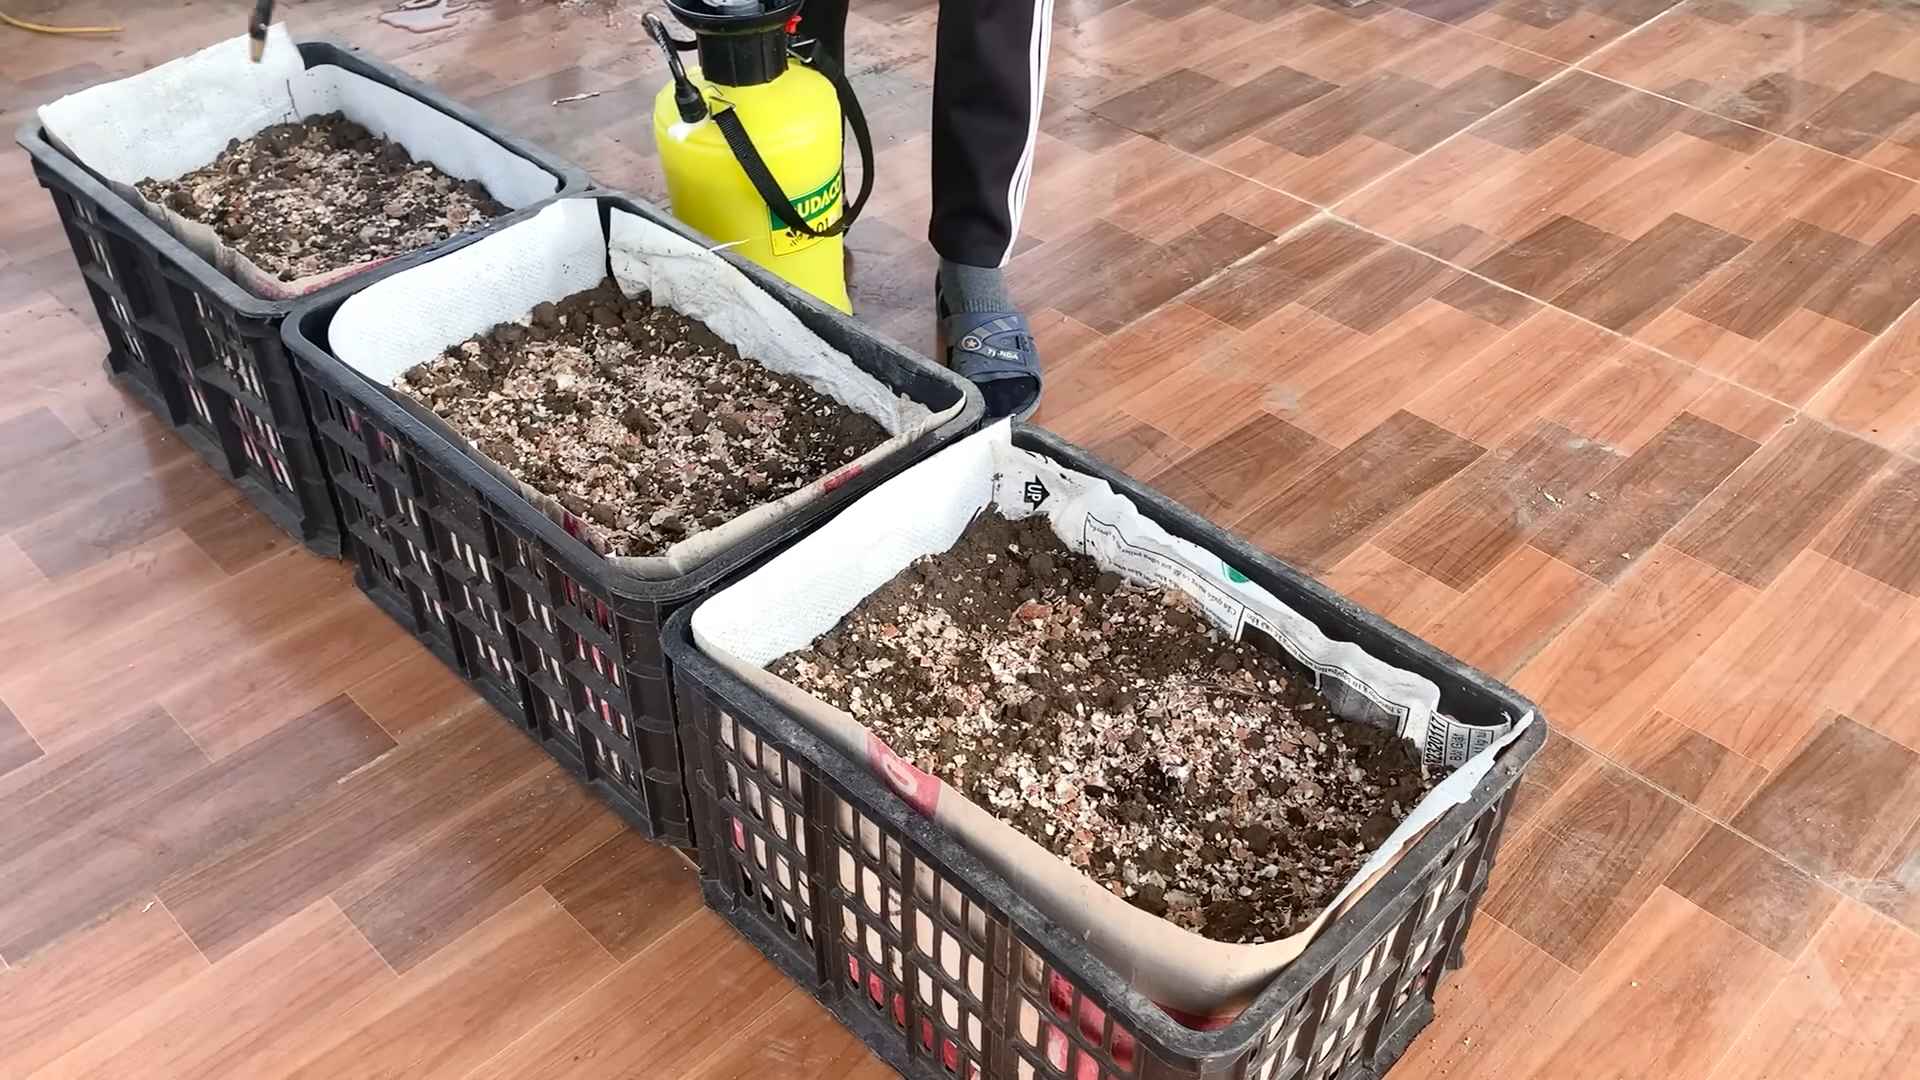
Preparing the Planting Mix
Asparagus needs well-draining, nutrient-rich soil. Here’s my go-to recipe for a perfect asparagus planting mix:
* Base Mix: Combine equal parts of potting soil, compost, and perlite or vermiculite.
* Amendments: Add a handful of bone meal and a handful of slow-release fertilizer to the mix. Bone meal provides phosphorus, which is essential for root development, and the slow-release fertilizer will provide a steady supply of nutrients.
* pH Level: Asparagus prefers a slightly acidic to neutral soil pH (around 6.5-7.0). You can test your soil pH with a soil testing kit and amend it accordingly.
I like to mix everything together in a large tub before filling the planter. This ensures that the ingredients are evenly distributed.
Planting Your Asparagus Crowns
Now for the fun part – planting your asparagus crowns!
1. Soak the Crowns: Before planting, soak the asparagus crowns in water for about an hour. This will help rehydrate them and give them a good start.
2. Create a Mound: Fill the planter with your prepared planting mix, leaving about 6 inches of space at the top. Create a small mound in the center of the planter.
3. Position the Crown: Place the asparagus crown on top of the mound, spreading the roots out around it.
4. Cover the Crown: Gently cover the crown with about 2 inches of soil.
5. Water Thoroughly: Water the planter thoroughly after planting.
If you’re planting multiple crowns in the same planter, space them about 12 inches apart.
Caring for Your Asparagus Plants
Asparagus is relatively low-maintenance once established, but there are a few key things to keep in mind.
* Watering: Water your asparagus plants regularly, especially during dry spells. The soil should be consistently moist, but not waterlogged. I usually water deeply once or twice a week, depending on the weather.
* Fertilizing: Fertilize your asparagus plants in early spring and again in mid-summer with a balanced fertilizer. You can also side-dress with compost or aged manure.
* Weeding: Keep the planter free of weeds. Weeds compete with asparagus for nutrients and water.
* Mulching: Apply a layer of mulch around the base of the plants to help retain moisture, suppress weeds, and regulate soil temperature. I like to use straw or wood chips.
* Sunlight: Asparagus needs at least 6-8 hours of sunlight per day. Place your planter in a sunny location.
The Waiting Game: Patience is a Virtue
This is where the patience comes in. Do not harvest any spears during the first year. This allows the plants to establish a strong root system. In the second year, you can harvest a few spears, but only for a short period (about 2-3 weeks). In the third year and beyond, you can harvest spears for a longer period (about 6-8 weeks).
* Why the Wait?: Harvesting too early can weaken the plants and reduce future yields. Trust me, it’s worth the wait!
* Fern Development: After the harvesting period, let the asparagus plants grow into ferns. These ferns are essential for photosynthesis and will help the plants store energy for the next growing season.
Harvesting Your Asparagus
Finally, the moment you’ve been waiting for – harvesting your homegrown asparagus!
1. When to Harvest: Harvest asparagus spears when they are about 6-8 inches tall and about as thick as your finger.
2. How to Harvest: Use a sharp knife to cut the spears at ground level.
3. Harvesting Period: As mentioned earlier, the harvesting period will depend on the age of your plants. In the third year and beyond, you can harvest spears for about 6-8 weeks.
4. Stop Harvesting: Stop harvesting when the spears become thin and spindly. This indicates that the plants are starting to run out of energy.
I love to grill my homegrown asparagus with a little olive oil, salt, and pepper. It’s also delicious steamed, roasted, or added to salads and omelets.
Overwintering Asparagus in Planters
Asparagus is a perennial plant, meaning it will come back year after year. In the fall, the ferns will turn yellow and brown.
1. Cut Back the Ferns: Once the ferns have completely died back, cut them down to ground level.
2. Mulch Heavily: Apply a thick layer of mulch around the base of the plants to protect the roots from freezing temperatures.
3. Water Sparingly: Water the plants sparingly during the winter months.
4. Dormancy: Asparagus needs a period of dormancy to thrive. Don’t try to force it to grow during the winter.
If you live in a very cold climate, you may want to move the planter to a sheltered location, such as a garage or shed.
Troubleshooting Common Problems
Even with the best care, you might encounter a few problems along the way. Here are some common issues and how to address them:
* Yellowing Ferns: Yellowing ferns can be caused by a variety of factors, including overwatering, underwatering, nutrient deficiencies, or pests. Check the soil moisture and nutrient levels and treat any pests accordingly.
* Thin Spears: Thin spears can be a sign of overharvesting, nutrient deficiencies, or lack of sunlight. Reduce the harvesting period, fertilize the plants, and make sure they’re getting enough sunlight.
* Asparagus Beetles: Asparagus beetles are common pests that can damage the spears and ferns. Handpick the beetles or use an insecticidal soap to control them.
* Fusarium Crown and Root Rot: This fungal disease can cause the plants to wilt and die. Prevent it by planting disease-resistant varieties, providing good drainage, and avoiding overwatering.
Extending the Harvest
Want to enjoy asparagus for even longer? Here are a few tips:
* Succession Planting: Plant different varieties of asparagus that mature at different times.
* Cold Frames: Use a cold frame
Conclusion
So, there you have it! Growing asparagus in planters isn’t just a possibility; it’s a rewarding and surprisingly accessible way to enjoy fresh, homegrown asparagus, even without a sprawling garden. We’ve walked through the process, from selecting the right container and soil to nurturing your asparagus crowns and patiently waiting for that first delicious harvest.
Why is this DIY trick a must-try? Because it democratizes access to fresh, flavorful asparagus. No longer are you limited by yard size or soil conditions. With a little planning and effort, you can cultivate your own miniature asparagus patch on a balcony, patio, or even a sunny rooftop. Imagine the satisfaction of snipping off those tender spears, knowing they’ve been nurtured by your own hands. The taste difference between store-bought and freshly harvested asparagus is truly remarkable – a vibrant, slightly sweet flavor that will elevate your spring and summer meals.
Beyond the sheer deliciousness, growing asparagus in planters offers a unique connection to nature. It’s a chance to witness the miracle of growth firsthand, to learn about the plant’s life cycle, and to appreciate the bounty that the earth provides. It’s also a sustainable choice, reducing your reliance on commercially grown produce and minimizing your carbon footprint.
But the beauty of this method lies in its adaptability. Feel free to experiment with different varieties of asparagus. ‘Jersey Knight’ is a reliable choice for beginners, but ‘Purple Passion’ offers a unique color and slightly sweeter flavor. You can also companion plant with herbs like parsley or basil to deter pests and enhance the flavor of your asparagus. Consider adding a trellis or support structure as your asparagus ferns grow taller, creating a beautiful vertical garden element.
Don’t be afraid to get creative with your container choices, too. While we’ve recommended larger pots, you can repurpose old barrels, troughs, or even sturdy plastic bins, as long as they provide adequate drainage. Just remember to prioritize the size and drainage to ensure your asparagus crowns have plenty of room to thrive.
The key to success with this DIY trick is patience. Asparagus takes time to establish, but the rewards are well worth the wait. Remember to water consistently, fertilize regularly, and protect your plants from extreme weather conditions. With a little care and attention, you’ll be harvesting fresh asparagus for years to come.
We wholeheartedly encourage you to give growing asparagus in planters a try. It’s a fun, fulfilling, and ultimately delicious project that will transform your outdoor space and your culinary experiences. And once you’ve tasted the difference between homegrown and store-bought asparagus, you’ll never look back.
So, grab your planters, soil, and asparagus crowns, and get ready to embark on this exciting gardening adventure. We can’t wait to hear about your experiences! Share your photos, tips, and triumphs with us in the comments below. Let’s build a community of asparagus enthusiasts and inspire others to discover the joys of growing their own food. Let us know how your **asparagus growing** journey is going!
Frequently Asked Questions (FAQ)
Q: How long does it take to harvest asparagus after planting?
A: This is the most common question, and patience is key! It typically takes 2-3 years after planting asparagus crowns before you can begin harvesting. In the first year, allow the ferns to grow and establish a strong root system. In the second year, you can harvest a few spears, but only for a short period (about 2 weeks). By the third year, you can enjoy a more substantial harvest for 6-8 weeks. Remember, over-harvesting young plants can weaken them and reduce future yields.
Q: What is the best type of soil for growing asparagus in planters?
A: Asparagus thrives in well-draining, fertile soil. A mix of equal parts compost, potting soil, and sand or perlite is ideal. This combination provides the necessary nutrients, moisture retention, and drainage that asparagus needs to flourish. Avoid heavy clay soils, as they can become waterlogged and lead to root rot. You can also amend your soil with bone meal or rock phosphate to provide phosphorus, which is essential for root development.
Q: How often should I water my asparagus plants in planters?
A: Water deeply and regularly, especially during dry periods. The soil should be consistently moist but not waterlogged. Check the soil moisture level by sticking your finger about an inch into the soil. If it feels dry, it’s time to water. During hot summer months, you may need to water daily. In cooler weather, you can reduce watering frequency. Ensure your planters have adequate drainage holes to prevent water from pooling at the bottom.
Q: What kind of fertilizer should I use for asparagus?
A: Asparagus is a heavy feeder, so regular fertilization is essential. Use a balanced fertilizer (e.g., 10-10-10) in early spring, before the spears emerge. You can also side-dress with compost or aged manure throughout the growing season. Avoid over-fertilizing, as this can lead to excessive foliage growth at the expense of spear production. Organic fertilizers, such as fish emulsion or seaweed extract, are also excellent choices.
Q: How do I protect my asparagus plants from pests and diseases?
A: Asparagus is relatively pest-resistant, but common pests include asparagus beetles and aphids. Handpicking beetles or using insecticidal soap can control these pests. To prevent fungal diseases, ensure good air circulation around your plants and avoid overwatering. Remove any dead or diseased foliage promptly. Companion planting with herbs like basil or marigolds can also help deter pests.
Q: Can I grow asparagus in a shady location?
A: Asparagus needs at least 6-8 hours of direct sunlight per day to thrive. While it can tolerate some partial shade, yields will be significantly reduced. Choose a sunny location for your planters to ensure optimal growth and spear production. If you live in a very hot climate, some afternoon shade may be beneficial to prevent the ferns from scorching.
Q: How do I know when to harvest asparagus spears?
A: Asparagus spears are ready to harvest when they are about 6-8 inches tall and the tips are still tightly closed. Use a sharp knife to cut the spears at ground level. Avoid cutting spears that are too thin, as these are still developing. Harvest regularly throughout the harvest season to encourage continued spear production.
Q: What do I do with the asparagus ferns after the harvest season?
A: After the harvest season, allow the asparagus ferns to grow and mature. These ferns will photosynthesize and store energy in the roots for the following year’s growth. In late fall or early winter, after the ferns have turned brown and died back, cut them down to a few inches above the ground. This will help prevent disease and pests from overwintering in the foliage.
Q: Can I move my asparagus plants to a different planter?
A: Transplanting asparagus can be stressful for the plants, but it is possible. The best time to transplant is in early spring, before new growth begins. Dig up the asparagus crowns carefully, being sure to retain as much of the root system as possible. Replant them in a new planter with fresh soil, ensuring that the crowns are planted at the same depth as before. Water thoroughly after transplanting.
Q: What are some good companion plants for asparagus in planters?
A: Several plants can benefit asparagus when grown together. Tomatoes, basil, parsley, and marigolds are all excellent choices. Tomatoes help deter asparagus beetles, while basil and parsley attract beneficial insects that prey on pests. Marigolds repel nematodes and other soil-borne pests. Avoid planting asparagus near onions or garlic, as these can inhibit its growth.
Q: Can I grow asparagus from seed instead of crowns?
A: Yes, you can grow asparagus from seed, but it takes longer to establish and harvest. Start seeds indoors in early spring and transplant them to your planters after the last frost. Be prepared to wait at least 3-4 years before you can begin harvesting spears. Growing from crowns is generally recommended for faster results.
Q: How long will my asparagus plants last in planters?
A: With proper care, asparagus plants can live for 15-20 years or even longer. Regular fertilization, watering, and pest control are essential for maintaining their health and productivity. Repotting every few years with fresh soil can also help prolong their lifespan.
Q: What if my asparagus spears are thin and spindly?
A: Thin and spindly spears can indicate that the plants are not getting enough nutrients or water. Ensure that you are fertilizing regularly and watering deeply, especially during dry periods. Overcrowding can also contribute to thin spears, so make sure your plants have enough space to grow.
Q: Can I grow asparagus in a container indoors?
A: While possible, growing asparagus indoors is challenging due to the plant’s need for ample sunlight and space. If you attempt it, provide at least 6-8 hours of direct sunlight daily, using grow lights if necessary. Choose a very large container and ensure excellent drainage. Indoor asparagus may not produce as many spears as outdoor plants.
Leave a Comment