
Grow Heirloom Tomatoes Indoors and savor the taste of summer, even when the snow is falling! Have you ever dreamt of biting into a juicy, sun-ripened heirloom tomato in the dead of winter? I know I have! It feels like a little rebellion against the seasons, doesn’t it? Well, dream no more! This DIY guide is your ticket to fresh, flavorful tomatoes year-round, right from the comfort of your own home.
The tradition of cultivating heirloom tomatoes stretches back generations, with families carefully preserving seeds from their most prized plants. These weren’t just tomatoes; they were living legacies, passed down through time. Now, you can participate in this rich history, even without a sprawling garden.
Let’s face it, store-bought tomatoes in the off-season often leave much to be desired. They lack the vibrant flavor and unique characteristics that make heirloom varieties so special. That’s where this DIY guide comes in. I’m going to show you simple, effective tricks and hacks to grow heirloom tomatoes indoors successfully. Imagine the satisfaction of harvesting your own delicious tomatoes, knowing exactly where they came from and how they were grown. Plus, it’s a fantastic way to add a touch of green to your living space and boost your mood during those dreary winter months. So, grab your gardening gloves, and let’s get started!
Growing Heirloom Tomatoes Indoors: A DIY Guide
Hey there, fellow gardening enthusiasts! Ever dreamt of biting into a juicy, sun-ripened heirloom tomato in the dead of winter? Well, dream no more! I’m going to walk you through the process of growing these flavorful beauties indoors, so you can enjoy that garden-fresh taste year-round. It might seem daunting, but trust me, with a little patience and the right setup, you’ll be harvesting your own heirloom tomatoes in no time.
Choosing Your Heirloom Tomato Variety
First things first, let’s talk tomatoes! Not all heirloom varieties are created equal when it comes to indoor growing. Some are just too big and sprawling for a confined space. I’ve had great success with these varieties:
* ‘Roma’: A classic paste tomato, perfect for sauces and canning. It’s relatively compact and productive.
* ‘Black Cherry’: These small, dark, and intensely flavored tomatoes are surprisingly easy to grow indoors.
* ‘San Marzano’: Another excellent paste tomato with a rich, sweet flavor.
* ‘Amish Paste’: Similar to San Marzano, but often slightly larger and more productive.
* ‘Tiny Tim’: As the name suggests, this is a dwarf variety that’s ideal for small spaces.
Important Note: Avoid large beefsteak varieties like ‘Brandywine’ or ‘Mortgage Lifter’ for indoor growing. They require a lot of space and light, making them challenging to manage indoors.
Setting Up Your Indoor Tomato Garden
Now, let’s get our hands dirty (figuratively, for now!). Setting up the right environment is crucial for success. Here’s what you’ll need:
* Grow Lights: This is non-negotiable. Tomatoes need a LOT of light, and a sunny windowsill just won’t cut it. I recommend LED grow lights, as they’re energy-efficient and provide the full spectrum of light that plants need.
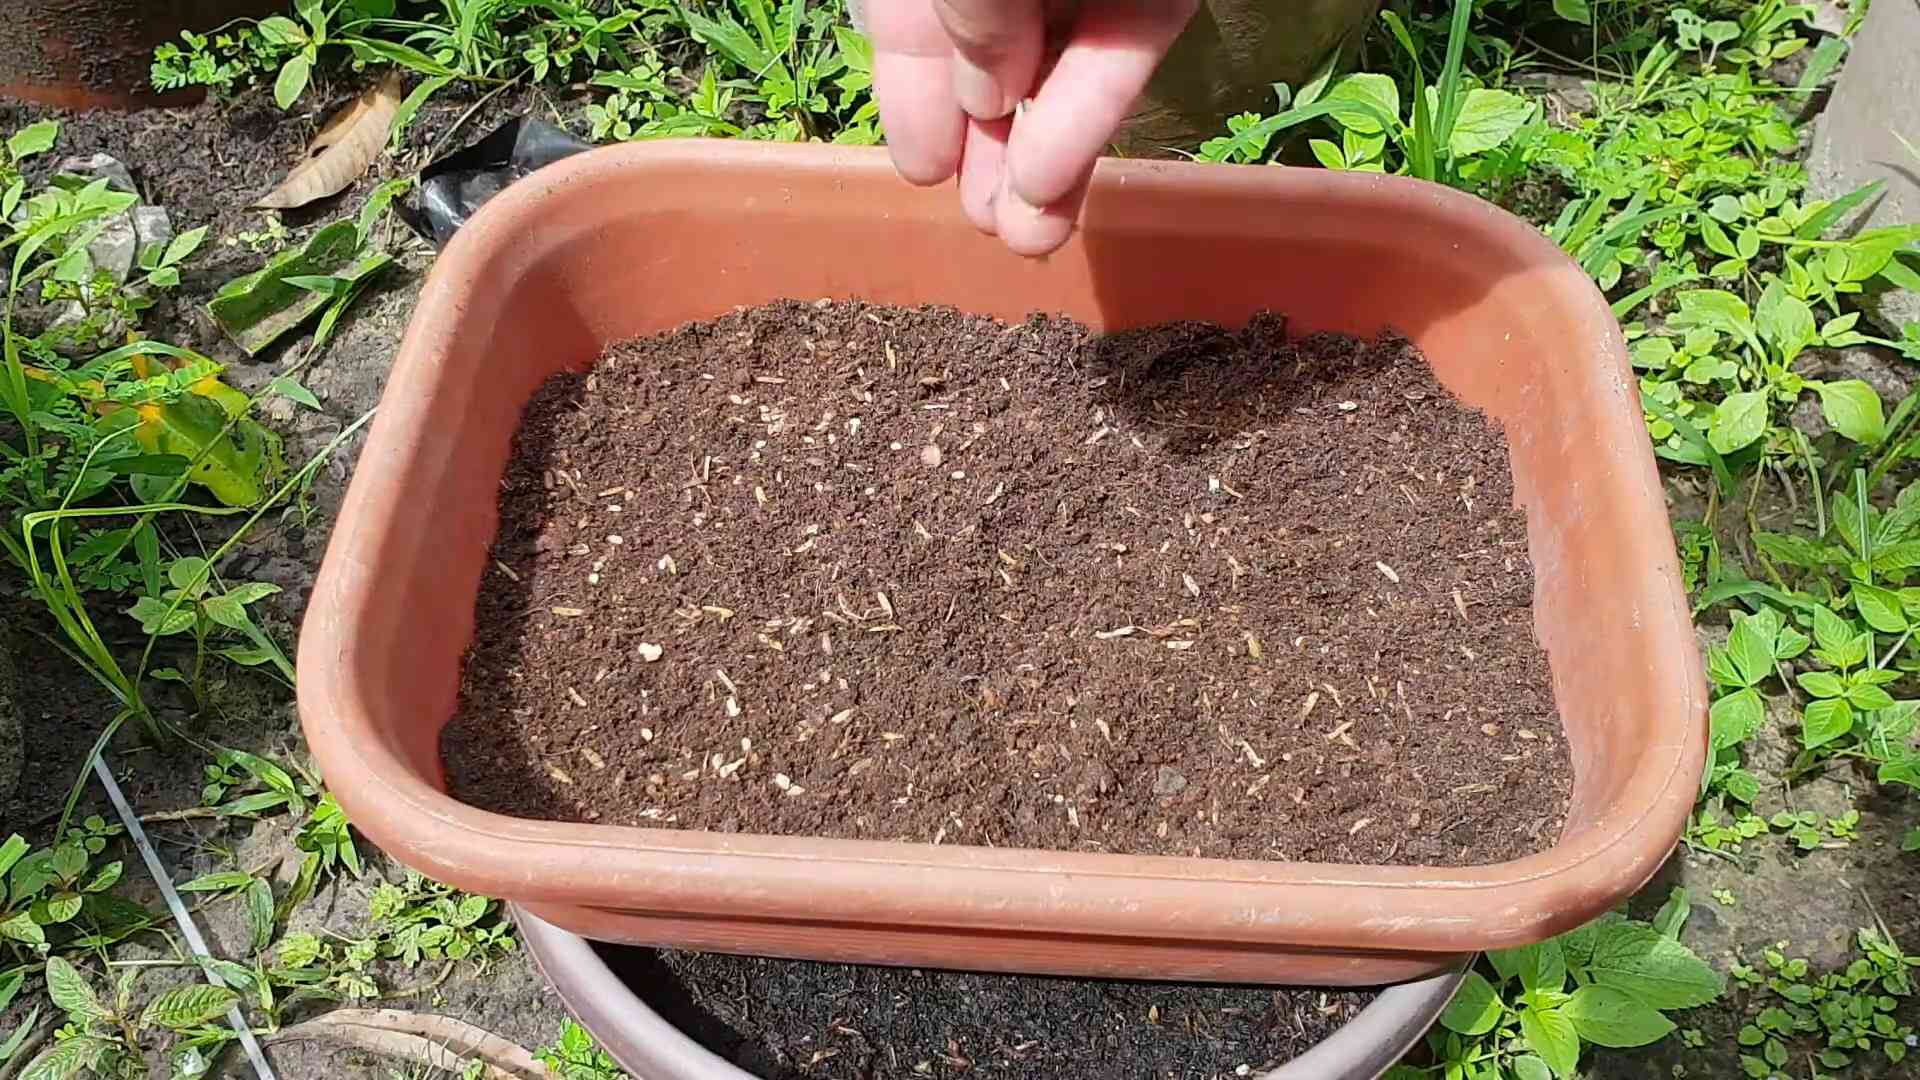
* Containers: Start with small seed starting trays or pots (about 2-3 inches in diameter). You’ll need to transplant them later into larger containers (5-gallon buckets or larger).
* Potting Mix: Use a high-quality, well-draining potting mix. Avoid using garden soil, as it can compact and harbor diseases.
* Fertilizer: A balanced liquid fertilizer formulated for tomatoes is essential.
* Watering Can or Spray Bottle: For gentle watering.
* Small Fan: To provide air circulation and prevent fungal diseases.
* Seed Starting Heat Mat (Optional): This can speed up germination.
* Timer: To automate your grow lights.
Step-by-Step Instructions: From Seed to Harvest
Okay, let’s get started! I’ll break down the process into manageable steps.
1. Sowing the Seeds
1. Prepare your seed starting trays or pots: Fill them with your chosen potting mix, leaving about half an inch of space at the top.
2. Sow the seeds: Make a small indentation (about ¼ inch deep) in the soil. Place 2-3 seeds in each indentation.
3. Cover the seeds: Gently cover the seeds with potting mix.
4. Water gently: Use a spray bottle to moisten the soil. Avoid overwatering, as this can lead to damping off (a fungal disease that kills seedlings).
5. Provide warmth: If you’re using a heat mat, place the trays on the mat. Otherwise, find a warm spot in your home (around 70-75°F).
6. Cover with a humidity dome (optional): This helps to retain moisture and speed up germination.
7. Wait for germination: This usually takes 5-10 days. Keep the soil consistently moist, but not soggy.
2. Caring for Seedlings
1. Remove the humidity dome: Once the seedlings emerge, remove the humidity dome to prevent fungal diseases.
2. Provide light: Place the seedlings under your grow lights. Position the lights a few inches above the seedlings and adjust as they grow. I usually keep my lights on for 14-16 hours a day.
3. Thin the seedlings: Once the seedlings have their first true leaves (the second set of leaves), thin them to one seedling per pot. Choose the strongest, healthiest-looking seedling and snip off the others at the soil line.
4. Water regularly: Water when the top inch of soil feels dry to the touch. Avoid overwatering.
5. Fertilize: Start fertilizing with a diluted liquid fertilizer (half strength) about two weeks after germination.
3. Transplanting
1. Prepare your larger containers: Fill your 5-gallon buckets (or larger) with potting mix.
2. Transplant the seedlings: Gently remove the seedlings from their small pots. Be careful not to damage the roots.
3. Plant the seedlings: Dig a hole in the potting mix large enough to accommodate the root ball. Place the seedling in the hole and cover the roots with potting mix.
4. Water thoroughly: Water the transplanted seedlings well.
5. Provide support: Tomatoes need support as they grow. Use stakes, cages, or trellises to support the plants.
4. Ongoing Care
1. Watering: Water deeply and regularly, especially when the plants are flowering and fruiting. Allow the top inch of soil to dry out between waterings.
2. Fertilizing: Continue fertilizing with a balanced liquid fertilizer every 2-3 weeks.
3. Pruning: Prune your tomato plants regularly to encourage air circulation and fruit production. Remove suckers (the small shoots that grow between the main stem and the branches).
4. Pollination: Indoor tomatoes often need help with pollination. You can hand-pollinate them by gently shaking the plants or using a small paintbrush to transfer pollen from one flower to another. A small fan blowing on the plants can also help with pollination.
5. Pest and Disease Control: Keep an eye out for pests and diseases. Common pests include aphids, whiteflies, and spider mites. Common diseases include powdery mildew and blossom end rot. Treat any problems promptly with organic pest control methods or fungicides.
6. Light Adjustment: As the plants grow, continue to adjust the height of your grow lights to keep them a few inches above the foliage.
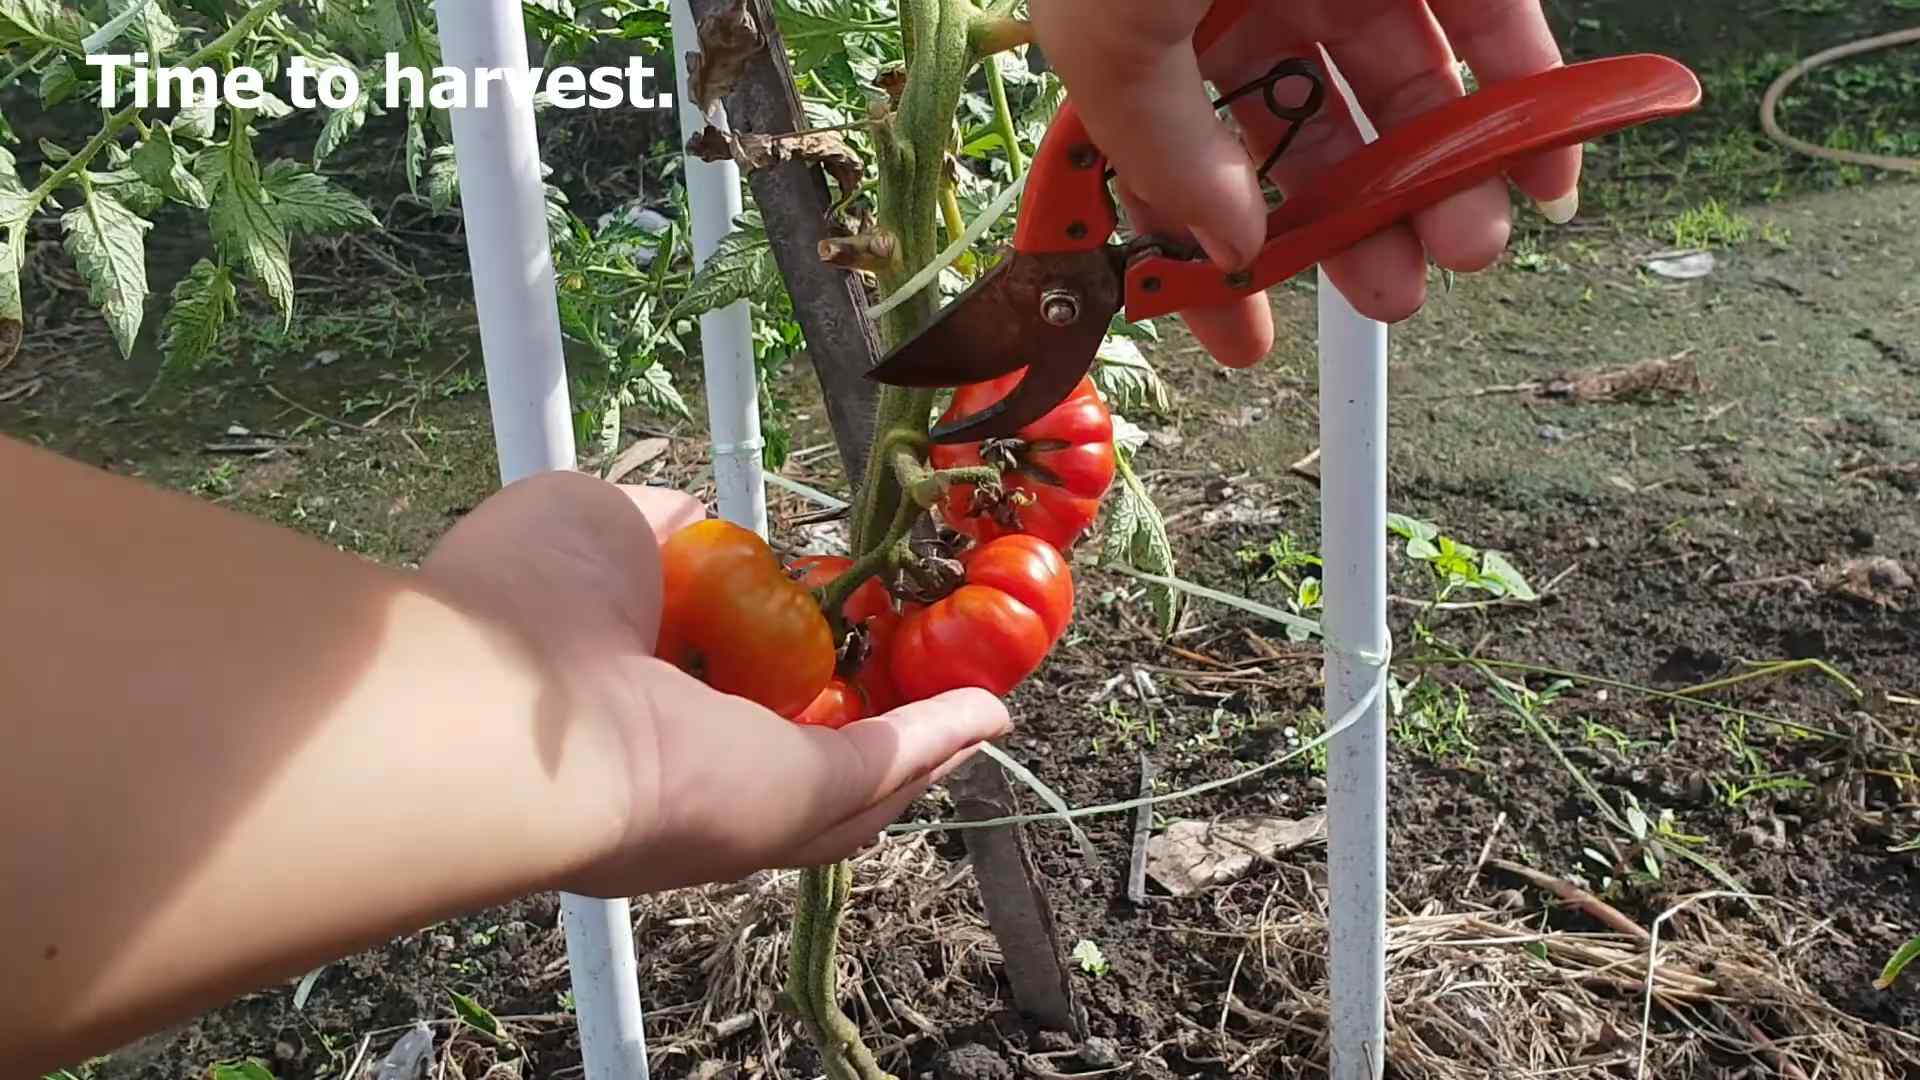
5. Harvesting
1. Wait for ripeness: Tomatoes are ready to harvest when they are fully colored and slightly soft to the touch.
2. Harvest carefully: Gently twist or cut the tomatoes from the vine.
3. Enjoy your harvest! Savor the taste of your homegrown heirloom tomatoes.
Troubleshooting Tips
Even with the best care, you might encounter some challenges. Here are a few common problems and how to address them:
* Leggy Seedlings: This means your seedlings aren’t getting enough light. Move the grow lights closer to the seedlings or provide more light.
* Yellowing Leaves: This could be a sign of overwatering, underwatering, or nutrient deficiency. Check the soil moisture and adjust your watering accordingly. Fertilize with a balanced fertilizer.
* Blossom End Rot: This is caused by a calcium deficiency. Ensure your potting mix contains calcium and water consistently. You can also add calcium to the soil.
* Pests: Treat pests with organic pest control methods, such as insecticidal soap or neem oil.
* Lack of Fruit: This could be due to poor pollination. Hand-pollinate your plants or use a small fan to improve air circulation.
Maintaining Your Indoor Tomato Garden
To keep your indoor tomato garden thriving, here are a few maintenance tips:
* Cleanliness: Keep your growing area clean and free of debris. This will help to prevent pests and diseases.
* Rotation: Rotate your tomato plants every few months to prevent nutrient depletion in the soil.
* Soil Amendment: Add compost or other organic matter to the soil to improve its fertility.
* Monitor Regularly: Regularly inspect your plants for signs of pests, diseases, or nutrient deficiencies.
Growing heirloom tomatoes indoors is a rewarding experience. With a little effort and attention, you can enjoy the delicious taste of homegrown tomatoes all year round. Don’t be afraid to experiment and learn from your mistakes. Happy gardening!
Conclusion
So, there you have it! Growing heirloom tomatoes indoors might seem like a daunting task, but with the right approach and a little patience, you can enjoy the unparalleled flavor of these unique varieties year-round. This DIY method isn’t just about saving money; it’s about connecting with your food, understanding its origins, and experiencing the sheer joy of nurturing life from a tiny seed.
Why is this a must-try? Because store-bought tomatoes, even the “organic” ones, often lack the intense, complex flavors that make heirloom tomatoes so special. They’re bred for shelf life and uniformity, sacrificing taste in the process. By growing your own, you control every aspect of the process, from the soil composition to the amount of sunlight your plants receive, ensuring a harvest bursting with flavor. Plus, you get to choose from a vast array of heirloom varieties, each with its own unique characteristics and story. Imagine sinking your teeth into a juicy Brandywine, a tangy Cherokee Purple, or a sweet Green Zebra, all grown right in your own home!
Don’t be afraid to experiment! Try different heirloom varieties to discover your favorites. Some, like Roma or determinate varieties, are naturally more compact and well-suited for indoor growing. You can also explore different growing mediums, such as hydroponics, for a more controlled and efficient system. Consider adding companion plants like basil or marigolds to your indoor garden to deter pests and enhance the flavor of your tomatoes. Remember to keep a journal of your progress, noting which techniques work best for you and which ones need tweaking.
This DIY approach to growing heirloom tomatoes indoors is more than just a gardening project; it’s an investment in your health, your taste buds, and your connection to the natural world. It’s a chance to learn new skills, to challenge yourself, and to reap the rewards of your hard work in the form of delicious, homegrown tomatoes.
We wholeheartedly encourage you to give this a try. Start small, perhaps with just one or two plants, and gradually expand your indoor garden as you gain experience. The satisfaction of harvesting your own heirloom tomatoes, especially during the cold winter months, is truly unparalleled.
And most importantly, we want to hear about your experiences! Share your successes, your challenges, and your tips in the comments below. Let’s build a community of indoor heirloom tomato growers and learn from each other. What varieties did you choose? What growing techniques did you find most effective? What challenges did you overcome? Your insights could be invaluable to other aspiring gardeners. So, get your hands dirty, embrace the process, and enjoy the delicious fruits (or rather, vegetables) of your labor! Let’s all learn how to **grow heirloom tomatoes indoors** together!
FAQ
What are heirloom tomatoes, and why are they special?
Heirloom tomatoes are open-pollinated varieties that have been passed down through generations, often for 50 years or more. Unlike hybrid tomatoes, which are bred for specific traits like uniformity and disease resistance, heirloom tomatoes are prized for their unique flavors, colors, and shapes. They often have a richer, more complex taste than commercially grown tomatoes. Because they are open-pollinated, you can save the seeds from your heirloom tomatoes and plant them again the following year, knowing that they will produce plants with the same characteristics as the parent plant. This allows you to preserve these unique varieties and contribute to the biodiversity of our food system.
What are the best heirloom tomato varieties to grow indoors?
While you can technically grow any heirloom tomato variety indoors, some are better suited for container gardening than others. Determinate varieties, which grow to a certain size and then stop, are generally easier to manage indoors than indeterminate varieties, which continue to grow and produce fruit throughout the season. Some popular determinate heirloom varieties for indoor growing include Roma, Celebrity, and Patio. Indeterminate varieties that can be successfully grown indoors with proper support and pruning include Brandywine, Cherokee Purple, and Black Krim. Consider the size of your growing space and the amount of light available when choosing your varieties. Also, think about the flavors you prefer – some heirloom tomatoes are sweet, while others are tangy or earthy.
How much light do heirloom tomatoes need when grown indoors?
Heirloom tomatoes require a significant amount of light to thrive, typically 6-8 hours of direct sunlight per day. If you don’t have a south-facing window that provides enough sunlight, you’ll need to supplement with grow lights. LED grow lights are a popular choice because they are energy-efficient and provide the full spectrum of light that plants need to grow. Position the grow lights close to the plants, but not so close that they burn the leaves. You can also use a timer to ensure that your plants receive the correct amount of light each day. Rotate your plants regularly to ensure that all sides receive equal exposure to the light.
What kind of soil should I use for growing heirloom tomatoes indoors?
Use a high-quality potting mix that is well-draining and rich in organic matter. Avoid using garden soil, as it can be too heavy and may contain pests or diseases. You can also amend your potting mix with compost or other organic materials to improve its fertility. Make sure your containers have drainage holes to prevent waterlogging, which can lead to root rot. Consider using self-watering containers to help maintain consistent moisture levels.
How often should I water my indoor heirloom tomato plants?
Water your heirloom tomato plants regularly, keeping the soil consistently moist but not waterlogged. The frequency of watering will depend on factors such as the size of your containers, the temperature and humidity of your environment, and the growth stage of your plants. Check the soil moisture regularly by sticking your finger into the soil. If the top inch of soil feels dry, it’s time to water. Water deeply, allowing the water to drain out of the drainage holes. Avoid watering the foliage, as this can encourage fungal diseases.
Do I need to fertilize my indoor heirloom tomato plants?
Yes, heirloom tomato plants need regular fertilization to produce a bountiful harvest. Use a balanced fertilizer that is specifically formulated for tomatoes. Follow the instructions on the fertilizer label carefully, as over-fertilizing can damage your plants. You can also use organic fertilizers, such as compost tea or fish emulsion. Fertilize your plants every 2-3 weeks during the growing season.
How do I pollinate my indoor heirloom tomato plants?
Since there are no bees or other pollinators indoors, you’ll need to hand-pollinate your heirloom tomato plants. This is a simple process that involves transferring pollen from the male part of the flower (the stamen) to the female part (the pistil). You can do this by gently shaking the plants, using a small paintbrush to transfer pollen, or using an electric toothbrush to vibrate the flowers. Pollinate your plants every day or two, especially when they are in bloom.
How do I deal with pests and diseases on my indoor heirloom tomato plants?
Inspect your plants regularly for signs of pests or diseases. Common pests that can affect indoor tomato plants include aphids, whiteflies, and spider mites. You can control these pests by spraying your plants with insecticidal soap or neem oil. Common diseases that can affect indoor tomato plants include powdery mildew and early blight. You can prevent these diseases by providing good air circulation, avoiding overwatering, and using disease-resistant varieties. If you notice any signs of disease, remove the affected leaves or plants immediately.
How long does it take to grow heirloom tomatoes indoors?
The time it takes to grow heirloom tomatoes indoors will depend on the variety you choose and the growing conditions you provide. Generally, it takes about 60-80 days from transplanting seedlings to harvesting your first tomatoes. Start your seeds indoors 6-8 weeks before you plan to transplant them into larger containers. Be patient and provide your plants with the care they need, and you’ll be rewarded with a delicious harvest of homegrown heirloom tomatoes.
Leave a Comment