
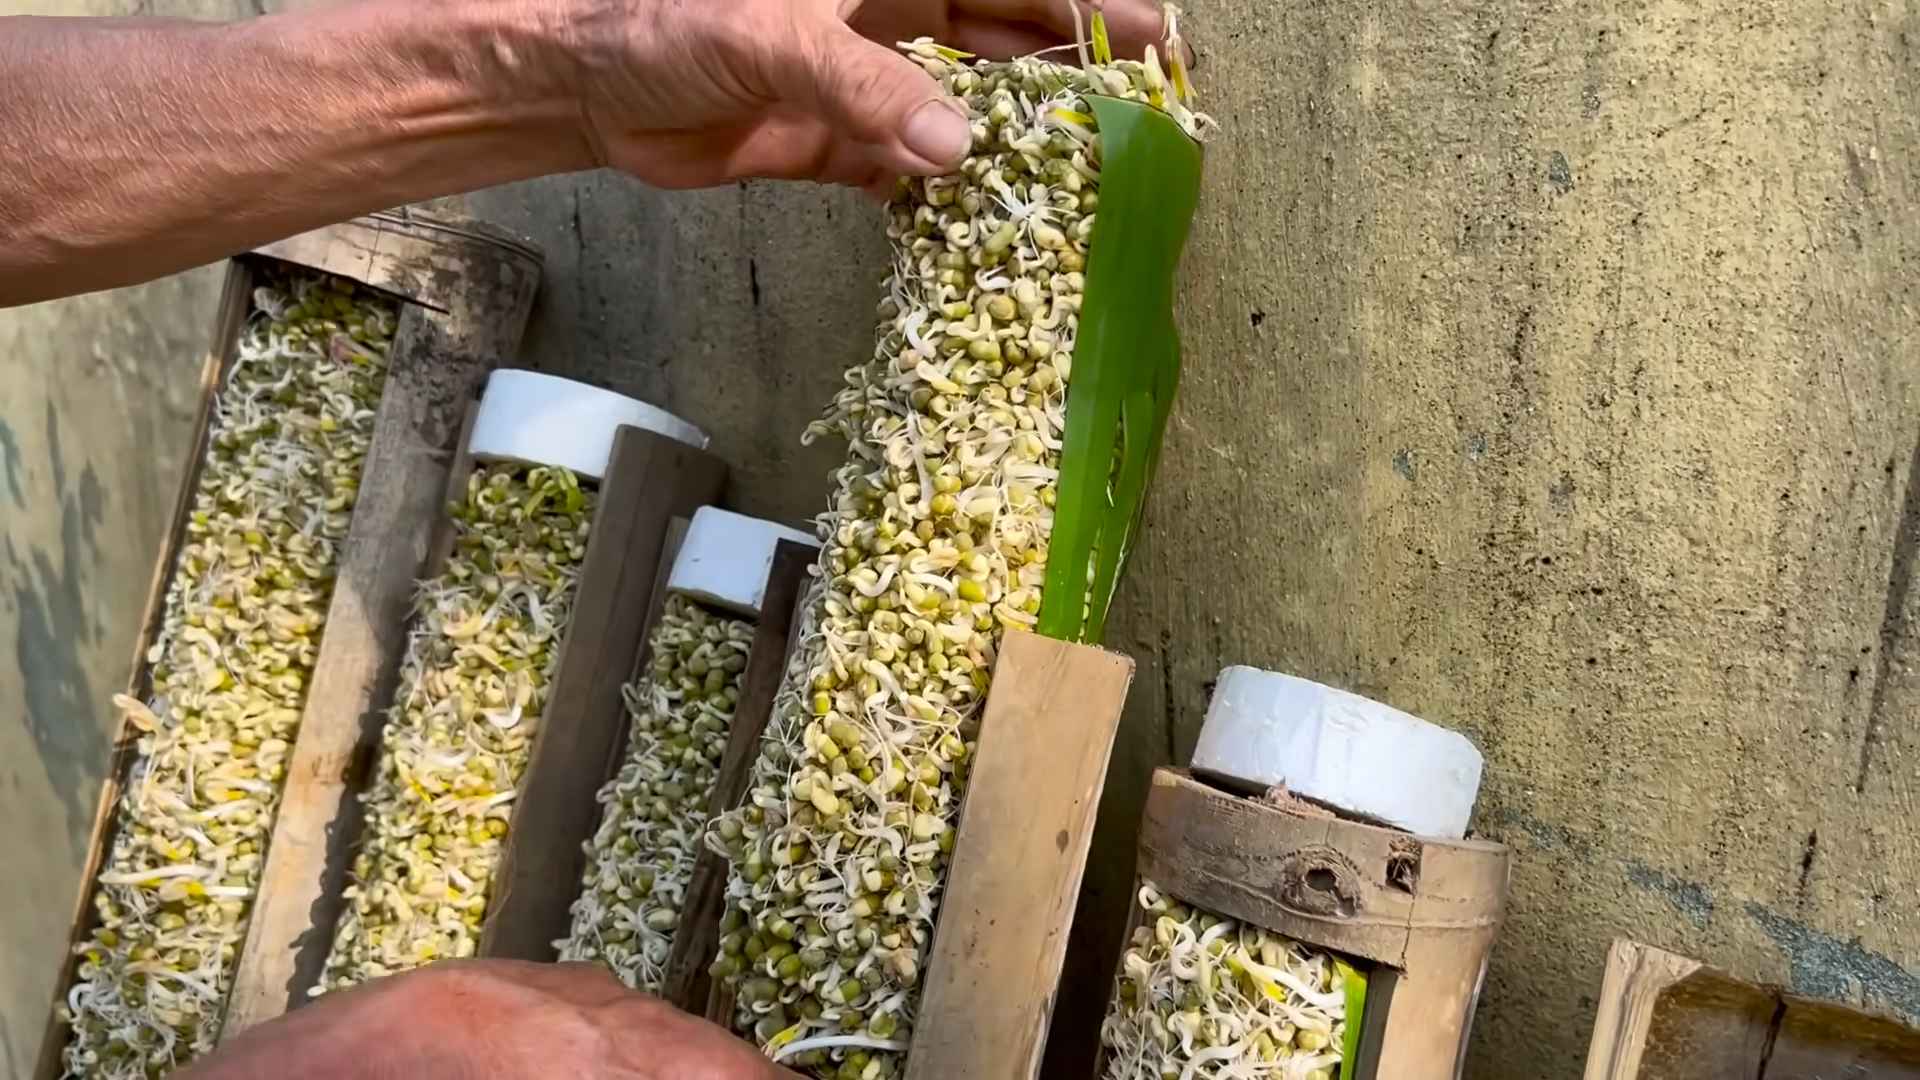
Growing bean sprouts easily at home is simpler than you might think, and I’m here to show you how! Forget those expensive, pre-packaged sprouts from the grocery store – we’re about to embark on a fun and rewarding DIY adventure that will bring fresh, crunchy goodness right to your kitchen counter.
Sprouts have been a staple in Asian cuisine for centuries, dating back to ancient China where they were valued for their nutritional benefits and ability to provide fresh greens during the winter months. Think of it – a tiny seed bursting with life, offering a concentrated dose of vitamins and minerals! It’s a culinary tradition with a rich history, and now, you can easily bring that tradition into your own home.
Why should you bother learning this DIY trick? Well, for starters, growing bean sprouts easily allows you to control exactly what goes into your food. No more worrying about pesticides or questionable growing practices. Plus, it’s incredibly cost-effective! A small bag of dried beans can yield a surprisingly large amount of sprouts. But beyond the practical benefits, there’s something deeply satisfying about nurturing life from a tiny seed. It’s a little bit of magic, a little bit of science, and a whole lot of deliciousness all rolled into one. So, are you ready to ditch the store-bought sprouts and become a sprouting pro? Let’s get started!
Growing Bean Sprouts at Home: A Super Easy DIY Guide
Hey there, fellow sprout enthusiasts! I’m so excited to share this incredibly simple and rewarding DIY project with you: growing your own bean sprouts! Seriously, it’s easier than you think, and the fresh, crunchy sprouts you’ll get are a delicious and healthy addition to salads, stir-fries, sandwiches – you name it! Plus, it’s a fantastic way to have fresh greens even in the dead of winter. Let’s get sprouting!
What You’ll Need
Before we dive in, let’s gather our supplies. The beauty of this project is that you probably already have most of what you need!
* **Beans:** Mung beans are the classic choice for bean sprouts, and they’re readily available in most grocery stores. You can also experiment with other beans like adzuki, lentil, or even chickpeas, but mung beans are the easiest to start with. Make sure you’re using *whole, dried* beans, not split or cooked ones. About 1/2 cup of dried beans will yield a good amount of sprouts.
* **A Wide-Mouth Jar:** A quart-sized mason jar works perfectly. You can also use a clean glass container or even a plastic container, as long as it’s food-safe and has a wide opening.
* **Sprouting Lid or Cheesecloth:** You’ll need something to cover the jar and allow for drainage. A sprouting lid is ideal (they’re inexpensive and designed specifically for this purpose), but a piece of cheesecloth secured with a rubber band works just as well.
* **Water:** Clean, filtered water is best.
* **A Dark Place:** Bean sprouts need darkness to germinate properly. A cupboard, pantry, or even a covered box will do the trick.
* **A Bowl or Tray:** To catch any drips from the jar.
Getting Started: Soaking the Beans
This is the first crucial step to wake up those dormant beans!
1. **Rinse the Beans:** Place your 1/2 cup of dried mung beans in a colander and rinse them thoroughly under cool water. This removes any dust or debris.
2. **Soak the Beans:** Transfer the rinsed beans to your wide-mouth jar. Add about 2-3 cups of cool, filtered water. Make sure the beans are completely submerged, as they will expand considerably during soaking.
3. **Let Them Soak:** Cover the jar with your sprouting lid or cheesecloth and secure it with a rubber band. Place the jar in a dark place and let the beans soak for 8-12 hours, or even overnight. I usually soak mine before I go to bed, so they’re ready to go in the morning.
The Sprouting Process: Rinse and Repeat!
This is where the magic happens! Consistency is key here.
1. **Drain the Soaking Water:** After the soaking period, drain the water from the jar. Use your sprouting lid or cheesecloth to prevent the beans from escaping.
2. **Rinse Thoroughly:** Rinse the beans thoroughly with cool, filtered water. Make sure to get all the beans wet and dislodge any loose hulls.
3. **Drain Again:** Drain the water completely. It’s important to remove as much excess water as possible to prevent mold growth.
4. **Invert the Jar:** Place the jar upside down in a bowl or tray at an angle. This allows any remaining water to drain out and provides good air circulation. I usually prop mine up against something to ensure it’s tilted.
5. **Return to the Dark Place:** Place the jar back in your dark place.
6. **Rinse and Repeat (Twice a Day!):** This is the most important part! You need to rinse and drain the beans *twice a day* – once in the morning and once in the evening. This keeps them hydrated and prevents them from drying out or getting moldy. Repeat steps 2-5 every morning and evening.
Troubleshooting: Common Issues and Solutions
Sometimes things don’t go exactly as planned. Here are a few common issues and how to fix them:
* **Mold:** Mold is the biggest enemy of bean sprouts. It usually appears as fuzzy white or gray patches. If you see mold, unfortunately, you’ll need to discard the entire batch. To prevent mold, make sure you’re rinsing and draining the beans thoroughly twice a day, and that there’s good air circulation in the jar. Avoid overcrowding the jar with too many beans.
* **Slow Growth:** If your sprouts are growing slowly, it could be due to temperature. Bean sprouts prefer a temperature of around 70-75°F (21-24°C). If your house is too cold, try placing the jar in a slightly warmer location. Also, make sure you’re using fresh beans. Older beans may have a lower germination rate.
* **Unpleasant Smell:** A slightly earthy smell is normal, but a foul or ammonia-like odor indicates that something is wrong. It could be a sign of bacterial growth or decomposition. If you notice a bad smell, discard the sprouts.
* **Uneven Sprouting:** Sometimes, not all the beans will sprout at the same rate. This is normal. Just continue rinsing and draining as usual, and the slower sprouts will eventually catch up.
Harvesting and Storing Your Bean Sprouts
After about 3-5 days, your bean sprouts should be ready to harvest! They should be about 1-2 inches long and have a nice, crunchy texture.
1. **Final Rinse:** Give your bean sprouts one final rinse in the jar.
2. **Remove the Hulls (Optional):** Some people prefer to remove the hulls (the outer skins of the beans) before eating the sprouts. This is optional, but it can improve the texture. To remove the hulls, place the sprouts in a large bowl of water and gently agitate them. The hulls will float to the surface, and you can skim them off.
3. **Drain Thoroughly:** Drain the sprouts thoroughly.
4. **Store in the Refrigerator:** Store your bean sprouts in the refrigerator in a sealed container. I like to line the container with a paper towel to absorb any excess moisture. They should keep for about 5-7 days.
5. **Enjoy!** Add your fresh, homemade bean sprouts to salads, stir-fries, sandwiches, soups, or anything else you can think of!
Tips for Success
Here are a few extra tips to help you grow the best bean sprouts ever:
* Use High-Quality Beans: The quality of your beans will directly impact the success of your sprouting. Choose beans that are specifically labeled for sprouting or are known to have a high germination rate.
* Maintain Cleanliness: Cleanliness is crucial to prevent mold and bacteria growth. Make sure your jar, sprouting lid, and hands are clean before starting the process.
* Don’t Overcrowd: Don’t try to sprout too many beans in one jar. Overcrowding can lead to poor air circulation and increase the risk of mold.
* Experiment with Different Beans: Once you’ve mastered mung bean sprouts, try experimenting with other types of beans, such as adzuki, lentil, or chickpeas. Each type of bean has a slightly different flavor and texture.
* Consider a Sprouting Kit: If you’re serious about sprouting, you might want to invest in a sprouting kit. These kits typically include multiple jars and a stand, making it easy to sprout different types of beans at the same time.
* Be Patient: Sprouting takes time and patience. Don’t get discouraged if your first batch isn’t perfect. Just keep practicing, and you’ll eventually get the hang of it.
* Sunlight (Briefly): While sprouts need darkness to germinate, exposing them to indirect sunlight for a few hours before harvesting can help them develop chlorophyll and turn a bit greener. This isn’t essential, but it can improve their appearance and nutritional value. Just don’t leave them in direct sunlight, as this can overheat them.
Why Grow Your Own Bean Sprouts?
Besides being incredibly easy and fun, growing your own bean sprouts offers several benefits:
* Freshness: You can’t beat the taste of freshly grown bean sprouts. They’re much more flavorful and crunchy than store-bought sprouts.
* Cost-Effective: Growing your own bean sprouts is much cheaper than buying them at the store. A small bag of dried beans can yield a large amount of sprouts.
* Nutritious: Bean sprouts are packed with vitamins, minerals, and enzymes. They’re a great source of protein, fiber, and antioxidants.
* Sustainable: Growing your own bean sprouts is a sustainable way to get fresh greens. You’re reducing your carbon footprint by avoiding transportation and packaging.
* Educational: Sprouting is a great educational activity for kids. It teaches them about plant growth and healthy eating.
So there you have it! Everything you need to know to grow your own delicious and nutritious bean sprouts at home. I hope you give it a try – you won’t be disappointed!

Conclusion
So, there you have it! Growing bean sprouts easily at home is not only achievable but also incredibly rewarding. Forget those limp, flavorless sprouts from the grocery store. With this simple DIY trick, you can cultivate a vibrant, crunchy, and nutritious addition to your meals, all from the comfort of your own kitchen.
Why is this a must-try? Because it puts you in control. You control the freshness, the quality, and the cost. You know exactly what’s going into your sprouts – just beans and water! No preservatives, no hidden ingredients, just pure, wholesome goodness. Plus, it’s a fantastic way to reduce food waste and embrace a more sustainable lifestyle. Imagine the satisfaction of sprinkling your own homegrown sprouts onto your salad, sandwich, or stir-fry.
But the fun doesn’t stop there! Feel free to experiment with different types of beans. Mung beans are the classic choice, but you can also try adzuki beans, lentils, or even chickpeas. Each variety will offer a unique flavor and texture profile. Consider adding a touch of natural light during the last day or two of sprouting to encourage chlorophyll production, resulting in greener and slightly sweeter sprouts. You can also play around with the sprouting container. While a mason jar works perfectly, you could also use a sprouting bag or a multi-tiered sprouting system for larger batches.
Don’t be intimidated! This method is incredibly forgiving. Even if you’re a complete beginner, you’ll likely find success on your first try. The key is to maintain a consistent rinsing schedule and ensure proper drainage.
We wholeheartedly encourage you to give this DIY trick a try. It’s a small investment of time that yields a significant return in terms of flavor, nutrition, and overall satisfaction. Once you experience the joy of growing your own bean sprouts easily, you’ll never go back to store-bought again.
And most importantly, we want to hear about your experience! Share your photos, tips, and variations in the comments below. Let’s build a community of sprout enthusiasts and inspire others to embrace the magic of homegrown goodness. What beans did you use? What dishes did you add them to? What challenges did you face, and how did you overcome them? Your feedback is invaluable and will help us refine this guide and empower even more people to grow their own delicious and nutritious sprouts. Happy sprouting!
Frequently Asked Questions (FAQ)
What types of beans are best for sprouting?
The most popular and readily available bean for sprouting is the mung bean. Mung beans sprout quickly and reliably, producing crisp and flavorful sprouts. However, you can also successfully sprout other types of beans and legumes, including:
* Adzuki beans: These have a slightly nutty flavor and a reddish-brown color.
* Lentils: Lentils sprout quickly and offer a slightly earthy flavor.
* Chickpeas: Chickpeas require a longer soaking and sprouting time but offer a hearty and substantial sprout.
* Alfalfa seeds: Technically seeds, not beans, but they sprout easily and are packed with nutrients.
* Radish seeds: Similar to alfalfa, radish seeds sprout quickly and add a spicy kick.
* Broccoli seeds: Another seed option, broccoli sprouts are known for their health benefits.
Experiment to find your favorite! Just be sure to use beans that are specifically intended for sprouting or culinary use, not those treated with chemicals for planting.
How long does it take for bean sprouts to grow?
The sprouting time varies depending on the type of bean and the ambient temperature. Generally, mung beans will sprout in 3-5 days. Lentils may sprout even faster, in 2-3 days. Chickpeas can take up to 5-7 days. Keep in mind that warmer temperatures will accelerate the sprouting process, while cooler temperatures will slow it down. Monitor your sprouts closely and harvest them when they reach your desired length and crunchiness.
What if my bean sprouts start to smell bad?
A foul odor is a sign of bacterial contamination. This usually happens if the sprouts are not rinsed frequently enough or if the sprouting environment is too warm and humid. Discard the sprouts immediately if they smell bad. To prevent this, ensure you rinse the sprouts thoroughly at least twice a day with cool, clean water. Also, make sure the sprouting container has adequate drainage to prevent water from pooling at the bottom.
Can I eat the bean sprout roots?
Yes, the roots of bean sprouts are perfectly edible and safe to consume. They are part of the sprout and contribute to its overall texture and flavor. Some people prefer to trim the roots for aesthetic reasons, but it’s not necessary.
How do I store bean sprouts?
Once your bean sprouts have reached your desired length, rinse them thoroughly and drain them well. Store them in an airtight container lined with a paper towel in the refrigerator. The paper towel will help absorb excess moisture and keep the sprouts fresh for up to a week. Check them daily and discard any sprouts that show signs of spoilage.
Are there any health benefits to eating bean sprouts?
Absolutely! Bean sprouts are a nutritional powerhouse. They are low in calories and fat but rich in vitamins, minerals, and enzymes. They are a good source of vitamin C, vitamin K, folate, and fiber. Bean sprouts also contain antioxidants that can help protect your body against damage from free radicals. The sprouting process increases the bioavailability of nutrients, making them easier for your body to absorb.
Can I sprout any type of bean?
While many beans can be sprouted, it’s crucial to use beans specifically intended for sprouting or culinary use. Avoid using beans that are treated with pesticides or other chemicals, as these can be harmful to your health. Also, some beans, like kidney beans, contain toxins that are destroyed during cooking but may be present in raw sprouts. Therefore, it’s best to stick to beans that are known to be safe for sprouting, such as mung beans, adzuki beans, and lentils.
How do I prevent mold growth on my bean sprouts?
Mold growth is a common concern when sprouting beans. To prevent it, ensure proper ventilation and drainage. Don’t overcrowd the sprouting container, as this can restrict airflow. Rinse the sprouts thoroughly at least twice a day with cool, clean water. If you live in a humid environment, consider using a fan to circulate air around the sprouting container. If you notice any signs of mold, discard the affected sprouts immediately.
My bean sprouts are not sprouting. What am I doing wrong?
Several factors can prevent bean sprouts from sprouting. First, ensure that your beans are fresh and viable. Old beans may have a lower germination rate. Second, make sure the beans are properly soaked before sprouting. Soaking softens the seed coat and allows water to penetrate, initiating the sprouting process. Third, maintain a consistent rinsing schedule and ensure proper drainage. Finally, provide a warm and humid environment for the sprouts to thrive. If you’ve addressed all these factors and your sprouts are still not sprouting, try using a different batch of beans.
Can I grow bean sprouts in direct sunlight?
While some light is beneficial for bean sprouts, direct sunlight can be too intense and can scorch the sprouts. It’s best to keep them in a dimly lit area or indirect sunlight. A little bit of light during the last day or two of sprouting can encourage chlorophyll production, resulting in greener and slightly sweeter sprouts.
Leave a Comment