
Drain Starfish DIY: Ever stared into your shower drain, a miniature ecosystem of hair and gunk staring back? I know I have! It’s a common household woe, and let’s be honest, dealing with clogged drains is nobody’s idea of a good time. But fear not, fellow homeowners and renters, because I’m about to share a game-changing DIY trick that will banish those drain monsters for good!
For centuries, keeping our living spaces clean and functional has been a top priority. While modern plumbing is relatively new, the struggle against clogged drains is an age-old battle. From ancient civilizations using rudimentary tools to clear pipes to our modern-day plungers and chemical solutions, the quest for free-flowing drains continues. But what if I told you there’s a simple, effective, and eco-friendly way to tackle this problem without harsh chemicals or expensive plumbers?
That’s where the Drain Starfish DIY comes in! This ingenious little device, crafted from readily available materials, acts as a sentinel, capturing hair and debris before they have a chance to wreak havoc in your pipes. Think of it as a tiny, proactive superhero for your plumbing. You need this DIY trick because it saves you money on expensive drain cleaners, prevents costly plumbing repairs down the line, and keeps your bathroom smelling fresh and clean. Plus, it’s a fun and rewarding project that you can easily complete in an afternoon. So, let’s dive in and create our own drain-clearing champions!

DIY Drain Starfish: Conquer Clogged Drains with Style!
Okay, friends, let’s talk about something we all dread: clogged drains. Hair, soap scum, mysterious gunk – it all adds up to a plumbing nightmare. But fear not! I’m going to show you how to create your very own “Drain Starfish” – a simple, effective, and dare I say, *adorable* tool to keep those drains flowing freely. This is a super easy DIY project, perfect for beginners, and it’ll save you money on expensive drain cleaners and plumber visits. Let’s get started!
What You’ll Need:
Before we dive in, let’s gather our supplies. This is a low-cost project, so you probably already have most of these items lying around.
* Plastic Zip Ties: You’ll need a good handful of these. I recommend using standard-sized zip ties, not the super thin ones, as they’ll be more durable. Different colors can be fun, but black or white are perfectly fine too.
* Scissors or Wire Cutters: For trimming the zip ties. Sharp scissors work well, but wire cutters will give you a cleaner cut.
* Gloves (Optional): If you’re squeamish about touching drain gunk, gloves are a good idea.
* Needle-Nose Pliers (Optional): These can be helpful for manipulating the zip ties, especially if you have larger hands.
* A Sink or Tub Drain (Obviously!): This is where your Drain Starfish will live and work its magic.
Building Your Drain Starfish: Step-by-Step
Alright, let’s get our hands dirty (or gloved, if you prefer!). This is where the magic happens. Follow these steps carefully, and you’ll have your Drain Starfish ready to go in no time.
1. Creating the Core:
* Take one zip tie and form a loop. Don’t tighten it completely yet.
* Insert the tail end of another zip tie through the loop you just created.
* Tighten the first zip tie, securing the second zip tie in place. This forms the center of your starfish.
* Repeat this process, adding more zip ties around the central loop. Aim for at least 6-8 zip ties radiating outwards. The more you add, the more effective your starfish will be at catching debris. Think of it as building the “body” of your starfish.
* Make sure the zip ties are evenly spaced around the central loop. This will ensure that your starfish is balanced and effective at catching hair and debris from all directions.
2. Adding the “Arms”:
* Now, we’re going to create the “arms” of our starfish. These are the parts that will actually catch the hair and gunk.
* Take each zip tie that’s radiating outwards from the center and gently bend it outwards, away from the center loop.
* Using your scissors or wire cutters, carefully snip the end of each zip tie at an angle. This creates a pointed tip that will be more effective at snagging hair. Be careful not to cut yourself!
* The length of the “arms” is up to you, but I recommend leaving them long enough to extend slightly beyond the drain opening. This will maximize their reach and effectiveness.
* Experiment with different angles and lengths for the “arms” to see what works best for your drain. You can always trim them shorter later if needed.
3. Securing and Reinforcing:
* To make your Drain Starfish more durable, you can add a second layer of zip ties around the central loop. This will reinforce the structure and prevent it from falling apart over time.
* Simply repeat the process from Step 1, adding more zip ties around the existing central loop.
* You can also use a few extra zip ties to connect the “arms” to each other, creating a more rigid structure. This will help prevent the “arms” from bending or breaking.
* Consider adding a small loop of zip tie at the very center of the starfish. This will make it easier to grab and remove the starfish from the drain when it’s time to clean it.
4. Customizing for Your Drain:
* Every drain is different, so you may need to customize your Drain Starfish to fit your specific drain.
* If your drain has a pop-up stopper, you may need to trim the “arms” of the starfish to prevent them from interfering with the stopper mechanism.
* If your drain is particularly deep, you may want to make the “arms” longer to reach further down into the drain.
* If your drain is prone to clogs, you may want to add more “arms” to your starfish to increase its catching power.
* Don’t be afraid to experiment and adjust your design until you find what works best for you.
Using and Maintaining Your Drain Starfish
Okay, your Drain Starfish is ready for action! Here’s how to use it and keep it working its best.
1. Installation:
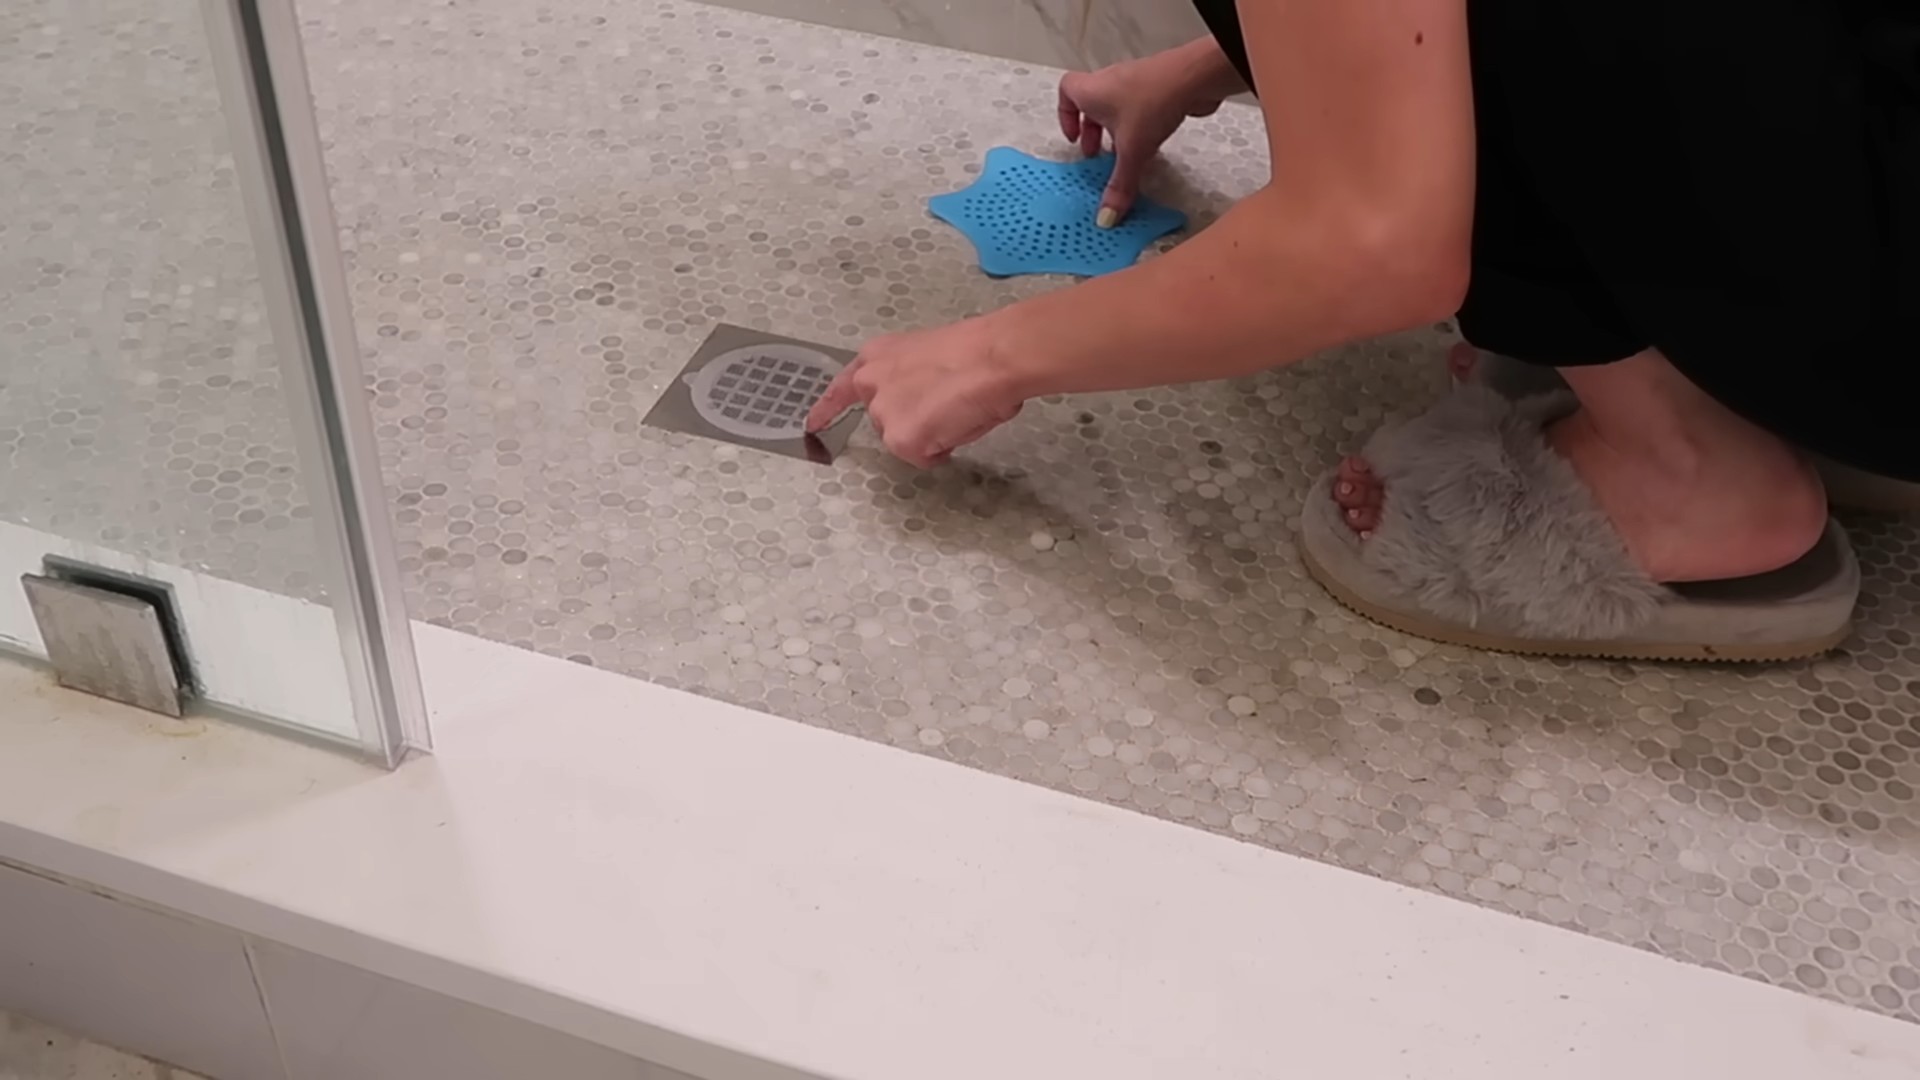
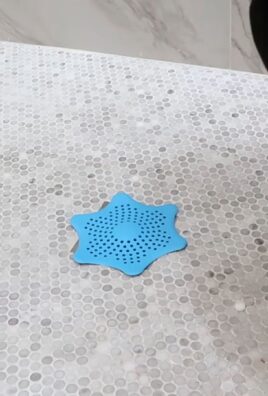
* Simply place your Drain Starfish over the drain opening. The “arms” should extend slightly beyond the edges of the drain.
* If you have a pop-up stopper, make sure the starfish doesn’t interfere with its operation.
* That’s it! Your Drain Starfish is now on duty, protecting your drain from clogs.
2. Cleaning:
* Periodically (I recommend every week or two, depending on how much hair you shed!), remove the Drain Starfish from the drain.
* You’ll likely find a collection of hair, soap scum, and other gunk clinging to the “arms.”
* Using your gloved hands (or needle-nose pliers), carefully remove the debris from the starfish.
* Rinse the starfish thoroughly with water to remove any remaining residue.
* Inspect the starfish for any damage or wear and tear. If any of the “arms” are broken or bent, you can easily replace them with new zip ties.
* Once the starfish is clean and dry, simply place it back over the drain opening.
3. Troubleshooting:
* If your Drain Starfish isn’t catching enough hair, try adding more “arms” or making the existing “arms” longer.
* If your Drain Starfish is getting clogged too quickly, try trimming the “arms” slightly or cleaning it more frequently.
* If your Drain Starfish is interfering with your pop-up stopper, try trimming the “arms” that are closest to the stopper mechanism.
* If your Drain Starfish is falling apart, try reinforcing the structure with a second layer of zip ties.
Why This Works (The Science Behind the Starfish!)
You might be wondering, “Why does this simple thing actually work?” Well, it’s all about intercepting the clog-causing culprits *before* they get deep into your drain.
* Hair Trap: The primary function is to catch hair. Hair is a major contributor to clogs, as it binds with soap scum and other debris to form a solid mass. The zip tie “arms” act like little hooks, snagging hair before it can go down the drain.
* Debris Deflector: The starfish also helps to deflect larger pieces of debris that might otherwise get stuck in the drain.
* Easy Maintenance: The beauty of this DIY solution is its ease of maintenance. Unlike chemical drain cleaners, which can be harsh and damaging to your pipes, the Drain Starfish is a gentle and reusable solution. Regular cleaning prevents buildup and keeps your drains flowing smoothly.
* Cost-Effective: Let’s be honest, plumbing services can be expensive. This simple DIY project can save you a significant amount of money on drain cleaning services and expensive drain cleaners.
Variations and Enhancements
Want to take your Drain Starfish to the next level? Here are a few ideas for variations and enhancements:
* Colored Zip Ties: Use different colored zip ties to create a more visually appealing Drain Starfish. You could even match the colors to your bathroom decor!
* Glow-in-the-Dark Zip Ties: For a fun and functional twist, use glow-in-the-dark zip ties. This will make it easier to see the starfish in a dimly lit bathroom.
* Essential Oil Infusion: Add a few drops of your favorite essential oil to the zip ties to create a pleasant scent in your bathroom. Lavender, eucalyptus, and tea tree oil are all good choices.
* Different Materials: While zip ties are the most common material, you could experiment with other materials, such as plastic straws or pipe cleaners. Just make sure the material is durable and water-resistant.
* Mini Starfish for Smaller Drains: Create smaller versions of the Drain Starfish for smaller drains, such as those in your bathroom sink or kitchen sink.
Safety First!
While this is a simple DIY project
Conclusion
So, there you have it! The Drain Starfish DIY – a simple, effective, and surprisingly satisfying solution to a common household problem. We’ve walked you through the steps, highlighted the benefits, and hopefully, convinced you that this little project is well worth your time.
Why is this a must-try? Because it’s more than just a drain cleaner; it’s a proactive measure against future clogs. Think about the money you’ll save on expensive drain cleaners or plumber visits. Think about the peace of mind knowing you’re preventing those slow-draining sinks and showers that can quickly turn into a major headache. And think about the satisfaction of creating something useful with your own two hands!
This Drain Starfish DIY is also incredibly versatile. Feel free to experiment with different materials. While we’ve suggested using sturdy plastic, you could also try using flexible wire or even repurposing plastic from old containers. Just make sure whatever you choose is durable enough to withstand the constant flow of water and debris.
Consider adding essential oils to your Drain Starfish for a pleasant scent. A few drops of tea tree oil can help combat bacteria and mold, while lavender or eucalyptus can add a refreshing aroma to your bathroom. Just be mindful of the type of plastic you’re using, as some essential oils can degrade certain materials over time.
Another variation is to adjust the size and shape of the starfish arms to better fit your specific drain. If you have a particularly narrow drain, you might want to make the arms thinner and more flexible. If you have a drain that tends to collect a lot of hair, you might want to make the arms longer and more spaced out.
We truly believe that this Drain Starfish DIY is a game-changer for anyone who wants to keep their drains clear and their plumbing happy. It’s a simple, cost-effective, and environmentally friendly alternative to harsh chemical drain cleaners.
But don’t just take our word for it! We encourage you to give this DIY trick a try and see the results for yourself. We’re confident that you’ll be amazed at how well it works.
Once you’ve created your own Drain Starfish, we’d love to hear about your experience. Share your photos, tips, and variations in the comments below. Let’s create a community of DIY drain-cleaning enthusiasts and help each other keep our homes running smoothly! Did you find a particular type of plastic that worked exceptionally well? Did you add any unique features to your Drain Starfish? We’re all ears!
Remember, a little bit of prevention goes a long way when it comes to plumbing. And with this Drain Starfish DIY, you can take control of your drains and say goodbye to clogs for good. So, grab your materials, get creative, and start building your own drain-cleaning superhero today! You’ll be glad you did.
Frequently Asked Questions (FAQ)
What exactly is a Drain Starfish and how does it work?
The Drain Starfish is a DIY drain hair catcher designed to prevent clogs in your sinks, showers, and bathtubs. It’s typically made from a piece of plastic or wire, shaped like a starfish with multiple arms that extend outwards. These arms sit inside the drain and act as a barrier, catching hair, soap scum, and other debris before they can travel further down the drain and cause a blockage. The design allows water to flow freely while trapping the unwanted materials. Periodically, you simply lift the Drain Starfish out of the drain, remove the collected debris, and replace it.
What materials are best suited for making a Drain Starfish?
The ideal material for a Drain Starfish is durable, flexible, and water-resistant. Sturdy plastic, like that from a recycled container (yogurt tubs, margarine containers, etc.), is a popular choice. Flexible wire, such as coated craft wire or even repurposed wire hangers, can also work well. The key is to choose a material that won’t easily break down or rust in the damp environment of a drain. Avoid using materials that are too brittle or that could potentially dissolve or leach chemicals into the water.
How do I clean the Drain Starfish once it’s collected debris?
Cleaning the Drain Starfish is a simple process. First, carefully remove it from the drain. Then, using your fingers or a small tool (like an old toothbrush or a toothpick), gently remove the collected hair, soap scum, and other debris. Rinse the Drain Starfish thoroughly under running water to remove any remaining residue. For a more thorough cleaning, you can soak it in a solution of warm water and dish soap for a few minutes before rinsing. Make sure the Drain Starfish is completely clean before replacing it in the drain.
How often should I clean the Drain Starfish?
The frequency of cleaning depends on how much hair and debris typically goes down your drain. As a general guideline, check and clean the Drain Starfish at least once a week. If you notice that it’s filling up quickly or that your drain is starting to slow down, you may need to clean it more frequently. Regular cleaning will prevent the Drain Starfish from becoming overloaded and ensure that it continues to function effectively.
Can I use this Drain Starfish DIY in all types of drains?
The Drain Starfish DIY is generally suitable for most standard sink, shower, and bathtub drains. However, it’s important to consider the size and shape of your specific drain before creating your Drain Starfish. If your drain is particularly small or has an unusual shape, you may need to adjust the design accordingly. For example, you might need to make the arms thinner or shorter to fit properly. It’s also important to ensure that the Drain Starfish doesn’t obstruct the drain’s opening or interfere with any existing drain stoppers or mechanisms.
Is the Drain Starfish DIY safe for my plumbing system?
Yes, the Drain Starfish DIY is generally safe for your plumbing system, as long as you use appropriate materials and ensure that it’s properly installed. Avoid using materials that could potentially damage your pipes or cause corrosion. Make sure the Drain Starfish fits snugly in the drain without being too tight, which could restrict water flow or put pressure on the pipes. Regularly cleaning the Drain Starfish will also prevent debris from building up and causing blockages further down the drain.
What if the Drain Starfish doesn’t seem to be catching much hair?
If you find that your Drain Starfish isn’t catching much hair, there are a few possible reasons. First, make sure that the arms of the starfish are positioned correctly to intercept the flow of water and debris. You may need to adjust their angle or length to better capture the hair. Second, consider whether the material you’re using is too stiff or too flexible. If it’s too stiff, the arms may not be able to conform to the shape of the drain and effectively trap hair. If it’s too flexible, the arms may bend too easily and allow hair to pass through. Finally, make sure that the Drain Starfish is clean and free of any buildup that could be preventing it from functioning properly.
Can I add essential oils to my Drain Starfish?
Yes, you can add essential oils to your Drain Starfish for a pleasant scent and added benefits. Tea tree oil is a popular choice for its antibacterial and antifungal properties, which can help combat mold and mildew in the drain. Lavender or eucalyptus oil can add a refreshing aroma to your bathroom. However, it’s important to be mindful of the type of plastic you’re using, as some essential oils can degrade certain materials over time. Test a small amount of essential oil on an inconspicuous area of the plastic before applying it to the entire Drain Starfish. Also, use essential oils sparingly, as too much can leave a residue or clog the drain.
Where can I find inspiration for different Drain Starfish designs?
The internet is a great resource for finding inspiration for different Drain Starfish designs. Search online for images and tutorials of DIY drain hair catchers to see a variety of ideas and techniques. You can also check out online forums and social media groups dedicated to DIY projects and home improvement. Experiment with different materials, shapes, and sizes to create a Drain Starfish that perfectly suits your needs and preferences. Don’t be afraid to get creative and personalize your design!
What are the environmental benefits of using a Drain Starfish DIY?
Using a Drain Starfish DIY offers several environmental benefits compared to using chemical drain cleaners. Chemical drain cleaners often contain harsh chemicals that can pollute waterways and harm aquatic life. By using a Drain Starfish, you can prevent clogs from forming in the first place, reducing the need for these harmful chemicals. Additionally, the Drain Starfish is a reusable and long-lasting solution, which reduces waste compared to disposable drain cleaning products. By making your own Drain Starfish from recycled materials, you can further minimize your environmental impact.

Leave a Comment