
Planting Celery Home Garden: Ever dreamt of snipping fresh, crisp celery stalks right from your backyard for your salads or soups? I know I have! There’s something incredibly satisfying about growing your own food, and celery, while sometimes perceived as tricky, is totally achievable with a few clever tricks and a little DIY spirit.
Celery has a rich history, dating back to ancient times where it was used medicinally before becoming a culinary staple. From the Mediterranean, where wild celery thrived, to our modern gardens, this crunchy vegetable has journeyed through time, adapting and becoming a beloved ingredient worldwide. But let’s be honest, buying celery from the store can be a gamble – sometimes it’s limp, sometimes it’s bitter, and sometimes it’s just… blah. That’s where the magic of planting celery home garden comes in!
This article is your ultimate guide to unlocking the secrets of successful celery cultivation at home. We’ll dive into simple, effective DIY hacks that will transform your gardening experience, even if you’re a complete beginner. Imagine the joy of harvesting vibrant, flavorful celery whenever you need it. No more disappointing store-bought stalks! I’m here to show you how to avoid common pitfalls and maximize your yield, ensuring you have a thriving celery patch that will make your neighbors green with envy. So, grab your gardening gloves, and let’s get started on this exciting journey of growing your own delicious celery!
Growing Bok Choy Indoors: A Beginner’s Guide
Hey there, fellow plant enthusiasts! Ever thought about growing your own fresh, crisp bok choy right in your home? It’s easier than you might think, and I’m here to guide you through the whole process. Forget those wilted, overpriced greens at the grocery store – let’s get growing!
Choosing the Right Bok Choy Variety
First things first, let’s talk about bok choy varieties. While most bok choy will grow indoors, some are better suited than others. Here are a few of my favorites:
* Dwarf Bok Choy (e.g., Toy Choy, Mei Qing Choi): These are compact and perfect for smaller spaces. They mature quickly, which is a huge plus when you’re itching for a harvest.
* Baby Bok Choy: Similar to dwarf varieties, baby bok choy stays small and tender. It’s great for salads or stir-fries.
* Shanghai Bok Choy: This variety has light green stems and a milder flavor. It’s a bit larger than the dwarf types, so make sure you have enough room.
What You’ll Need
Before we dive into the growing process, let’s gather our supplies. Here’s a checklist of everything you’ll need:
* Bok Choy Seeds: Choose a variety that suits your space and taste.
* Seed Starting Tray or Small Pots: These are perfect for getting your seeds started.
* Seed Starting Mix: This is a light, well-draining soil mix specifically designed for seedlings.
* Larger Pots (at least 6 inches in diameter): You’ll need these when you transplant your seedlings.
* Potting Soil: A good quality potting mix is essential for healthy growth.
* Grow Lights: Bok choy needs plenty of light, especially indoors.
* Watering Can or Spray Bottle: For gentle watering.
* Fertilizer: A balanced liquid fertilizer will help your bok choy thrive.
* Optional: Heat Mat: To speed up germination.
Step-by-Step Instructions: From Seed to Harvest
Okay, let’s get our hands dirty! Here’s a detailed guide to growing bok choy indoors:
Section 1: Starting Your Seeds
1. Prepare Your Seed Starting Tray: Fill your seed starting tray or small pots with seed starting mix. Gently pat it down to remove any air pockets.
2. Sow the Seeds: Sow 2-3 seeds per cell or pot, about ¼ inch deep. I like to make a small indentation with my finger and then drop the seeds in.
3. Cover the Seeds: Lightly cover the seeds with more seed starting mix.
4. Water Gently: Use a spray bottle or watering can with a gentle nozzle to water the soil. You want to moisten the soil without disturbing the seeds.
5. Provide Warmth: Bok choy seeds germinate best in temperatures between 65-75°F (18-24°C). If your home is cooler, consider using a heat mat to speed up germination.
6. Cover with a Humidity Dome (Optional): A humidity dome will help keep the soil moist and create a favorable environment for germination. If you don’t have a dome, you can cover the tray with plastic wrap.
7. Place Under Grow Lights: Place the seed starting tray under grow lights. Keep the lights on for 12-14 hours per day.
8. Monitor Moisture: Check the soil moisture daily. Keep the soil consistently moist, but not soggy.
9. Wait for Germination: Bok choy seeds typically germinate within 5-7 days. Once the seedlings emerge, remove the humidity dome or plastic wrap.
Section 2: Transplanting Your Seedlings
1. Thin the Seedlings: Once your seedlings have developed their first true leaves (the second set of leaves that appear after the initial seed leaves), thin them to one seedling per cell or pot. Choose the strongest, healthiest-looking seedling and gently snip off the others at the soil line.
2. Prepare Your Larger Pots: Fill your larger pots (at least 6 inches in diameter) with potting soil.
3. Gently Remove the Seedlings: Carefully remove the seedlings from the seed starting tray or small pots. Be gentle to avoid damaging the roots. I like to use a small spoon or fork to help lift them out.
4. Plant the Seedlings: Make a hole in the potting soil large enough to accommodate the seedling’s root ball. Place the seedling in the hole and gently backfill with potting soil.
5. Water Thoroughly: Water the seedlings thoroughly after transplanting.
6. Place Under Grow Lights: Return the transplanted seedlings under the grow lights.
Section 3: Caring for Your Bok Choy
1. Light: Bok choy needs at least 6 hours of direct light per day. If you’re growing indoors, grow lights are essential. Keep the lights on for 12-14 hours per day. Position the lights a few inches above the plants.
2. Watering: Water your bok choy regularly, keeping the soil consistently moist but not soggy. Check the soil moisture daily and water when the top inch of soil feels dry. Avoid overwatering, as this can lead to root rot.
3. Fertilizing: Fertilize your bok choy every 2-3 weeks with a balanced liquid fertilizer. Follow the instructions on the fertilizer label. I prefer using an organic fertilizer for healthier plants.
4. Temperature: Bok choy prefers cooler temperatures, ideally between 60-70°F (15-21°C). Avoid placing your plants near heat sources, such as radiators or vents.
5. Air Circulation: Good air circulation is important to prevent fungal diseases. If your indoor space is stuffy, consider using a small fan to improve air circulation.
6. Pest Control: Keep an eye out for pests, such as aphids and cabbage worms. If you spot any pests, you can try spraying them with insecticidal soap or neem oil. I usually check the undersides of the leaves regularly.
7. Rotation: Rotate your bok choy plants regularly to ensure they receive even light exposure.
Section 4: Harvesting Your Bok Choy
1. Harvest Time: Bok choy is typically ready to harvest in 45-60 days from sowing, depending on the variety. You can harvest the entire plant at once, or you can harvest individual leaves as needed.
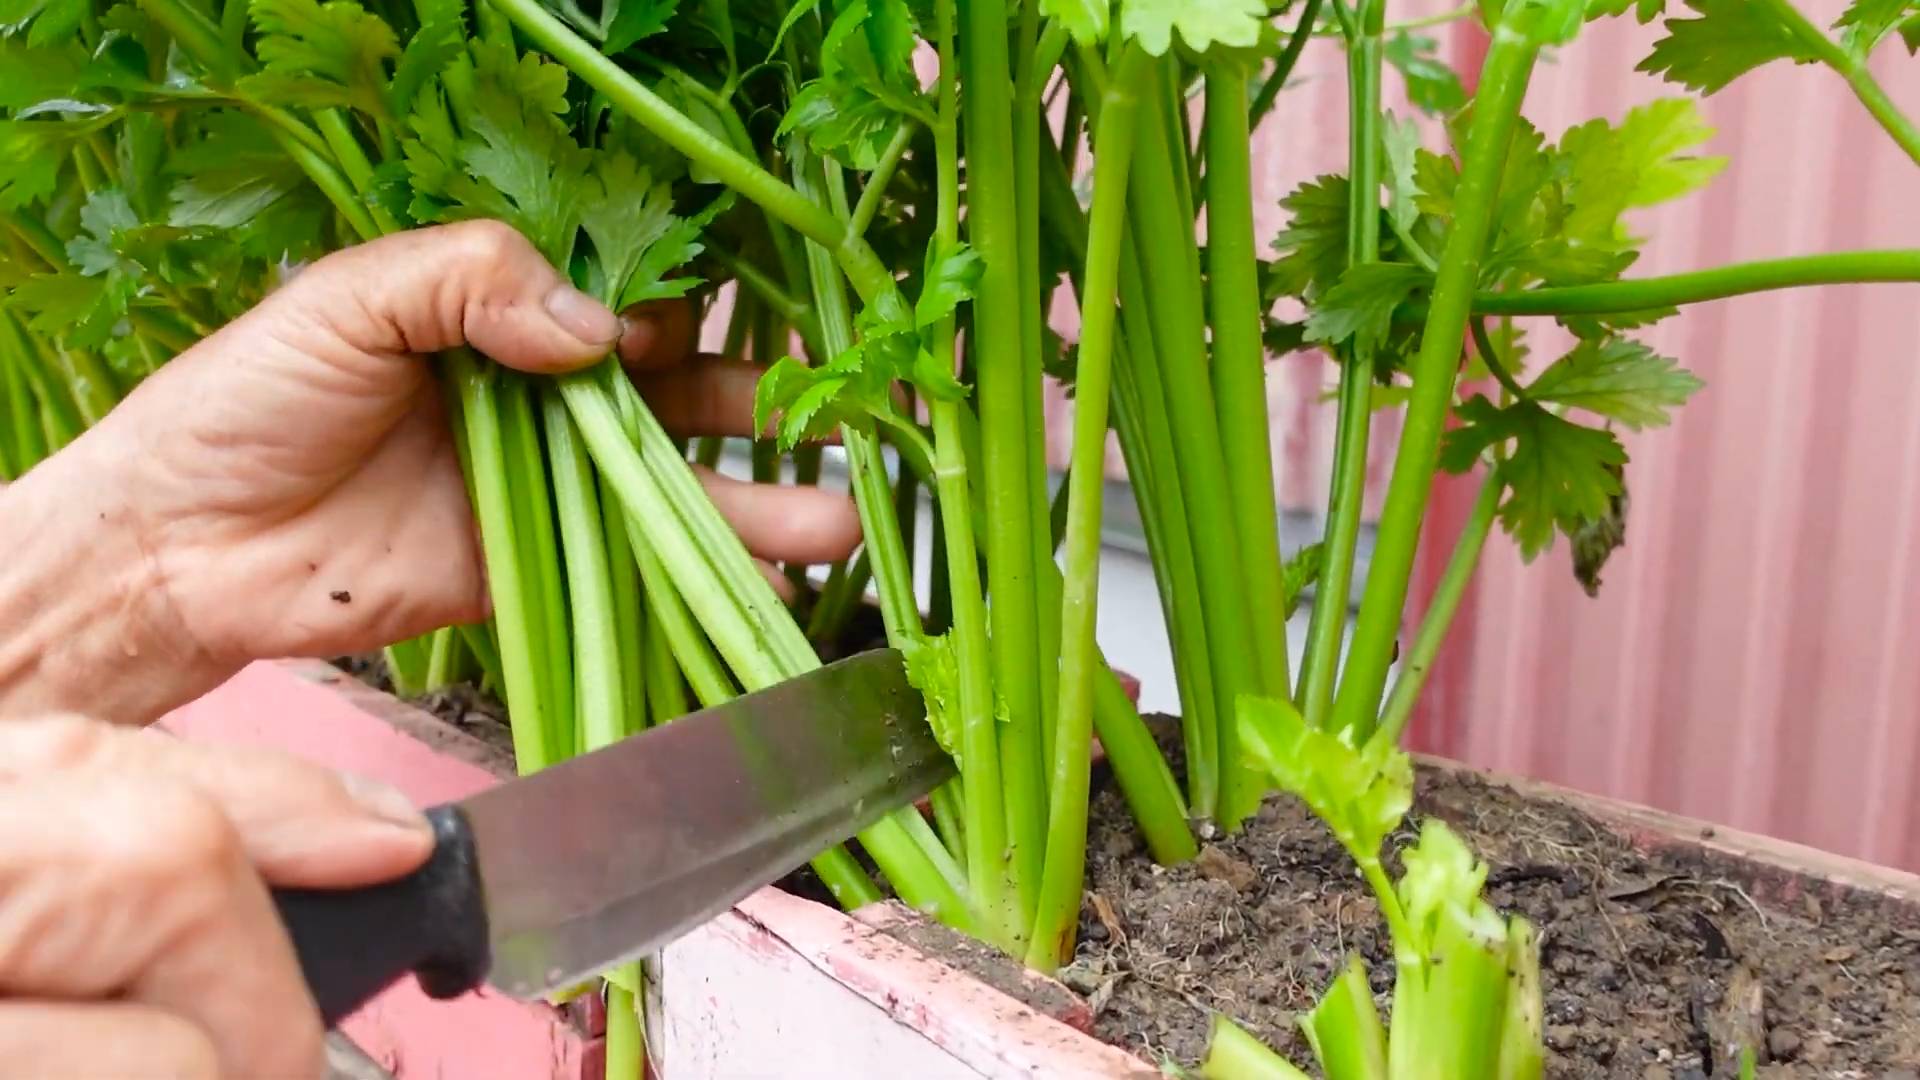
2. Harvesting Individual Leaves: To harvest individual leaves, simply cut them off at the base of the plant with a sharp knife or scissors. Start with the outer leaves and work your way inwards.
3. Harvesting the Entire Plant: To harvest the entire plant, cut it off at the base with a sharp knife.
4. Enjoy Your Harvest: Wash your bok choy thoroughly before eating. It can be used in salads, stir-fries, soups, and many other dishes.
Troubleshooting Common Problems
Even with the best care, you might encounter some problems while growing bok choy indoors. Here are a few common issues and how to address them:
* Leggy Seedlings: This is usually caused by insufficient light. Make sure your seedlings are getting enough light, either from grow lights or a sunny window.
* Yellowing Leaves: This can be caused by overwatering, underwatering, or nutrient deficiencies. Check the soil moisture and adjust your watering accordingly. Fertilize your plants regularly with a balanced fertilizer.
* Pests: Keep an eye out for pests, such as aphids and cabbage worms. Spray them with insecticidal soap or neem oil.
* Bolting: Bolting is when the plant prematurely flowers, which can make the leaves bitter. This is usually caused by high temperatures or stress. Try to keep your plants in a cool, well-ventilated area.
Tips for Success
Here are a few extra tips to help you succeed in growing bok choy indoors:
* Start with Quality Seeds: Use fresh, high-quality seeds from a reputable source.
* Use the Right Soil: Use a well-draining potting mix that is specifically designed for vegetables.
* Provide Adequate Light: Bok choy needs plenty of light, so make sure you have adequate grow lights.
* Water Regularly: Keep the soil consistently moist, but not soggy.
* Fertilize Regularly: Fertilize your plants every 2-3 weeks with a balanced fertilizer.
* Monitor for Pests and Diseases: Keep an eye out for pests and diseases and take action promptly.
* Be Patient: Growing plants takes time and patience. Don’t get discouraged if you don’t see results immediately.
Growing bok choy indoors can be a
Conclusion
So, there you have it! Planting celery in your home garden isn’t just a fun project; it’s a gateway to fresher, more flavorful meals and a deeper connection with the food you eat. We’ve walked through the simple steps, from nurturing those tiny seeds or regrowing from a store-bought stalk to harvesting your own crisp, green stalks.
Why is this DIY trick a must-try? Because it puts you in control. You know exactly what’s going into your celery – no mystery pesticides or long-distance transportation. Plus, the taste difference between store-bought and homegrown celery is remarkable. The homegrown variety boasts a brighter, more intense celery flavor that will elevate your soups, salads, and snacks.
But the benefits extend beyond just taste. Gardening is therapeutic. It’s a chance to de-stress, connect with nature, and get your hands dirty (literally!). And let’s not forget the satisfaction of watching something you planted grow and thrive. It’s a small miracle, and you get to be a part of it.
Don’t be afraid to experiment! Try different celery varieties to find your favorite. Some gardeners prefer the Pascal celery for its classic flavor, while others enjoy the pink celery for its unique color and slightly sweeter taste. You can also adjust the growing conditions to influence the flavor. For example, providing consistent moisture will result in sweeter, less bitter celery.
Consider companion planting to further enhance your celery’s growth and flavor. Onions, garlic, and marigolds are excellent companions, helping to deter pests and improve soil health. You can also interplant with herbs like chamomile or dill, which are said to improve celery’s flavor.
And if you’re feeling adventurous, try saving your own celery seeds for future plantings. It’s a rewarding way to close the loop and become even more self-sufficient. Just allow a few plants to bolt (flower) and collect the seeds once they’ve dried.
We encourage you to take the plunge and start planting celery in your home garden today. It’s easier than you think, and the rewards are well worth the effort. Once you’ve harvested your first crop, be sure to share your experiences with us! Tell us about your successes, your challenges, and any tips or tricks you’ve discovered along the way. We’d love to hear from you and learn from your experiences. Share your photos and stories on social media using #HomegrownCelery and let’s inspire others to get growing!
Remember, even if you only have a small balcony or patio, you can still grow celery in containers. So, no matter your space constraints, there’s no excuse not to give it a try. Get ready to enjoy the freshest, most flavorful celery you’ve ever tasted, all thanks to your own green thumb!
Frequently Asked Questions (FAQ)
Q: What is the best time of year to start planting celery?
A: Celery is a cool-season crop, so the best time to start planting is in early spring or late summer. For a spring crop, start seeds indoors 10-12 weeks before the last expected frost. For a fall crop, start seeds indoors in mid-summer. If you live in a region with mild winters, you may be able to grow celery throughout the year. The key is to avoid extreme heat, which can cause celery to bolt (go to seed) and become bitter.
Q: How much sunlight does celery need?
A: Celery needs at least six hours of sunlight per day to thrive. However, in hot climates, it can benefit from some afternoon shade to prevent scorching. If you’re growing celery in containers, you can easily move them to a shadier location during the hottest part of the day.
Q: What kind of soil is best for growing celery?
A: Celery prefers rich, well-drained soil with a pH between 6.0 and 6.8. Amend your soil with compost or other organic matter to improve its fertility and drainage. Celery is a heavy feeder, so it’s important to provide it with plenty of nutrients. Consider adding a slow-release fertilizer at planting time and side-dressing with compost tea or liquid fertilizer every few weeks.
Q: How often should I water celery?
A: Celery needs consistent moisture to grow properly. Water deeply and regularly, especially during hot, dry weather. Aim to keep the soil consistently moist but not waterlogged. Mulching around the plants can help to retain moisture and suppress weeds. A good rule of thumb is to water when the top inch of soil feels dry to the touch.
Q: What are some common pests and diseases that affect celery?
A: Celery can be susceptible to several pests and diseases, including aphids, celery leaf miners, and fungal diseases like early blight and late blight. Regularly inspect your plants for signs of pests or diseases and take action promptly. Organic pest control methods, such as insecticidal soap or neem oil, can be effective for controlling aphids and leaf miners. To prevent fungal diseases, ensure good air circulation around your plants and avoid overhead watering.
Q: How long does it take for celery to mature?
A: Celery typically takes 100-130 days to mature from seed. If you’re starting with transplants, it will take less time, usually around 70-90 days. You can start harvesting celery when the stalks are at least 6 inches tall.
Q: Can I grow celery in containers?
A: Yes, celery can be successfully grown in containers. Choose a large container that is at least 12 inches deep and wide to accommodate the plant’s root system. Use a high-quality potting mix and provide consistent moisture and nutrients. Container-grown celery may require more frequent watering and fertilizing than celery grown in the ground.
Q: How do I blanch celery?
A: Blanching celery is a technique used to make the stalks more tender and less bitter. To blanch celery, exclude light from the stalks for a few weeks before harvesting. You can do this by mounding soil around the base of the plants, wrapping the stalks with newspaper or cardboard, or using blanching collars.
Q: How do I store harvested celery?
A: To store harvested celery, wrap it loosely in plastic wrap and store it in the refrigerator. Celery can last for several weeks when stored properly. You can also freeze celery for later use. To freeze celery, wash and chop it, then blanch it in boiling water for 2-3 minutes. Cool the celery in ice water, drain it well, and then freeze it in freezer bags or containers.
Q: Can I regrow celery from a store-bought stalk?
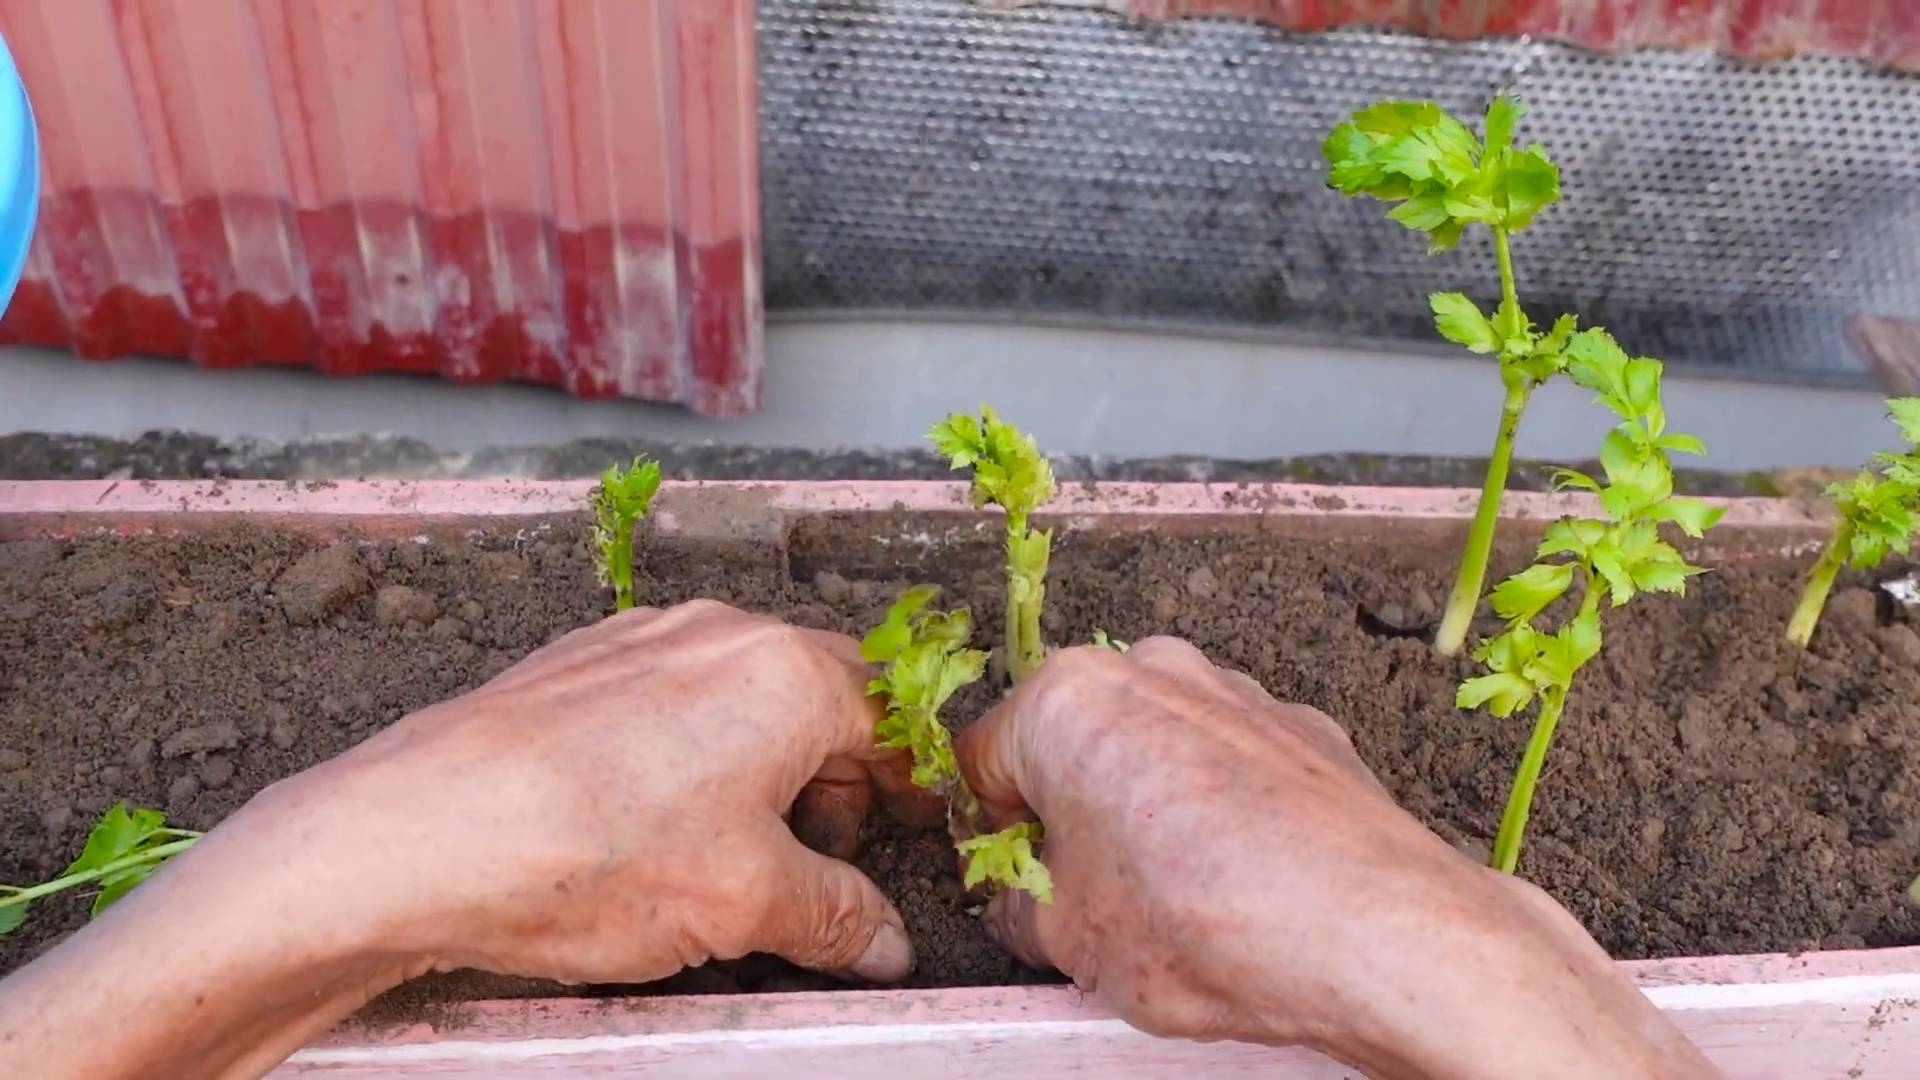
A: Yes, you can regrow celery from a store-bought stalk. Cut off the bottom 2 inches of the stalk and place it in a shallow dish of water. Place the dish in a sunny location and change the water every day. After a few days, you should see new roots and leaves sprouting from the top of the stalk. Once the roots are well-developed, you can transplant the celery into a pot or garden bed. This method is a great way to reduce food waste and get a head start on your celery crop.

Leave a Comment