
Hydroponic Garlic Bottle Growing: Ever dreamed of having fresh, flavorful garlic readily available, right at your fingertips? Imagine bypassing the grocery store and harvesting your own pungent cloves, all thanks to a simple, upcycled plastic bottle! This isn’t some futuristic farming technique reserved for experts; it’s a surprisingly easy and rewarding DIY project that anyone can tackle, even with limited space or gardening experience.
Garlic, a staple in cuisines worldwide, has a rich history dating back thousands of years. From ancient Egypt, where it was believed to bestow strength upon pyramid builders, to its use in traditional medicine across various cultures, garlic has always been valued for its potent flavor and purported health benefits. Now, you can connect with this ancient tradition in a modern, sustainable way.
Let’s face it, buying garlic from the store can be unpredictable. Sometimes it’s fresh and vibrant, other times it’s sprouted or past its prime. With hydroponic garlic bottle growing, you gain complete control over the process, ensuring a consistent supply of high-quality garlic. Plus, it’s a fantastic way to reduce waste by repurposing plastic bottles and embracing a more eco-friendly lifestyle. I’m excited to share this simple yet effective method that will transform the way you think about growing garlic!
DIY Hydroponic Garlic Bottle Growing: A Beginner’s Guide
Hey there, fellow plant enthusiasts! Ever thought about growing garlic indoors, without soil, using just a recycled bottle? It’s easier than you think, and I’m here to guide you through the whole process. This hydroponic method is a fun and sustainable way to enjoy fresh garlic greens right from your kitchen. Let’s get started!
What You’ll Need
Before we dive in, let’s gather our supplies. This project is all about using what you have, so feel free to get creative with substitutions!
* **A Plastic Bottle:** A 2-liter soda bottle works perfectly, but any sturdy plastic bottle will do. Just make sure it’s clean!
* **Garlic Cloves:** Choose organic garlic cloves if possible, as they’re less likely to be treated with chemicals that could inhibit growth. Look for firm, healthy cloves.
* **Water:** Tap water is fine, but filtered water is even better.
* **Nutrient Solution (Optional):** While not strictly necessary, a diluted hydroponic nutrient solution will give your garlic a boost. I’ll explain more about this later.
* **Growing Medium (Optional):** This could be perlite, coco coir, or even gravel. It helps support the garlic cloves and provides aeration.
* **Scissors or a Craft Knife:** For cutting the bottle. Be careful!
* **Dark Tape or Paint (Optional):** To block light from reaching the roots.
* **Small Net Pots or Plastic Cups (Optional):** To hold the garlic cloves if you’re using a growing medium.
* **Measuring Cup or Spoon:** For measuring water and nutrient solution.
Preparing the Bottle
This is where we transform our humble plastic bottle into a mini hydroponic garden.
1. **Clean the Bottle:** Wash the bottle thoroughly with soap and water to remove any residue. Rinse it well to ensure no soap remains.
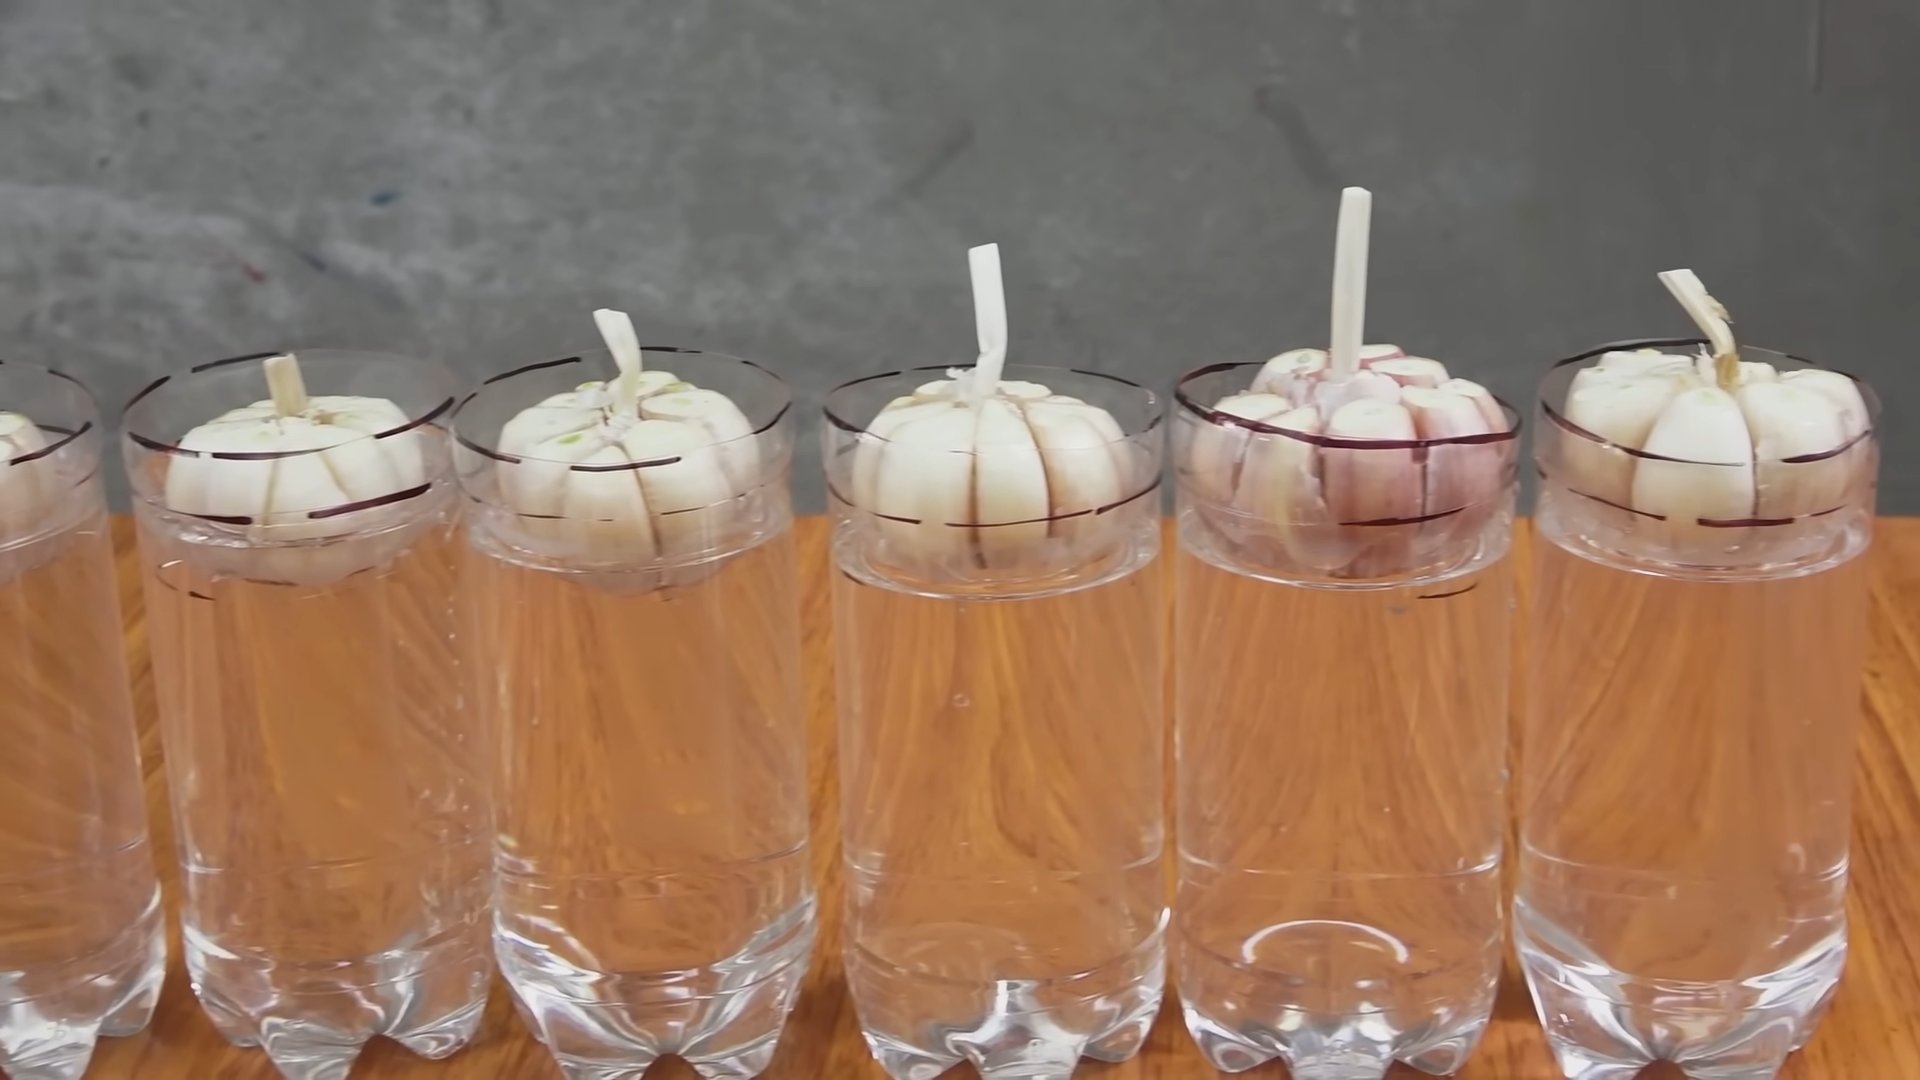
2. **Cut the Bottle:** Using your scissors or craft knife, carefully cut the bottle in half horizontally. You’ll be using the top half as the planting container and the bottom half as the water reservoir. I usually cut mine about two-thirds of the way up, leaving a larger reservoir.
3. **Prepare the Top Half (Planting Container):** If you’re using a growing medium and net pots, you’ll need to create drainage holes in the bottom of the top half of the bottle. You can do this by poking holes with a hot needle (adult supervision required!) or drilling small holes. If you’re not using a growing medium, you can skip this step.
4. **Darken the Reservoir (Optional):** Algae can grow in the water reservoir if it’s exposed to light. To prevent this, you can wrap the bottom half of the bottle with dark tape or paint it. This step is optional, but I highly recommend it.
Planting the Garlic
Now for the fun part – planting our garlic cloves!
1. **Prepare the Garlic Cloves:** Gently separate the cloves from the garlic bulb. Choose the largest, healthiest-looking cloves for planting. You don’t need to peel them.
2. **Planting with Growing Medium:** If you’re using a growing medium, place a net pot or plastic cup in the top half of the bottle. Fill the pot with your chosen growing medium (perlite, coco coir, or gravel). Gently push a garlic clove into the growing medium, pointy side up, so that the top of the clove is just barely covered.
3. **Planting Without Growing Medium:** If you’re not using a growing medium, simply place the garlic clove, pointy side up, in the top half of the bottle. You might need to use a small piece of sponge or cotton ball to stabilize the clove and keep it from falling through the opening.
4. **Assemble the System:** Carefully place the top half of the bottle (the planting container) inside the bottom half of the bottle (the water reservoir).
Adding Water and Nutrients
This is where the magic happens – providing our garlic with the water and nutrients it needs to thrive.
1. **Add Water to the Reservoir:** Fill the bottom half of the bottle with water, making sure the water level reaches the bottom of the planting container. If you’re using a growing medium, the water should just barely touch the bottom of the medium.
2. **Add Nutrient Solution (Optional):** If you’re using a nutrient solution, follow the instructions on the package to dilute it properly. I usually start with a very weak solution (half the recommended strength) and gradually increase it as the garlic grows. Add the diluted nutrient solution to the water reservoir.
3. **Monitor the Water Level:** Check the water level in the reservoir regularly and add more water (or nutrient solution) as needed. The water level should always be touching the bottom of the planting container.
Caring for Your Hydroponic Garlic
Now that our garlic is planted, let’s talk about how to keep it happy and healthy.
1. **Light:** Garlic needs plenty of light to grow. Place your hydroponic garlic system in a sunny windowsill or under a grow light. Aim for at least 6-8 hours of light per day.
2. **Water Changes:** Change the water (or nutrient solution) in the reservoir every 1-2 weeks to prevent algae growth and maintain a healthy environment for your garlic.
3. **Temperature:** Garlic prefers temperatures between 60-75°F (15-24°C). Avoid placing your system in direct sunlight during the hottest part of the day, as this can overheat the water.
4. **Air Circulation:** Good air circulation helps prevent fungal diseases. Make sure your system is in a well-ventilated area.
5. **Pest Control:** Hydroponic systems are generally less susceptible to pests than soil-based gardens, but it’s still a good idea to keep an eye out for any signs of infestation. If you notice any pests, you can try spraying them with a mild solution of soapy water.
Harvesting Your Garlic Greens
The best part – enjoying the fruits (or rather, greens) of your labor!
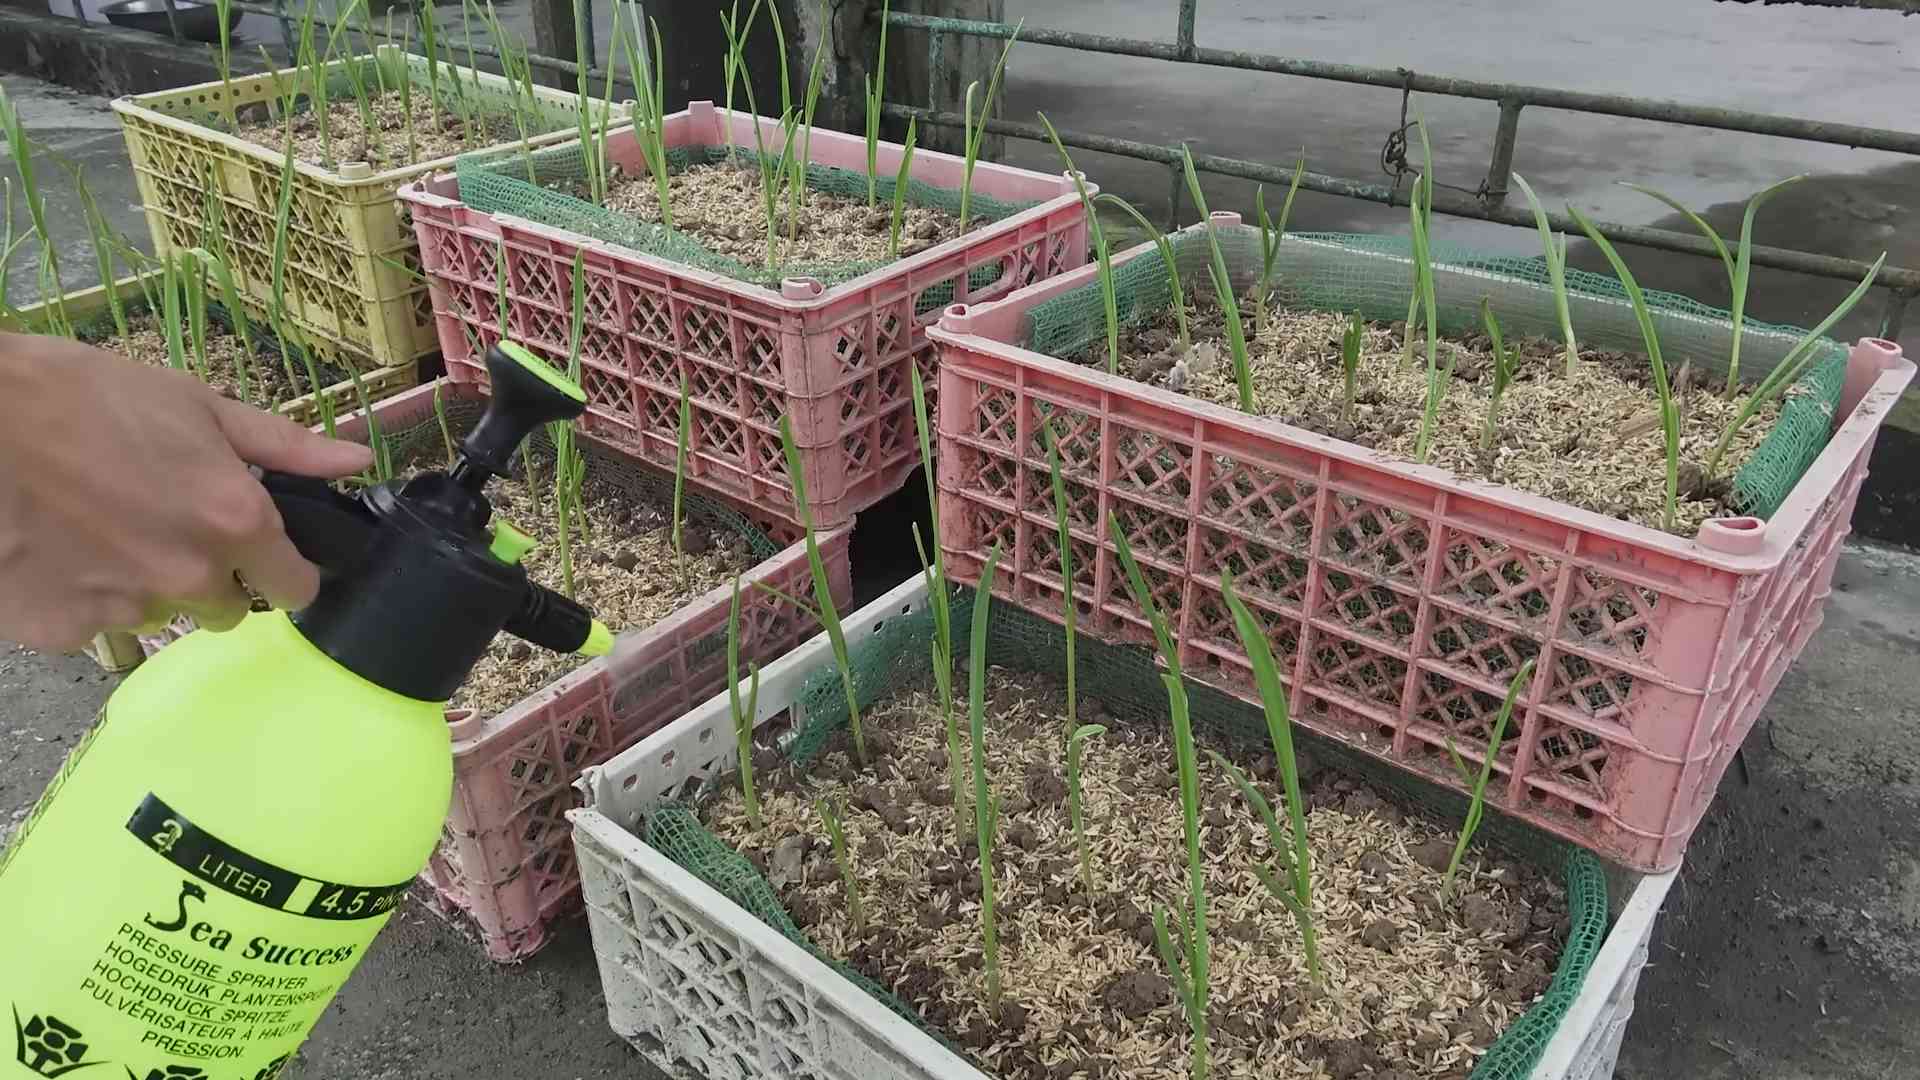
1. **When to Harvest:** You can start harvesting garlic greens when they are about 6-8 inches tall.
2. **How to Harvest:** Use scissors to snip off the greens near the base of the plant. Be careful not to cut too much at once, as this can weaken the plant.
3. **Enjoy Your Harvest:** Garlic greens have a mild garlic flavor and can be used in salads, soups, stir-fries, and other dishes. They’re a delicious and nutritious addition to any meal!
Troubleshooting
Even with the best care, sometimes things don’t go as planned. Here are a few common problems and how to fix them:
* **Yellowing Leaves:** This could be a sign of nutrient deficiency. Try adding a diluted nutrient solution to the water reservoir. It could also be a sign of overwatering, so make sure the water level isn’t too high.
* **Slow Growth:** This could be due to insufficient light. Try moving your system to a sunnier location or adding a grow light.
* **Algae Growth:** This is usually caused by too much light reaching the water reservoir. Wrap the reservoir with dark tape or paint it to block the light.
* **Root Rot:** This is caused by poor aeration and can be prevented by using a well-draining growing medium and changing the water regularly.
Advanced Tips and Tricks
Want to take your hydroponic garlic growing to the next level? Here are a few advanced tips and tricks:
* **Experiment with Different Growing Mediums:** Try different growing mediums to see which one works best for you. Perlite, coco coir, and gravel are all good options.
* **Use an Air Pump:** Adding an air pump to the water reservoir can improve aeration and promote root growth.
* **Monitor pH:** The ideal pH for hydroponic garlic is between 6.0 and 6.5. You can use a pH meter to monitor the pH of the water and adjust it as needed.
* **Succession Planting:** Plant new garlic cloves every few weeks to ensure a continuous supply of fresh garlic greens.
I hope this guide has inspired you to try growing garlic hydroponically. It’s a fun, easy, and rewarding project that anyone can do. Happy growing!
Conclusion
So, there you have it! Transforming a simple plastic bottle into a thriving hydroponic garlic garden is not just a fun project; it’s a game-changer for fresh herb enthusiasts and anyone looking to add a touch of green to their living space. This method of hydroponic garlic bottle growing offers a unique blend of sustainability, convenience, and delicious results. Forget those sad, store-bought garlic cloves that have lost their zing. With this DIY trick, you can enjoy the vibrant flavor of freshly grown garlic greens right at your fingertips.
Why is this a must-try? Firstly, it’s incredibly space-efficient. Whether you live in a sprawling house or a cozy apartment, this vertical garden solution fits seamlessly into any environment. Secondly, it’s a fantastic way to recycle plastic bottles, turning potential waste into a productive and beautiful addition to your home. Thirdly, and perhaps most importantly, the taste is simply unparalleled. Freshly snipped garlic greens offer a delicate, yet pungent flavor that elevates everything from salads and soups to stir-fries and omelets.
Looking to experiment? Consider these variations:
* Garlic Variety: While this method works wonders with standard garlic cloves, try experimenting with different varieties like elephant garlic for larger greens or Rocambole garlic for a more intense flavor.
* Nutrient Solutions: While the recipe suggests a basic nutrient solution, you can explore commercially available hydroponic nutrient blends tailored for leafy greens. Just be sure to follow the manufacturer’s instructions carefully.
* Lighting: If you live in a particularly dark environment, consider supplementing natural light with a grow light. This will ensure your garlic greens receive adequate energy for optimal growth.
* Container Size: While a standard plastic bottle works well, you can adapt the method to larger containers for a more substantial harvest. Just be sure to adjust the nutrient solution accordingly.
* Companion Planting: While the focus is on garlic, you can experiment with adding other herbs that thrive in similar conditions, such as chives or parsley, to create a mini-hydroponic herb garden.
But the real magic lies in the experience itself. Watching those tiny roots emerge and the vibrant green shoots reach for the light is incredibly rewarding. It’s a tangible connection to the natural world, even within the confines of your home.
So, what are you waiting for? Gather your supplies, follow the simple steps outlined, and embark on your own hydroponic garlic adventure. We’re confident that you’ll be amazed by the results. And most importantly, we want to hear about your experience! Share your photos, tips, and variations on social media using #HydroponicGarlicBottleGrowing. Let’s create a community of indoor gardeners and inspire others to embrace the joy of growing their own food, one bottle at a time. We can’t wait to see what you create!
Frequently Asked Questions (FAQ)
What kind of garlic should I use for hydroponic garlic bottle growing?
You can use any type of garlic clove you find at the grocery store. However, organic garlic is often recommended to avoid any potential pesticide residue. Different varieties will yield slightly different flavors in the greens. Experiment with different types to find your favorite! Elephant garlic will produce larger greens, while other varieties might offer a more intense garlic flavor.
How long does it take for the garlic greens to grow?
You should start seeing sprouts within a week or two. The greens will be ready to harvest in about 3-4 weeks, depending on the variety of garlic and the growing conditions. Consistent light and proper nutrient levels will encourage faster growth.
What kind of water should I use?
It’s best to use filtered or dechlorinated water. Tap water often contains chlorine and other chemicals that can inhibit growth. If you only have tap water, let it sit out for 24 hours to allow the chlorine to evaporate before using it.
How often should I change the nutrient solution?
Change the nutrient solution every 1-2 weeks to prevent the buildup of algae and maintain optimal nutrient levels. When you change the solution, gently rinse the roots of the garlic to remove any debris.
What if the garlic cloves start to rot?
Rotting is usually caused by overwatering or poor drainage. Make sure the cloves are not submerged in water and that the bottle has adequate drainage holes. If you notice any rotting, remove the affected cloves immediately to prevent it from spreading.
How much light do the garlic greens need?
Garlic greens need at least 6 hours of sunlight per day. If you don’t have enough natural light, you can supplement with a grow light. Position the light about 6-12 inches above the plants.
Can I use this method to grow other herbs?
While this method is specifically tailored for garlic, you can certainly experiment with other herbs that thrive in similar conditions, such as chives, scallions, or even some types of lettuce. Just be sure to research the specific needs of each herb and adjust the nutrient solution accordingly.
How do I harvest the garlic greens?
Simply snip off the greens with scissors when they reach the desired length. Avoid cutting off more than one-third of the plant at a time to allow it to continue growing. The more you harvest, the more the plant will produce.
Is hydroponic garlic bottle growing safe to eat?
Yes, as long as you use clean water, a food-safe nutrient solution, and avoid using any pesticides or herbicides. Rinse the greens thoroughly before eating.
What are the benefits of growing garlic hydroponically?
Hydroponic garlic bottle growing offers several benefits, including:
* Space efficiency: It’s perfect for small spaces like apartments.
* Sustainability: It’s a great way to recycle plastic bottles.
* Freshness: You’ll have access to fresh, flavorful garlic greens year-round.
* Control: You have more control over the growing environment and nutrient levels.
* Educational: It’s a fun and educational project for kids and adults alike.
Can I reuse the garlic cloves after harvesting the greens?
No, the garlic cloves will eventually deplete their energy reserves and will not produce more greens. It’s best to start with fresh cloves each time.
What if I don’t have a hydroponic nutrient solution?
While a hydroponic nutrient solution is ideal, you can use a diluted liquid fertilizer as a substitute. Just be sure to use a fertilizer that is specifically formulated for leafy greens and follow the instructions on the label carefully. Start with a very diluted solution to avoid burning the roots.
How do I prevent algae growth in the bottle?
Algae growth is a common problem in hydroponic systems. To prevent it, keep the bottle out of direct sunlight and use an opaque container. You can also add a small amount of hydrogen peroxide to the nutrient solution to help control algae growth.
What do I do if I see pests on my garlic greens?
Pests are less common in hydroponic systems than in soil-based gardens, but they can still occur. If you see any pests, such as aphids or spider mites, try spraying the plants with a solution of water and dish soap. You can also use neem oil as a natural pesticide.
How do I know if my garlic greens are getting enough nutrients?
If your garlic greens are yellowing or stunted, it could be a sign that they are not getting enough nutrients. Try increasing the concentration of the nutrient solution or changing it more frequently. If the leaves are dark green and growing rapidly, it could be a sign that they are getting too many nutrients. Try diluting the nutrient solution.
Leave a Comment