
Bay Leaf Cuttings Propagation: Ever dreamt of having a constant supply of fresh, aromatic bay leaves right at your fingertips? Imagine stepping into your garden and snipping off a few leaves to elevate your culinary creations. Well, dream no more! This isn’t just a gardener’s fantasy; it’s an achievable reality with a little know-how and a touch of DIY magic. For centuries, bay leaves have been prized not only for their distinct flavor but also for their medicinal properties, finding their way into ancient remedies and culinary traditions across the globe.
But buying bay leaves from the store can be expensive, and they often lack the vibrant freshness of homegrown ones. That’s where the art of bay leaf cuttings propagation comes in! This DIY guide will empower you to bypass the nursery and cultivate your own thriving bay laurel plant from simple cuttings. I’ll walk you through each step, from selecting the perfect cutting to nurturing its growth, ensuring you have a flourishing bay leaf plant that will provide you with years of aromatic delight. So, grab your gardening gloves, and let’s embark on this exciting propagation journey together!
Propagating Bay Leaf Cuttings: A Gardener’s Guide
Hey there, fellow plant enthusiasts! Ever wanted to expand your bay leaf collection without shelling out cash at the nursery? Well, you’re in the right place! Propagating bay leaf ( *Laurus nobilis*) from cuttings is a rewarding and relatively straightforward process. I’ve successfully done it myself, and I’m here to guide you through each step, ensuring you have the best chance of success. Let’s get started!
What You’ll Need
Before we dive in, let’s gather all the necessary supplies. Having everything ready beforehand will make the process smoother and more enjoyable.
* **Healthy Bay Leaf Plant:** This is your source! Choose a mature, healthy bay leaf plant that’s free from pests and diseases.
* **Sharp, Clean Pruning Shears or Knife:** Sterilize your cutting tools with rubbing alcohol to prevent the spread of diseases.
* **Rooting Hormone (Optional but Recommended):** This will significantly increase your chances of successful rooting. I personally prefer a powder-based rooting hormone, but gel or liquid works too.
* **Small Pots or Containers:** Choose pots with drainage holes. Size depends on the size of your cuttings, but 2-3 inch pots are usually ideal.
* **Well-Draining Potting Mix:** A mix specifically designed for seedlings or cuttings is best. You can also create your own by combining equal parts peat moss (or coco coir), perlite, and vermiculite.
* **Clear Plastic Bag or Humidity Dome:** This will help maintain high humidity around the cuttings, which is crucial for root development.
* **Spray Bottle with Water:** For misting the cuttings.
* **Warm, Bright Location (Indirect Sunlight):** Avoid direct sunlight, which can scorch the cuttings.
* **Patience!** Rooting cuttings takes time, so don’t get discouraged if you don’t see results immediately.
Choosing and Preparing Your Cuttings
This is a crucial step! Selecting the right cuttings will greatly impact your success rate.
1. **Timing is Key:** The best time to take bay leaf cuttings is in late spring or early summer, when the plant is actively growing.
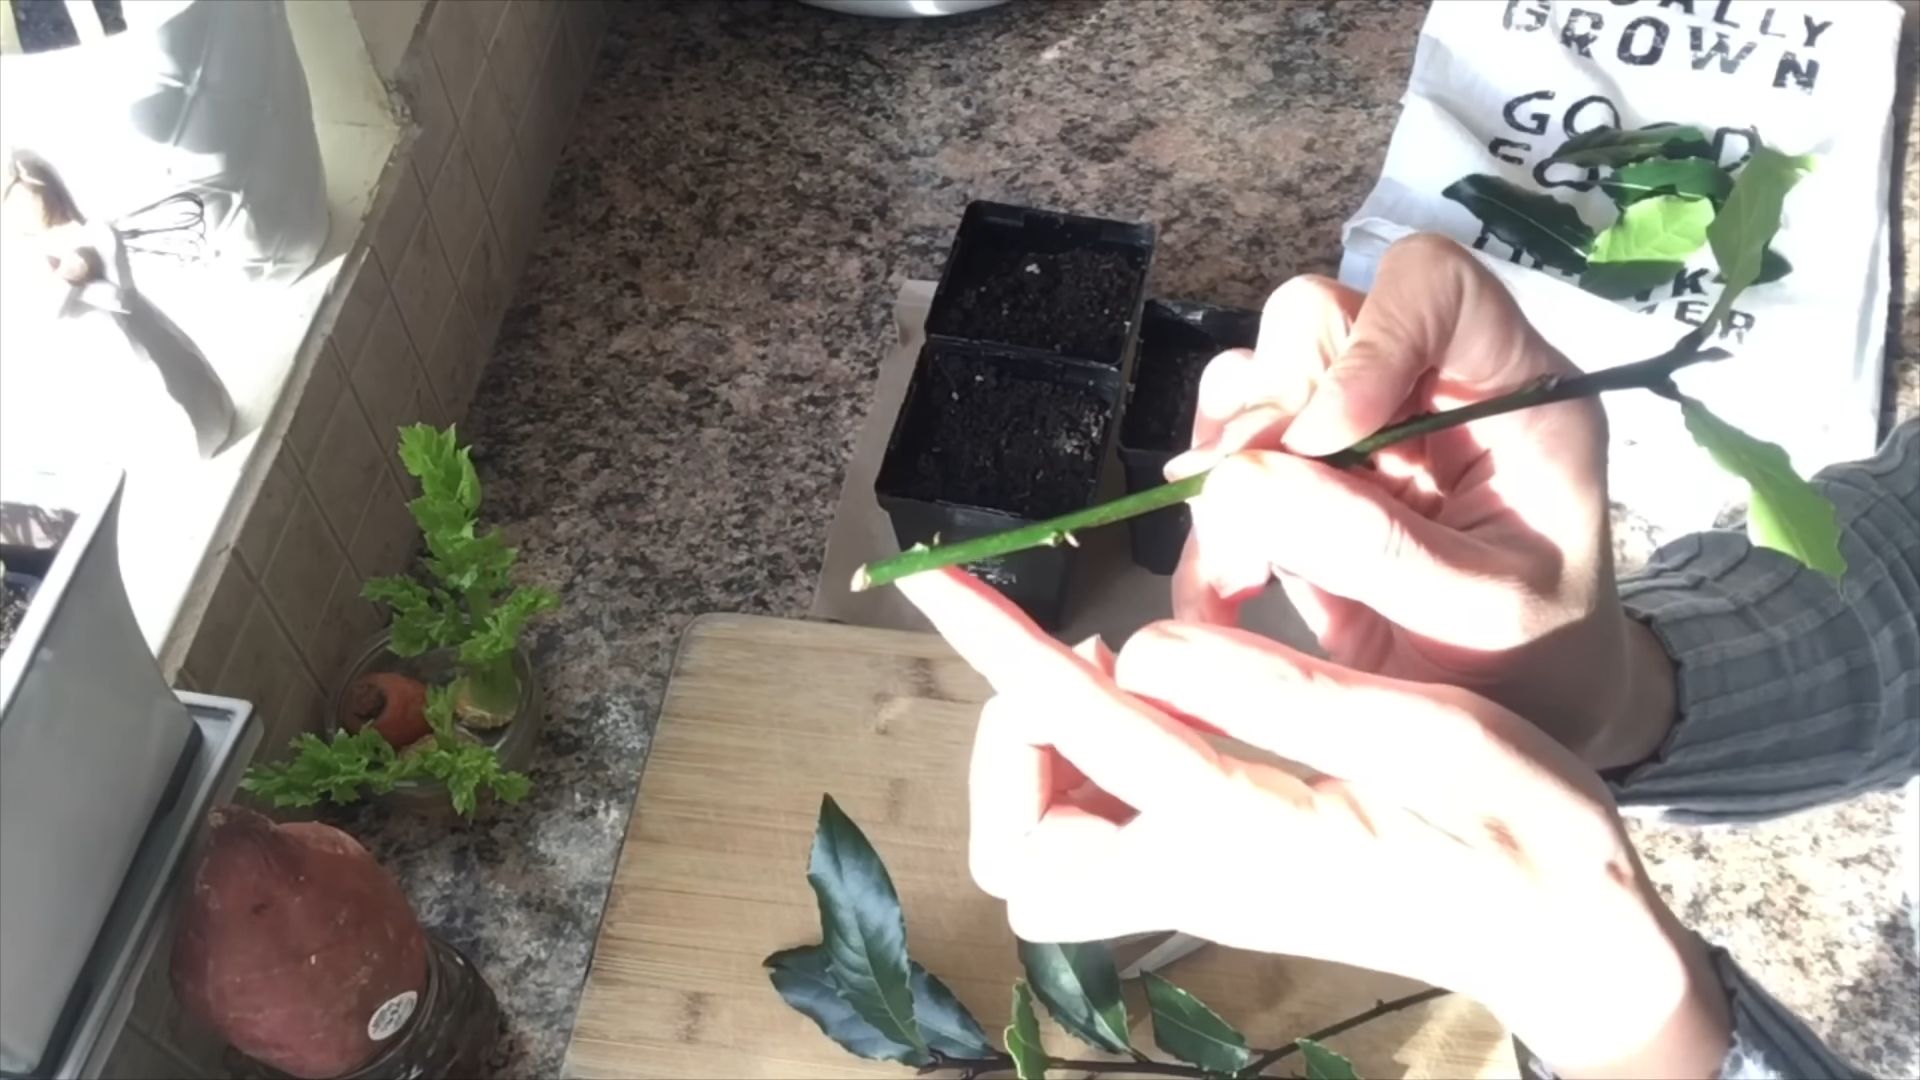
2. **Select Healthy Stems:** Look for semi-hardwood stems that are about 4-6 inches long. These are stems that are neither too soft and green nor too woody and brown. They should be flexible but not flimsy.
3. **Make the Cut:** Using your sterilized pruning shears or knife, make a clean cut just below a leaf node (the point where a leaf grows from the stem). This is where roots are most likely to develop.
4. **Remove Lower Leaves:** Carefully remove the leaves from the bottom 1-2 inches of the cutting. This will prevent them from rotting in the soil and also encourages root growth.
5. **Reduce Leaf Size (Optional):** If the remaining leaves are large, you can cut them in half horizontally. This reduces water loss through transpiration, helping the cutting stay hydrated.
Planting Your Cuttings
Now comes the fun part – getting those cuttings into the soil!
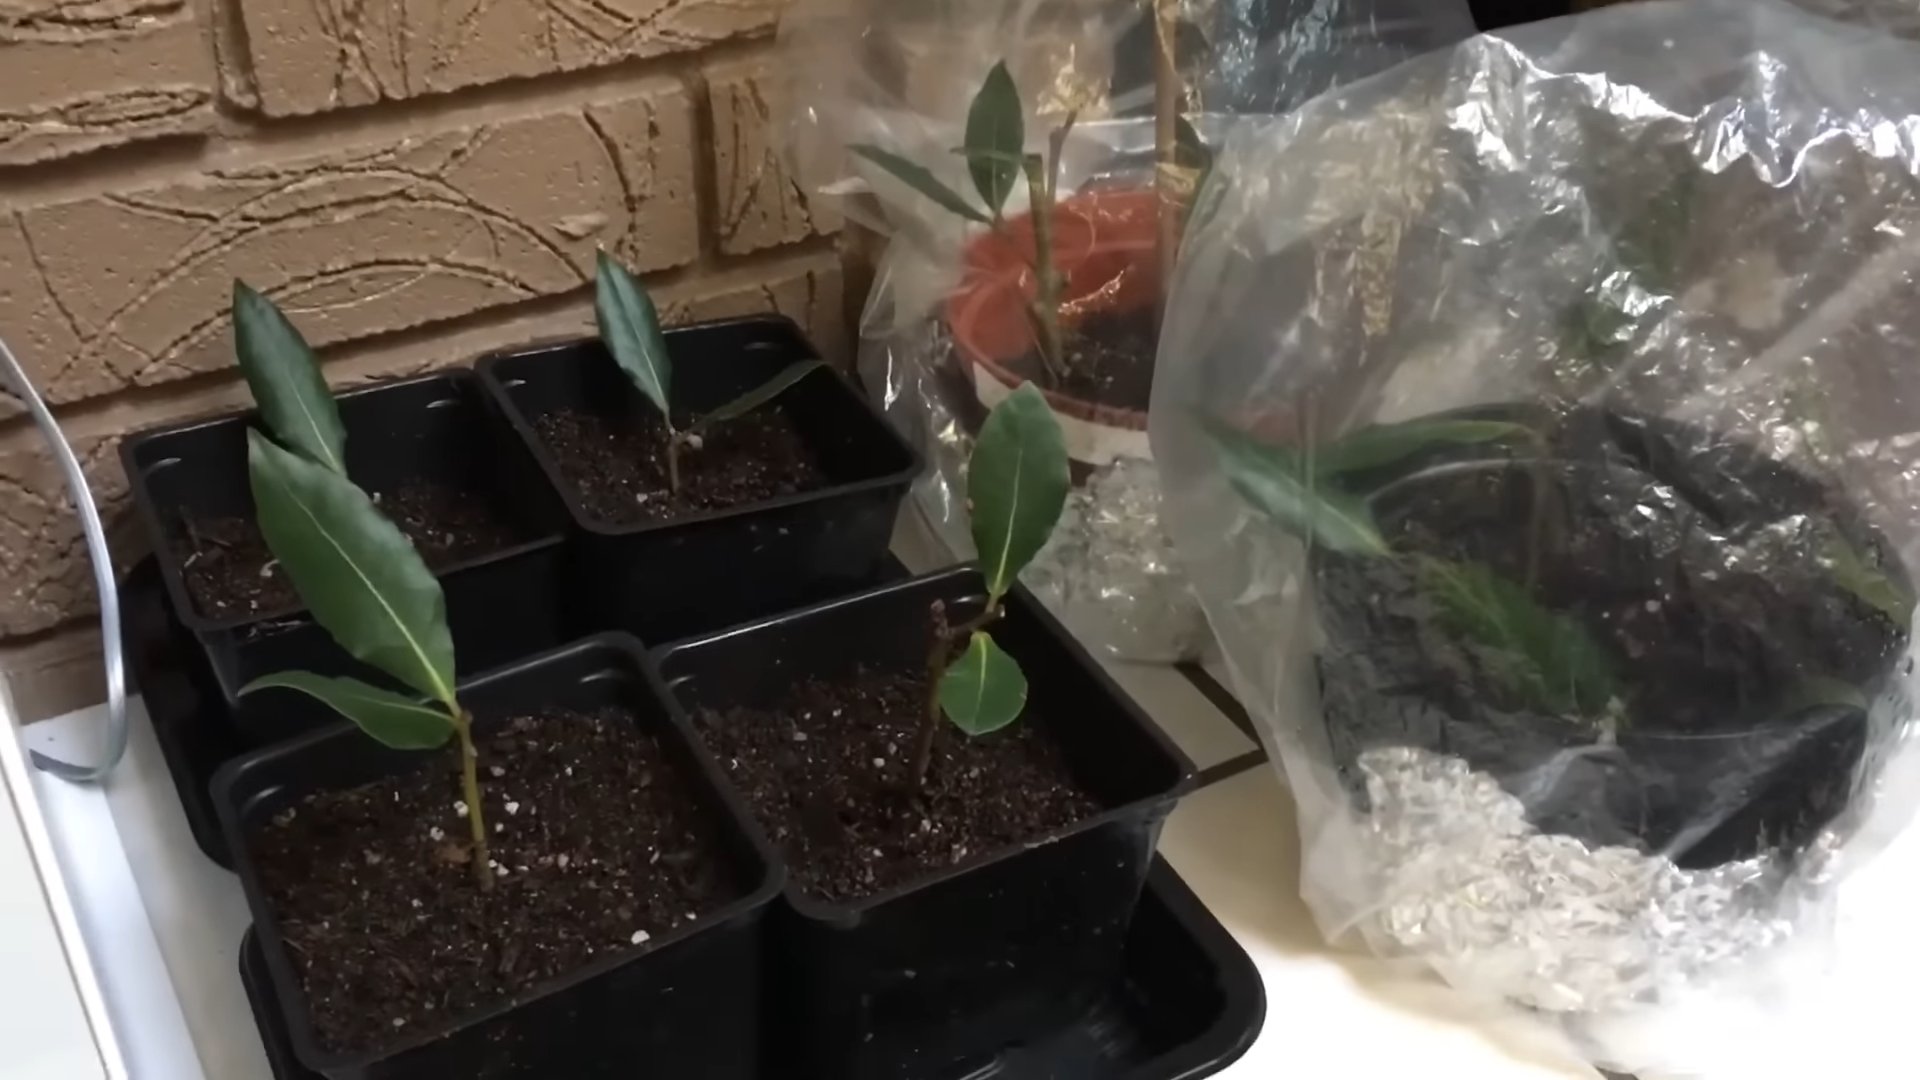
1. **Prepare Your Pots:** Fill your pots with the well-draining potting mix. Moisten the mix thoroughly, but don’t let it become waterlogged.
2. **Apply Rooting Hormone (Optional):** If using rooting hormone, moisten the bottom inch of the cutting and dip it into the hormone powder. Tap off any excess.
3. **Make a Hole:** Use a pencil or your finger to create a hole in the potting mix deep enough to accommodate the bottom inch of the cutting.
4. **Insert the Cutting:** Gently insert the cutting into the hole, being careful not to rub off the rooting hormone (if used).
5. **Firm the Soil:** Gently firm the soil around the base of the cutting to provide support.
6. **Water Gently:** Water the cutting lightly to settle the soil.
Creating a Humid Environment
Bay leaf cuttings need high humidity to prevent them from drying out before they can develop roots.
1. **Cover with Plastic Bag or Humidity Dome:** Place the pot inside a clear plastic bag or under a humidity dome. Make sure the bag or dome doesn’t touch the leaves of the cutting. You can use skewers or chopsticks to prop up the bag if needed.
2. **Misting:** Mist the inside of the bag or dome with water to increase humidity.
3. **Placement:** Place the pot in a warm, bright location that receives indirect sunlight. Avoid direct sunlight, which can overheat the cuttings.
Caring for Your Cuttings
Consistent care is essential for successful rooting.
1. **Maintain Humidity:** Check the humidity level inside the bag or dome regularly. If it seems dry, mist the cuttings with water.
2. **Ventilation:** Open the bag or dome for a few minutes every day to allow for air circulation and prevent fungal growth.
3. **Watering:** Keep the potting mix consistently moist, but not waterlogged. Water when the top inch of soil feels dry to the touch.
4. **Monitor for Rooting:** After a few weeks (usually 4-8 weeks), you can gently check for root development. Tug lightly on the cutting. If it resists, it has likely rooted. You can also look for new growth on the cutting.
5. **Be Patient:** Rooting can take time, so don’t get discouraged if you don’t see results immediately.
Transplanting Your Rooted Cuttings
Once your cuttings have developed a healthy root system, it’s time to transplant them into larger pots.
1. **Choose a Larger Pot:** Select a pot that is a few inches larger in diameter than the current pot.
2. **Prepare the Potting Mix:** Use a well-draining potting mix suitable for mature bay leaf plants.
3. **Gently Remove the Cutting:** Carefully remove the rooted cutting from its original pot, being careful not to damage the roots.
4. **Plant the Cutting:** Place the cutting in the center of the new pot and fill in around the roots with potting mix.
5. **Water Thoroughly:** Water the newly transplanted cutting thoroughly.
6. **Acclimatize:** Gradually acclimatize the plant to outdoor conditions by placing it in a sheltered location for a few hours each day, gradually increasing the amount of time it spends outdoors.
Troubleshooting
Even with the best care, you might encounter some challenges. Here are some common problems and how to address them:
* **Cuttings Rotting:** This is usually caused by overwatering or poor drainage. Make sure your potting mix is well-draining and avoid overwatering. Remove any rotting leaves or stems.
* **Cuttings Drying Out:** This is usually caused by low humidity. Make sure the cuttings are covered with a plastic bag or humidity dome and mist them regularly.
* **No Root Development:** This could be due to several factors, including poor cutting selection, lack of rooting hormone, or improper environmental conditions. Try taking new cuttings from a different part of the plant, using rooting hormone, and ensuring adequate humidity and warmth.
* **Fungal Growth:** This can occur in humid environments. Ensure adequate ventilation by opening the bag or dome regularly. You can also use a fungicide if necessary.
Tips for Success
Here are a few extra tips to increase your chances of successfully propagating bay leaf cuttings:
* Use fresh cuttings: The sooner you plant the cuttings after taking them, the better.
* Maintain consistent moisture: Don’t let the potting mix dry out completely, but avoid overwatering.
* Provide adequate warmth: Bay leaf cuttings root best in warm temperatures (around 70-75°F).
* Be patient: Rooting can take several weeks, so don’t give up too soon.
* Experiment: Try different techniques and see what works best for you.
Propagating bay leaf cuttings can be a rewarding experience. With a little patience and care, you can easily expand your bay leaf collection and enjoy the fresh, aromatic leaves in your cooking for years to come! Happy gardening!
Conclusion
So, there you have it! Propagating bay leaf cuttings might seem a little daunting at first, but with a little patience and the right approach, you can successfully cultivate your own thriving bay laurel plant. This DIY trick isn’t just about saving money; it’s about connecting with nature, understanding the life cycle of plants, and enjoying the satisfaction of nurturing something from a simple cutting into a flourishing herb. Imagine the pride you’ll feel when you’re seasoning your favorite dishes with bay leaves harvested from a plant you grew yourself!
Why is this a must-try? Because store-bought bay leaves, while convenient, often lack the vibrant aroma and flavor of freshly grown ones. Plus, commercially grown plants may have been treated with pesticides or herbicides that you might prefer to avoid. By propagating your own, you have complete control over the growing process, ensuring a healthy and flavorful addition to your culinary repertoire.
Don’t be afraid to experiment! While we’ve outlined a successful method, there are always variations you can try. For instance, some gardeners have success using different rooting hormones or varying the humidity levels. You could also try propagating in different mediums, such as perlite or vermiculite, to see which works best for you. Consider the type of bay leaf you are propagating. Some varieties might root more easily than others. Experimenting with different types of bay leaf cuttings can also be a fun way to learn more about the plant.
The key to success is consistency and observation. Keep a close eye on your cuttings, ensuring they remain moist and protected from harsh conditions. Don’t get discouraged if your first attempt isn’t successful. Propagation can be a learning process, and each attempt will provide valuable insights.
We highly encourage you to give this bay leaf cuttings propagation method a try. It’s a rewarding experience that will not only provide you with a continuous supply of fresh bay leaves but also deepen your appreciation for the natural world. Once you’ve successfully propagated your bay leaf cuttings, consider sharing your experience with us! We’d love to hear about your successes, challenges, and any variations you tried. Share your tips and tricks in the comments below, and let’s build a community of bay leaf enthusiasts! Happy propagating!
Frequently Asked Questions (FAQ)
Why should I propagate bay leaf cuttings instead of buying a plant?
Propagating bay leaf cuttings offers several advantages. Firstly, it’s a cost-effective way to expand your herb garden. Buying a mature bay laurel plant can be expensive, while cuttings are essentially free if you have access to an existing plant. Secondly, it’s a rewarding experience that allows you to connect with nature and learn about plant propagation. You gain a deeper understanding of the plant’s life cycle and develop valuable gardening skills. Thirdly, you have control over the growing process, ensuring that your plant is grown organically and free from harmful chemicals. Finally, home-grown bay leaves often have a more intense flavor and aroma compared to store-bought ones.
What is the best time of year to propagate bay leaf cuttings?
The best time to propagate bay leaf cuttings is typically in late spring or early summer. During this period, the plant is actively growing, and the cuttings are more likely to root successfully. The warmer temperatures and longer daylight hours provide optimal conditions for root development. However, you can also attempt propagation in early fall, although the success rate might be slightly lower. Avoid propagating during the dormant winter months when the plant’s growth is significantly reduced.
How long does it take for bay leaf cuttings to root?
Rooting time can vary depending on several factors, including the time of year, the health of the cutting, and the environmental conditions. Generally, it takes anywhere from 4 to 8 weeks for bay leaf cuttings to develop roots. Be patient and consistent with your care, and avoid disturbing the cuttings too much during this period. You can gently tug on the cutting after a few weeks to check for resistance, which indicates root development.
What type of rooting hormone should I use?
While rooting hormone is not strictly necessary, it can significantly increase the success rate of bay leaf cuttings propagation. Look for a rooting hormone specifically formulated for woody or semi-hardwood cuttings. These hormones typically contain a higher concentration of auxins, which are plant hormones that promote root growth. You can find rooting hormones in powder, liquid, or gel form. Follow the instructions on the product label for proper application.
What kind of soil should I use for rooting bay leaf cuttings?
The ideal soil for rooting bay leaf cuttings is a well-draining and sterile potting mix. A mixture of perlite and peat moss or coco coir is often recommended. This combination provides good aeration and moisture retention, which are essential for root development. Avoid using garden soil, as it may contain pathogens or pests that can harm the cuttings. Sterilizing the potting mix before use can further reduce the risk of disease.
How much light do bay leaf cuttings need?
Bay leaf cuttings need bright, indirect light to thrive. Avoid placing them in direct sunlight, as this can scorch the leaves and damage the cuttings. A location near a window with filtered sunlight is ideal. You can also use artificial grow lights to supplement natural light, especially during the winter months. Ensure that the cuttings receive at least 6-8 hours of light per day.
How often should I water bay leaf cuttings?
It’s crucial to keep the rooting medium consistently moist but not waterlogged. Water the cuttings whenever the top inch of the soil feels dry to the touch. Avoid overwatering, as this can lead to root rot. Use a spray bottle to mist the cuttings regularly to maintain high humidity levels. A humidity dome or plastic bag can also be used to create a humid environment.
How do I know if my bay leaf cuttings have rooted?
The most reliable way to determine if your bay leaf cuttings have rooted is to gently tug on them. If you feel resistance, it indicates that roots have developed. You can also carefully remove a cutting from the rooting medium and examine the roots. Look for small, white roots emerging from the stem. Once the cuttings have developed a healthy root system, they can be transplanted into individual pots.
What do I do after my bay leaf cuttings have rooted?
Once your bay leaf cuttings have rooted, gradually acclimate them to outdoor conditions before transplanting them into larger pots or the garden. Start by placing them in a sheltered location with indirect sunlight for a few hours each day, gradually increasing the exposure over a week or two. This process, known as hardening off, helps the plants adjust to the changes in temperature, humidity, and sunlight. After hardening off, transplant the cuttings into well-draining soil in a sunny location.
Can I propagate bay leaf cuttings in water?
While it’s possible to propagate bay leaf cuttings in water, it’s generally less successful than using a rooting medium. Cuttings rooted in water often develop weaker root systems that are more susceptible to transplant shock. If you choose to propagate in water, change the water every few days to prevent the growth of bacteria and algae. Once roots develop, transplant the cuttings into a well-draining potting mix as soon as possible.
Leave a Comment