
Regrow Enoki Mushrooms at Home: Sounds like something out of a sci-fi movie, right? But trust me, it’s totally doable, and I’m here to show you how! Forget those pricey grocery store runs for exotic mushrooms; imagine harvesting your own fresh, delicious Enoki right from your kitchen counter.
Mushrooms, in general, have a rich history, dating back centuries in various cultures. In Asian cuisine, Enoki mushrooms, with their delicate flavor and unique texture, have been prized for generations. They’re not just tasty; they’re packed with nutrients too! But what if I told you that you don’t need a fancy farm or a green thumb to enjoy these culinary delights?
In today’s world, where sustainability and self-sufficiency are becoming increasingly important, learning to regrow Enoki mushrooms at home is more relevant than ever. Not only will you save money, but you’ll also reduce your carbon footprint by avoiding those long supply chains. Plus, it’s a super fun and rewarding project! Who wouldn’t want to impress their friends and family with their homegrown gourmet mushrooms? So, let’s dive into this easy-to-follow DIY guide and unlock the secrets to cultivating your own Enoki mushroom paradise. Get ready to transform your kitchen into a mini mushroom farm!
Regrow Enoki Mushrooms at Home: A Fun & Frugal DIY Project!
Hey mushroom lovers! Ever bought a pack of those delicate, long-stemmed Enoki mushrooms and felt bad tossing the base? Well, I’ve got some exciting news: you can actually regrow them at home! It’s a surprisingly simple and rewarding process, and I’m here to guide you through every step. Get ready to impress your friends with your mushroom-growing skills!
What You’ll Need
Before we dive in, let’s gather our supplies. This is a pretty low-cost project, which is always a win in my book!
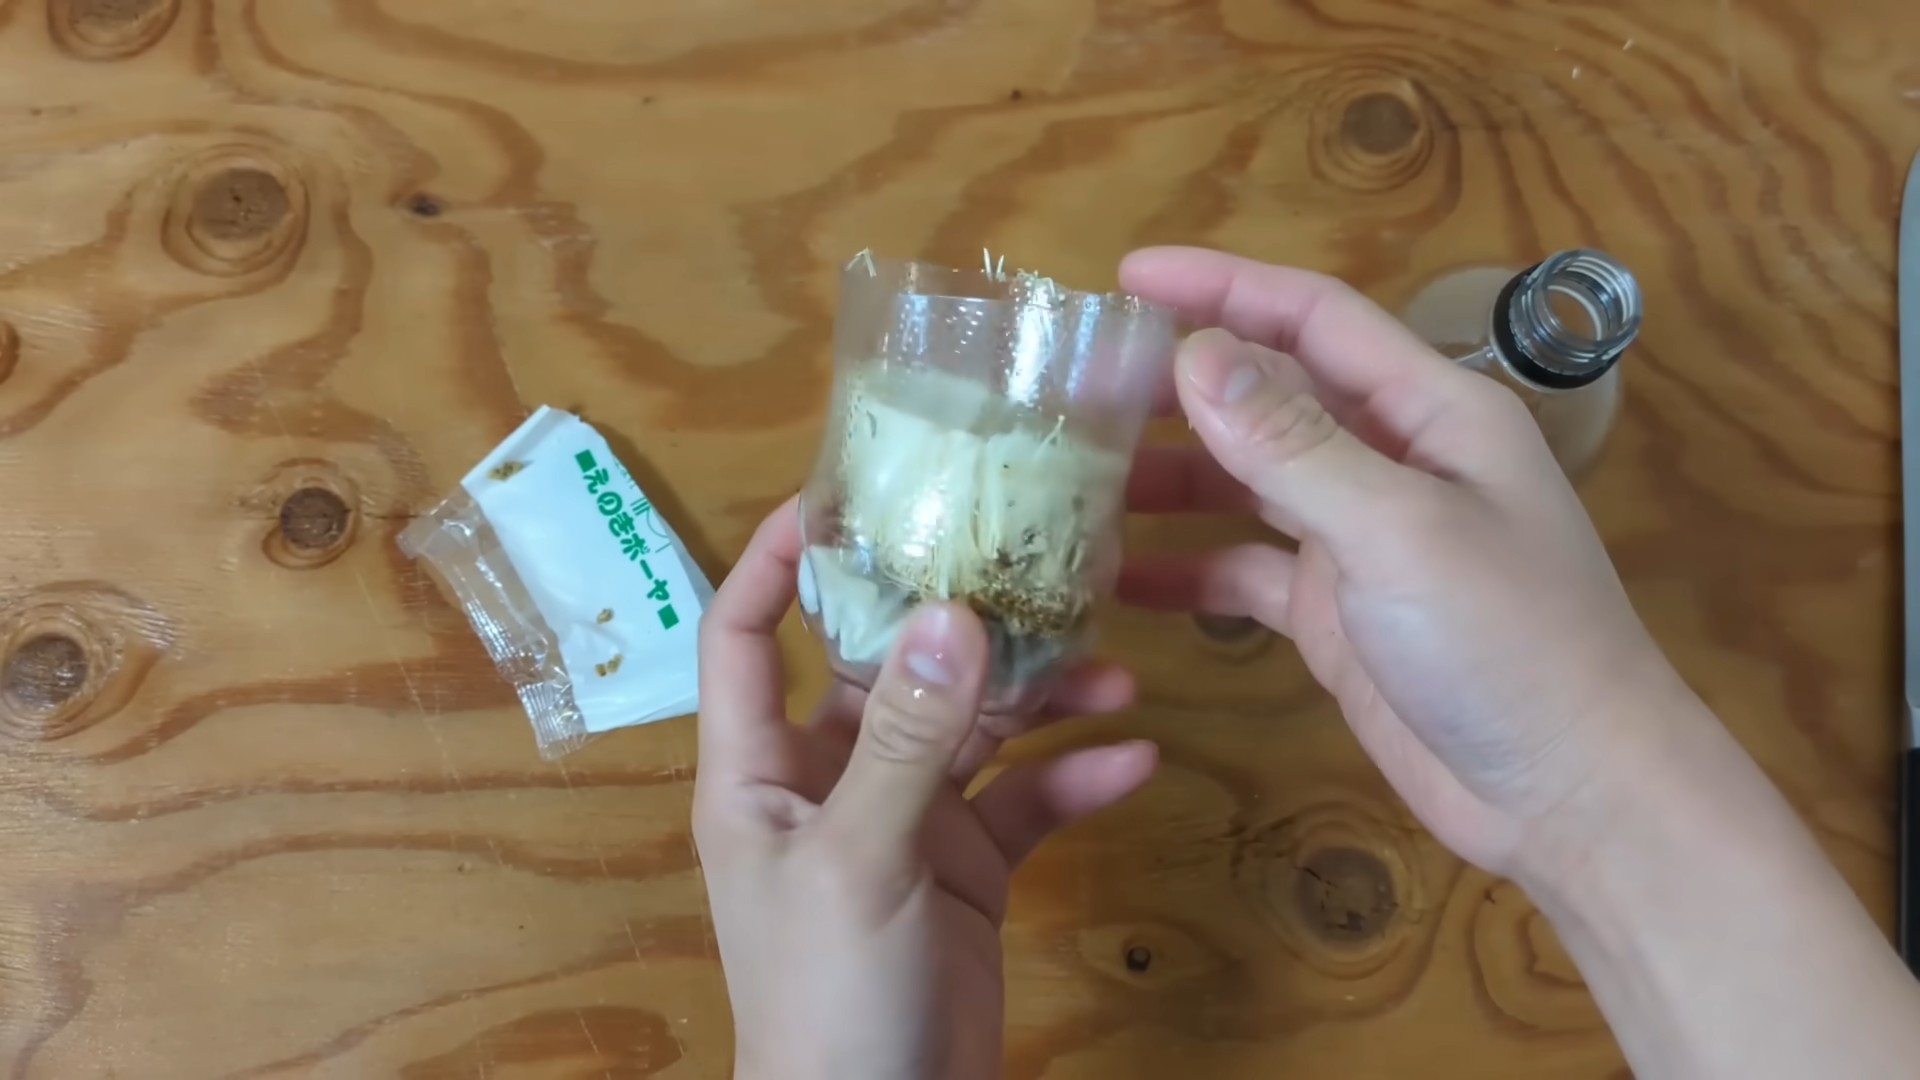
* Enoki Mushroom Base: This is the most important ingredient! After using the tops in your cooking, save the base with the mycelium (the white, fuzzy part). The fresher, the better.
* Cardboard: Plain, unprinted cardboard is ideal. Think cereal boxes, shipping boxes, or even toilet paper rolls. Avoid glossy or heavily printed cardboard, as the inks can be harmful.
* Coffee Grounds: Used coffee grounds are a fantastic nutrient source for Enoki mushrooms. Make sure they’re cooled down before using them.
* Spray Bottle: For misting and maintaining humidity.
* Container: A plastic container with a lid, a glass jar, or even a resealable plastic bag will work. The key is to create a humid environment.
* Optional: Hydrogen Peroxide (3%): This can help prevent mold contamination, but it’s not strictly necessary.
* Optional: Vermiculite or Perlite: These can be added to the substrate to improve drainage and aeration.
Understanding the Process
Basically, we’re going to create a mini-environment where the Enoki mushroom mycelium can thrive and produce new mushrooms. The cardboard and coffee grounds provide the nutrients, and the container helps maintain the necessary humidity. It’s like giving those little mushroom roots a cozy home to grow in!
Step-by-Step Instructions
Alright, let’s get our hands dirty! Here’s the breakdown of how to regrow your Enoki mushrooms:
Phase 1: Preparing the Substrate
This is where we create the perfect growing medium for our mushrooms.
1. Tear the Cardboard: Rip the cardboard into small pieces, about 1-2 inches in size. The smaller the pieces, the easier it will be for the mycelium to colonize. I like to use my hands for this, but you can also use scissors if you prefer.
2. Pasteurize the Cardboard: This step is crucial to kill off any unwanted bacteria or mold spores that might compete with our Enoki mushrooms. There are a couple of ways to do this:
* Method 1 (Boiling Water): Place the shredded cardboard in a heat-safe bowl or pot. Pour boiling water over the cardboard until it’s completely submerged. Let it soak for about an hour. Then, drain the water and squeeze out any excess moisture. The cardboard should be damp but not dripping wet.
* Method 2 (Microwave): Place the shredded cardboard in a microwave-safe bowl. Add enough water to moisten the cardboard thoroughly. Microwave on high for 2-3 minutes, or until the cardboard is steaming. Let it cool slightly before squeezing out the excess water.
3. Mix in the Coffee Grounds: In a clean bowl, combine the pasteurized cardboard and the used coffee grounds. A good ratio is about 2 parts cardboard to 1 part coffee grounds. Mix well, ensuring the coffee grounds are evenly distributed throughout the cardboard. This mixture is now our substrate!
4. Optional: Add Vermiculite or Perlite: If you’re using vermiculite or perlite, add a handful or two to the substrate mixture. This will help improve drainage and aeration, which can prevent the substrate from becoming waterlogged.
Phase 2: Inoculating the Substrate
This is where we introduce the Enoki mushroom mycelium to our prepared substrate.
1. Prepare the Container: Clean your container thoroughly with soap and water. Rinse well and dry completely. This helps prevent contamination.
2. Layer the Substrate: Place a layer of the cardboard and coffee ground mixture at the bottom of the container. The layer should be about 1-2 inches thick.
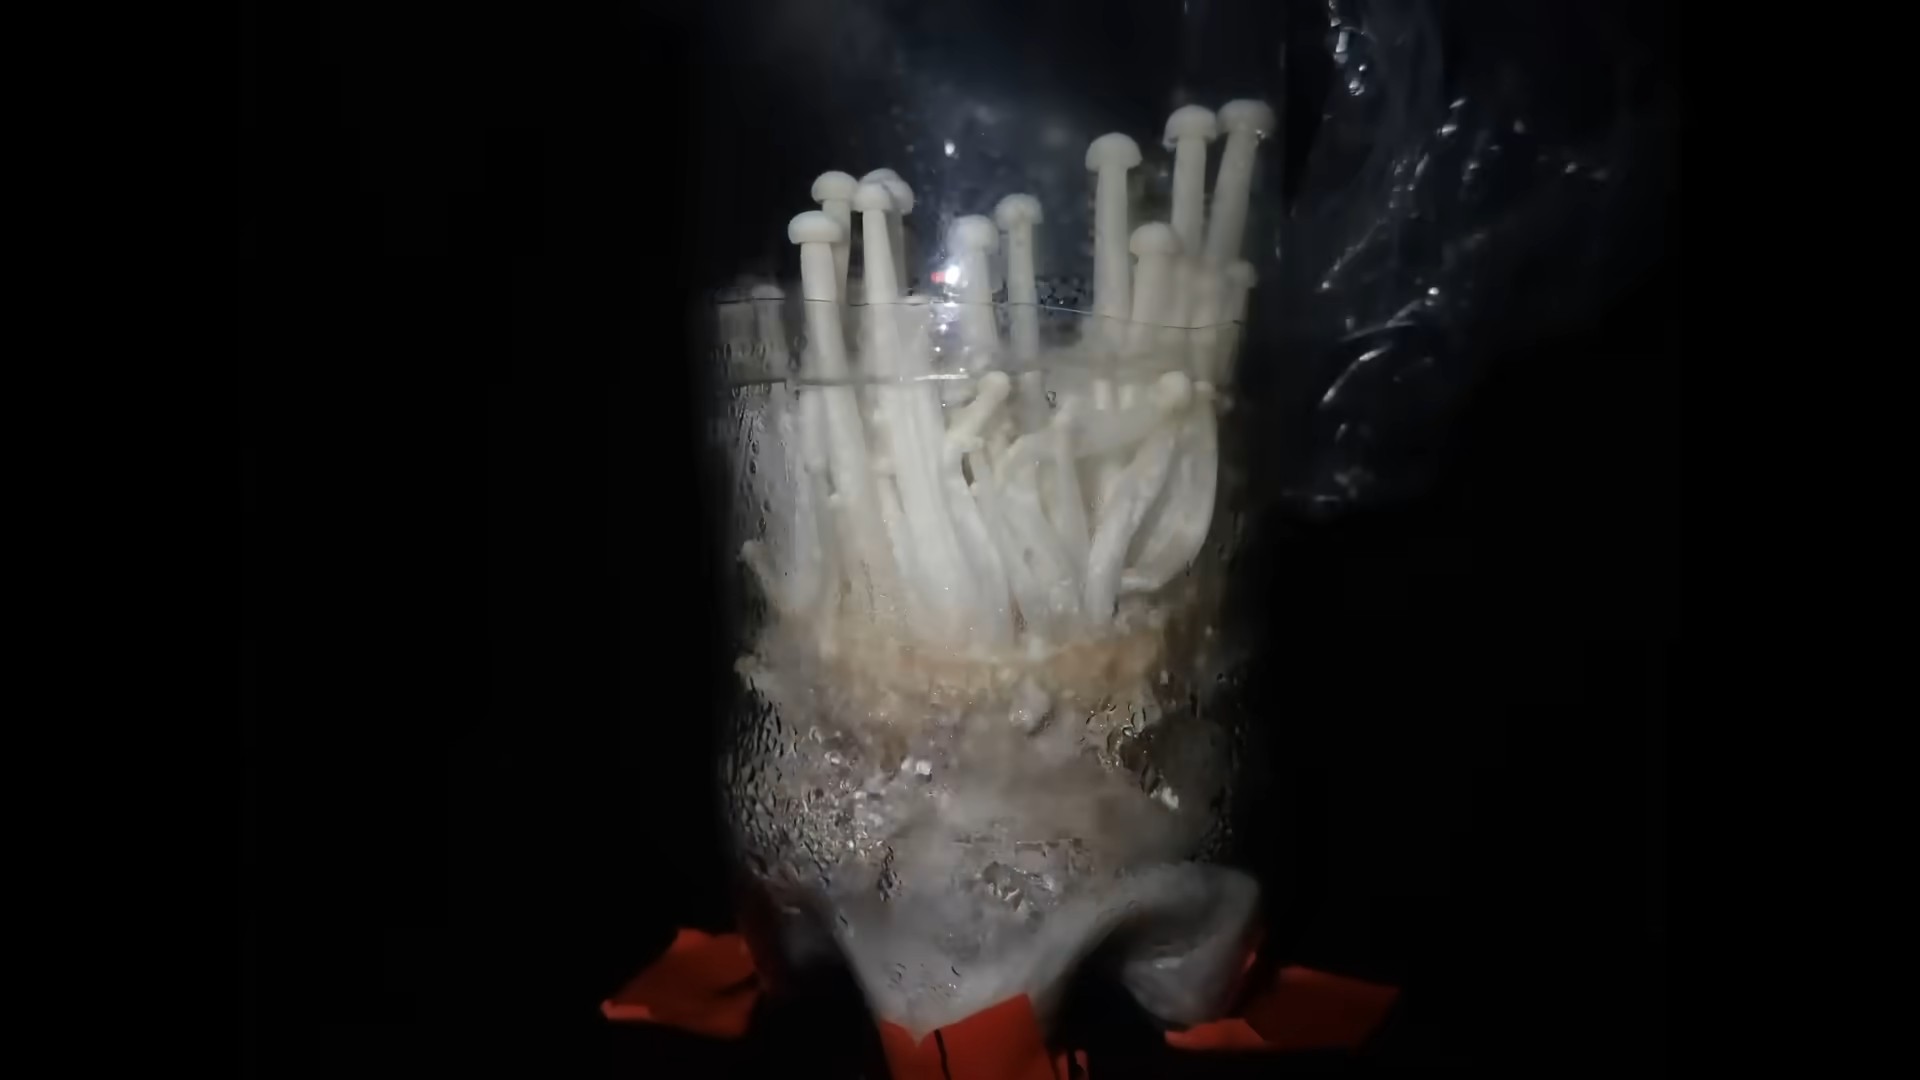
3. Introduce the Enoki Base: Place the Enoki mushroom base on top of the substrate layer. Make sure the cut end (where you separated the mushrooms) is facing down, in contact with the substrate.
4. Cover with More Substrate: Cover the Enoki mushroom base with another layer of the cardboard and coffee ground mixture. Gently press down to ensure good contact between the base and the substrate. Leave about an inch of space at the top of the container.
5. Optional: Lightly Mist: If the substrate seems dry, lightly mist the surface with water from your spray bottle. Be careful not to overwater, as this can lead to mold growth.
6. Close the Container: Place the lid on the container or seal the plastic bag. If using a container with a tight-fitting lid, you might want to leave it slightly ajar to allow for some air circulation.
Phase 3: Incubation
This is the waiting game! We need to provide the right conditions for the mycelium to colonize the substrate.
1. Find a Dark, Cool Place: Place the container in a dark, cool place with a temperature between 60-70°F (15-21°C). A basement, closet, or cupboard are all good options. Avoid direct sunlight, as this can overheat the container and kill the mycelium.
2. Monitor Humidity: Check the container every few days to make sure the substrate is still moist. If it seems dry, lightly mist the surface with water. You should see condensation forming on the inside of the container.
3. Check for Contamination: Keep an eye out for any signs of mold contamination. Green, black, or fuzzy patches are a bad sign. If you see any mold, carefully remove the contaminated area with a spoon and discard it. You can also spray the affected area with a diluted hydrogen peroxide solution (1 part hydrogen peroxide to 9 parts water).
4. Wait for Colonization: After a few weeks, you should start to see the white, fuzzy mycelium spreading throughout the substrate. This is a good sign! It means the Enoki mushrooms are taking root and starting to grow. This process can take anywhere from 2-4 weeks, depending on the conditions.
Phase 4: Fruiting
This is the exciting part – when we get to see our mushrooms grow!
1. Introduce Light: Once the substrate is fully colonized with mycelium, it’s time to introduce light. Move the container to a location with indirect sunlight or artificial light. A north-facing window or a fluorescent light are good options.
2. Lower the Temperature: Enoki mushrooms prefer cooler temperatures for fruiting. Ideally, the temperature should be between 50-60°F (10-15°C). This can be a bit tricky to achieve indoors, but you can try placing the container in a cooler room or even in the refrigerator for a few hours each day.
3. Increase Humidity: Maintain high humidity levels by misting the container regularly. You can also place a tray of water near the container to increase the humidity in the surrounding area.
4. Ventilation: Provide adequate ventilation by opening the container for a few minutes each day. This will help prevent the buildup of carbon dioxide, which can inhibit mushroom growth.
5. Wait for Mushrooms to Form: After a week or two, you should start to see tiny mushroom pins forming on the surface of the substrate. These pins will gradually grow into mature Enoki mushrooms.
6. Harvest Your Mushrooms: When the mushrooms are about 4-6 inches long, they’re ready to harvest. Use a clean knife or scissors to cut the mushrooms at the base of the stem.
Tips and Troubleshooting
* Patience is Key: Growing mushrooms takes time and patience. Don’t get discouraged if you don’t see results immediately.
* Cleanliness is Crucial: Maintaining a clean environment is essential to prevent contamination. Always wash your hands and equipment thoroughly before handling the substrate or mushrooms.
* Experiment with Different Substrates: You can experiment with different substrates, such as sawdust, straw, or even shredded paper.
* Don’t Overwater: Overwatering can lead to mold growth. Make sure the substrate is damp but not dripping wet.
* Control Temperature: Maintaining the correct temperature is crucial for successful mushroom growth.
* Contamination: If you see mold, remove the contaminated area immediately. You can also try spraying the affected area with a diluted hydrogen peroxide solution.
* No Mushrooms: If you don’t see any mushrooms forming after a few weeks, try lowering the temperature or increasing the humidity.
Enjoy Your Homegrown Enoki Mushrooms
Conclusion
So, there you have it! Regrowing Enoki mushrooms at home is not just a fun experiment; it’s a rewarding way to reduce food waste, connect with nature, and enjoy fresh, delicious mushrooms right from your kitchen. This simple DIY trick transforms kitchen scraps into a sustainable source of culinary delight. Forget those expensive grocery store runs for specialty mushrooms – with a little patience and these easy steps, you can cultivate your own supply of delicate, flavorful Enoki.
Why is this a must-try? Because it’s incredibly satisfying to witness the magic of regrowth. Seeing those tiny pins emerge and develop into a cluster of edible mushrooms is a testament to the power of nature and your own green thumb (even if you don’t think you have one!). Plus, you’re actively participating in a more sustainable lifestyle by minimizing food waste and reducing your carbon footprint. It’s a win-win!
Beyond the basic method, there’s plenty of room for experimentation. Try using different types of growing mediums, such as sawdust or even coffee grounds, to see how they affect the growth and flavor of your Enoki. You can also adjust the humidity levels by covering the container with a perforated plastic bag or using a humidity dome. Consider experimenting with different light conditions – while Enoki mushrooms don’t need direct sunlight, a little indirect light can encourage healthy growth.
Don’t be afraid to get creative! You could even try inoculating sterilized grain spawn with Enoki mushroom tissue cultures for a more controlled and potentially faster growth process. This is a more advanced technique, but it can yield impressive results.
We wholeheartedly encourage you to give this DIY trick a try. It’s a fantastic project for individuals, families, and classrooms alike. The process is educational, engaging, and ultimately delicious. Once you’ve harvested your first batch of homegrown Enoki, you’ll be amazed at the difference in flavor and freshness compared to store-bought varieties.
Imagine adding these delicate mushrooms to your favorite soups, salads, stir-fries, or even using them as a garnish for elegant appetizers. The possibilities are endless!
But the real magic lies in sharing your experience. We want to hear about your successes, your challenges, and your unique variations. Did you discover a particularly effective growing medium? Did you find a way to accelerate the growth process? Share your tips and tricks in the comments below! Let’s create a community of Enoki enthusiasts and learn from each other.
So, grab those leftover Enoki stems, gather your supplies, and embark on this exciting journey of mushroom cultivation. You’ll be amazed at what you can achieve with a little effort and a lot of curiosity. Happy growing! Remember, mastering this simple technique for regrowing Enoki mushrooms at home is not just about saving money; it’s about connecting with nature and embracing a more sustainable way of life.
Frequently Asked Questions (FAQ)
What exactly are Enoki mushrooms, and why are they good to regrow?
Enoki mushrooms (Flammulina velutipes) are long, thin, white mushrooms with small caps, often sold in clusters. They have a mild, slightly fruity flavor and a crisp texture, making them a popular addition to Asian cuisine. They are also relatively easy to regrow from their base because the mycelium (the vegetative part of the fungus) is often still viable in the leftover stems. This makes them an ideal candidate for home cultivation and a great way to reduce food waste.
How long does it take to regrow Enoki mushrooms?
The time it takes to regrow Enoki mushrooms can vary depending on environmental factors such as temperature, humidity, and light. Generally, you can expect to see new growth within 1-2 weeks. It may take 3-4 weeks to harvest a full cluster of mushrooms. Patience is key! Maintaining consistent humidity and temperature will help speed up the process.
What is the best growing medium to use?
While the method described typically uses water, you can experiment with other growing mediums for potentially better results. Some options include:
* **Sawdust:** Sterilized hardwood sawdust can provide a nutrient-rich environment for the mushrooms.
* **Coffee Grounds:** Used coffee grounds are a readily available and sustainable option. Make sure to sterilize them before use to prevent contamination.
* **Agar:** For more advanced growers, agar plates can be used to isolate and propagate the Enoki mycelium before transferring it to a larger growing medium.
* **Vermiculite:** This provides good moisture retention and aeration.
What kind of container should I use?
Any clean, food-safe container will work. A plastic container with a lid is ideal for maintaining humidity. You can also use a glass jar or even a plastic bag. Just make sure the container is clean and allows for some airflow to prevent mold growth. If using a container without a lid, cover it loosely with plastic wrap and poke a few holes for ventilation.
How much light do Enoki mushrooms need?
Enoki mushrooms don’t require direct sunlight. In fact, direct sunlight can be harmful. Indirect light is sufficient. A location near a window or under a fluorescent light is ideal. The amount of light can influence the color of the mushrooms. More light tends to result in darker colored mushrooms, while less light results in the characteristic white color.
How do I maintain the right humidity levels?
Maintaining high humidity is crucial for successful Enoki mushroom regrowth. You can achieve this by:
* **Covering the container:** A lid or plastic wrap will help trap moisture.
* **Misting:** Regularly mist the inside of the container with water to keep the growing medium moist.
* **Humidity Dome:** If you’re serious about mushroom cultivation, consider investing in a humidity dome.
* **Placement:** Place the container in a humid environment, such as a bathroom or near a humidifier.
How do I prevent contamination?
Contamination is a common challenge in mushroom cultivation. To minimize the risk:
* **Sterilize everything:** Use clean containers and sterilized growing mediums.
* **Wash your hands:** Wash your hands thoroughly before handling the mushrooms or the growing medium.
* **Maintain cleanliness:** Keep your growing area clean and free of dust and debris.
* **Monitor for mold:** Regularly inspect the container for signs of mold or other contamination. If you see any, discard the entire batch.
When are the Enoki mushrooms ready to harvest?
Enoki mushrooms are ready to harvest when they have reached your desired length and thickness. Typically, they are harvested when they are about 4-6 inches long. The caps should still be small and tightly closed. To harvest, simply cut the mushrooms at the base of the cluster.
Can I regrow Enoki mushrooms more than once from the same base?
Yes, it is possible to regrow Enoki mushrooms multiple times from the same base. However, each subsequent harvest may be smaller than the previous one. Eventually, the nutrient reserves in the base will be depleted, and the mushrooms will no longer regrow.
Are there any risks associated with eating homegrown Enoki mushrooms?
While homegrown Enoki mushrooms are generally safe to eat, it’s important to ensure they are properly grown and free from contamination. If you notice any unusual colors, smells, or textures, discard the mushrooms. Always cook Enoki mushrooms thoroughly before eating to kill any potential bacteria.
What can I do with my homegrown Enoki mushrooms?
The culinary possibilities are endless! Enoki mushrooms can be added to soups, salads, stir-fries, noodle dishes, and even used as a garnish. Their delicate flavor and crisp texture make them a versatile ingredient for a variety of dishes.
What if my Enoki mushrooms don’t grow?
Don’t be discouraged! Mushroom cultivation can be tricky. If your Enoki mushrooms don’t grow, consider the following:
* **Check the humidity:** Make sure the humidity levels are high enough.
* **Check the temperature:** Ensure the temperature is within the optimal range (60-70°F).
* **Check for contamination:** Look for signs of mold or other contamination.
* **Try a different growing medium:** Experiment with different growing mediums to see what works best.
* **Be patient:** Sometimes, it just takes time.
Remember, even experienced mushroom growers encounter failures. The key is to learn from your mistakes and keep trying!
Leave a Comment