
Growing Cabbage from Seed might seem daunting, but trust me, it’s incredibly rewarding! Imagine biting into a crisp, homegrown cabbage, knowing you nurtured it from a tiny seed. That’s the magic of home gardening, isn’t it? For centuries, cabbage has been a staple in diets worldwide, from the hearty stews of Eastern Europe to the vibrant slaws of America. Its cultivation dates back to ancient times, with evidence suggesting its presence in the gardens of ancient Greeks and Romans.
But why bother growing cabbage from seed yourself? Well, for starters, you gain complete control over the process, ensuring your cabbage is free from unwanted chemicals. Plus, you have access to a wider variety of cabbage types than you’d typically find at the grocery store. More importantly, it’s a fantastic way to connect with nature, relieve stress, and enjoy the satisfaction of harvesting your own food. In this article, I’ll share my favorite DIY tricks and hacks to make growing cabbage from seed a breeze, even if you’re a complete beginner. Get ready to transform your garden into a cabbage patch paradise!
Growing Cabbage from Seed: A Beginner’s Guide
Okay, so you want to grow your own cabbage from seed? Awesome! It’s surprisingly rewarding, and nothing beats the taste of homegrown veggies. Don’t worry if you’re a newbie; I’m going to walk you through every step, from choosing the right seeds to transplanting your little cabbage babies. Let’s get started!
Choosing Your Cabbage Variety
First things first, let’s talk cabbage types. There are tons of varieties out there, each with its own unique characteristics. Consider your climate, growing season, and personal preferences when making your choice. Here are a few popular options:
* Early Cabbage: These mature quickly (around 60-70 days) and are great for short growing seasons. Examples include ‘Golden Acre’ and ‘Early Jersey Wakefield’.
* Mid-Season Cabbage: These take a bit longer (70-85 days) and offer good yields. ‘Copenhagen Market’ is a reliable choice.
* Late Cabbage: These need the longest growing season (85+ days) and are often used for storage. ‘Danish Ballhead’ is a classic example.
* Savoy Cabbage: These have crinkled leaves and a milder flavor. ‘Savoy Ace’ is a popular variety.
* Red Cabbage: Adds a pop of color to your garden and is great for salads and pickling. ‘Red Acre’ is a good option.
Once you’ve picked your variety, make sure you source your seeds from a reputable supplier. Good quality seeds are crucial for successful germination and healthy plants.
Starting Seeds Indoors (Recommended)
While you *can* direct sow cabbage seeds, I highly recommend starting them indoors, especially if you live in an area with a short growing season. This gives your plants a head start and protects them from early-season pests and diseases.
Here’s what you’ll need:
* Cabbage seeds
* Seed starting trays or small pots
* Seed starting mix (a light, well-draining mix is essential)
* Watering can or spray bottle
* Grow lights (optional, but highly recommended)
* Heat mat (optional, but helpful for germination)
Now, let’s get planting!
1. Prepare Your Seed Starting Trays: Fill your seed starting trays or pots with seed starting mix. Gently tap the trays to settle the mix, but don’t pack it down too tightly.
2. Sow the Seeds: Make a small indentation (about 1/4 inch deep) in the center of each cell or pot. Place 2-3 seeds in each indentation. This increases your chances of at least one seed germinating.
3. Cover the Seeds: Gently cover the seeds with more seed starting mix. Lightly pat the surface.
4. Water Thoroughly: Use a watering can or spray bottle to gently water the soil. You want the soil to be moist, but not soggy.
5. Provide Warmth and Light: Place your seed starting trays on a heat mat (if using) and under grow lights (if using). If you don’t have grow lights, place the trays in a sunny window. Cabbage seeds germinate best at temperatures between 65-75°F (18-24°C).
6. Maintain Moisture: Keep the soil consistently moist by watering as needed. Check the soil daily and water when the top inch feels dry to the touch.
7. Thin Seedlings (If Necessary): Once the seedlings emerge (usually within 5-10 days), thin them to one plant per cell or pot. Choose the strongest, healthiest-looking seedling and snip off the others at the soil line with scissors. Don’t pull them out, as this can disturb the roots of the remaining seedling.
Hardening Off Your Seedlings
Before you transplant your cabbage seedlings outdoors, you need to “harden them off.” This process gradually acclimates them to the outdoor environment, preventing shock and increasing their chances of survival.
Here’s how to do it:
1. Start Slowly: About a week before you plan to transplant, begin taking your seedlings outdoors for a few hours each day. Choose a sheltered spot with partial shade.
2. Gradually Increase Exposure: Each day, gradually increase the amount of time your seedlings spend outdoors, and expose them to more sunlight.
3. Protect from Extreme Weather: If there’s a risk of frost or extreme heat, bring your seedlings back indoors.
4. Water Regularly: Continue to water your seedlings regularly during the hardening-off process.
5. After a week, your seedlings should be ready to handle full sun and outdoor conditions.
Preparing Your Garden Bed
While your seedlings are hardening off, it’s time to prepare your garden bed. Cabbage needs well-drained, fertile soil with a pH between 6.0 and 7.5.
Here’s what you need to do:
1. Choose a Sunny Location: Cabbage needs at least 6 hours of sunlight per day.
2. Clear the Area: Remove any weeds, rocks, or debris from the planting area.
3. Amend the Soil: Amend the soil with compost or well-rotted manure to improve drainage and fertility.
Okay, so you want to grow your own cabbage from seed? Awesome! It’s surprisingly rewarding, and nothing beats the taste of homegrown veggies. Don’t worry if you’re a newbie; I’m going to walk you through every step, from choosing the right seeds to transplanting your little cabbage babies. Let’s get started!
Choosing Your Cabbage Variety
First things first, let’s talk cabbage types. There are tons of varieties out there, each with its own unique characteristics. Consider your climate, growing season, and personal preferences when making your choice. Here are a few popular options:
* Early Cabbage: These mature quickly (around 60-70 days) and are great for short growing seasons. Examples include ‘Golden Acre’ and ‘Early Jersey Wakefield’.
* Mid-Season Cabbage: These take a bit longer (70-85 days) and offer good yields. ‘Copenhagen Market’ is a reliable choice.
* Late Cabbage: These need the longest growing season (85+ days) and are often used for storage. ‘Danish Ballhead’ is a classic example.
* Savoy Cabbage: These have crinkled leaves and a milder flavor. ‘Savoy Ace’ is a popular variety.
* Red Cabbage: Adds a pop of color to your garden and is great for salads and pickling. ‘Red Acre’ is a good option.
Once you’ve picked your variety, make sure you source your seeds from a reputable supplier. Good quality seeds are crucial for successful germination and healthy plants.
Starting Seeds Indoors (Recommended)
While you *can* direct sow cabbage seeds, I highly recommend starting them indoors, especially if you live in an area with a short growing season. This gives your plants a head start and protects them from early-season pests and diseases.
Here’s what you’ll need:
* Cabbage seeds
* Seed starting trays or small pots
* Seed starting mix (a light, well-draining mix is essential)
* Watering can or spray bottle
* Grow lights (optional, but highly recommended)
* Heat mat (optional, but helpful for germination)
Now, let’s get planting!
1. Prepare Your Seed Starting Trays: Fill your seed starting trays or pots with seed starting mix. Gently tap the trays to settle the mix, but don’t pack it down too tightly.
2. Sow the Seeds: Make a small indentation (about 1/4 inch deep) in the center of each cell or pot. Place 2-3 seeds in each indentation. This increases your chances of at least one seed germinating.
3. Cover the Seeds: Gently cover the seeds with more seed starting mix. Lightly pat the surface.
4. Water Thoroughly: Use a watering can or spray bottle to gently water the soil. You want the soil to be moist, but not soggy.
5. Provide Warmth and Light: Place your seed starting trays on a heat mat (if using) and under grow lights (if using). If you don’t have grow lights, place the trays in a sunny window. Cabbage seeds germinate best at temperatures between 65-75°F (18-24°C).
6. Maintain Moisture: Keep the soil consistently moist by watering as needed. Check the soil daily and water when the top inch feels dry to the touch.
7. Thin Seedlings (If Necessary): Once the seedlings emerge (usually within 5-10 days), thin them to one plant per cell or pot. Choose the strongest, healthiest-looking seedling and snip off the others at the soil line with scissors. Don’t pull them out, as this can disturb the roots of the remaining seedling.
Hardening Off Your Seedlings
Before you transplant your cabbage seedlings outdoors, you need to “harden them off.” This process gradually acclimates them to the outdoor environment, preventing shock and increasing their chances of survival.
Here’s how to do it:
1. Start Slowly: About a week before you plan to transplant, begin taking your seedlings outdoors for a few hours each day. Choose a sheltered spot with partial shade.
2. Gradually Increase Exposure: Each day, gradually increase the amount of time your seedlings spend outdoors, and expose them to more sunlight.
3. Protect from Extreme Weather: If there’s a risk of frost or extreme heat, bring your seedlings back indoors.
4. Water Regularly: Continue to water your seedlings regularly during the hardening-off process.
5. After a week, your seedlings should be ready to handle full sun and outdoor conditions.
Preparing Your Garden Bed
While your seedlings are hardening off, it’s time to prepare your garden bed. Cabbage needs well-drained, fertile soil with a pH between 6.0 and 7.5.
Here’s what you need to do:
1. Choose a Sunny Location: Cabbage needs at least 6 hours of sunlight per day.
2. Clear the Area: Remove any weeds, rocks, or debris from the planting area.
3. Amend the Soil: Amend the soil with compost or well-rotted manure to improve drainage and fertility. Work the amendments into the soil to a depth of at least 12 inches.
4. Test the Soil pH: Use a soil testing kit to check the pH of your soil. If the pH is too low (acidic), add lime to raise it. If the pH is too high (alkaline), add sulfur to lower it. Follow the instructions on the soil testing kit and amendment packaging.
5. Create Planting Holes: Dig planting holes that are slightly larger than the root balls of your seedlings. Space the holes 12-24 inches apart, depending on the variety of cabbage you’re growing. Check the seed packet for specific spacing recommendations.
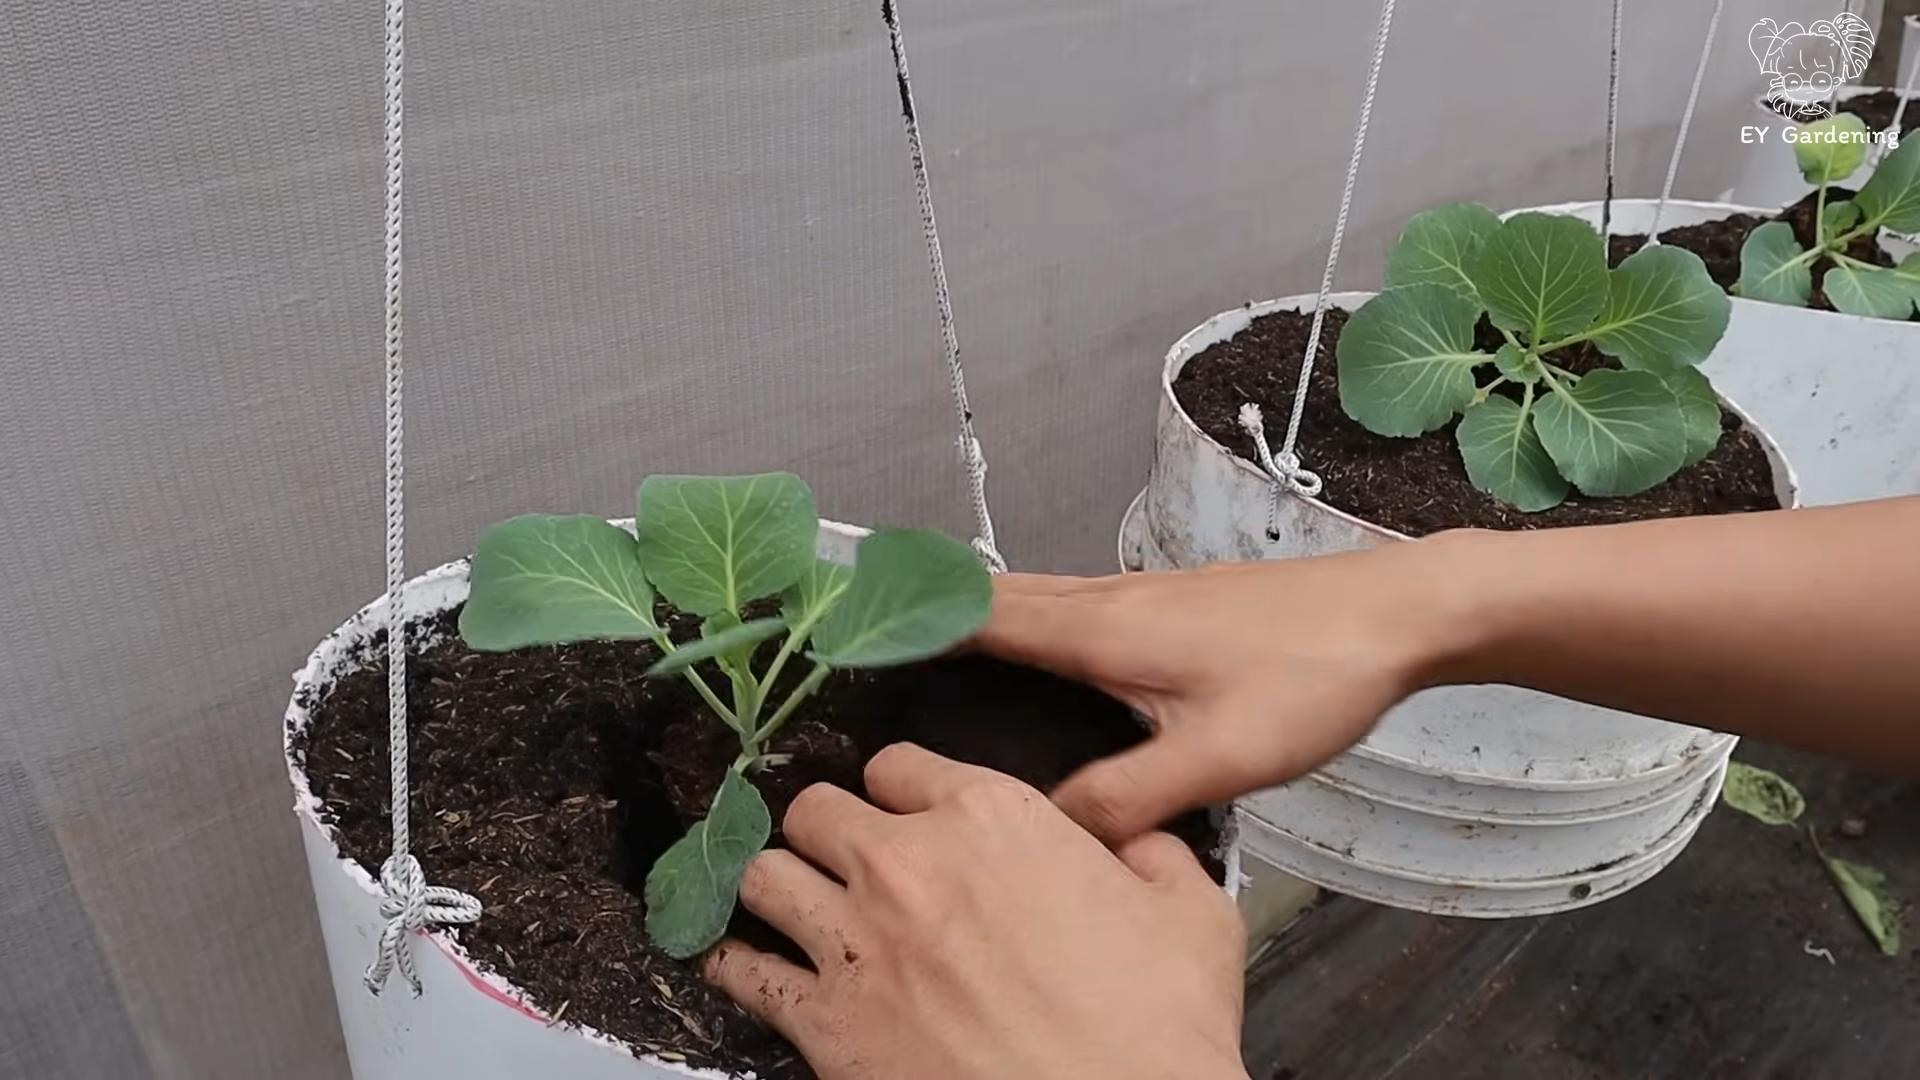
Transplanting Your Cabbage Seedlings
Now for the exciting part – transplanting your cabbage seedlings into the garden!
1. Water the Seedlings: Before transplanting, water your seedlings thoroughly. This will help them handle the transplanting process.
2. Carefully Remove Seedlings: Gently remove the seedlings from their trays or pots. Be careful not to damage the roots. If the roots are tightly bound, gently loosen them with your fingers.
3. Place Seedlings in Holes: Place each seedling in a planting hole, making sure the top of the root ball is level with the surrounding soil.
4. Fill the Holes: Fill the holes with soil, gently firming it around the base of the plants.
5. Water Thoroughly: Water the newly transplanted seedlings thoroughly.
6. Mulch (Optional): Apply a layer of mulch around the plants to help retain moisture, suppress weeds, and regulate soil temperature. Straw, wood chips, or shredded leaves are good options.
Caring for Your Cabbage Plants
Once your cabbage plants are in the ground, it’s important to provide them with proper care to ensure a bountiful harvest.
* Watering: Cabbage needs consistent moisture, especially during head formation. Water deeply and regularly, especially during dry periods. Aim for about 1 inch of water per week.
* Fertilizing: Fertilize your cabbage plants every 2-3 weeks with a balanced fertilizer. Follow the instructions on the fertilizer packaging.
* Weeding: Keep the area around your cabbage plants free of weeds. Weeds compete with cabbage for nutrients and water.
* Pest Control: Cabbage can be susceptible to various pests, including cabbage worms, aphids, and flea beetles. Inspect your plants regularly for signs of pests and take action as needed. You can use organic pest control methods, such as insecticidal soap or neem oil. Row covers can also help protect your plants from pests.
* Disease Control: Cabbage can also be susceptible to diseases, such as black rot and clubroot. Choose disease-resistant varieties and practice good garden hygiene to prevent disease. Remove any infected plants immediately.
Harvesting Your Cabbage
The moment you’ve been waiting for! Knowing when to harvest your cabbage is key to getting the best flavor and texture.
* Check for Firmness: The head should feel firm and solid when you squeeze it gently.
* Consider Size: The head should be the size typical for the variety you’re growing. Check the seed packet for specific size information.
* Look for Cracking: If the head starts to crack, it’s a sign that it’s overripe and should be harvested immediately.
* Harvesting Technique: Use a sharp knife to cut the head from the stem, leaving a few outer leaves attached.
Storing Your Cabbage
If you’re not planning to eat your cabbage right away, you can store it in the refrigerator for several weeks. Wrap the head in plastic wrap or store it in a plastic bag
Conclusion
So, there you have it! Growing cabbage from seed might seem daunting at first, but with a little patience and the right approach, you can cultivate your own crisp, flavorful heads of cabbage right in your backyard. This DIY trick isn’t just about saving money; it’s about connecting with your food, understanding the growing process, and enjoying the unparalleled satisfaction of harvesting something you nurtured from a tiny seed.
Why is this a must-try? Because store-bought cabbage simply can’t compare to the vibrant taste and freshness of homegrown. Plus, you have complete control over the growing conditions, ensuring your cabbage is free from unwanted pesticides and chemicals. Think of the delicious slaws, stir-fries, and hearty soups you can create with your own organically grown cabbage!
But the adventure doesn’t stop there. Feel free to experiment with different varieties of cabbage. Red cabbage adds a beautiful splash of color to salads, while Savoy cabbage offers a milder, more delicate flavor. You can also adjust the planting schedule to stagger your harvests, ensuring a continuous supply of fresh cabbage throughout the growing season. Consider companion planting with herbs like rosemary or thyme to deter pests naturally.
Don’t be afraid to get your hands dirty and embrace the learning process. Even if you encounter a few challenges along the way, the reward of harvesting your own cabbage is well worth the effort. Remember to document your progress, take pictures, and share your experiences with fellow gardeners.
We encourage you to try this DIY trick and discover the joy of growing your own cabbage from seed. It’s a rewarding experience that will not only enhance your culinary creations but also deepen your appreciation for the natural world. So, grab your seeds, prepare your soil, and get ready to embark on a cabbage-growing adventure! We are confident that you will find that growing cabbage from seed is not only possible but also incredibly rewarding.
Now, go forth and grow some amazing cabbage! And don’t forget to share your successes (and even your challenges!) in the comments below. We’d love to hear about your experience and learn from your insights. Happy gardening!
Frequently Asked Questions (FAQ)
Q: What is the best time to start cabbage seeds indoors?
A: The ideal time to start cabbage seeds indoors is typically 4-6 weeks before the last expected frost in your area. This allows the seedlings to develop a strong root system before being transplanted outdoors. Check your local frost dates to determine the appropriate timing for your region. Starting too early can result in leggy, weak seedlings, while starting too late may shorten your growing season.
Q: What type of soil is best for growing cabbage from seed?
A: Cabbage thrives in well-drained, fertile soil that is rich in organic matter. A slightly acidic to neutral pH (around 6.0 to 7.0) is ideal. Before planting, amend your soil with compost or well-rotted manure to improve drainage, fertility, and water retention. Avoid heavy clay soils, as they can become waterlogged and hinder root development. If you have clay soil, consider adding sand and organic matter to improve its structure.
Q: How often should I water my cabbage seedlings?
A: Cabbage seedlings need consistent moisture to thrive. Water them regularly, especially during dry periods, to keep the soil consistently moist but not waterlogged. Check the soil moisture level daily by sticking your finger about an inch into the soil. If it feels dry, it’s time to water. Avoid overhead watering, as it can promote fungal diseases. Instead, water at the base of the plants.
Q: What are some common pests and diseases that affect cabbage?
A: Cabbage is susceptible to several pests and diseases, including cabbage worms, cabbage loopers, aphids, flea beetles, and clubroot. To prevent pest infestations, consider using row covers to protect your plants. Regularly inspect your plants for signs of pests and diseases, and take action promptly if you notice any problems. Organic pest control methods, such as insecticidal soap or Bacillus thuringiensis (Bt), can be effective against many common pests. For clubroot, ensure proper soil drainage and pH, and consider crop rotation.
Q: How do I harden off my cabbage seedlings before transplanting them outdoors?
A: Hardening off is the process of gradually acclimating your seedlings to outdoor conditions before transplanting them. This helps them adjust to the sun, wind, and temperature fluctuations, reducing transplant shock. About a week before transplanting, start by placing your seedlings outdoors in a sheltered location for a few hours each day, gradually increasing the amount of time they spend outdoors. Protect them from direct sunlight and strong winds initially.
Q: When is the best time to transplant my cabbage seedlings outdoors?
A: Transplant your cabbage seedlings outdoors when they are about 4-6 inches tall and have developed several true leaves. Choose a cloudy day or late afternoon to minimize transplant shock. Space the seedlings about 12-18 inches apart in rows that are 2-3 feet apart. Water them thoroughly after transplanting.
Q: How long does it take for cabbage to mature from seed?
A: The time it takes for cabbage to mature from seed varies depending on the variety and growing conditions. Generally, it takes about 60-100 days from seed to harvest. Check the seed packet for specific information on the maturity time for your chosen variety.
Q: How do I know when my cabbage is ready to harvest?
A: Cabbage is ready to harvest when the head is firm and solid to the touch. The size of the head will vary depending on the variety. Check the seed packet for information on the expected head size. To harvest, cut the head from the stem with a sharp knife.
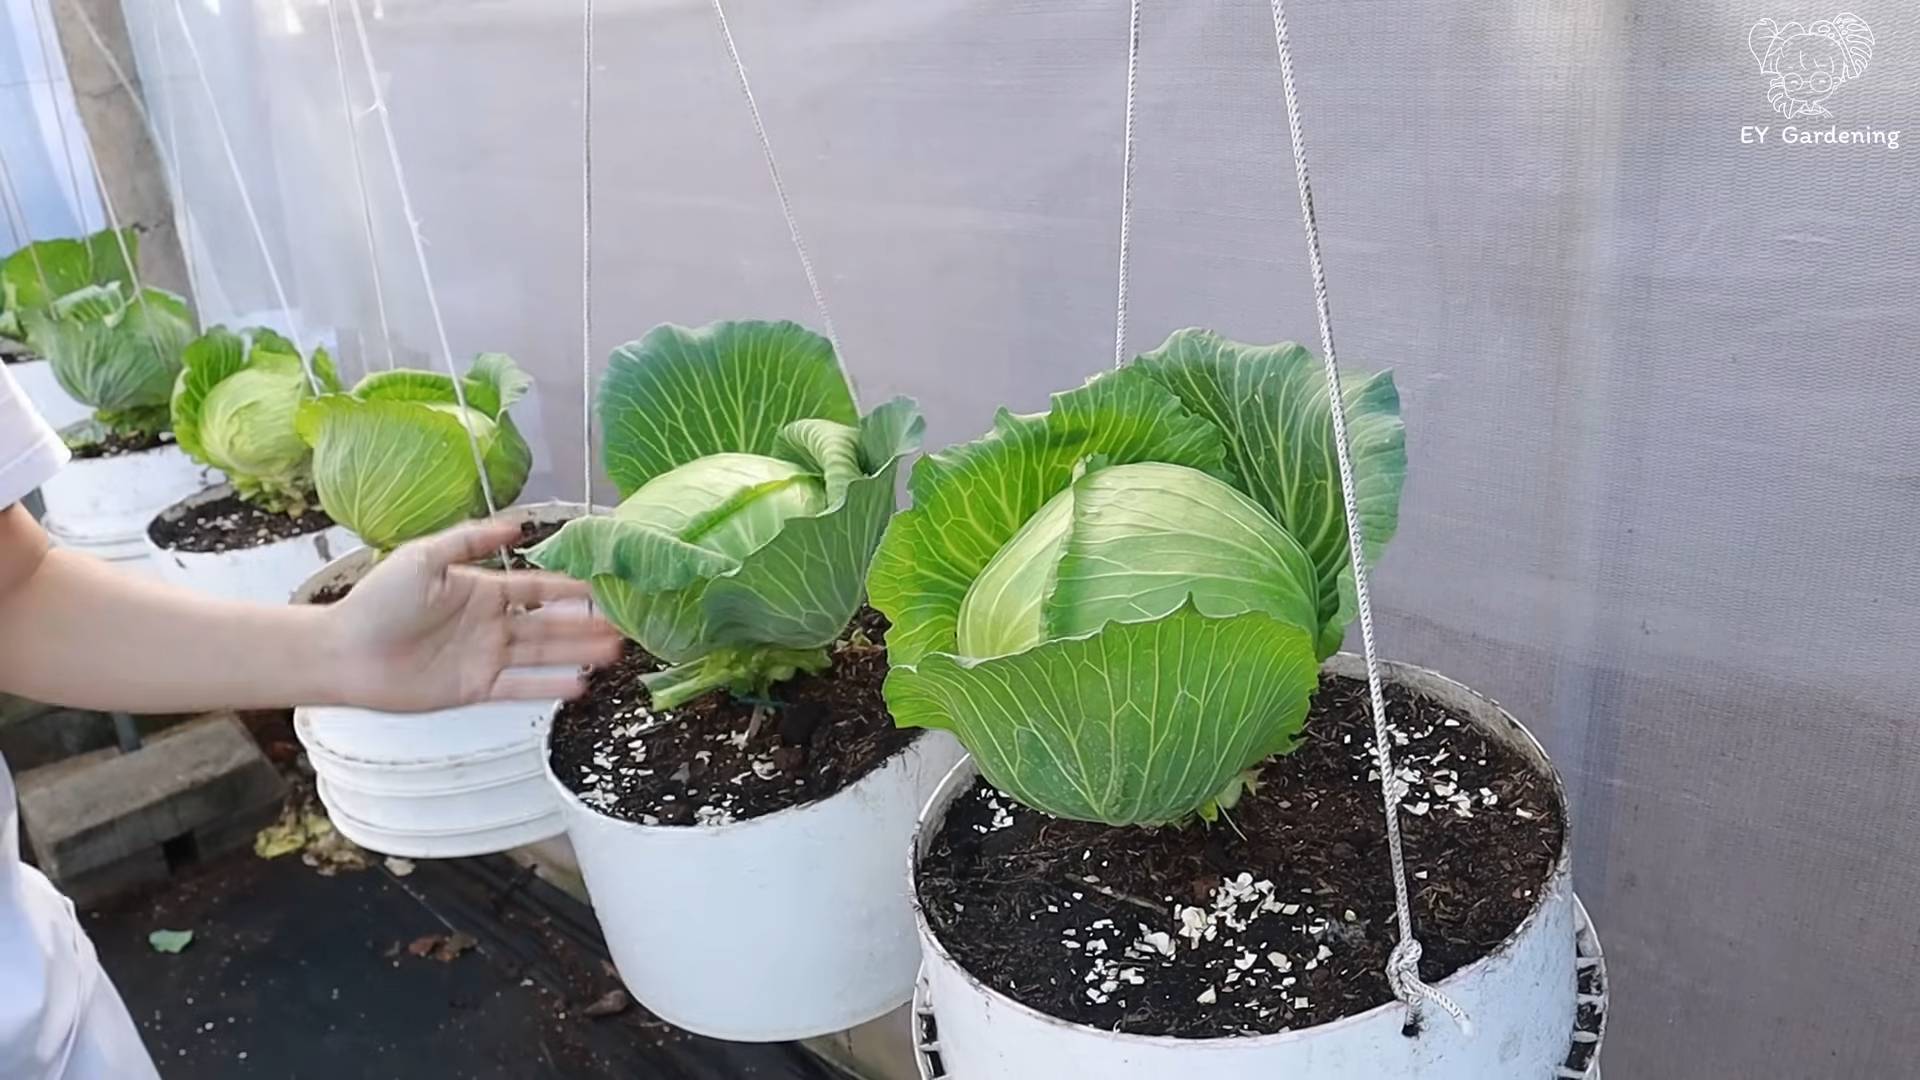
Q: Can I grow cabbage in containers?
A: Yes, you can grow cabbage in containers, but you’ll need to choose a large container (at least 12 inches in diameter) to accommodate the plant’s root system. Use a well-draining potting mix and provide regular watering and fertilization. Container-grown cabbage may require more frequent watering than cabbage grown in the ground.
Q: What are some good companion plants for cabbage?
A: Companion planting can help deter pests, attract beneficial insects, and improve the overall health of your cabbage plants. Some good companion plants for cabbage include:
* **Aromatic herbs:** Rosemary, thyme, sage, and dill can help repel cabbage moths and other pests.
* **Marigolds:** Marigolds are known for their pest-repelling properties.
* **Nasturtiums:** Nasturtiums attract aphids, which can help keep them away from your cabbage plants.
* **Legumes:** Beans and peas can help fix nitrogen in the soil, which is beneficial for cabbage growth.
* **Onions and garlic:** These plants can help deter cabbage root flies.
Q: How can I prevent my cabbage from splitting?
A: Cabbage heads can sometimes split open, especially after heavy rainfall. This is usually caused by rapid growth. To prevent splitting, ensure consistent watering and avoid over-fertilizing. If heavy rain is expected, consider harvesting your cabbage heads early.
Q: Can I save seeds from my homegrown cabbage?
A: Saving seeds from cabbage can be challenging, as cabbage is a biennial plant, meaning it typically takes two years to produce seeds. In the first year, the plant produces a head of cabbage. In the second year, it flowers and produces seeds. To save seeds, you’ll need to overwinter the cabbage plant and allow it to flower in the spring. However, cabbage is also cross-pollinated, so the seeds you save may not be true to type.


Leave a Comment