
Growing celery along a fence might sound like an unusual gardening hack, but trust me, it’s a game-changer! Are you tired of your precious celery stalks sprawling all over your garden bed, taking up valuable space? Or perhaps you’re looking for a clever way to maximize your yield in a small urban garden? Well, you’ve come to the right place!
Celery, with its crisp, refreshing crunch, has been enjoyed for centuries. Originating in the Mediterranean, it was initially valued for its medicinal properties before becoming a culinary staple. From ancient Roman feasts to modern-day salads, celery has a rich history. But let’s be honest, growing it can be a bit tricky. It needs consistent moisture, fertile soil, and protection from harsh weather. That’s where our DIY fence-growing trick comes in!
This article will show you how to utilize your existing fence line to create a supportive and sheltered environment for your celery plants. Not only will this method save space and improve air circulation, reducing the risk of disease, but it will also add a touch of vertical greenery to your garden. I’m excited to share this simple yet effective technique that will help you achieve a bountiful celery harvest, even if you’re short on space. So, let’s get started and discover the secrets to successfully growing celery along a fence!
Sellerie am Zaun ziehen: Ein DIY-Leitfaden für den vertikalen Garten
Hallo liebe Gartenfreunde! Habt ihr auch das Problem, dass euer Garten nicht unendlich groß ist, ihr aber trotzdem gerne frisches Gemüse anbauen möchtet? Dann habe ich heute genau das Richtige für euch: Sellerie am Zaun ziehen! Ja, ihr habt richtig gehört. Wir nutzen die Vertikale, um Platz zu sparen und gleichzeitig einen dekorativen Hingucker zu schaffen. Sellerie ist nicht nur super gesund, sondern auch unglaublich vielseitig in der Küche. Und das Beste daran: Es ist gar nicht so schwer, wie man vielleicht denkt. Lasst uns loslegen!
Warum Sellerie am Zaun ziehen?
Bevor wir ins Detail gehen, kurz die Vorteile dieser Methode:
* Platzsparend: Perfekt für kleine Gärten, Balkone oder Terrassen.
* Dekorativ: Ein grüner Zaun ist ein echter Blickfang.
* Schädlingsbekämpfung: Durch die erhöhte Position sind die Pflanzen weniger anfällig für Schnecken und andere Schädlinge.
* Erleichterte Ernte: Kein Bücken mehr!
* Bessere Belüftung: Die Pflanzen trocknen schneller ab, was das Risiko von Pilzkrankheiten reduziert.
Was ihr für euer Sellerie-Zaun-Projekt benötigt
Hier ist eine Liste aller Materialien und Werkzeuge, die ihr für dieses Projekt benötigt:
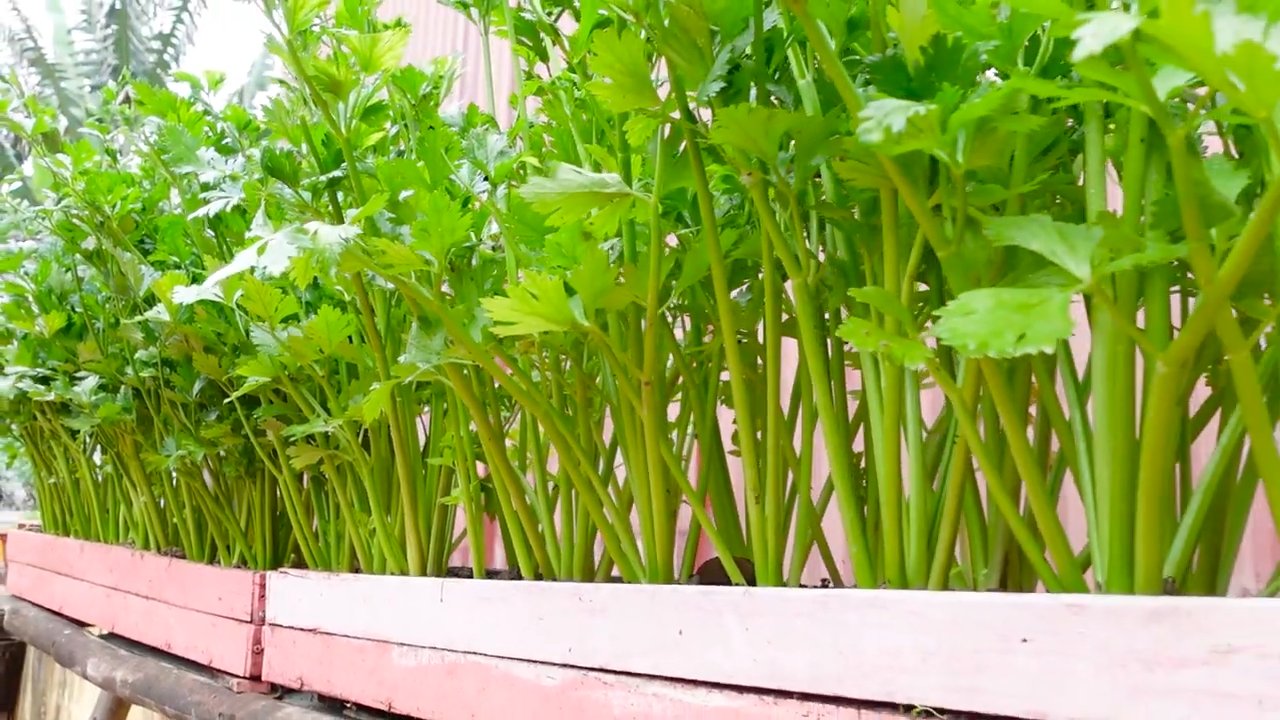
* Selleriesetzlinge: Am besten im Fachhandel kaufen, um gesunde Pflanzen zu gewährleisten. Achtet auf robuste Setzlinge mit kräftigen Blättern.
* Pflanzgefäße: Hängekörbe, Pflanztaschen oder recycelte Plastikflaschen (mit Löchern für den Wasserabfluss) eignen sich hervorragend. Die Größe sollte ausreichend sein, um den Selleriepflanzen genügend Platz für die Wurzeln zu bieten.
* Pflanzerde: Eine hochwertige Gemüseerde ist ideal. Sie sollte locker, nährstoffreich und gut wasserdurchlässig sein.
* Zaun: Ein Maschendrahtzaun, Holzzaun oder eine andere stabile Struktur.
* Befestigungsmaterial: Kabelbinder, Haken oder Draht, um die Pflanzgefäße am Zaun zu befestigen.
* Gießkanne oder Gartenschlauch: Für die regelmäßige Bewässerung.
* Gartenschere: Zum Entfernen von welken Blättern.
* Dünger: Ein organischer Gemüsedünger, um die Pflanzen mit ausreichend Nährstoffen zu versorgen.
* Optional: Mulch (z.B. Stroh oder Holzhackschnitzel), um die Feuchtigkeit im Boden zu halten und Unkraut zu unterdrücken.
Schritt-für-Schritt-Anleitung: Sellerie am Zaun pflanzen
Jetzt geht es ans Eingemachte! Folgt diesen Schritten, um euren eigenen Sellerie-Zaun zu gestalten:
1. Vorbereitung des Zauns
* Reinigung: Entfernt zunächst alle Verschmutzungen, Algen oder Moos vom Zaun. Eine saubere Oberfläche sorgt für eine bessere Haftung der Befestigungsmaterialien.
* Stabilität prüfen: Stellt sicher, dass der Zaun stabil genug ist, um das Gewicht der Pflanzgefäße und der Erde zu tragen. Verstärkt ihn gegebenenfalls mit zusätzlichen Pfosten oder Streben.
* Anordnung planen: Überlegt euch, wie ihr die Pflanzgefäße am Zaun anordnen möchtet. Markiert die Stellen, an denen ihr sie befestigen wollt, um ein gleichmäßiges und ästhetisches Bild zu erhalten.
2. Vorbereitung der Pflanzgefäße
* Abflusslöcher: Wenn ihr recycelte Plastikflaschen oder andere Behälter verwendet, bohrt unbedingt Abflusslöcher in den Boden, damit überschüssiges Wasser ablaufen kann und Staunässe vermieden wird.
* Befestigung vorbereiten: Bringt an den Pflanzgefäßen Befestigungspunkte an, z.B. Ösen oder Schlaufen, durch die ihr später die Kabelbinder oder Haken ziehen könnt.
* Erde einfüllen: Füllt die Pflanzgefäße mit der Gemüseerde. Lasst dabei etwa 2-3 cm Platz bis zum Rand, damit das Wasser beim Gießen nicht überläuft.
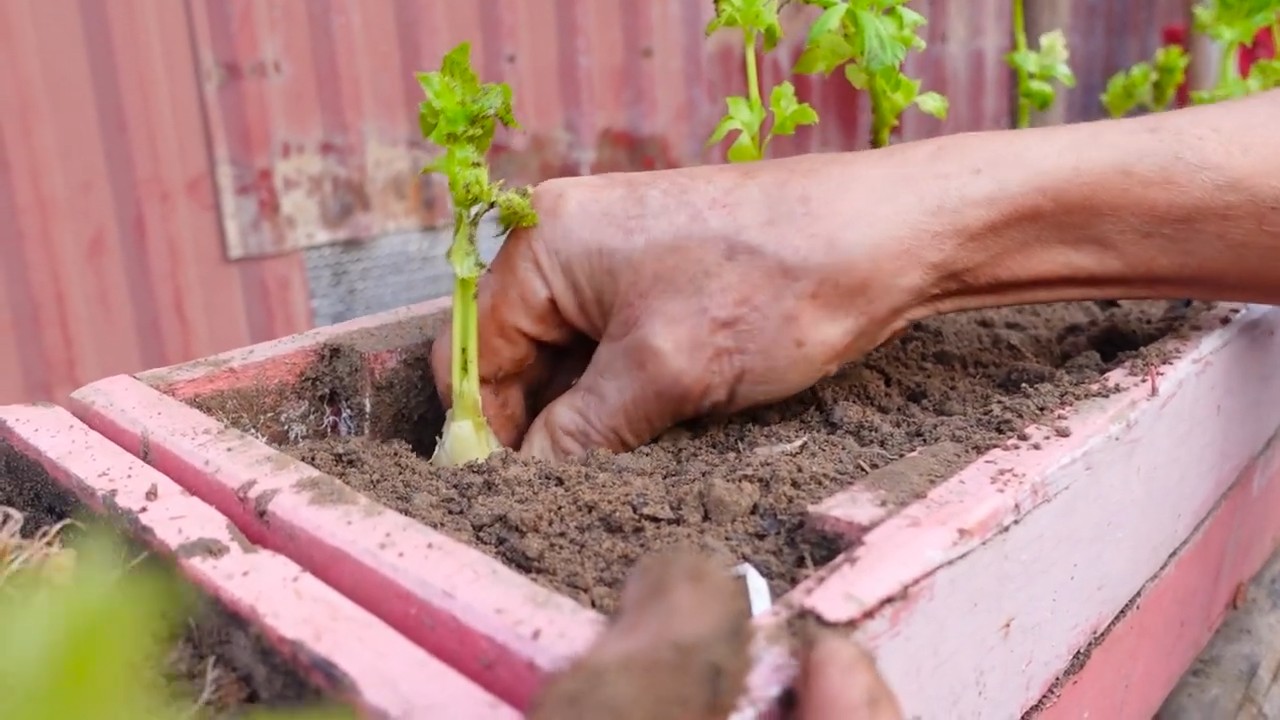
3. Einpflanzen der Selleriesetzlinge
* Setzlinge vorbereiten: Nehmt die Selleriesetzlinge vorsichtig aus ihren Töpfen. Lockert die Wurzeln etwas auf, damit sie sich besser in der neuen Erde ausbreiten können.
* Pflanzlöcher graben: Grabt in jedem Pflanzgefäß ein kleines Loch, das groß genug ist, um die Wurzeln des Setzlings aufzunehmen.
* Einsetzen: Setzt die Setzlinge in die Löcher und füllt sie mit Erde auf. Drückt die Erde leicht an, damit die Pflanzen stabil stehen.
* Angießen: Gießt die Setzlinge gründlich an, damit die Erde sich setzt und die Wurzeln gut mit Wasser versorgt werden.
4. Befestigung am Zaun
* Pflanzgefäße aufhängen: Befestigt die Pflanzgefäße mit den Kabelbindern, Haken oder dem Draht am Zaun. Achtet darauf, dass sie sicher und stabil hängen.
* Abstand beachten: Lasst zwischen den Pflanzgefäßen genügend Platz, damit die Selleriepflanzen ausreichend Licht und Luft bekommen.
* Ausrichtung: Richtet die Pflanzgefäße so aus, dass die Pflanzen optimal von der Sonne profitieren.
5. Pflege des Sellerie-Zauns
* Bewässerung: Sellerie benötigt regelmäßig Wasser, besonders während der Wachstumsphase. Gießt die Pflanzen am besten morgens oder abends, um Verdunstung zu vermeiden. Die Erde sollte immer leicht feucht sein, aber nicht nass.
* Düngung: Düngt die Selleriepflanzen alle 2-3 Wochen mit einem organischen Gemüsedünger. Beachtet dabei die Anweisungen auf der Verpackung.
* Unkraut entfernen: Entfernt regelmäßig Unkraut aus den Pflanzgefäßen, damit die Selleriepflanzen nicht um Nährstoffe und Wasser konkurrieren müssen.
* Schädlingskontrolle: Kontrolliert die Pflanzen regelmäßig auf Schädlinge wie Blattläuse oder Schnecken. Bei Bedarf könnt ihr natürliche Schädlingsbekämpfungsmittel einsetzen.
* Welke Blätter entfernen: Entfernt regelmäßig welke oder gelbe Blätter, um die Gesundheit der Pflanzen zu fördern und Pilzkrankheiten vorzubeugen.
* Mulchen: Eine Mulchschicht aus Stroh oder Holzhackschnitzeln hilft, die Feuchtigkeit im Boden zu halten und Unkraut zu unterdrücken.
Zusätzliche Tipps für den erfolgreichen Sellerie-Anbau
* Standort: Sellerie bevorzugt einen sonnigen bis halbschattigen Standort.
* Boden: Der Boden sollte locker, nährstoffreich und gut wasserdurchlässig sein.
* Nachbarn: Gute Nachbarn für Sellerie sind Tomaten, Kohl und Zwiebeln.
* Ernte: Die Erntezeit beginnt in der Regel etwa 3-4 Monate nach dem Pflanzen. Ihr könnt die äußeren Stängel nach Bedarf ernten, während die inneren Stängel weiterwachsen.
* Überwinterung: Sellerie ist nicht winterhart. In kälteren Regionen müsst ihr die Pflanzen entweder ins Haus holen oder sie als einjährige Pflanze behandeln.
Häufige Probleme und Lösungen
* Gelbe Blätter: Können auf Nährstoffmangel, Überwässerung oder Schädlingsbefall hindeuten. Überprüft die Bewässerung, düngt die Pflanzen und kontrolliert sie auf Schädlinge.
* Schneckenbefall: Schnecken lieben Sellerie! Sammelt sie regelmäßig ab oder verwendet natürliche Schneckenabwehrmittel wie Kaffeesatz oder Schneckenzäune.
* Pilzkrankheiten: Eine gute Belüftung und das Entfernen von welken Blättern helfen, Pilzkrankheiten vorzubeugen. Bei Bedarf könnt ihr ein Fungizid einsetzen.
* Blattläuse: Blattläuse können mit einem Wasserstrahl abgespült oder mit einem natürlichen Insektizid bekämpft werden.
Sellerie ernten und verwenden
Die Ernte ist der Lohn für eure Mühe! Ihr könnt die äußeren Stängel des Selleries nach Bedarf er
Conclusion
So, there you have it! Growing celery along your fence isn’t just a quirky gardening experiment; it’s a practical, space-saving, and visually appealing way to cultivate this crisp and refreshing vegetable. We’ve explored the numerous benefits, from maximizing your garden’s footprint to creating a natural barrier against pests and even adding a touch of verdant beauty to your property.
But why is this DIY trick a must-try? Simply put, it’s about efficiency and resourcefulness. In a world where space is often at a premium, especially in urban and suburban settings, utilizing vertical space like your fence line is a game-changer. It allows you to grow more food in less area, making self-sufficiency more attainable. Beyond space, growing celery along a fence offers a unique microclimate. The fence provides partial shade during the hottest parts of the day, which celery appreciates, and can also offer protection from strong winds that might otherwise damage the stalks.
Furthermore, this method encourages healthier plants. By elevating the celery off the ground, you reduce the risk of soilborne diseases and pests. The improved air circulation around the plants also helps to prevent fungal issues. And let’s not forget the aesthetic appeal! A row of lush green celery plants cascading along your fence is far more attractive than a bare or neglected boundary.
Now, let’s talk about variations and suggestions. While we’ve focused on the basic method, there’s plenty of room for customization. Consider using different types of supports along your fence, such as repurposed pallets or trellises, to create a more structured growing environment. You can also experiment with companion planting. Marigolds, for example, are known to deter pests and can be planted alongside your celery. Another variation is to try different celery varieties. ‘Utah Tall’ is a classic choice, but you might also explore ‘Golden Self-Blanching’ for a milder flavor or ‘Redventure’ for a colorful twist.
Don’t be afraid to get creative with your watering system. A simple drip irrigation system along the fence line can ensure that your celery receives consistent moisture without overwatering. You can even collect rainwater to further reduce your environmental impact.
Ultimately, the success of growing celery along your fence depends on your willingness to experiment and adapt. Pay attention to your local climate, soil conditions, and the specific needs of your celery plants. Observe how they respond to different watering schedules, sunlight exposure, and nutrient levels.
We wholeheartedly encourage you to give this DIY trick a try. It’s a rewarding experience that combines gardening, sustainability, and a touch of ingenuity. And most importantly, don’t forget to share your experiences! We’d love to hear about your successes, challenges, and any unique variations you’ve discovered. Post photos of your celery fence on social media using #CeleryFence or tag us in your posts. Let’s build a community of gardeners who are passionate about maximizing their space and growing their own fresh, delicious celery. This method of **growing celery** is sure to be a hit!
Frequently Asked Questions (FAQ)
1. What type of fence is best for growing celery along?
The ideal fence for growing celery is one that provides adequate support and allows for good air circulation. A chain-link fence, wooden fence with gaps, or even a sturdy wire mesh fence can work well. The key is to ensure that the celery plants have something to lean against as they grow taller. Avoid solid fences that block airflow, as this can increase the risk of fungal diseases. Also, consider the height of the fence. A fence that is at least 3-4 feet tall will provide sufficient support for most celery varieties. If you have a shorter fence, you may need to provide additional support, such as stakes or trellises.
2. What kind of soil is best for growing celery along a fence?
Celery thrives in rich, well-draining soil that is high in organic matter. Before planting, amend the soil along your fence line with compost, aged manure, or other organic materials. This will improve the soil’s fertility, drainage, and water-holding capacity. Celery prefers a slightly acidic to neutral soil pH, ideally between 6.0 and 7.0. You can test your soil pH using a home testing kit or by sending a sample to your local agricultural extension office. If your soil is too acidic, you can add lime to raise the pH. If it’s too alkaline, you can add sulfur to lower the pH.
3. How much sunlight does celery need when grown along a fence?
Celery needs at least 6 hours of sunlight per day to thrive. However, it also benefits from some afternoon shade, especially in hot climates. When planting celery along a fence, consider the orientation of the fence and the amount of sunlight it receives throughout the day. An east-facing fence is often ideal, as it provides morning sun and afternoon shade. A south-facing fence can also work well, but you may need to provide additional shade during the hottest part of the day. A north-facing fence may not receive enough sunlight, especially in areas with short growing seasons.
4. How often should I water celery grown along a fence?
Celery needs consistent moisture to grow well. Water your celery plants deeply and regularly, especially during hot, dry weather. Aim to keep the soil consistently moist but not waterlogged. A good rule of thumb is to water when the top inch of soil feels dry to the touch. You can also use a moisture meter to check the soil moisture levels. Consider using a drip irrigation system or soaker hose to deliver water directly to the roots of the plants. This will help to conserve water and reduce the risk of fungal diseases.
5. What are some common pests and diseases that affect celery, and how can I prevent them?
Celery is susceptible to several pests and diseases, including aphids, celery leaf miners, and fungal diseases like early blight and late blight. To prevent pest and disease problems, start with healthy seedlings, provide good air circulation, and avoid overwatering. Inspect your plants regularly for signs of pests or diseases. If you spot any problems, take action immediately. You can use insecticidal soap or neem oil to control aphids and leaf miners. For fungal diseases, use a copper-based fungicide or other appropriate treatment. Companion planting with marigolds or other pest-repelling plants can also help to keep pests away.
6. Can I grow celery along a fence in containers?
Yes, you can grow celery along a fence in containers. Choose large containers that are at least 12 inches deep and wide. Fill the containers with a high-quality potting mix that is rich in organic matter. Be sure to provide adequate support for the celery plants, such as stakes or trellises. Water the containers regularly, as they tend to dry out more quickly than soil in the ground. Fertilize the plants every few weeks with a balanced fertilizer.
7. How long does it take for celery to mature when grown along a fence?
Celery typically takes 100-130 days to mature from seed. However, you can start harvesting the outer stalks when they are large enough to use, even if the entire plant is not fully mature. The exact time to maturity will depend on the variety of celery, the growing conditions, and your local climate.
8. What are some good companion plants for celery grown along a fence?
Good companion plants for celery include onions, garlic, leeks, tomatoes, marigolds, and nasturtiums. Onions, garlic, and leeks help to deter pests, while tomatoes provide shade and support. Marigolds and nasturtiums also repel pests and attract beneficial insects.
9. How do I blanch celery grown along a fence?
Blanching celery is the process of excluding light from the stalks to make them more tender and less bitter. You can blanch celery by wrapping the stalks with newspaper, cardboard, or cloth for a few weeks before harvesting. Be sure to leave the tops of the plants exposed to sunlight. Alternatively, you can mound soil around the base of the plants to blanch the stalks. Some celery varieties are self-blanching, meaning they don’t require any special treatment to become tender and mild.
10. Can I save seeds from celery grown along a fence?
Saving seeds from celery can be challenging, as celery is a biennial plant, meaning it takes two years to produce seeds. In the first year, the plant grows vegetatively, and in the second year, it flowers and produces seeds. To save seeds, you need to overwinter the plants and allow them to flower in the second year. However, celery is also prone to cross-pollination, so the seeds may not be true to type. For best results, purchase seeds from a reputable source.

Leave a Comment