
Grow Cauliflower Backyard: Your Guide to a Bountiful Harvest
Growing cauliflower in your backyard might seem daunting, but I’m here to tell you it’s easier than you think! This article is packed with simple Grow Cauliflower Backyard tricks and DIY solutions that will transform your gardening experience. Forget expensive, underwhelming supermarket cauliflowers; I’ll show you how to cultivate your own delicious, homegrown heads, bursting with flavor.
For centuries, cauliflower has held a place of honor in gardens across the globe. From ancient Roman times, where it was considered a delicacy, to its modern-day popularity, this versatile vegetable has captivated cooks and gardeners alike. Its creamy texture and subtle flavor make it a staple in countless cuisines, and nothing beats the satisfaction of harvesting your own perfectly formed head.
Why Grow Your Own Cauliflower?
There are so many reasons to try your hand at Grow Cauliflower Backyard gardening! Firstly, homegrown cauliflower tastes infinitely better than anything you’ll find in the store. It’s fresher, more flavorful, and free from pesticides and preservatives. Secondly, it’s incredibly rewarding. Watching a tiny seedling grow into a magnificent head of cauliflower is a truly satisfying experience. Finally, it’s a cost-effective way to enjoy this delicious vegetable throughout the growing season.
So, whether you’re a seasoned gardener or a complete beginner, get ready to embark on this exciting journey. This article is your comprehensive guide, filled with practical tips, clever DIY solutions, and everything you need to know to successfully grow your own cauliflower. Let’s get started!
Growing Cauliflower in Your Backyard: A Step-by-Step Guide
Cauliflower, with its beautiful white heads, is a rewarding vegetable to grow at home. It might seem intimidating, but with a little patience and these instructions, you’ll be harvesting your own delicious cauliflower in no time!
Planning and Preparation
- Choose the right time: Cauliflower thrives in cool weather. The best time to plant is in early spring or late summer/early fall, depending on your climate. Check your local frost dates – you want to avoid planting too early and risking frost damage, or too late and risking hot weather that can cause the heads to bolt (go to seed).
- Select a sunny spot: Cauliflower needs at least six hours of sunlight per day. Find a location in your garden that receives ample sun.
- Prepare the soil: Cauliflower needs well-drained, fertile soil. Amend heavy clay soil with compost or other organic matter to improve drainage and aeration. Test your soil’s pH; cauliflower prefers slightly acidic soil with a pH between 6.0 and 6.8. You can adjust the pH using lime (to raise it) or sulfur (to lower it).
- Choose your cauliflower variety: There are many cauliflower varieties available, each with different characteristics like head size, color, and maturity time. Choose a variety that suits your climate and growing season. Consider early, mid-season, or late-season varieties depending on your planting time.
- Gather your supplies: You’ll need cauliflower seeds or seedlings, garden trowel, watering can, fertilizer (optional, but recommended), mulch (straw or wood chips), and possibly row covers (to protect against pests and frost).
Planting Your Cauliflower
- Starting from seed (indoors): If starting from seed, sow seeds indoors 6-8 weeks before the last expected frost. Use seed starting mix and plant seeds about ¼ inch deep. Keep the soil moist and warm (around 70°F). Once seedlings have a few true leaves, transplant them outdoors.
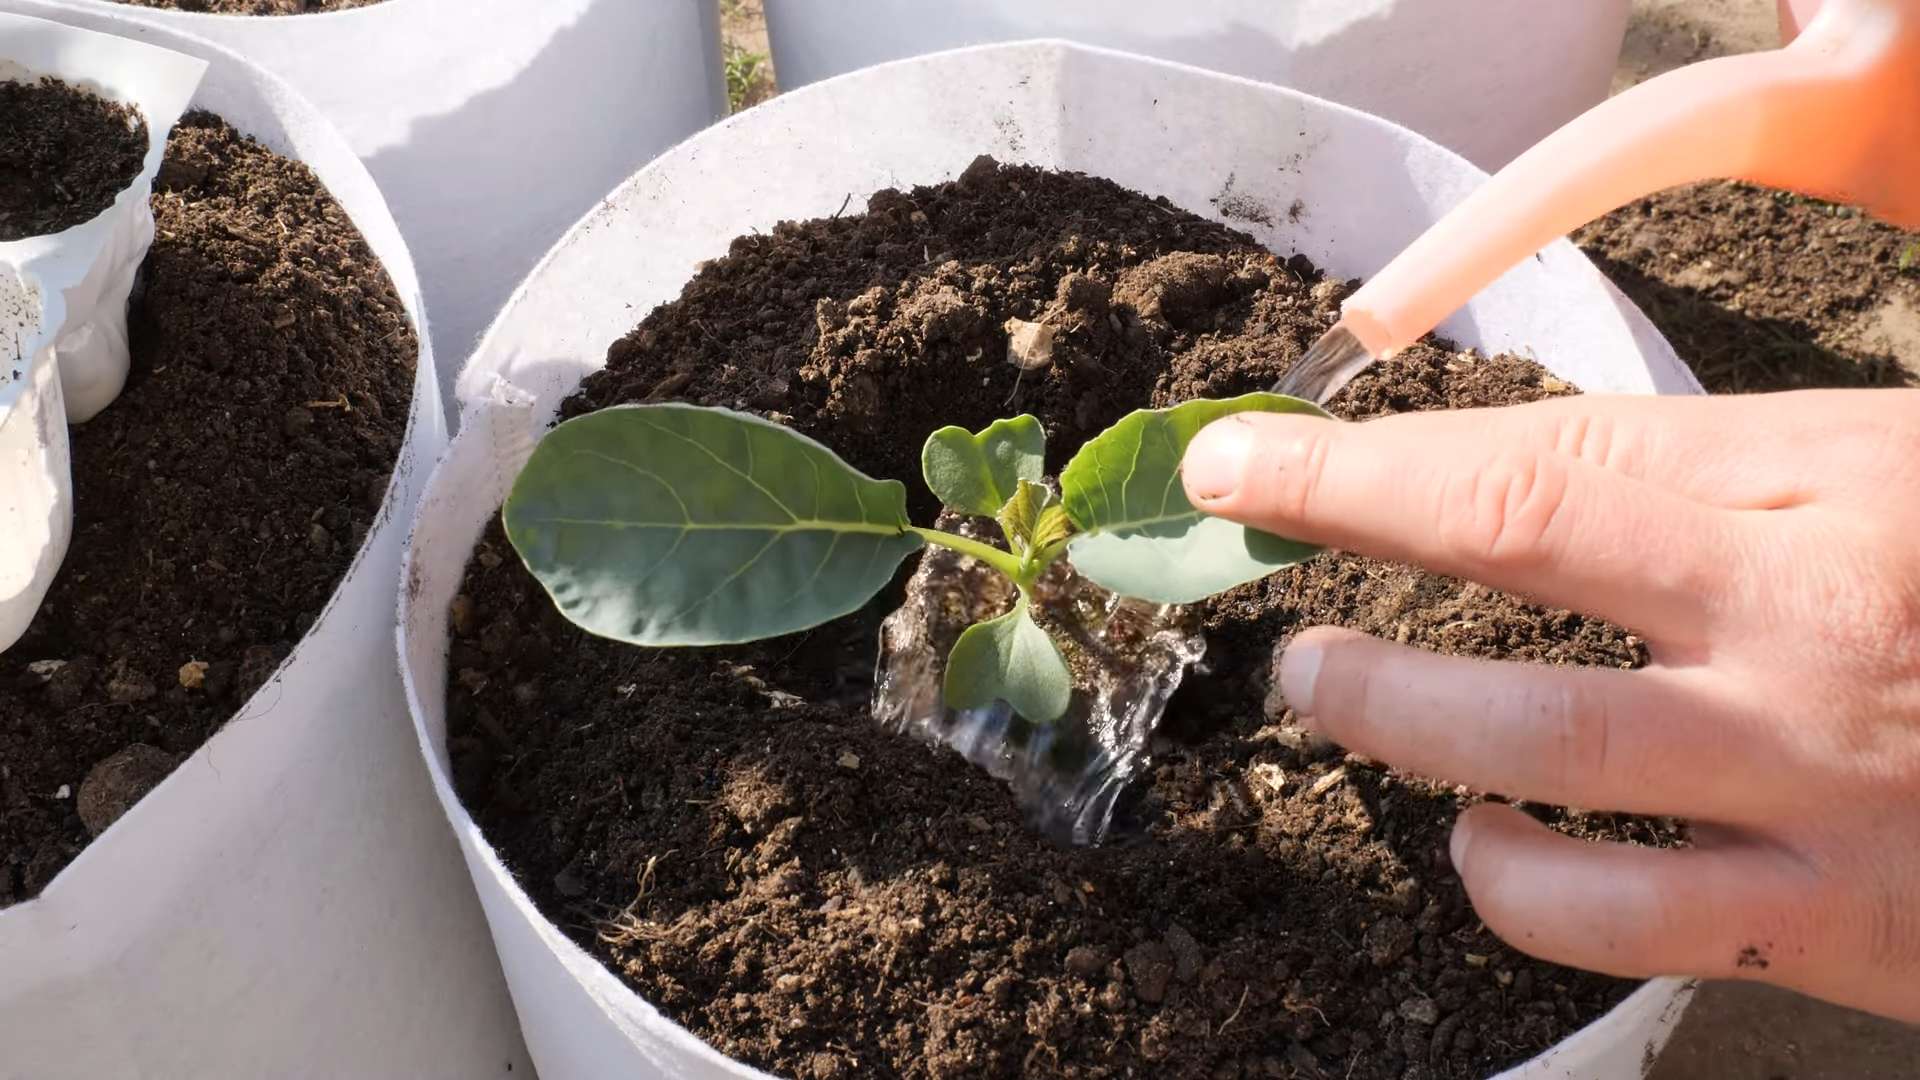
- Starting from seedlings (outdoors): If buying seedlings, choose healthy plants with strong stems and dark green leaves. Space seedlings 18-24 inches apart, depending on the variety. Dig holes slightly larger than the root ball.
- Planting: Gently remove the seedlings from their containers, being careful not to damage the roots. Place them in the prepared holes, ensuring the top of the root ball is level with the soil surface. Fill in the holes with soil and gently firm the soil around the base of the plants.
- Watering: Water thoroughly after planting to help the seedlings settle in. Keep the soil consistently moist, but not waterlogged, throughout the growing season.
Caring for Your Cauliflower
- Watering: Consistent watering is crucial, especially during dry periods. Aim for about 1 inch of water per week, either through rainfall or supplemental watering. Water deeply and less frequently rather than shallowly and often to encourage deep root growth.
- Fertilizing: A balanced fertilizer can help promote healthy growth. Apply a slow-release fertilizer at planting time or use a liquid fertilizer every few weeks, following the product instructions. Avoid over-fertilizing, which can lead to excessive leaf growth at the expense of head development.
- Weed control: Regularly weed around your cauliflower plants to prevent competition for water and nutrients. Mulching helps suppress weeds and retain soil moisture.
- Pest and disease control: Monitor your plants regularly for pests like aphids, cabbage worms, and slugs. Use appropriate pest control methods, such as handpicking pests, insecticidal soap, or diatomaceous earth. Be vigilant for diseases like black rot and clubroot. Good sanitation practices, crop rotation, and disease-resistant varieties can help prevent diseases.
- Choose the right time: Cauliflower thrives in cool weather. The best time to plant is in early spring or late summer/early fall, depending on your climate. Check your local frost dates – you want to avoid planting too early and risking frost damage, or too late and risking hot weather that can cause the heads to bolt (go to seed).
- Select a sunny spot: Cauliflower needs at least six hours of sunlight per day. Find a location in your garden that receives ample sun.
- Prepare the soil: Cauliflower needs well-drained, fertile soil. Amend heavy clay soil with compost or other organic matter to improve drainage and aeration. Test your soil’s pH; cauliflower prefers slightly acidic soil with a pH between 6.0 and 6.8. You can adjust the pH using lime (to raise it) or sulfur (to lower it).
- Choose your cauliflower variety: There are many cauliflower varieties available, each with different characteristics like head size, color, and maturity time. Choose a variety that suits your climate and growing season. Consider early, mid-season, or late-season varieties depending on your planting time.
- Gather your supplies: You’ll need cauliflower seeds or seedlings, garden trowel, watering can, fertilizer (optional, but recommended), mulch (straw or wood chips), and possibly row covers (to protect against pests and frost).
- Starting from seed (indoors): If starting from seed, sow seeds indoors 6-8 weeks before the last expected frost. Use seed starting mix and plant seeds about ¼ inch deep. Keep the soil moist and warm (around 70°F). Once seedlings have a few true leaves, transplant them outdoors.
- Starting from seedlings (outdoors): If buying seedlings, choose healthy plants with strong stems and dark green leaves. Space seedlings 18-24 inches apart, depending on the variety. Dig holes slightly larger than the root ball.
- Planting: Gently remove the seedlings from their containers, being careful not to damage the roots. Place them in the prepared holes, ensuring the top of the root ball is level with the soil surface. Fill in the holes with soil and gently firm the soil around the base of the plants.
- Watering: Water thoroughly after planting to help the seedlings settle in. Keep the soil consistently moist, but not waterlogged, throughout the growing season.
- Watering: Consistent watering is crucial, especially during dry periods. Aim for about 1 inch of water per week, either through rainfall or supplemental watering. Water deeply and less frequently rather than shallowly and often to encourage deep root growth.
- Fertilizing: A balanced fertilizer can help promote healthy growth. Apply a slow-release fertilizer at planting time or use a liquid fertilizer every few weeks, following the product instructions. Avoid over-fertilizing, which can lead to excessive leaf growth at the expense of head development.
- Weed control: Regularly weed around your cauliflower plants to prevent competition for water and nutrients. Mulching helps suppress weeds and retain soil moisture.
- Pest and disease control: Monitor your plants regularly for pests like aphids, cabbage worms, and slugs. Use appropriate pest control methods, such as handpicking pests, insecticidal soap, or diatomaceous earth. Be vigilant for diseases like black rot and clubroot. Good sanitation practices, crop rotation, and disease-resistant varieties can help prevent diseases.
- Blanching (optional but recommended): Blanching involves tying the outer leaves of the cauliflower together to protect the developing head from the sun. This prevents the head from turning green and bitter. Start blanching when the heads are about the size of a baseball. Use twine or rubber bands to gently tie the leaves together.
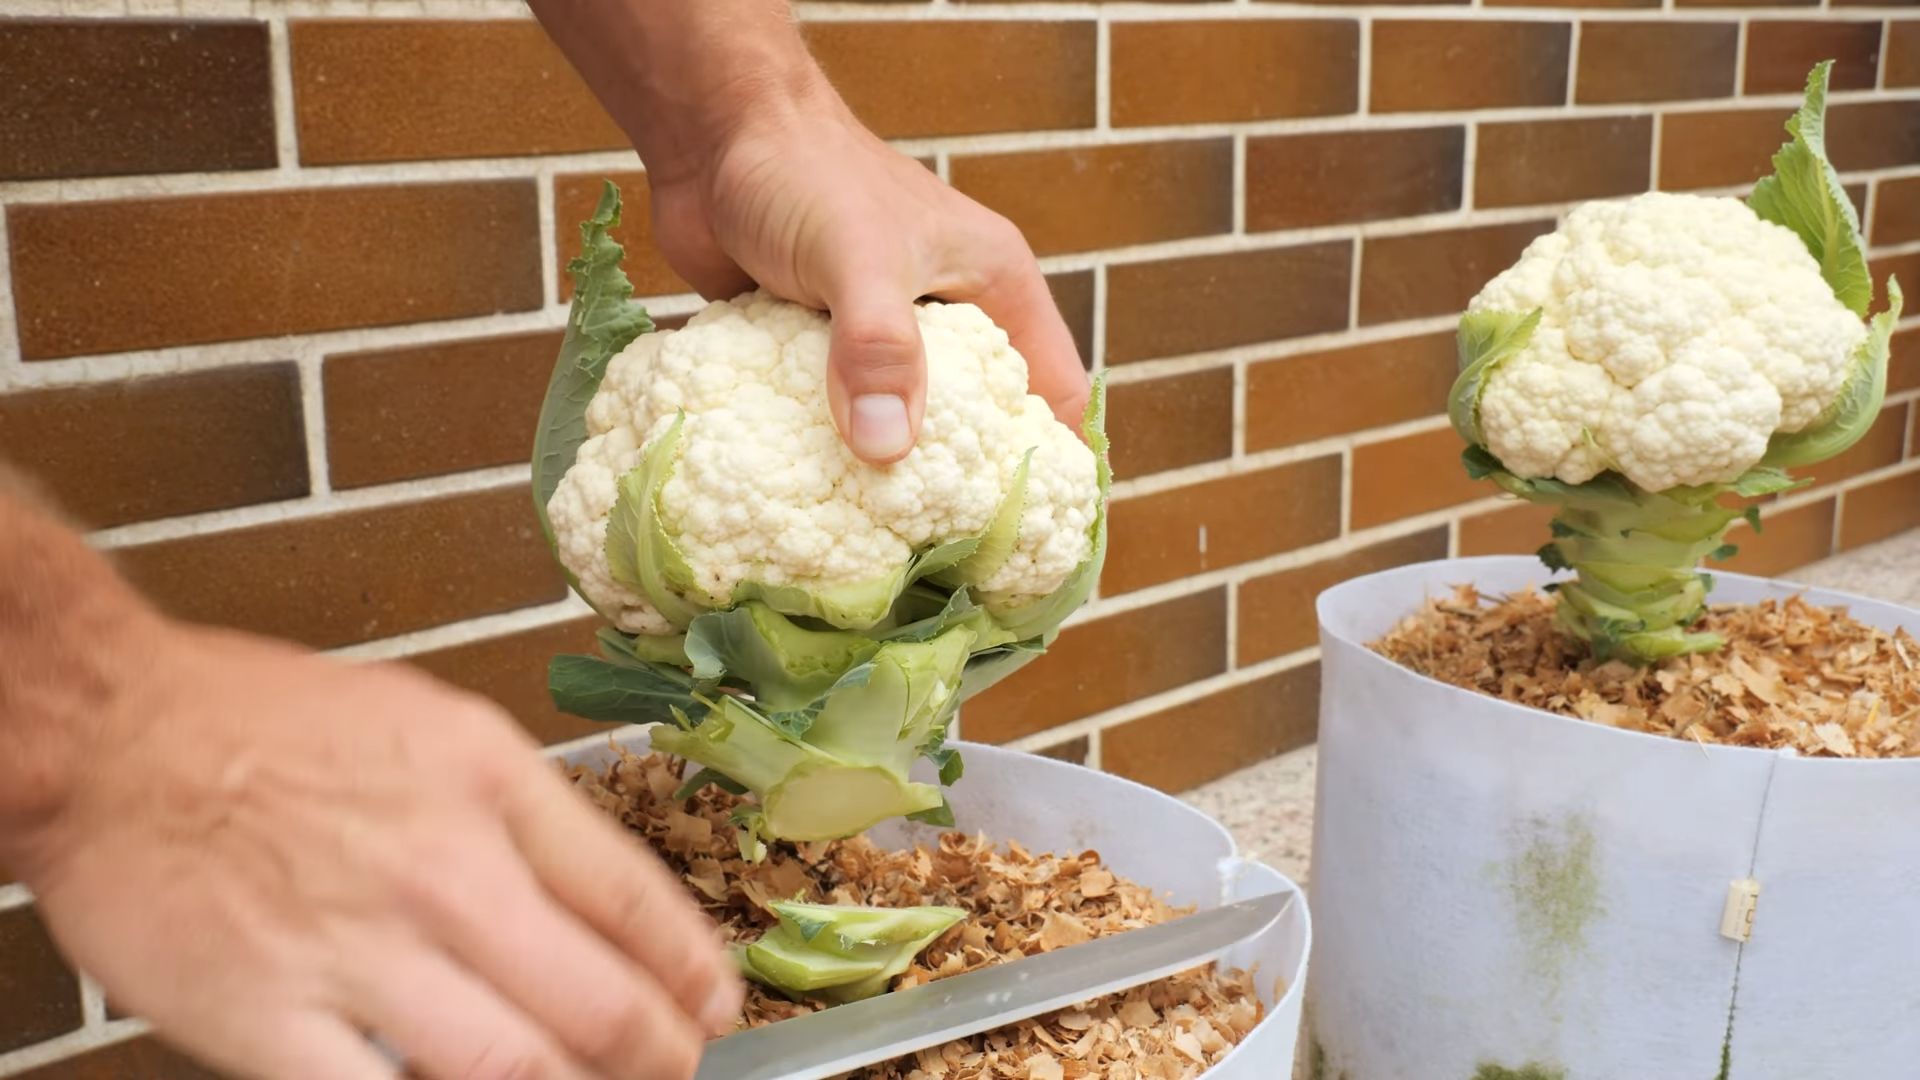
- Timing: Cauliflower is ready for harvest when the heads are firm, compact, and fully developed. The size will vary depending on the variety, but generally, heads should be 6-8 inches in diameter. Harvesting too early will result in small heads, while harvesting too late will result in a tough, woody head.
- Harvesting technique: Use a sharp knife to cut the head from the plant, leaving about 2 inches of stem attached. Be careful not to damage the surrounding leaves.
- Storage: Store harvested cauliflower in the refrigerator in a plastic bag for up to a week. You can also freeze cauliflower for longer storage.
- Small heads: This can be due to insufficient sunlight, poor soil conditions, or overcrowding. Ensure your plants have enough space and sunlight, and amend the soil if necessary.
- Green heads: This is often caused by lack of blanching. Blanch the heads to protect them from the sun.
- Bolting: This occurs when the plant goes to seed prematurely, usually due to hot weather. Choose a variety suitable for your climate and plant at the appropriate time.
- Pests and diseases: Regularly inspect your plants for pests and diseases and take appropriate action as needed. Use organic pest control methods whenever possible.
Cauliflower, with its beautiful white heads, is a rewarding vegetable to grow at home. It might seem intimidating, but with a little patience and these instructions, you’ll be harvesting your own delicious cauliflower in no time!
Planning and Preparation
Planting Your Cauliflower
Caring for Your Cauliflower
Harvesting Your Cauliflower
Troubleshooting
Problems and Solutions:
Remember to enjoy the fruits (or rather, vegetables!) of your labor! Happy gardening!
Conclusion
Growing your own cauliflower in your backyard is a profoundly rewarding experience, offering a taste of freshness and satisfaction unmatched by store-bought produce. This DIY approach to growing cauliflower isn’t just about saving money; it’s about connecting with nature, understanding the life cycle of your food, and enjoying the fruits (or rather, the florets!) of your labor. The process, while requiring some dedication, is surprisingly straightforward, and the results – crisp, flavorful cauliflower heads bursting with nutrients – are well worth the effort. You’ll be amazed at the difference in taste and quality compared to supermarket varieties. This method empowers you to control the growing process, ensuring pesticide-free, organically grown cauliflower tailored to your preferences.
Beyond the core method outlined, there’s a world of possibilities for customization. Experiment with different cauliflower varieties – from the classic white to vibrant purple or even romanesco with its fractal beauty. Consider companion planting, incorporating herbs like rosemary or thyme to deter pests and enhance the soil. If space is limited, explore vertical gardening techniques or container gardening to maximize your yield. For those in colder climates, consider starting your cauliflower seedlings indoors to give them a head start before transplanting them outdoors. And don’t be afraid to adjust the watering schedule based on your local climate and soil conditions. The key is to observe your plants and adapt your approach accordingly.
We strongly encourage you to embark on this rewarding journey of growing cauliflower in your backyard. The sense of accomplishment, the delicious harvest, and the knowledge of where your food comes from are invaluable. Share your experiences with us! Post pictures of your thriving cauliflower plants and your delicious creations on social media using #GrowCauliflowerBackyard. Let’s build a community of home gardeners, sharing tips, tricks, and celebrating the joy of growing our own food. We can’t wait to see your flourishing gardens and hear about your bountiful harvests. Remember, even small successes are significant steps towards a more sustainable and fulfilling lifestyle. So, grab your seeds, prepare your soil, and get ready to experience the magic of homegrown cauliflower!
Frequently Asked Questions
What type of soil is best for growing cauliflower?
Cauliflower thrives in loose, well-draining soil rich in organic matter. Amend heavy clay soils with compost or other organic materials to improve drainage and aeration. A slightly acidic pH (between 6.0 and 6.8) is ideal.
How much sunlight does cauliflower need?
Cauliflower requires at least 6-8 hours of direct sunlight per day. Choose a sunny location in your garden to ensure optimal growth and head development. Insufficient sunlight can lead to smaller, less dense heads.
When is the best time to plant cauliflower?
The best time to plant cauliflower depends on your climate. In cooler climates, start seeds indoors 6-8 weeks before the last expected frost. In warmer climates, you can direct sow seeds after the danger of frost has passed. Check your local frost dates for the most accurate planting schedule.
How often should I water my cauliflower?
Water your cauliflower regularly, keeping the soil consistently moist but not waterlogged. Aim for about 1 inch of water per week, either through rainfall or supplemental irrigation. Adjust watering frequency based on your local climate and soil conditions. During hot, dry periods, you may need to water more frequently.
What are some common cauliflower pests and diseases?
Common cauliflower pests include aphids, cabbage worms, and slugs. Regularly inspect your plants for signs of infestation and take appropriate measures, such as handpicking pests or using organic pest control methods. Diseases like black rot and clubroot can also affect cauliflower. Practicing crop rotation and ensuring good soil drainage can help prevent these diseases.
How do I harvest my cauliflower?
Harvest cauliflower when the heads are firm and compact, typically 70-80 days after transplanting. Cut the head with a sharp knife, leaving about 2 inches of stem attached. Harvesting at the right time ensures the best flavor and texture.
Can I save cauliflower seeds for next year?
While you can technically save cauliflower seeds, it’s generally not recommended for home gardeners. Cauliflower is a hybrid plant, meaning the seeds from your harvest may not produce the same variety of cauliflower the following year. It’s often easier and more reliable to purchase fresh seeds from a reputable supplier.
What can I do with leftover cauliflower?
Cauliflower is incredibly versatile! You can roast it, steam it, mash it, make cauliflower rice, add it to stir-fries, or use it in countless other recipes. Its mild flavor makes it a great addition to many dishes.
My cauliflower heads are small. What went wrong?
Small cauliflower heads can result from several factors, including insufficient sunlight, inadequate watering, nutrient deficiencies, or pest infestations. Review the growing conditions and address any potential issues to improve the size of your future harvests.
What if my cauliflower plants bolt (go to seed) prematurely?
Bolting, or premature flowering, often occurs due to heat stress. Planting cauliflower in cooler weather, providing adequate shade during hot periods, and choosing a variety suited to your climate can help prevent bolting.

Leave a Comment