
Growing Sweet Potatoes: Your Guide to a Bountiful Harvest
Growing sweet potatoes has always fascinated me. There’s something incredibly rewarding about nurturing a tiny slip into a thriving plant, eventually yielding a harvest of these vibrant, nutritious tubers. From the ancient Incan civilizations who cultivated them centuries ago to modern-day home gardeners, sweet potatoes have held a special place in our history and culinary traditions. This isn’t just about growing food; it’s about connecting with nature and experiencing the satisfaction of creating something delicious and healthy with your own two hands.
But let’s be honest, growing sweet potatoes can seem daunting. Many people believe it’s a difficult crop to cultivate, requiring specialized knowledge and extensive space. That’s where this article comes in! I’m here to share my Growing Sweet Potatoes secrets – simple, effective DIY tricks and hacks that will help you achieve a bountiful harvest, even if you’re working with a limited garden space or have minimal gardening experience. Whether you’re a seasoned gardener or a complete beginner, these tips will empower you to successfully grow your own sweet potatoes.
Why Grow Your Own?
There’s nothing quite like the taste of a homegrown sweet potato, freshly pulled from the earth. Beyond the superior flavor, growing your own offers numerous benefits: you control the quality, avoiding pesticides and chemicals; you can choose varieties tailored to your taste; and you’ll experience the immense satisfaction of nurturing a plant from start to finish. This guide on Growing Sweet Potatoes will equip you with the knowledge and confidence to embark on this rewarding journey.
So, let’s get started and unlock the secrets to a successful sweet potato harvest! Prepare to be amazed by how easy it can be to grow these delicious and versatile tubers right in your own backyard.
Growing Sweet Potatoes: A Complete DIY Guide
I love sweet potatoes! They’re delicious, versatile, and surprisingly easy to grow yourself, even if you don’t have a huge garden. This guide will walk you through the entire process, from preparing your slips to harvesting your delicious crop.
Phase 1: Preparing Your Sweet Potato Slips
- Selecting Sweet Potatoes: Choose healthy, organically grown sweet potatoes that are firm and free from blemishes. Avoid potatoes that are already sprouting excessively, as these might be too old.
- Preparing the Sweet Potatoes: Wash the sweet potatoes thoroughly and let them dry completely. This prevents rot.
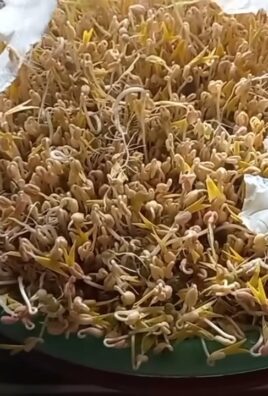
- Sprouts vs. Slips: You’ll need “slips”, which are the shoots that grow from the potato. If your sweet potato already has sprouts, you can skip to the next section. If not, you’ll need to encourage sprouting.
- Encouraging Sprouting: Place the sweet potatoes horizontally in a shallow tray filled with moist peat moss or vermiculite. Keep the tray in a warm, dark place (around 70-80°F) for a few weeks. Make sure the growing medium stays consistently moist, but not soggy. You’ll start to see sprouts emerge from the “eyes” of the potato.
- Growing the Slips: Once the sprouts are a few inches long, carefully separate them from the main potato. Handle them gently to avoid damaging the delicate roots. You can plant these slips directly, or you can further develop them in a tray of moist potting mix for a few weeks before transplanting.
- Select 2-3 healthy, firm sweet potatoes. Avoid any that are soft or show signs of rot.
- Thoroughly wash the potatoes and pat them dry. This is crucial to prevent fungal diseases.
- Place the potatoes in a shallow tray filled with moist peat moss or vermiculite. Ensure the potatoes are partially buried.
- Place the tray in a warm, dark location (70-80°F) for 2-3 weeks. Check the moisture level regularly and water as needed. The goal is to keep the medium consistently moist, not waterlogged.
- After 2-3 weeks, you should see sprouts emerging from the “eyes” of the sweet potatoes. These sprouts are your slips.
- Once the sprouts are 4-6 inches long, gently separate them from the main potato, being careful not to damage the roots. You can use a sharp knife or your fingers to carefully separate the slips.
- If you want to give your slips a head start, plant them in small pots filled with potting mix. Keep them in a warm, sunny location and water regularly.
Phase 2: Preparing Your Planting Area
- Sunlight: Sweet potatoes need at least 6-8 hours of direct sunlight per day. Choose a sunny spot in your garden.
- Soil: Well-drained soil is essential. Sweet potatoes don’t like wet feet. Amend heavy clay soils with compost or other organic matter to improve drainage.
- Soil pH: Aim for a slightly acidic to neutral soil pH (6.0-7.0). You can test your soil pH using a home testing kit.
- Preparing the Soil: Till the soil to a depth of 12-18 inches. Remove any rocks or weeds. Incorporate compost or other organic matter to enrich the soil and improve drainage.
- Choose a sunny location in your garden that receives at least 6-8 hours of direct sunlight daily. South-facing areas are ideal.
- Test your soil’s pH. Ideally, it should be between 6.0 and 7.0. You can purchase a soil testing kit from most garden centers.
- Amend your soil if necessary. If your soil is heavy clay, add compost or other organic matter to improve drainage. Sandy soils may benefit from the addition of peat moss to retain moisture.
- Till the soil to a depth of 12-18 inches. Remove any rocks, weeds, or debris. This ensures good root development.
- Create raised beds if your soil is poorly drained. This will help prevent root rot.
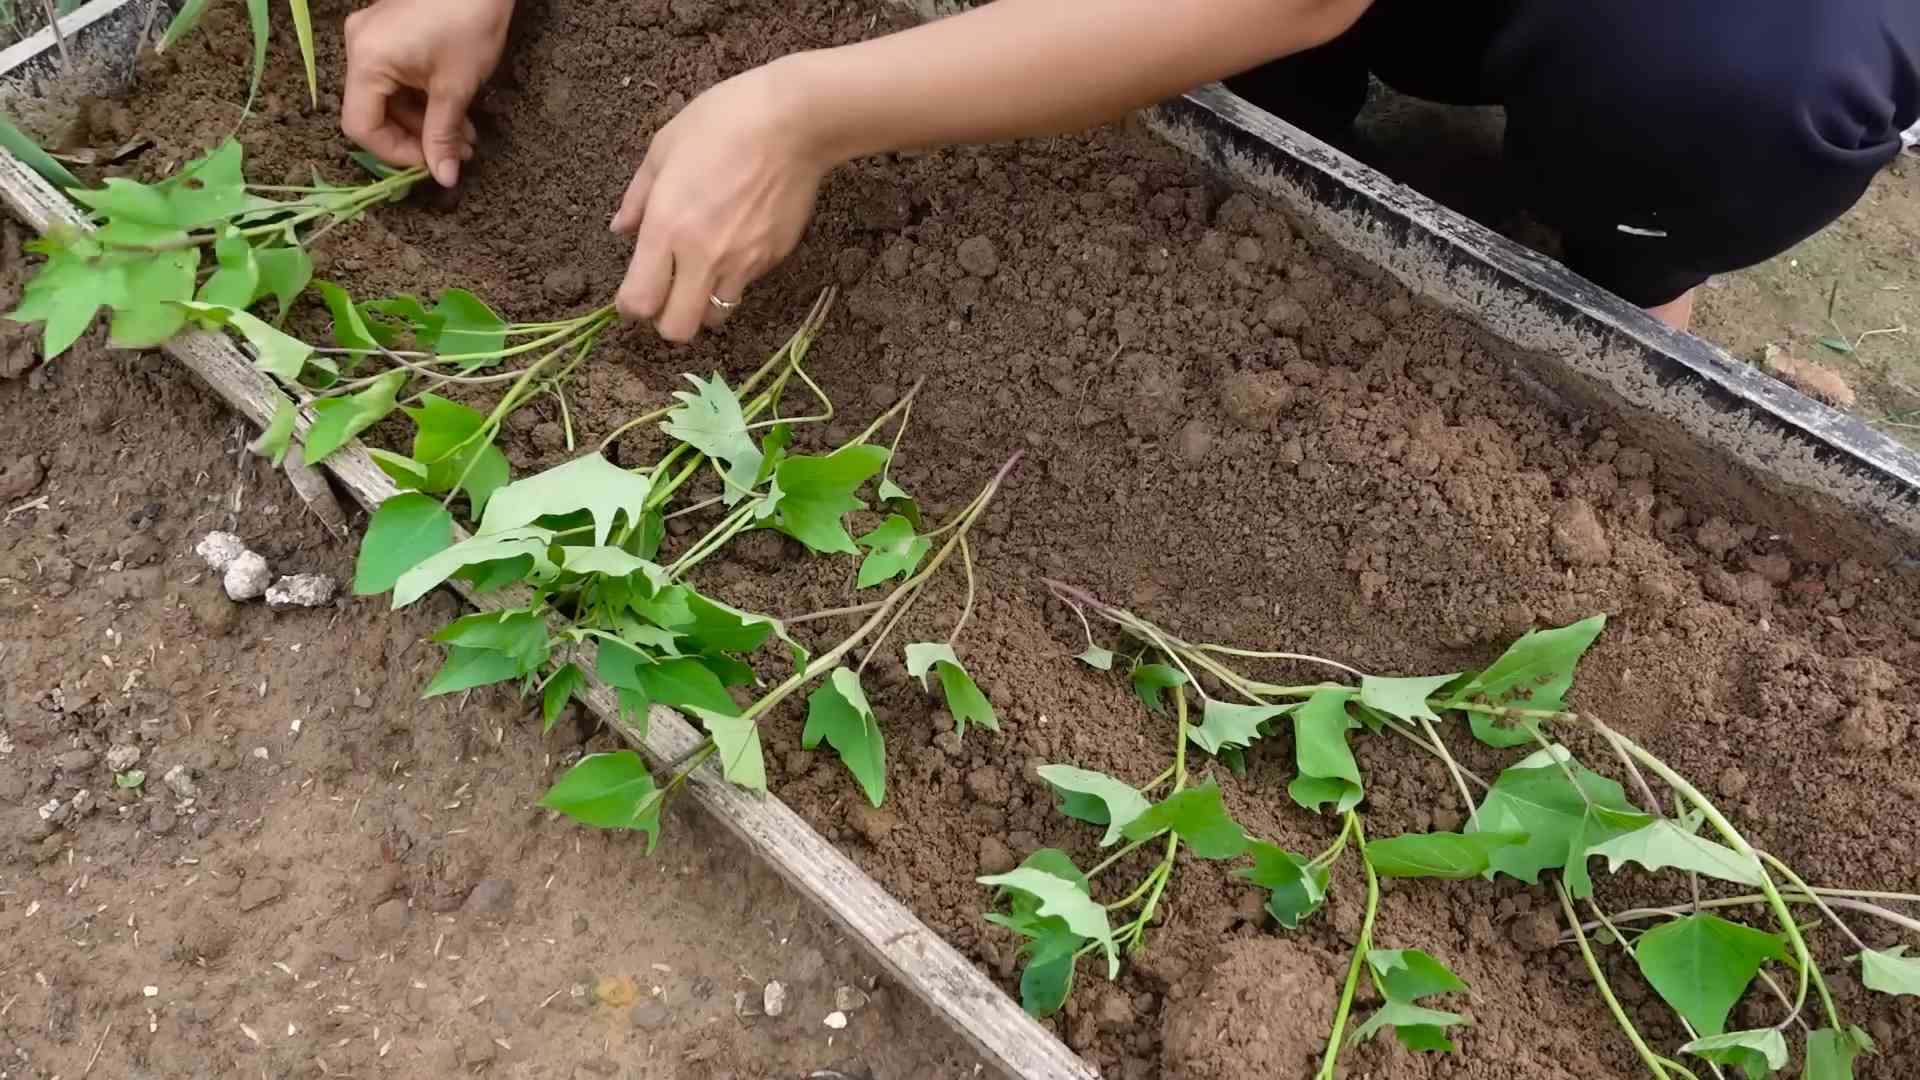
Phase 3: Planting and Growing Your Sweet Potatoes
- Planting Depth: Plant the slips 4-6 inches deep and 12-18 inches apart.
- Watering: Water deeply after planting and keep the soil consistently moist, but not waterlogged, throughout the growing season.
- Weed Control: Regularly weed around the plants to prevent competition for nutrients and water.
- Fertilizing: Sweet potatoes are relatively low-maintenance, but a balanced fertilizer can boost yields. Follow the instructions on the fertilizer package.
- Hilling: As the plants grow, gradually hill the soil around the base of the plants. This encourages more root development and prevents the potatoes from being exposed to sunlight.
- Plant your slips 4-6 inches deep and 12-18 inches apart. Space them further apart if you are using larger slips or expect vigorous growth.
- Water deeply after planting. Maintain consistent moisture throughout the growing season, but avoid overwatering, which can lead to root rot.
- Regularly weed around the plants to prevent competition for nutrients and water. Mulching can help suppress weeds.
- Fertilize your plants with a balanced fertilizer according to package instructions. Avoid over-fertilizing, which can negatively impact the taste and quality of the sweet potatoes.
- As the plants grow, gradually hill the soil around the base of the plants. This encourages the development of more sweet potatoes.
- Monitor your plants for pests and diseases. Address any issues promptly to prevent significant damage.
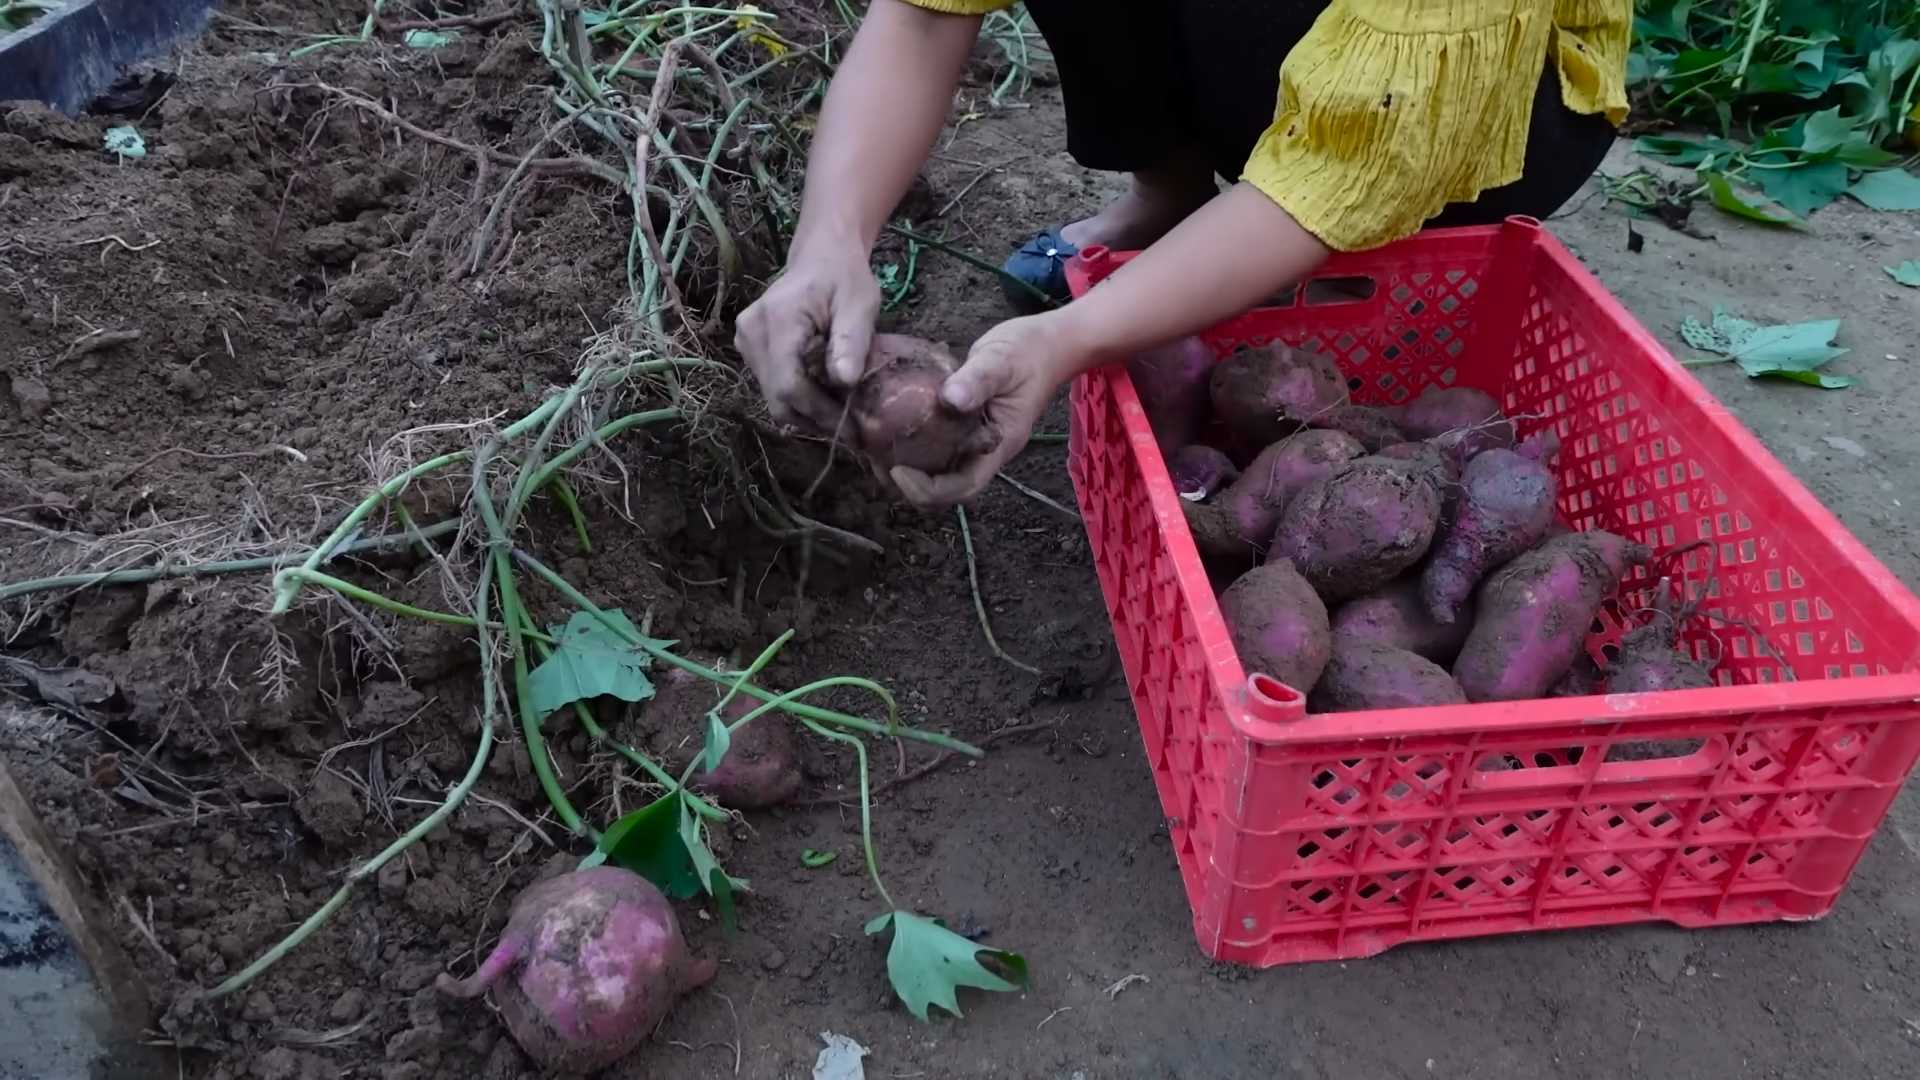
Phase 4: Harvesting Your Sweet Potatoes
- Harvest Time: Sweet potatoes are typically ready for harvest 3-4 months after planting, depending on the variety and growing conditions. The leaves will start to yellow and die back as a sign of maturity.
- Harvesting: Carefully dig up the sweet potatoes, being careful not to damage them. Use a garden fork or trowel to loosen the soil around the plants before gently lifting them out.
- Curing: After harvesting, cure the sweet potatoes in a warm, dry, well-ventilated area for 7-10 days. This allows the skin to heal and improves their storage life.
- Storage: Store cured sweet potatoes in a cool, dark, and dry place. They can be stored for several months under the right conditions.
- Sweet potatoes are typically ready for harvest 3-4 months after planting. Look for signs of maturity, such as yellowing and dying back of the leaves.
- On a dry day, carefully dig up the sweet potatoes using a garden fork or trowel. Be gentle to avoid damaging the potatoes.
- Gently brush off excess soil from the sweet potatoes. Inspect them for any damage or signs of disease.
- Cure the sweet potatoes in a warm, dry, and well-ventilated area for 7-10 days. This helps to heal the skin and improve their storage life.
- After curing, store the sweet potatoes in a cool, dark, and dry place. Ideal storage temperatures are between 55-60°F. They can be stored for several months under these conditions.
Important Note: Always practice good garden hygiene. Remove and dispose of any diseased plants to prevent the spread of disease.
Conclusion
So there you have it! Our guide to successfully growing sweet potatoes from slips. This DIY method isn’t just about saving money; it’s about connecting with the growing process in a deeply satisfying way. You get to nurture your plants from the very beginning, witnessing their transformation from humble slips to bountiful harvests. The satisfaction of pulling a sweet potato, knowing you cultivated it from start to finish, is unparalleled. This simple yet effective technique allows you to grow your own delicious, healthy sweet potatoes, even if you have limited space or gardening experience. It’s a rewarding project that yields incredibly sweet results, literally! Beyond the taste, you’ll be contributing to a more sustainable lifestyle by reducing your reliance on commercially grown produce. This DIY approach to growing sweet potatoes is a must-try for anyone, from seasoned gardeners to complete beginners. The process is surprisingly straightforward, and the rewards are incredibly sweet.
You can experiment with different varieties of sweet potatoes to discover your favorites. Some varieties are better suited to certain climates than others, so research your local options for optimal results. Consider trying different soil compositions to see what works best in your garden. Adding compost or other organic matter can significantly improve soil drainage and nutrient content, leading to healthier and more productive plants. You can also experiment with different planting methods, such as using raised beds or containers, to adapt to your available space and resources. For those with limited space, vertical gardening techniques could be a great option. Remember, the key is to provide your sweet potato plants with plenty of sunlight, well-drained soil, and consistent watering.
Don’t be afraid to experiment and adapt the techniques outlined in this guide to suit your specific needs and environment. The beauty of gardening is in its adaptability. We encourage you to try this DIY method and share your experiences with us! Post pictures of your thriving sweet potato plants and your bountiful harvest on social media using #GrowYourOwnSweetPotatoes. We’d love to see your success stories and learn from your experiences. Let’s build a community of home gardeners who are passionate about growing their own food. Share your tips, tricks, and challenges – together, we can create a thriving network of sweet potato enthusiasts! Remember, even small successes are worth celebrating. So grab some slips, get your hands dirty, and embark on this rewarding journey of growing your own sweet potatoes. You won’t regret it!
Frequently Asked Questions
What type of soil is best for growing sweet potatoes?
Sweet potatoes thrive in well-drained, sandy loam soil. Avoid heavy clay soils, which can retain too much water and lead to root rot. Adding organic matter like compost can improve drainage and soil structure in heavier soils. A slightly acidic pH (around 6.0-6.8) is ideal.
How much sunlight do sweet potatoes need?
Sweet potatoes are sun-worshippers! They need at least 6-8 hours of direct sunlight per day to grow optimally. Choose a location in your garden that receives ample sunlight throughout the day. Insufficient sunlight can lead to reduced yields and smaller sweet potatoes.
When is the best time to plant sweet potato slips?
The best time to plant sweet potato slips is after the last frost and when the soil has warmed up to at least 60-70°F (15-21°C). This usually falls between late spring and early summer, depending on your location. Check your local frost dates for the most accurate planting time.
How often should I water my sweet potatoes?
Consistent watering is crucial, especially during dry periods. Aim for moist but not waterlogged soil. Overwatering can lead to root rot, while underwatering can stunt growth. Water deeply and less frequently, allowing the soil to dry slightly between waterings. Mulching can help retain soil moisture.
How do I know when my sweet potatoes are ready to harvest?
Sweet potatoes are typically ready for harvest 3-4 months after planting, usually in the fall. The leaves will start to yellow and die back, indicating maturity. You can gently dig up a few test potatoes to check for size and firmness. Harvest on a dry day to prevent rot.
What should I do with my harvested sweet potatoes?
After harvesting, gently clean the sweet potatoes and allow them to cure in a warm, dry, and well-ventilated area for 7-10 days. This process helps to develop their flavor and extends their shelf life. After curing, store them in a cool, dark, and dry place for several months.
Can I grow sweet potatoes in containers?
Absolutely! Growing sweet potatoes in containers is a great option for those with limited space. Choose large containers (at least 12 inches deep) with drainage holes. Use a well-draining potting mix and ensure the containers receive ample sunlight.
What are some common problems when growing sweet potatoes?
Common problems include root rot (due to overwatering or poorly drained soil), insect pests (like sweet potato weevils), and diseases (like fungal leaf spots). Proper soil preparation, consistent watering, and regular monitoring can help prevent these issues. Consult your local garden center for advice on pest and disease control.
Can I save seeds from my sweet potatoes to grow more?
Sweet potatoes are not grown from seeds; they are propagated from slips (stem cuttings). You can save slips from your harvest to plant the following year, or purchase new slips from a garden center or online retailer.
What are some other ways to use sweet potatoes besides eating them?
Beyond their culinary uses, sweet potatoes can also be used for various purposes. The leaves can be used as animal feed, and the vines can be composted to enrich the soil. Sweet potatoes are also a source of starch, which has various industrial applications.

Leave a Comment