
Growing Grape Tomatoes can be incredibly rewarding, offering a burst of sweet, juicy flavor straight from your backyard! Imagine popping those tiny, sun-ripened gems into your mouth – a taste of summer you cultivated yourself. But let’s be honest, sometimes getting those perfect little tomatoes can feel like a challenge. Are you tired of lackluster harvests, plants plagued by pests, or simply not knowing where to start?
For centuries, cultivating tomatoes, in all their varieties, has been a cherished tradition. From their origins in South America to their adoption by European chefs and home gardeners worldwide, tomatoes have become a staple in our diets and a symbol of fresh, homegrown goodness. The grape tomato, a relatively recent addition to the tomato family, offers a convenient and delicious snacking option that’s perfect for salads, appetizers, or just enjoying on its own.
That’s where these DIY tricks and hacks come in! I’m going to share my tried-and-true secrets to help you achieve a bountiful harvest of delicious grape tomatoes, even if you’re a complete beginner. We’ll cover everything from choosing the right varieties and preparing your soil to warding off common pests and maximizing your yield. Growing Grape Tomatoes doesn’t have to be complicated. With a little know-how and these simple DIY solutions, you’ll be enjoying a steady supply of these delightful little fruits all season long. Let’s get started!
DIY: So ziehst du saftige Cherrytomaten selbst!
Hallo liebe Gartenfreunde! Ich liebe Cherrytomaten – diese kleinen, süßen Dinger, die man direkt vom Strauch naschen kann. Und das Beste: Sie sind super einfach selbst anzubauen! Ich zeige euch heute, wie ihr mit ein paar einfachen Tricks eine reiche Ernte erzielen könnt. Keine Angst, auch wenn ihr keinen grünen Daumen habt, das kriegen wir hin!
Was du brauchst:
* Cherrytomaten-Samen oder Jungpflanzen (ich empfehle robuste Sorten wie ‘Sungold’, ‘Sweet Million’ oder ‘Black Cherry’)
* Anzuchttöpfe oder -schalen
* Anzuchterde
* Größere Töpfe (mindestens 10 Liter Volumen pro Pflanze) oder ein sonniges Beet
* Tomatenerde
* Pflanzstäbe oder Tomatenkäfige
* Gießkanne
* Flüssigdünger für Tomaten
* Geduld und Liebe!
Aussaat und Anzucht: Der Grundstein für eine reiche Ernte
Die Anzucht ist der erste wichtige Schritt. Ich starte meistens schon im März oder April, damit die Pflanzen genug Zeit haben, um kräftig zu werden.
1. Vorbereitung der Anzuchttöpfe: Fülle deine Anzuchttöpfe oder -schalen mit Anzuchterde. Drücke die Erde leicht an.
2. Aussaat der Samen: Lege 2-3 Samen pro Topf auf die Erde. Bedecke sie mit einer dünnen Schicht Erde (ca. 0,5 cm).
3. Bewässerung: Befeuchte die Erde vorsichtig mit einer Sprühflasche oder einer Gießkanne mit Brauseaufsatz. Die Erde sollte feucht, aber nicht nass sein.
4. Der richtige Standort: Stelle die Töpfe an einen hellen und warmen Ort. Eine Fensterbank über der Heizung ist ideal. Eine Temperatur von 20-25°C ist optimal für die Keimung.
5. Feuchtigkeit halten: Um die Luftfeuchtigkeit zu erhöhen, kannst du die Töpfe mit Frischhaltefolie oder einem durchsichtigen Deckel abdecken. Lüfte die Abdeckung täglich, um Schimmelbildung zu vermeiden.
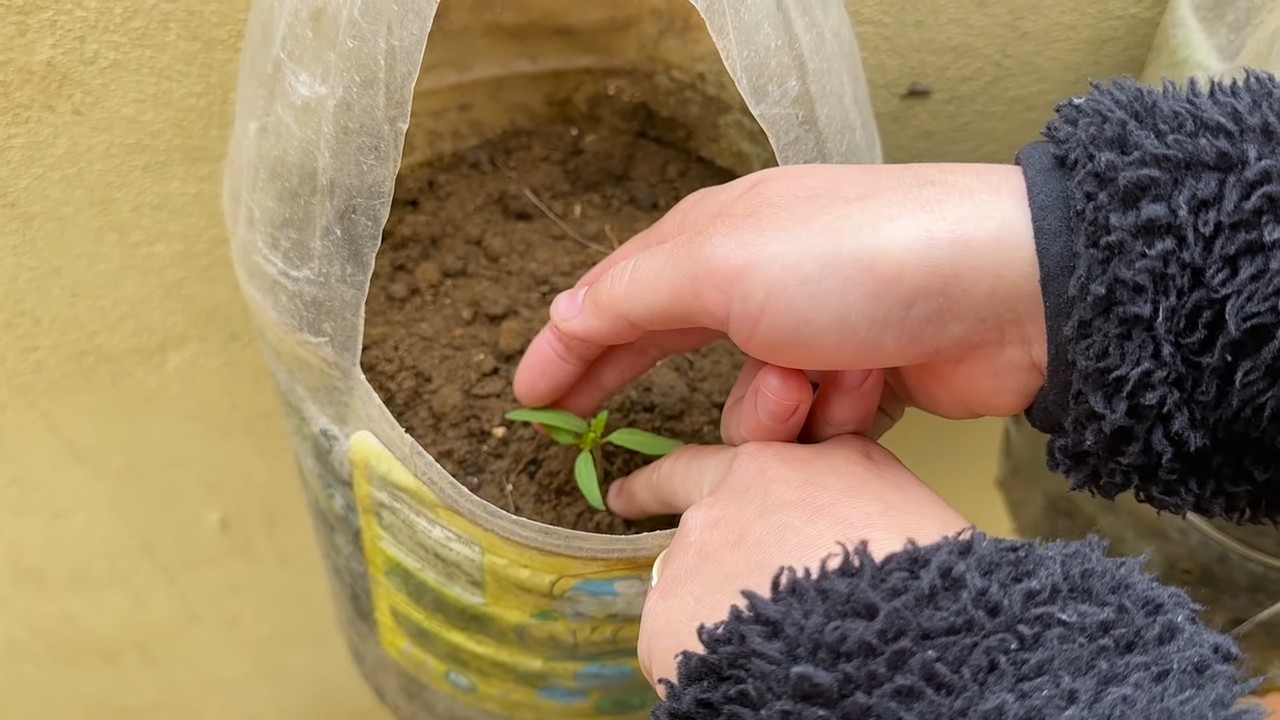
6. Geduld ist gefragt: Nach etwa 1-2 Wochen sollten die ersten Keimlinge zu sehen sein. Sobald die Pflanzen ihre ersten richtigen Blätter (neben den Keimblättern) haben, kannst du sie pikieren.
7. Pikieren: Wähle die kräftigsten Pflanzen aus und setze sie einzeln in größere Töpfe mit Anzuchterde. Achte darauf, die Wurzeln nicht zu beschädigen.
8. Weiterpflege: Stelle die pikierten Pflanzen an einen hellen, aber nicht zu sonnigen Ort. Gieße sie regelmäßig und dünge sie nach Bedarf mit einem milden Flüssigdünger.
Vorbereitung des Beetes oder der Töpfe: Ein gutes Fundament ist alles!
Bevor du die Jungpflanzen ins Freie setzt, solltest du das Beet oder die Töpfe vorbereiten.
1. Der richtige Standort: Cherrytomaten lieben die Sonne! Wähle einen sonnigen Standort, der mindestens 6 Stunden Sonne pro Tag bekommt.
2. Bodenbeschaffenheit: Der Boden sollte locker, humos und gut durchlässig sein. Schwere Böden kannst du mit Sand und Kompost verbessern.
3. Beet vorbereiten: Grabe das Beet um und entferne Unkraut und Steine. Arbeite Kompost oder organischen Dünger in den Boden ein.
4. Töpfe vorbereiten: Fülle die Töpfe mit Tomatenerde. Achte darauf, dass die Töpfe ausreichend groß sind (mindestens 10 Liter Volumen pro Pflanze).
Auspflanzen: Ab ins Freie!
Sobald keine Frostgefahr mehr besteht (meist Mitte Mai nach den Eisheiligen), kannst du die Jungpflanzen ins Freie setzen.
1. Abhärten: Bevor du die Pflanzen auspflanzt, solltest du sie einige Tage lang abhärten. Stelle sie tagsüber ins Freie und hole sie nachts wieder rein. So gewöhnen sie sich langsam an die Bedingungen im Freien.
2. Pflanzabstand: Pflanze die Cherrytomaten im Beet mit einem Abstand von ca. 50-60 cm zueinander. In Töpfen sollte jede Pflanze ihren eigenen Topf haben.
3. Pflanzloch ausheben: Hebe ein Pflanzloch aus, das etwas größer ist als der Wurzelballen der Pflanze.
4. Pflanze einsetzen: Setze die Pflanze vorsichtig in das Pflanzloch. Achte darauf, dass der Wurzelballen nicht beschädigt wird.
5. Mit Erde auffüllen: Fülle das Pflanzloch mit Erde auf und drücke sie leicht an.
6. Angießen: Gieße die Pflanze gründlich an.
7. Pflanzstab oder Tomatenkäfig: Setze einen Pflanzstab oder einen Tomatenkäfig neben die Pflanze. Cherrytomaten können sehr hoch werden und brauchen Unterstützung.
Pflege: Damit deine Cherrytomaten prächtig gedeihen
Die richtige Pflege ist entscheidend für eine reiche Ernte.
1. Gießen: Gieße die Cherrytomaten regelmäßig, besonders bei trockenem Wetter. Vermeide Staunässe. Gieße am besten morgens, damit die Blätter über Tag abtrocknen können.
2. Düngen: Dünge die Cherrytomaten regelmäßig mit einem Flüssigdünger für Tomaten. Beginne damit etwa 2-3 Wochen nach dem Auspflanzen. Befolge die Anweisungen auf der Düngerpackung.
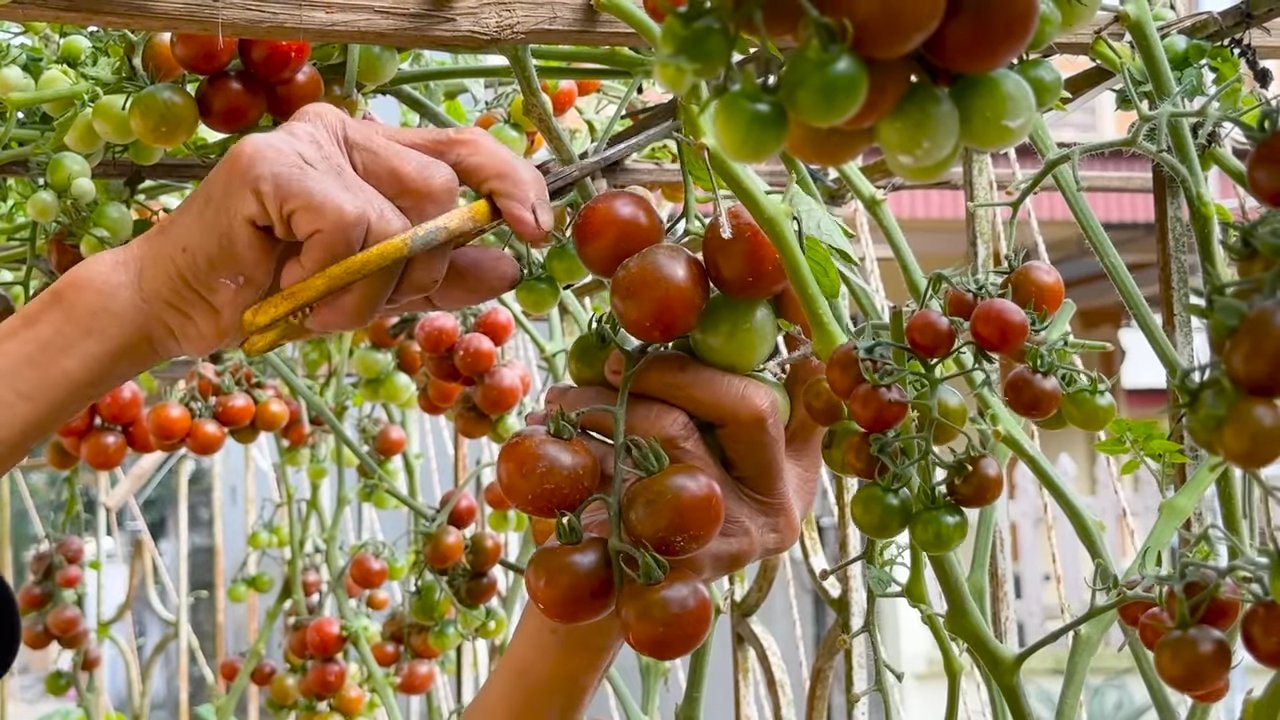
3. Ausgeizen: Cherrytomaten bilden sogenannte Geiztriebe in den Blattachseln. Diese Triebe solltest du regelmäßig ausbrechen, damit die Pflanze ihre Energie in die Fruchtbildung steckt. Breche die Geiztriebe am besten früh morgens aus, wenn sie noch klein sind.
4. Hochbinden: Binde die Cherrytomaten regelmäßig an den Pflanzstab oder den Tomatenkäfig. So verhinderst du, dass die Triebe abbrechen.
5. Blätter entfernen: Entferne regelmäßig die unteren Blätter der Pflanze. So verbesserst du die Belüftung und beugst Krankheiten vor.
6. Schutz vor Krankheiten: Cherrytomaten sind anfällig für verschiedene Krankheiten, wie z.B. die Kraut- und Braunfäule. Achte auf Anzeichen von Krankheiten und behandle die Pflanzen gegebenenfalls mit einem geeigneten Pflanzenschutzmittel. Eine gute Belüftung und ein sonniger Standort helfen, Krankheiten vorzubeugen.
Ernte: Der Lohn deiner Mühe!
Endlich ist es soweit: Die Cherrytomaten sind reif und können geerntet werden!
1. Reife erkennen: Reife Cherrytomaten haben eine intensive Farbe und lassen sich leicht vom Stiel lösen.
2. Ernten: Pflücke die reifen Cherrytomaten vorsichtig ab.
3. Regelmäßig ernten: Ernte die Cherrytomaten regelmäßig, damit die Pflanze neue Früchte bilden kann.
4. Genießen: Genieße deine selbstgezogenen Cherrytomaten! Sie schmecken pur, im Salat, auf Pizza oder als Snack zwischendurch.
Zusätzliche Tipps für eine erfolgreiche Cherrytomaten-Ernte:
* Mulchen: Bedecke den Boden um die Cherrytomaten mit Mulch (z.B. Stroh oder Rasenschnitt). Das hält den Boden feucht, unterdrückt Unkraut und schützt die Früchte vor Schmutz.
* Nützlinge fördern: Fördere Nützlinge wie Marienkäfer und Florfliegen in deinem Garten. Sie helfen, Schädlinge wie Blattläuse zu bekämpfen.
* Sortenwahl: Wähle robuste und krankheitsresistente Sorten. Informiere dich im Fachhandel oder im Internet über die verschiedenen Sorten.
* Eigene Samen gewinnen: Wenn du eine besonders leckere Sorte gefunden hast, kannst du im nächsten Jahr eigene Samen gewinnen. Lasse einige Früchte an der Pflanze ausreifen und entnimm die Samen. Trockne die Samen gut und bewahre sie an einem kühlen und trockenen Ort auf.
Ich hoffe, diese Anleitung hilft dir dabei, eine reiche Cherrytomaten-Ernte zu erzielen. Viel Spaß beim Gärtnern! Und denk dran:
Conclusion
So, there you have it! Mastering the art of growing grape tomatoes doesn’t require a green thumb blessed by the gardening gods. It’s about understanding the plant’s needs, providing the right environment, and employing a few clever DIY tricks to maximize your yield. This method, focusing on consistent watering, strategic pruning, and homemade support systems, is a game-changer for both novice and experienced gardeners alike.
Why is this DIY approach a must-try? Because it empowers you to take control of your tomato-growing journey. You’re not just passively waiting for nature to take its course; you’re actively shaping the outcome. You’re reducing your reliance on expensive store-bought solutions and embracing a more sustainable, hands-on approach. The satisfaction of harvesting plump, juicy grape tomatoes that you nurtured from seed to table is unparalleled.
But the beauty of this method lies in its adaptability. Feel free to experiment with variations to suit your specific needs and preferences. For instance, if you live in a particularly windy area, consider building a sturdier support system using repurposed wood or metal. If you’re short on space, explore vertical gardening techniques, training your grape tomato plants to climb trellises or even hanging baskets. You can also adjust the nutrient solution based on your soil’s composition and the specific needs of your tomato variety. Some gardeners swear by adding Epsom salts to the soil to boost magnesium levels, while others prefer using compost tea for a more organic approach.
Don’t be afraid to get creative with your DIY solutions. Perhaps you can repurpose old plastic bottles into self-watering planters or create a natural pest repellent using garlic and chili peppers. The possibilities are endless! The key is to observe your plants closely, listen to their needs, and adapt your approach accordingly.
Ultimately, growing grape tomatoes is a rewarding experience that connects you with nature and provides you with a delicious and healthy harvest. This DIY method is not just about saving money or reducing your environmental impact; it’s about fostering a deeper appreciation for the process of growing your own food. It’s about learning, experimenting, and sharing your knowledge with others.
We wholeheartedly encourage you to try this DIY trick for growing grape tomatoes. We are confident that you’ll be amazed by the results. And most importantly, we want to hear about your experience! Share your tips, tricks, and photos with us in the comments below. Let’s build a community of passionate grape tomato growers who are committed to sustainable and rewarding gardening practices. Let us know what worked for you, what challenges you faced, and what innovative solutions you came up with. Together, we can unlock the secrets to growing the most delicious and abundant grape tomatoes imaginable. So, grab your gardening gloves, get your hands dirty, and embark on this exciting adventure! Happy growing!
Frequently Asked Questions (FAQ)
What is the best time to start growing grape tomatoes?
The best time to start growing grape tomatoes depends on your climate. In general, you should start seeds indoors 6-8 weeks before the last expected frost. If you live in a warmer climate with a longer growing season, you can start seeds directly outdoors after the last frost. However, starting indoors gives you a head start and allows you to control the growing environment more effectively. Consider your local climate and growing season when determining the optimal time to start your seeds.
How often should I water my grape tomato plants?
Consistent watering is crucial for healthy grape tomato growth. Water deeply and regularly, especially during hot and dry periods. Aim to keep the soil consistently moist but not waterlogged. A good rule of thumb is to water when the top inch of soil feels dry to the touch. The frequency of watering will depend on factors such as weather conditions, soil type, and the size of your plants. Mulching around the base of the plants can help retain moisture and reduce the need for frequent watering.
What kind of soil is best for growing grape tomatoes?
Grape tomatoes thrive in well-drained, fertile soil that is rich in organic matter. A slightly acidic soil pH of 6.0 to 6.8 is ideal. Amend your soil with compost, aged manure, or other organic materials to improve its drainage, fertility, and water-holding capacity. Avoid heavy clay soils, as they can become waterlogged and inhibit root growth. If you have clay soil, consider growing your grape tomatoes in raised beds or containers with a well-draining potting mix.
How much sunlight do grape tomato plants need?
Grape tomato plants require at least 6-8 hours of direct sunlight per day to thrive. Choose a sunny location in your garden where your plants will receive ample sunlight throughout the day. If you live in a particularly hot climate, some afternoon shade may be beneficial to prevent the plants from overheating. Insufficient sunlight can lead to leggy growth, reduced fruit production, and increased susceptibility to diseases.
How do I prune my grape tomato plants?
Pruning is essential for maximizing grape tomato production. Remove suckers (the small shoots that grow between the main stem and the branches) to encourage the plant to focus its energy on fruit production. Pruning also improves air circulation, which helps prevent diseases. Use clean, sharp pruning shears to avoid damaging the plant. Regular pruning will result in healthier, more productive grape tomato plants.
What are some common pests and diseases that affect grape tomatoes?
Grape tomatoes are susceptible to various pests and diseases, including aphids, whiteflies, tomato hornworms, early blight, and blossom end rot. Regularly inspect your plants for signs of pests or diseases. Use organic pest control methods, such as insecticidal soap or neem oil, to control infestations. Ensure good air circulation and avoid overhead watering to prevent fungal diseases. Blossom end rot is often caused by calcium deficiency, so amend your soil with calcium-rich amendments if necessary.
How do I support my grape tomato plants?
Grape tomato plants can become quite heavy with fruit, so providing adequate support is crucial. Use stakes, cages, or trellises to support your plants and prevent them from collapsing under the weight of the tomatoes. Tie the main stem to the support structure using soft twine or plant ties. Supporting your plants also improves air circulation and makes it easier to harvest the tomatoes.
When are grape tomatoes ready to harvest?
Grape tomatoes are typically ready to harvest about 60-80 days after transplanting. The tomatoes should be fully colored (usually red, but some varieties are yellow or orange) and slightly soft to the touch. Gently twist the tomatoes off the vine, being careful not to damage the plant. Harvest your grape tomatoes regularly to encourage continued fruit production.
Can I grow grape tomatoes in containers?
Yes, grape tomatoes can be successfully grown in containers. Choose a large container (at least 10 gallons) with drainage holes. Use a high-quality potting mix and provide adequate support for the plants. Container-grown grape tomatoes may require more frequent watering and fertilization than those grown in the ground. Place the container in a sunny location and monitor the plants closely for signs of pests or diseases.
What are some good companion plants for grape tomatoes?
Companion planting can benefit grape tomatoes by attracting beneficial insects, repelling pests, and improving soil health. Some good companion plants for grape tomatoes include basil, marigolds, carrots, and onions. Basil repels tomato hornworms and whiteflies, while marigolds deter nematodes. Carrots improve soil drainage, and onions repel aphids. Avoid planting grape tomatoes near brassicas (such as cabbage and broccoli), as they can compete for nutrients.

Leave a Comment