
Grow Sweet Potatoes Easily, even if you think you don’t have a green thumb! Have you ever dreamt of harvesting your own vibrant, orange sweet potatoes, fresh from your backyard? Imagine the satisfaction of serving a delicious, homegrown sweet potato pie during the holidays, knowing you nurtured those spuds from tiny slips to hearty treasures. This isn’t just a pipe dream; it’s an achievable reality with a few simple tricks and DIY techniques.
Sweet potatoes, a staple in many cultures for centuries, boast a rich history. Originating in South America, they’ve journeyed across continents, becoming a beloved ingredient in cuisines worldwide. From the candied yams of American Thanksgiving to the savory stews of West Africa, the sweet potato’s versatility is undeniable. But beyond their culinary appeal, growing your own offers a connection to this history, a chance to participate in a tradition that spans generations.
Why should you learn to grow sweet potatoes easily at home? Well, store-bought sweet potatoes can be expensive, and you never truly know how they were grown. By cultivating your own, you control the process, ensuring they’re organic, pesticide-free, and bursting with flavor. Plus, it’s incredibly rewarding! This DIY guide will provide you with the insider secrets to successfully growing sweet potatoes, even in small spaces. We’ll cover everything from sprouting slips to harvesting your bountiful crop. Get ready to dig in and discover the joy of homegrown goodness!
Süßkartoffeln einfach selbst anbauen: Ein DIY-Guide für Anfänger
Hallo liebe Gartenfreunde! Habt ihr euch jemals gefragt, wie man diese köstlichen und nahrhaften Süßkartoffeln selbst anbauen kann? Ich zeige euch, wie es geht! Es ist einfacher als ihr denkt und macht unglaublich viel Spaß. Lasst uns gemeinsam in die Welt des Süßkartoffelanbaus eintauchen!
Was du für den Süßkartoffelanbau brauchst:
* Süßkartoffeln: Am besten Bio-Süßkartoffeln, da diese nicht mit Keimhemmern behandelt wurden.
* Wasserglas oder Gefäß: Um die Süßkartoffeln vorzuziehen.
* Zahnstocher: Zum Aufhängen der Süßkartoffel im Wasserglas.
* Pflanzerde: Für das Anziehen der Setzlinge und später für das Auspflanzen.
* Kompost: Zur Bodenverbesserung.
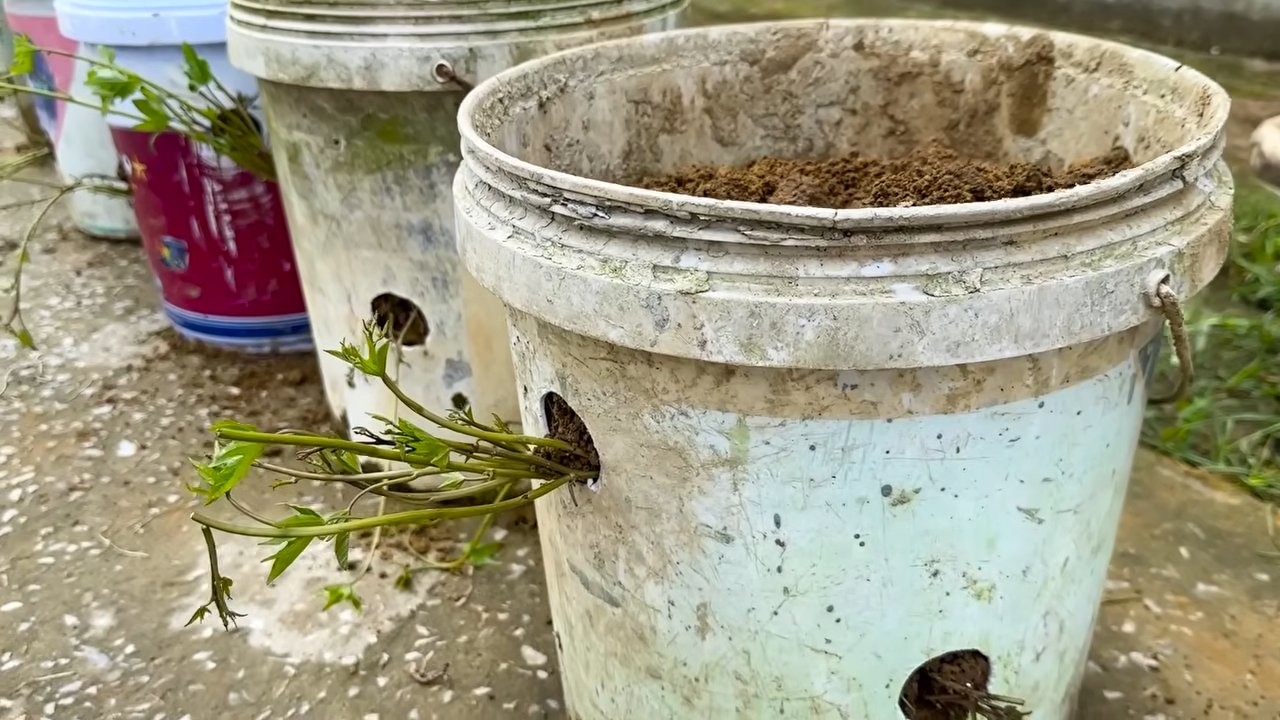
* Gartenbeet oder Kübel: Ein sonniger Standort ist wichtig!
* Gießkanne: Zum regelmäßigen Gießen.
* Geduld: Süßkartoffeln brauchen etwas Zeit, um zu wachsen.
Phase 1: Die Süßkartoffeln zum Austreiben bringen (Slips ziehen)
Das Wichtigste zuerst: Wir müssen die sogenannten “Slips” ziehen. Das sind die kleinen Triebe, die aus der Süßkartoffel wachsen und die wir später einpflanzen werden.
1. Süßkartoffel vorbereiten: Nehmt eure Süßkartoffel und wascht sie gründlich ab. Achtet darauf, dass keine Erde mehr daran haftet.
2. Zahnstocher anbringen: Steckt vier Zahnstocher etwa in der Mitte der Süßkartoffel ein, so dass sie sich kreuzweise gegenüberliegen. Diese dienen dazu, die Süßkartoffel im Wasserglas zu stabilisieren.
3. Ins Wasserglas hängen: Füllt euer Wasserglas oder Gefäß mit Wasser. Die Süßkartoffel sollte etwa zur Hälfte im Wasser hängen. Die Zahnstocher verhindern, dass sie ganz eintaucht.
4. Standort wählen: Stellt das Glas an einen warmen und hellen Ort, aber nicht in die pralle Sonne. Ein Fensterbrett ist ideal.
5. Geduld haben: Jetzt heißt es warten! Es kann einige Wochen dauern, bis die ersten Triebe erscheinen. Achtet darauf, dass der Wasserstand immer gleich bleibt und wechselt das Wasser alle paar Tage, um Schimmelbildung zu vermeiden.
6. Triebe wachsen lassen: Sobald die Triebe etwa 15-20 cm lang sind, können wir sie von der Süßkartoffel abnehmen.
Phase 2: Die Slips bewurzeln
Jetzt, wo wir unsere Slips haben, müssen wir ihnen helfen, Wurzeln zu schlagen, bevor wir sie in die Erde pflanzen können.
1. Slips vorsichtig abbrechen: Brecht die Triebe vorsichtig von der Süßkartoffel ab. Achtet darauf, dass ihr sie nicht beschädigt.
2. In Wasser stellen: Stellt die Slips in ein Glas mit Wasser. Achtet darauf, dass die unteren Blätter nicht im Wasser sind, da sie sonst faulen könnten.
3. Wurzeln bilden lassen: Stellt das Glas mit den Slips wieder an einen warmen und hellen Ort. Innerhalb weniger Tage sollten sich kleine Wurzeln bilden.
4. Regelmäßig Wasser wechseln: Wechselt das Wasser alle paar Tage, um die Bildung von Algen und Bakterien zu verhindern.
Phase 3: Die Süßkartoffeln auspflanzen
Sobald die Slips ausreichend Wurzeln gebildet haben, ist es Zeit, sie in die Erde zu pflanzen.
1. Boden vorbereiten: Süßkartoffeln bevorzugen einen lockeren, gut durchlässigen Boden. Lockert den Boden in eurem Gartenbeet oder Kübel auf und mischt Kompost unter, um ihn mit Nährstoffen anzureichern.
2. Pflanzlöcher graben: Grabt Pflanzlöcher im Abstand von etwa 30-40 cm.
3. Slips einpflanzen: Setzt die Slips vorsichtig in die Pflanzlöcher und bedeckt die Wurzeln mit Erde. Achtet darauf, dass die Blätter nicht mit Erde bedeckt sind.
4. Angießen: Gießt die frisch gepflanzten Slips gründlich an.
5. Mulchen: Eine Mulchschicht aus Stroh oder Rasenschnitt hilft, die Feuchtigkeit im Boden zu halten und Unkraut zu unterdrücken.
Phase 4: Pflege der Süßkartoffelpflanzen
Die Süßkartoffelpflanzen sind relativ pflegeleicht, aber ein paar Dinge solltet ihr beachten.
1. Regelmäßig gießen: Süßkartoffeln brauchen ausreichend Wasser, besonders während der Wachstumsphase. Gießt regelmäßig, aber vermeidet Staunässe.
2. Unkraut entfernen: Haltet das Beet oder den Kübel unkrautfrei, damit die Süßkartoffeln genügend Platz und Nährstoffe haben.
3. Düngen: Eine gelegentliche Düngung mit organischem Dünger fördert das Wachstum.
4. Schädlinge beobachten: Achtet auf Schädlinge wie Blattläuse oder Kartoffelkäfer. Bei Bedarf könnt ihr natürliche Schädlingsbekämpfungsmittel einsetzen.
Phase 5: Die Ernte
Die Erntezeit für Süßkartoffeln ist im Herbst, kurz vor dem ersten Frost.
1. Erntezeitpunkt bestimmen: Die Blätter der Süßkartoffelpflanzen werden gelb und beginnen abzusterben. Das ist ein Zeichen dafür, dass die Süßkartoffeln reif sind.
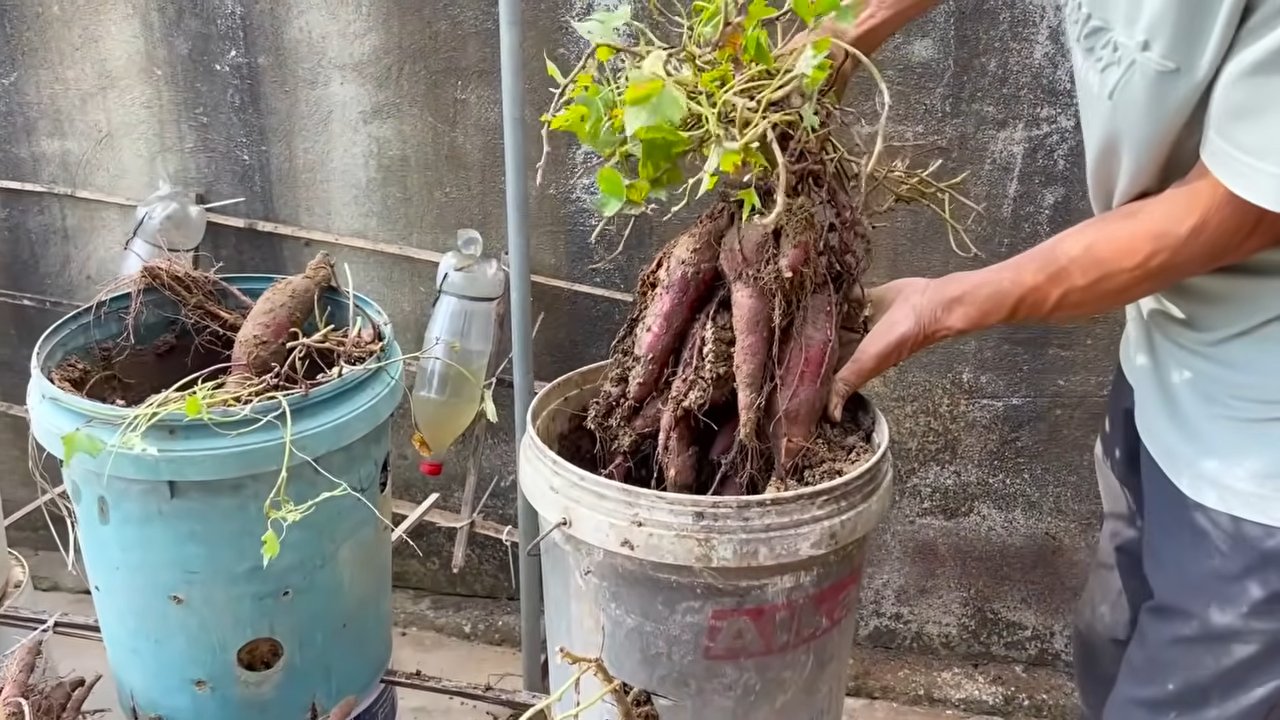
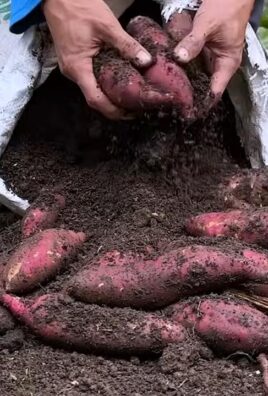
2. Vorsichtig ausgraben: Grabt die Süßkartoffeln vorsichtig aus, um sie nicht zu beschädigen. Am besten verwendet ihr eine Grabegabel.
3. Trocknen lassen: Lasst die Süßkartoffeln nach der Ernte ein paar Tage an einem warmen und trockenen Ort trocknen. Dadurch wird die Schale härter und die Süßkartoffeln sind länger haltbar.
4. Lagern: Lagert die Süßkartoffeln an einem kühlen, dunklen und trockenen Ort. Ideal ist ein Keller oder eine Speisekammer.
Zusätzliche Tipps und Tricks:
* Sonniger Standort: Süßkartoffeln lieben die Sonne! Wählt einen Standort, der mindestens 6 Stunden Sonne pro Tag bekommt.
* Bodenverbesserung: Ein lockerer, gut durchlässiger Boden ist entscheidend für den Erfolg. Mischt Kompost oder Sand unter, um den Boden zu verbessern.
* Rankhilfe: Süßkartoffelpflanzen können lange Ranken bilden. Eine Rankhilfe kann helfen, den Platz optimal zu nutzen.
* Sortenwahl: Es gibt viele verschiedene Süßkartoffelsorten. Informiert euch, welche Sorten in eurer Region gut wachsen.
* Schädlinge: Achtet auf Schädlinge wie Wühlmäuse, die gerne an den Wurzeln knabbern.
Ich hoffe, dieser Guide hilft euch dabei, eure eigenen Süßkartoffeln anzubauen. Es ist ein lohnendes Projekt, das euch mit köstlichen und gesunden Knollen belohnt. Viel Spaß beim Gärtnern!
Conclusion
So, there you have it! Growing sweet potatoes easily at home is not only achievable but also incredibly rewarding. Forget those expensive, often bland, store-bought sweet potatoes. Imagine biting into a sweet potato you nurtured from sprout to harvest, bursting with flavor and packed with nutrients. This DIY trick transforms a simple sweet potato into a source of homegrown goodness, bringing the farm-to-table experience right to your kitchen.
This method isn’t just about saving money; it’s about connecting with your food, understanding its journey, and enjoying the unparalleled taste of freshly harvested produce. The vibrant slips, the sprawling vines, and the eventual treasure of sweet potatoes beneath the soil – it’s a gardening adventure that’s both educational and delicious.
But the benefits don’t stop there. By growing your own sweet potatoes, you’re also reducing your carbon footprint. No more long-distance transportation or excessive packaging. You’re contributing to a more sustainable food system, one sweet potato at a time.
Why is this a must-try? Because it’s simple, cost-effective, and yields delicious results. It’s a fantastic project for families, a great way to introduce children to gardening, and a satisfying hobby for anyone who loves fresh, flavorful food.
Looking for variations? Experiment with different varieties of sweet potatoes! Beauregard, with its classic orange flesh, is a reliable choice. But don’t be afraid to try Japanese sweet potatoes with their purple skin and creamy white flesh, or even the Covington variety, known for its disease resistance. You can also adapt the container size to suit your space. Smaller containers are perfect for patios or balconies, while larger containers can accommodate more plants and potentially yield a bigger harvest. Consider companion planting too! Basil, thyme, and marigolds are known to deter pests and attract beneficial insects, creating a healthier environment for your sweet potatoes to thrive.
Ready to get started? Don’t wait! Grab a sweet potato, some water, and a sunny spot, and embark on this exciting gardening journey. We’re confident that you’ll be amazed by the results.
We encourage you to try this DIY trick for growing sweet potatoes easily and share your experience with us! Post photos of your sweet potato slips, your thriving vines, and your bountiful harvest on social media using #HomegrownSweetPotatoes. We can’t wait to see your success stories and learn from your experiences. Let’s build a community of sweet potato enthusiasts, sharing tips, tricks, and delicious recipes! Happy growing!
Frequently Asked Questions (FAQ)
1. What kind of sweet potato should I use to start the slips?
You can use any sweet potato you find at the grocery store, but organic sweet potatoes are generally recommended. Non-organic sweet potatoes may be treated with sprout inhibitors, which can prevent them from producing slips. Look for sweet potatoes that are firm, free from blemishes, and haven’t started to sprout already. If you have access to sweet potatoes from a local farmer’s market, those are often a great choice as well. Experiment with different varieties to see which ones grow best in your area and which flavors you prefer.
2. How long does it take for sweet potato slips to grow?
The time it takes for slips to grow varies depending on the temperature and humidity. Generally, you can expect to see sprouts emerging within 2-4 weeks. Once the sprouts are about 6-8 inches long, they’re ready to be carefully removed and planted. Be patient, and ensure the sweet potato is kept in a warm, bright location to encourage sprouting. If you’re starting in cooler weather, consider using a heat mat to speed up the process.
3. Can I grow sweet potatoes in a container? What size container is best?
Yes, absolutely! Growing sweet potatoes in containers is a great option, especially if you have limited space. A container that is at least 12 inches deep and 12 inches wide is recommended for each plant. Larger containers, such as half whiskey barrels or large grow bags, will allow the sweet potatoes to develop more fully and potentially yield a larger harvest. Ensure the container has good drainage to prevent root rot.
4. What kind of soil is best for growing sweet potatoes?
Sweet potatoes prefer well-drained, sandy loam soil. Avoid heavy clay soils, as they can become waterlogged and hinder root development. You can amend your soil with compost or other organic matter to improve drainage and fertility. A slightly acidic soil pH (around 6.0-6.5) is ideal. When growing in containers, use a high-quality potting mix specifically formulated for vegetables.
5. How much sun do sweet potatoes need?
Sweet potatoes need at least 6-8 hours of direct sunlight per day to thrive. Choose a sunny location in your garden or on your patio where they will receive ample sunlight. If you’re growing them indoors under grow lights, ensure the lights are positioned close enough to the plants and provide sufficient intensity.
6. How often should I water sweet potatoes?
Water sweet potatoes regularly, especially during hot, dry weather. Keep the soil consistently moist, but avoid overwatering, which can lead to root rot. Check the soil moisture by sticking your finger about an inch deep into the soil. If it feels dry, it’s time to water. Reduce watering frequency as the sweet potatoes mature and the vines begin to yellow.
7. Do sweet potatoes need fertilizer?
Sweet potatoes benefit from regular fertilization, especially during the early stages of growth. Use a balanced fertilizer with equal amounts of nitrogen, phosphorus, and potassium. Avoid over-fertilizing with nitrogen, as this can promote excessive vine growth at the expense of root development. You can also amend the soil with compost or other organic matter to provide slow-release nutrients.
8. When is the best time to harvest sweet potatoes?
Sweet potatoes are typically ready to harvest about 90-120 days after planting the slips. The best time to harvest is before the first frost, as frost can damage the roots. The vines will start to yellow and die back when the sweet potatoes are mature. To harvest, carefully dig around the plants with a garden fork, being careful not to damage the roots. Gently lift the sweet potatoes from the soil.
9. How do I cure sweet potatoes after harvesting?
Curing sweet potatoes is essential for developing their sweetness and improving their storage life. After harvesting, gently brush off any excess soil and allow the sweet potatoes to dry in a warm, humid place (80-85°F and 85-90% humidity) for 7-10 days. This process allows the skins to harden and any minor cuts or bruises to heal. After curing, store the sweet potatoes in a cool, dry, and well-ventilated place (55-60°F) for several months.
10. What are some common problems when growing sweet potatoes, and how can I prevent them?
Some common problems include pests like sweet potato weevils and diseases like stem rot. To prevent these problems, use disease-free slips, practice crop rotation, and control weeds. Companion planting with basil, thyme, or marigolds can help deter pests. Inspect your plants regularly for signs of pests or diseases and take appropriate action if necessary. Good soil drainage and proper watering practices can also help prevent root rot.


Leave a Comment