
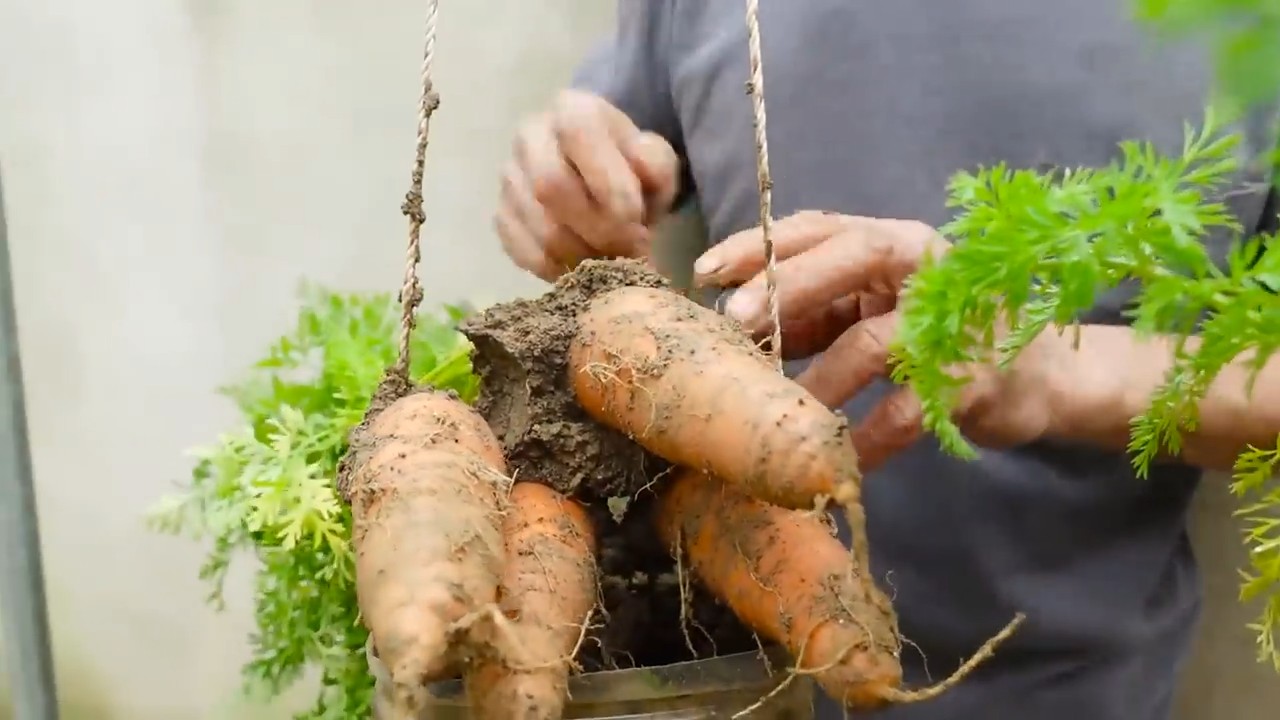
Growing Clean Carrots can feel like a real victory in the home garden! Let’s be honest, who hasn’t pulled a carrot from the earth, only to find it looking more like a mud monster than a healthy snack? I know I have! That’s why I’m so excited to share these simple, yet effective, DIY tricks and hacks that will help you harvest beautiful, clean carrots every time.
Carrots have been cultivated for centuries, with their origins tracing back to Central Asia. Initially, they weren’t even orange! Purple, yellow, and white varieties were common before the vibrant orange carrot we know and love became popularized in the Netherlands in the 17th century. Today, carrots are a staple in cuisines worldwide, celebrated for their nutritional value and versatility.
But here’s the thing: nobody wants to spend extra time scrubbing dirt off their freshly picked veggies. And more importantly, clean carrots are healthier carrots! Removing excess soil reduces the risk of bacteria and other contaminants. Plus, let’s face it, they just look more appealing on your dinner plate. This DIY guide will provide you with practical tips and tricks to ensure you’re growing clean carrots from seed to harvest, saving you time, effort, and ensuring you enjoy the freshest, healthiest produce possible. So, grab your gardening gloves, and let’s get started!
Karottenanbau leicht gemacht: Dein DIY-Guide für knackige, saubere Ernte
Hallo liebe Gartenfreunde! Ich liebe es, mein eigenes Gemüse anzubauen, und Karotten gehören definitiv zu meinen Favoriten. Sie sind nicht nur superlecker, sondern auch unglaublich vielseitig in der Küche. Aber wer kennt es nicht: Man erntet voller Vorfreude seine Karotten, und dann sind sie krumm, klein oder voller Erde. Keine Sorge, ich zeige dir, wie du mit ein paar einfachen Tricks knackige, saubere Karotten selbst anbauen kannst – ganz ohne viel Aufwand!
Die Vorbereitung: Der Schlüssel zum Erfolg
Bevor wir loslegen, ist eine gute Vorbereitung das A und O. Karotten sind nämlich etwas wählerisch, was ihren Standort und den Boden angeht.
* Standortwahl: Karotten lieben die Sonne! Wähle einen sonnigen Platz in deinem Garten, an dem die Pflanzen mindestens sechs Stunden direktes Sonnenlicht pro Tag bekommen.
* Bodenbeschaffenheit: Das ist das A und O für gerade, lange Karotten. Der Boden sollte locker, sandig und gut durchlässig sein. Vermeide steinige oder klumpige Böden, da die Karotten sonst Schwierigkeiten haben, sich zu entwickeln und krumm werden können.
* Bodenverbesserung: Wenn dein Boden nicht ideal ist, kannst du ihn mit Kompost, Sand oder gut verrottetem Mist verbessern. Das lockert den Boden auf und versorgt die Karotten mit wichtigen Nährstoffen.
* pH-Wert: Karotten bevorzugen einen leicht sauren bis neutralen pH-Wert zwischen 6,0 und 7,0. Du kannst den pH-Wert deines Bodens mit einem Testkit aus dem Gartencenter überprüfen und gegebenenfalls anpassen.
Aussaat: So bringst du die Samen in die Erde
Jetzt geht’s ans Eingemachte! Die Aussaat ist ein wichtiger Schritt, um den Grundstein für eine erfolgreiche Karottenernte zu legen.
1. Zeitpunkt: Karotten können ab April direkt ins Freiland gesät werden, sobald der Boden frostfrei ist. Für eine kontinuierliche Ernte kannst du alle paar Wochen nachsäen.
2. Aussaatrillen ziehen: Ziehe mit einem Rechen oder einer Hacke flache Rillen in den Boden. Die Rillen sollten etwa 1-2 cm tief und 20-30 cm voneinander entfernt sein.
3. Samen aussäen: Karottensamen sind sehr klein, daher ist es wichtig, sie nicht zu dicht auszusäen. Mische die Samen am besten mit etwas Sand, um sie gleichmäßiger verteilen zu können.
4. Bedecken und gießen: Bedecke die Samen mit einer dünnen Schicht Erde und drücke sie leicht an. Gieße die Rillen vorsichtig mit einer Brause, damit die Samen nicht weggeschwemmt werden.
5. Feuchtigkeit halten: Halte den Boden während der Keimung feucht, aber nicht nass. Du kannst die Rillen mit einem Vlies abdecken, um die Feuchtigkeit zu speichern und die Keimung zu beschleunigen.
Pflege: So bleiben deine Karotten gesund und munter
Nach der Aussaat ist es wichtig, die Karotten regelmäßig zu pflegen, damit sie optimal wachsen und gedeihen.
* Gießen: Karotten brauchen regelmäßig Wasser, besonders während trockener Perioden. Achte darauf, dass der Boden immer leicht feucht ist, aber vermeide Staunässe.
* Unkraut jäten: Unkraut kann den Karotten die Nährstoffe und das Licht wegnehmen. Jäte regelmäßig Unkraut, um sicherzustellen, dass die Karotten genügend Platz und Ressourcen haben.
* Ausdünnen: Wenn die Karottenpflanzen etwa 5 cm hoch sind, solltest du sie ausdünnen, damit sie genügend Platz zum Wachsen haben. Lasse zwischen den Pflanzen etwa 3-5 cm Abstand. Die herausgezogenen Pflänzchen kannst du übrigens auch essen!
* Boden lockern: Lockere den Boden regelmäßig um die Karotten herum auf, um die Belüftung zu verbessern und die Wurzelbildung zu fördern.
* Schädlinge und Krankheiten: Karotten können von verschiedenen Schädlingen und Krankheiten befallen werden. Achte auf Anzeichen wie gelbe Blätter, Fraßspuren oder Pilzbefall und ergreife gegebenenfalls Maßnahmen.
Ernte: Der Lohn deiner Mühe
Endlich ist es soweit: Die Karotten sind reif und können geerntet werden!
1. Zeitpunkt: Karotten sind in der Regel etwa 2-3 Monate nach der Aussaat erntereif. Du kannst den Reifegrad überprüfen, indem du eine Karotte vorsichtig aus der Erde ziehst. Wenn sie die gewünschte Größe und Farbe hat, kannst du mit der Ernte beginnen.
2. Ernten: Ziehe die Karotten vorsichtig an den Blättern aus der Erde. Wenn sie sich nicht leicht lösen, kannst du eine Grabegabel oder einen Spaten zur Hilfe nehmen.
3. Reinigen: Entferne die Erde von den Karotten und schneide die Blätter ab.
4. Lagern: Karotten können im Kühlschrank oder in einem kühlen, dunklen Keller gelagert werden. Wickle sie am besten in ein feuchtes Tuch oder lege sie in eine Kiste mit feuchtem Sand.
Zusätzliche Tipps für saubere Karotten
Hier sind noch ein paar zusätzliche Tipps, die dir helfen können, besonders saubere Karotten zu ernten:
* Hochbeet: Der Anbau von Karotten in einem Hochbeet ist eine tolle Möglichkeit, um den Boden besser zu kontrollieren und das Unkrautjäten zu erleichtern.
* Vlies: Ein Vlies schützt die Karotten vor Schädlingen und hält den Boden feucht.
* Mulchen: Mulchen mit Stroh oder Rasenschnitt hilft, den Boden feucht zu halten und das Unkrautwachstum zu unterdrücken.
* Sortenwahl: Es gibt verschiedene Karottensorten, die sich in Größe, Form und Farbe unterscheiden. Wähle eine Sorte, die für deine Bedürfnisse und deinen Standort geeignet ist.
Schritt-für-Schritt Anleitung im Detail
Um sicherzustellen, dass du wirklich alles richtig machst, hier nochmal eine detaillierte Schritt-für-Schritt Anleitung:
Schritt 1: Bodenvorbereitung
1. Boden auflockern: Beginne damit, den Boden gründlich aufzulockern. Verwende eine Grabegabel oder einen Spaten, um den Boden bis zu einer Tiefe von mindestens 30 cm zu bearbeiten. Entferne dabei alle Steine, Wurzeln und anderen Hindernisse.
2. Kompost einarbeiten: Arbeite reichlich Kompost in den Boden ein. Kompost verbessert die Bodenstruktur, erhöht die Wasserspeicherfähigkeit und versorgt die Karotten mit wichtigen Nährstoffen.
3. Sand hinzufügen: Wenn dein Boden sehr lehmig ist, kannst du etwas Sand hinzufügen, um ihn durchlässiger zu machen.
4. Boden glätten: Glätte den Boden mit einem Rechen, um eine ebene Oberfläche zu schaffen.
Schritt 2: Aussaat
1. Aussaatrillen ziehen: Ziehe mit einem Rechen oder einer Hacke flache Rillen in den Boden. Die Rillen sollten etwa 1-2 cm tief und 20-30 cm voneinander entfernt sein.
2. Samen vorbereiten: Mische die Karottensamen mit etwas Sand, um sie gleichmäßiger verteilen zu können.
3. Samen aussäen: Säe die Samen in die Rillen aus. Achte darauf, sie nicht zu dicht auszusäen.
4. Bedecken und andrücken: Bedecke die Samen mit einer dünnen Schicht Erde und drücke sie leicht an.
5. Gießen: Gieße die Rillen vorsichtig mit einer Brause, damit die Samen nicht weggeschwemmt werden.
Schritt 3: Pflege
1. Gießen: Gieße die Karotten regelmäßig, besonders während trockener Perioden. Achte darauf, dass der Boden immer leicht feucht ist, aber vermeide Staunässe.
2. Unkraut jäten: Jäte regelmäßig Unkraut, um sicherzustellen, dass die Karotten genügend Platz und Ressourcen haben.
3. Ausdünnen: Wenn die Karottenpflanzen etwa 5 cm hoch sind, dünne sie aus, damit sie genügend Platz zum Wachsen haben. Lasse zwischen den Pflanzen etwa 3-5 cm Abstand.
4. Boden lock
Conclusion
Growing your own clean carrots doesn’t have to be a daunting task. By embracing this simple DIY trick, you’re not just cultivating delicious, vibrant vegetables; you’re also taking control of what goes into your food and contributing to a healthier, more sustainable lifestyle. The satisfaction of pulling a perfectly formed, earth-kissed carrot from your own garden, knowing it’s free from harmful chemicals and pesticides, is truly unparalleled. It’s a reward that extends far beyond the dinner table.
This method, focusing on soil preparation and consistent watering, is a game-changer for anyone who’s struggled with misshapen, forked, or pest-ridden carrots in the past. The key is creating a loose, well-draining environment where the roots can easily penetrate the soil without encountering resistance. Remember, carrots thrive in conditions that mimic their natural habitat – think loose, sandy loam.
But don’t stop there! Feel free to experiment with different carrot varieties. From the classic Nantes to the colorful Rainbow blend, each type offers a unique flavor profile and visual appeal. You can also try companion planting. Marigolds, for example, are known to deter nematodes, while onions can repel carrot root flies. These natural partnerships can further enhance your carrot-growing success.
Consider adding a layer of mulch around your carrot plants to help retain moisture and suppress weeds. Straw, shredded leaves, or even grass clippings work wonders. Just be sure to keep the mulch away from the carrot crowns to prevent rot.
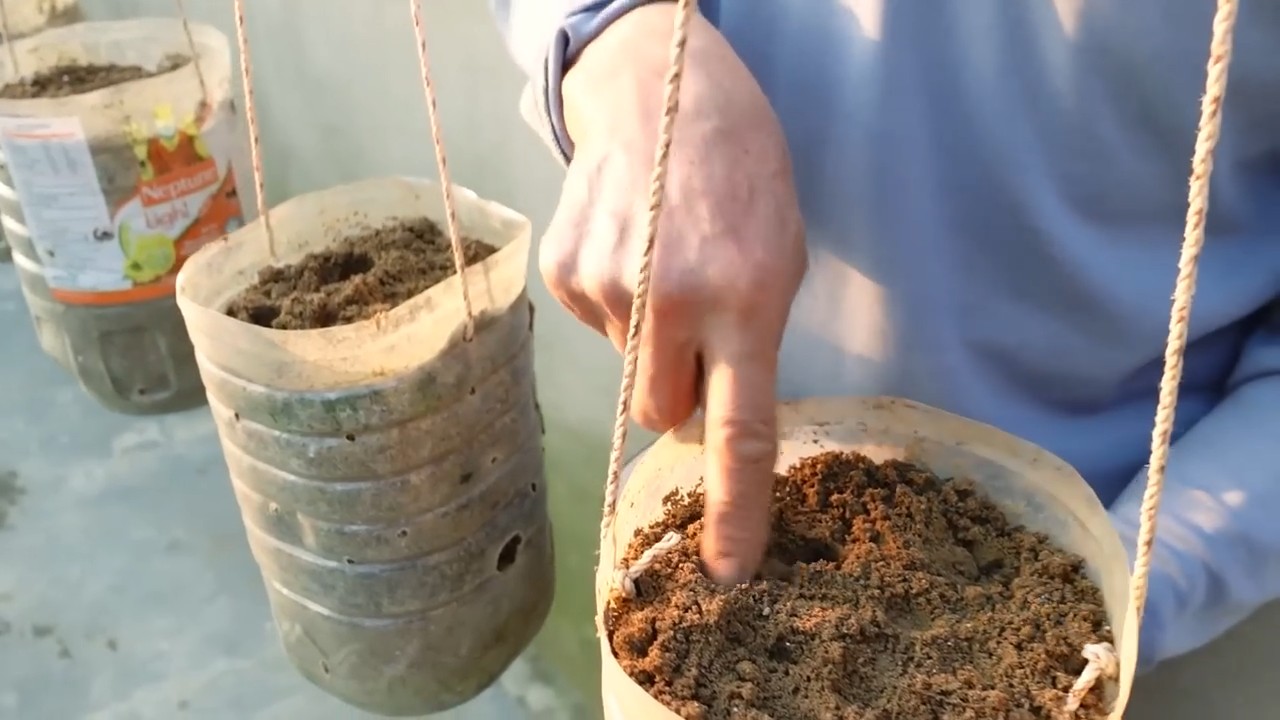
And if you’re short on space, don’t despair! Carrots can also be grown in containers. Choose a deep pot (at least 12 inches) and use a high-quality potting mix. Container-grown carrots may require more frequent watering, but they’re a great option for urban gardeners or those with limited outdoor space.
Ultimately, the success of growing clean carrots hinges on your willingness to experiment and adapt. Every garden is unique, and what works for one person may not work for another. So, don’t be afraid to try different techniques and find what suits your specific environment and growing conditions.
We wholeheartedly encourage you to give this DIY trick a try. It’s a simple, effective, and rewarding way to enjoy the freshest, most flavorful carrots imaginable. And once you’ve harvested your bounty, we’d love to hear about your experience! Share your photos, tips, and stories in the comments below. Let’s create a community of passionate carrot growers who are committed to sustainable and healthy gardening practices. Your insights could inspire others to embark on their own carrot-growing journey. Happy gardening!
Frequently Asked Questions (FAQ)
What kind of soil is best for growing clean carrots?
The ideal soil for growing clean carrots is loose, well-draining, and sandy loam. Carrots need to be able to easily push through the soil as they grow, so heavy clay soils can lead to misshapen or stunted roots. Amend heavy soils with plenty of organic matter, such as compost or well-rotted manure, to improve drainage and aeration. Avoid using fresh manure, as it can cause forking. A slightly acidic soil pH of 6.0 to 6.8 is also optimal. Before planting, consider getting a soil test to determine the pH and nutrient levels of your soil. This will help you make informed decisions about amendments and fertilization.
How often should I water my carrots?
Consistent watering is crucial for growing clean carrots. Keep the soil consistently moist, but not waterlogged. Aim for about 1 inch of water per week, either through rainfall or irrigation. During hot, dry periods, you may need to water more frequently. Use a soaker hose or drip irrigation to deliver water directly to the roots, minimizing water loss through evaporation. Avoid overhead watering, as it can promote fungal diseases. Check the soil moisture regularly by sticking your finger about an inch deep. If the soil feels dry, it’s time to water.
What are some common pests and diseases that affect carrots, and how can I prevent them?
Carrot root flies are a common pest that can damage carrot roots. Cover your carrot bed with a fine mesh netting to prevent the flies from laying their eggs. Nematodes can also be a problem, causing root knotting and stunted growth. Plant marigolds nearby to deter nematodes. Fungal diseases, such as leaf blight, can occur in humid conditions. Ensure good air circulation around your plants and avoid overhead watering. Remove any infected leaves promptly. Crop rotation can also help prevent the buildup of soilborne pests and diseases.
How do I know when my carrots are ready to harvest?
Carrots are typically ready to harvest 60-80 days after planting, depending on the variety. Check the seed packet for specific maturity dates. You can also gauge ripeness by looking at the size of the carrot shoulders, which should be visible above the soil line. Gently loosen the soil around the carrots and pull them up by the greens. If the carrots are difficult to pull, use a garden fork to lift them out of the ground. Harvest carrots on a dry day to prevent rot.
Can I grow carrots in containers?
Yes, carrots can be successfully grown in containers. Choose a deep pot (at least 12 inches) to accommodate the long roots. Use a high-quality potting mix that is well-draining. Container-grown carrots may require more frequent watering than those grown in the ground. Make sure the pot has drainage holes to prevent waterlogging. Consider using a slow-release fertilizer to provide nutrients throughout the growing season.
What are some good companion plants for carrots?
Companion planting can help improve carrot growth and deter pests. Some good companion plants for carrots include:
* **Onions and garlic:** Repel carrot root flies.
* **Marigolds:** Deter nematodes.
* **Rosemary:** Repels carrot rust fly and cabbage moths.
* **Lettuce:** Provides shade and helps retain moisture.
* **Radishes:** Loosen the soil and act as a trap crop for pests.
How can I prevent my carrots from forking or splitting?
Forking and splitting can be caused by several factors, including rocky soil, compacted soil, and inconsistent watering. To prevent these problems:
* Remove any rocks or debris from the soil before planting.
* Amend heavy soils with organic matter to improve drainage and aeration.
* Water consistently, especially during dry periods.
* Avoid over-fertilizing, as this can also cause forking.
Is it necessary to thin my carrot seedlings?
Yes, thinning is essential for growing clean carrots. Overcrowding can lead to stunted growth and misshapen roots. Thin the seedlings when they are about 2 inches tall, spacing them 1-2 inches apart. Use scissors to snip off the unwanted seedlings at the soil line, rather than pulling them out, to avoid disturbing the roots of the remaining plants.
Can I save carrot seeds for next year?
Saving carrot seeds is possible, but it requires a two-year cycle. In the first year, you grow the carrots. In the second year, you replant the best carrots and allow them to flower and produce seeds. However, carrots are cross-pollinated, so if you grow multiple varieties, the seeds may not be true to type. To ensure pure seeds, you need to isolate the carrot plants from other flowering carrots. Saving carrot seeds can be a rewarding experience, but it requires patience and attention to detail.


Leave a Comment