
Cucumber yield increase is the holy grail for any home gardener dreaming of crisp salads and tangy pickles overflowing from their kitchen. Let’s face it, there’s nothing more disappointing than nurturing your cucumber plants, only to be rewarded with a meager harvest. But fear not, fellow gardening enthusiasts! This isn’t just another article filled with vague advice; I’m about to share some tried-and-true DIY tricks and hacks that will have your cucumber plants bursting with delicious, green goodness.
Cucumbers have been cultivated for over 3,000 years, originating in India and spreading across the globe. They’ve been a staple in various cultures, valued not only for their refreshing taste but also for their medicinal properties. Think about it – from ancient Ayurvedic practices to modern-day spa treatments, cucumbers have always been associated with health and vitality. So, why not bring that vitality to your own garden and enjoy the fruits (or rather, vegetables!) of your labor?
In today’s world, where fresh, organic produce can be expensive and sometimes hard to find, maximizing your cucumber yield increase at home is more important than ever. These DIY tricks are designed to be simple, cost-effective, and, most importantly, effective. I’ll guide you through everything from soil preparation to clever trellising techniques, ensuring you get the most out of your cucumber plants. Get ready to transform your garden into a cucumber paradise!

Gurken-Ernte maximieren: Mein DIY-Leitfaden für eine üppige Ausbeute
Hallo liebe Gartenfreunde! Ich liebe es, frische Gurken aus meinem eigenen Garten zu ernten. Nichts schmeckt besser als eine knackige, selbst angebaute Gurke direkt vom Strauch. Aber manchmal ist die Ernte nicht so üppig, wie man es sich wünscht. Deshalb habe ich im Laufe der Jahre einige DIY-Tricks und Kniffe entwickelt, um die Gurken-Ernte zu maximieren. Und heute teile ich meine Geheimnisse mit euch!
Die Grundlagen für eine erfolgreiche Gurkenernte
Bevor wir uns den DIY-Hacks widmen, ist es wichtig, die Grundlagen für eine erfolgreiche Gurkenernte zu verstehen. Gurken sind nämlich etwas anspruchsvoll, was ihre Bedürfnisse angeht.
* Sonnenschein: Gurken lieben die Sonne! Sie brauchen mindestens 6-8 Stunden direkte Sonneneinstrahlung pro Tag.
* Boden: Der Boden sollte gut durchlässig, humusreich und locker sein. Gurken mögen keine Staunässe.
* Wasser: Regelmäßiges Gießen ist entscheidend, besonders während der Fruchtbildung. Achte darauf, dass der Boden immer feucht, aber nicht nass ist.
* Nährstoffe: Gurken sind Starkzehrer und benötigen ausreichend Nährstoffe, besonders Stickstoff, Phosphor und Kalium.
* Bestäubung: Die meisten Gurkensorten sind auf Bestäubung durch Bienen oder andere Insekten angewiesen.
DIY-Hacks für eine größere Gurkenernte
Jetzt kommen wir zu den spannenden DIY-Hacks, die ich selbst ausprobiert habe und die wirklich einen Unterschied gemacht haben!
1. Der selbstgemachte Gurken-Dünger
Gurken brauchen, wie gesagt, viele Nährstoffe. Anstatt teuren Dünger zu kaufen, stelle ich meinen eigenen her. Er ist nicht nur kostengünstiger, sondern auch umweltfreundlicher!
Du brauchst:
* Kaffeesatz (getrocknet)
* Eierschalen (zerkleinert)
* Bananenschalen (getrocknet und zerkleinert)
* Holzasche (optional, aber sehr gut für den Kaliumgehalt)
So geht’s:
1. Sammle deine Zutaten: Beginne damit, Kaffeesatz, Eierschalen und Bananenschalen zu sammeln. Den Kaffeesatz gut trocknen lassen, um Schimmelbildung zu vermeiden. Die Eierschalen gründlich reinigen und zerkleinern. Die Bananenschalen ebenfalls trocknen und in kleine Stücke schneiden oder zerbröseln.
2. Mische die Zutaten: Vermische alle Zutaten in einem Eimer oder einer großen Schüssel. Das Verhältnis sollte ungefähr so sein: 2 Teile Kaffeesatz, 1 Teil Eierschalen, 1 Teil Bananenschalen und optional 0,5 Teile Holzasche.
3. Anwendung: Verteile den selbstgemachten Dünger um die Gurkenpflanzen herum. Arbeite ihn leicht in die Erde ein.
4. Gießen: Gieße die Pflanzen anschließend gründlich, damit die Nährstoffe in den Boden gelangen.
5. Wiederholung: Wiederhole die Düngung alle 2-3 Wochen während der Wachstumsperiode.
Warum funktioniert das?
* Kaffeesatz: Enthält Stickstoff, der für das Wachstum der Blätter und Stängel wichtig ist.
* Eierschalen: Liefern Kalzium, das die Zellwände stärkt und Blütenendfäule verhindert.
* Bananenschalen: Sind reich an Kalium, das für die Fruchtbildung und die allgemeine Gesundheit der Pflanze wichtig ist.
* Holzasche: Enthält Kalium und andere Spurenelemente.
2. Das Gurken-Rankgitter aus Bambus
Gurken sind Kletterpflanzen und brauchen eine Rankhilfe, um optimal zu wachsen. Ein Rankgitter aus Bambus ist nicht nur stabil und langlebig, sondern sieht auch noch toll aus!
Du brauchst:
* Bambusstäbe (verschiedene Längen)
* Gartendraht oder Bindfaden
* Eine Säge (optional, um die Bambusstäbe zuzuschneiden)
So geht’s:
1. Zuschneiden (optional): Schneide die Bambusstäbe auf die gewünschte Länge zu. Ich verwende gerne Stäbe in verschiedenen Längen, um ein interessantes Design zu schaffen.
2. Rahmen bauen: Lege die längsten Bambusstäbe als Rahmen auf den Boden. Verbinde die Ecken mit Gartendraht oder Bindfaden.
3. Querstreben anbringen: Befestige die kürzeren Bambusstäbe als Querstreben am Rahmen. Achte darauf, dass die Abstände gleichmäßig sind.
4. Verstärken: Verstärke die Verbindungen mit zusätzlichem Gartendraht oder Bindfaden.
5. Aufstellen: Stelle das Rankgitter hinter die Gurkenpflanzen.
6. Anbinden: Binde die Gurkenpflanzen vorsichtig an das Rankgitter, damit sie sich daran hochranken können.
Warum funktioniert das?
* Bessere Belüftung: Durch das Ranken haben die Blätter mehr Luftzirkulation, was das Risiko von Pilzkrankheiten reduziert.
* Mehr Sonnenlicht: Die Gurkenpflanzen erhalten mehr Sonnenlicht, was die Photosynthese und somit das Wachstum fördert.
* Leichtere Ernte: Die Gurken hängen frei am Rankgitter, was die Ernte erleichtert.
* Platzsparend: Das Rankgitter spart Platz im Garten, da die Gurkenpflanzen nicht am Boden liegen.
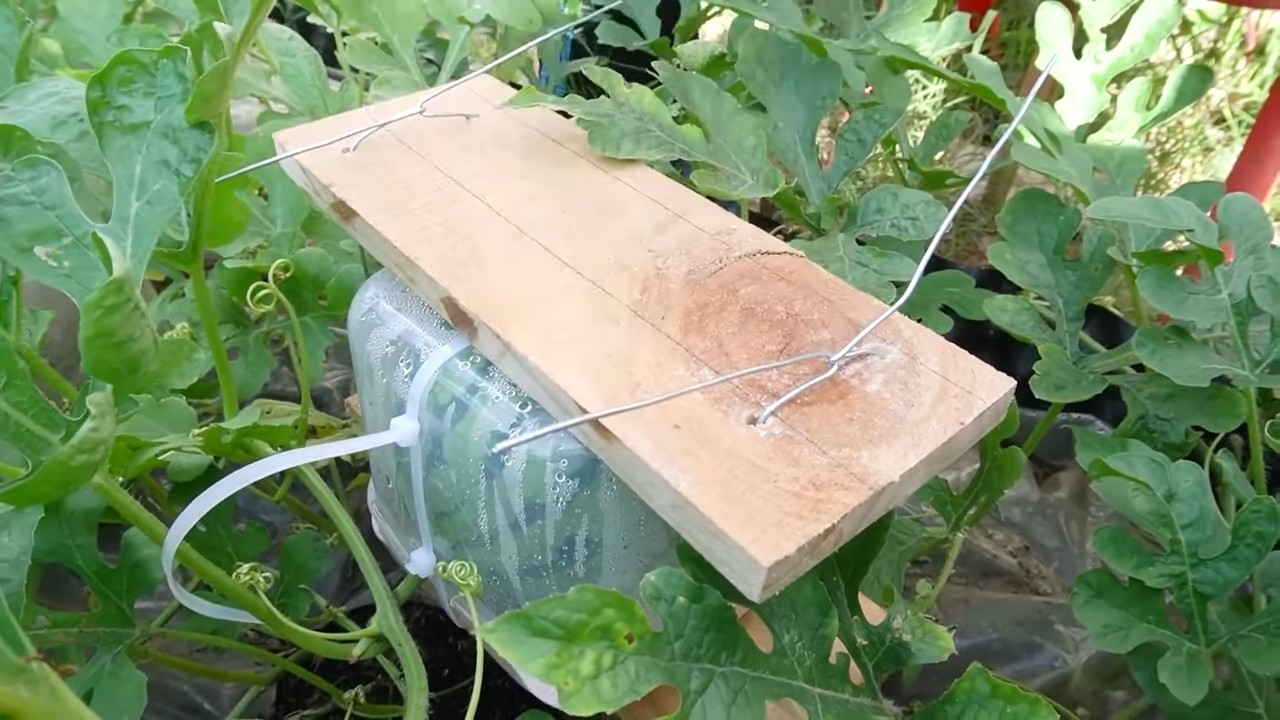
3. Die selbstgemachte Gurken-Bewässerung
Regelmäßiges Gießen ist für Gurken unerlässlich. Mit einer selbstgemachten Bewässerung kannst du sicherstellen, dass deine Gurkenpflanzen immer ausreichend mit Wasser versorgt sind.
Du brauchst:
* Eine Plastikflasche (1,5 oder 2 Liter)
* Einen Nagel oder eine Ahle
* Ein Messer oder eine Schere
So geht’s:
1. Löcher bohren: Bohre mit dem Nagel oder der Ahle mehrere kleine Löcher in den Deckel der Plastikflasche.
2. Flasche eingraben: Schneide mit dem Messer oder der Schere den Boden der Plastikflasche ab.
3. Eingraben: Grabe die Flasche mit dem Hals nach unten in die Erde, in der Nähe der Gurkenpflanze. Achte darauf, dass der Deckel mit den Löchern im Boden ist.
4. Befüllen: Fülle die Flasche mit Wasser.
5. Wiederbefüllen: Fülle die Flasche regelmäßig nach, wenn das Wasser aufgebraucht ist.
Warum funktioniert das?
* Gleichmäßige Bewässerung: Das Wasser sickert langsam durch die Löcher in den Boden und versorgt die Wurzeln der Gurkenpflanze gleichmäßig mit Feuchtigkeit.
* Weniger Wasserverschwendung: Das Wasser verdunstet nicht so schnell wie bei der herkömmlichen Bewässerung.
* Tiefe Bewässerung: Das Wasser gelangt direkt zu den Wurzeln, was die Pflanzen widerstandsfähiger macht.
4. Die Gurken-Bestäubungshilfe
Wie bereits erwähnt, sind die meisten Gurkensorten auf Bestäubung angewiesen. Wenn es nicht genügend Bienen oder andere Insekten in deinem Garten gibt, kannst du die Bestäubung selbst übernehmen.
Du brauchst:
* Einen kleinen Pinsel oder Wattestäbchen
So geht’s:
1. Männliche Blüte erkennen: Männliche Blüten haben einen dünnen Stiel und keinen Fruchtansatz.
2. Pollen aufnehmen: Streiche mit dem Pinsel oder Wattestäbchen vorsichtig über die Staubgefäße der männlichen Blüte, um den Pollen aufzunehmen.
3. Weibliche Blüte bestäuben: Streiche mit dem Pinsel oder Wattestäbchen über die Narbe der weiblichen Blüte. Weibliche Blüten haben einen kleinen Fruchtansatz direkt unter der Blüte.
4. Wiederholen: Wiederhole den Vorgang jeden Tag, solange es männliche und weibliche Blüten gibt.
Warum funktioniert das?
* Sicherstellung der Bestäubung: Du stellst sicher, dass die
Conclusion
So, there you have it! This simple, yet incredibly effective DIY trick for boosting your cucumber yield is a game-changer for any gardener, regardless of experience level. We’ve walked you through the process, highlighting the ease and affordability of implementing this method. But why is this a must-try? Because it directly addresses the common challenges faced by cucumber growers: pollination issues, nutrient deficiencies, and inefficient space utilization.
By implementing this DIY technique, you’re not just growing cucumbers; you’re cultivating a thriving ecosystem that supports robust plant growth and maximizes fruit production. Imagine harvesting baskets overflowing with crisp, juicy cucumbers, all thanks to a few simple adjustments to your gardening routine. The satisfaction of nurturing your plants and reaping the rewards of a bountiful harvest is truly unparalleled.
But the beauty of this DIY approach lies in its adaptability. Feel free to experiment with variations to suit your specific needs and preferences.
Variations and Suggestions:
* Companion Planting Boost: Enhance the effect by planting companion plants like marigolds or nasturtiums near your cucumbers. These flowers attract pollinators and deter pests, further contributing to a healthier and more productive cucumber patch.
* Vertical Growing Alternatives: If space is a concern, consider using different vertical structures like trellises or cages. This not only saves space but also improves air circulation around the plants, reducing the risk of fungal diseases.
* Nutrient Supplementation: While the core of this DIY trick focuses on optimizing existing resources, supplementing with a balanced organic fertilizer can provide an extra boost, especially during the fruiting stage. Look for fertilizers specifically formulated for vegetables or fruiting plants.
* Watering Techniques: Consistent and proper watering is crucial. Consider using a soaker hose or drip irrigation to deliver water directly to the roots, minimizing water waste and reducing the risk of foliar diseases.
* Seed Starting: For an even earlier harvest, start your cucumber seeds indoors a few weeks before the last expected frost. This gives your plants a head start and allows them to establish a strong root system before being transplanted outdoors.
We are confident that this DIY trick will significantly improve your cucumber yield increase. It’s a cost-effective, environmentally friendly, and incredibly rewarding way to enhance your gardening experience.
Now, it’s your turn! We encourage you to try this DIY trick in your own garden and witness the remarkable results firsthand. Don’t be afraid to experiment with different variations and find what works best for your specific growing conditions.
Most importantly, we want to hear about your experience! Share your success stories, challenges, and any modifications you made in the comments section below. Let’s create a community of cucumber enthusiasts who are passionate about maximizing their harvests and sharing their knowledge with others. Together, we can unlock the full potential of our gardens and enjoy the abundance of fresh, homegrown cucumbers. Happy gardening!
Frequently Asked Questions (FAQ)
Q: How long does it take to see results after implementing this DIY trick?
A: The timeframe for seeing noticeable results can vary depending on several factors, including the initial health of your cucumber plants, the growing conditions in your area, and the specific variations you implement. However, in general, you can expect to see improvements in plant growth and fruit production within 2-4 weeks of implementing this DIY trick. Keep a close eye on your plants, monitoring their overall health, the number of flowers produced, and the size and quantity of developing cucumbers. Remember that patience is key, and consistent care will ultimately lead to a more bountiful harvest.
Q: Is this DIY trick suitable for all types of cucumber plants?
A: Yes, this DIY trick is generally suitable for all types of cucumber plants, including slicing cucumbers, pickling cucumbers, and specialty varieties. The core principles of optimizing pollination, nutrient availability, and space utilization apply to all cucumber plants, regardless of their specific characteristics. However, it’s always a good idea to research the specific needs of your chosen cucumber variety and adjust the DIY trick accordingly. For example, some varieties may require more support for vertical growing, while others may be more susceptible to certain pests or diseases.
Q: What if I don’t have access to all the materials mentioned in the DIY trick?
A: Don’t worry if you don’t have access to all the materials mentioned in the DIY trick. The beauty of this approach is its adaptability. Feel free to substitute materials based on what you have available. For example, if you don’t have access to specific organic fertilizers, you can use compost or other natural soil amendments. If you don’t have a trellis, you can use stakes or other supports to encourage vertical growth. The key is to focus on the underlying principles of the DIY trick and find creative ways to achieve the same results using the resources you have at hand.
Q: Can I use this DIY trick in a container garden?
A: Absolutely! This DIY trick is perfectly suitable for container gardens. In fact, it can be even more effective in containers, as you have greater control over the growing environment. When growing cucumbers in containers, be sure to choose a pot that is large enough to accommodate the plant’s root system. Use a high-quality potting mix and provide adequate drainage. You may also need to water more frequently, as containers tend to dry out faster than garden beds. The principles of optimizing pollination, nutrient availability, and space utilization still apply, so be sure to implement the DIY trick accordingly.
Q: How often should I apply this DIY trick to my cucumber plants?
A: The frequency of application will depend on the specific components of the DIY trick. For example, you may need to reapply organic fertilizers or soil amendments every few weeks to maintain optimal nutrient levels. Similarly, you may need to adjust the vertical support system as the plants grow. Monitor your plants closely and adjust the frequency of application based on their needs. A good rule of thumb is to observe your plants regularly and address any issues promptly.
Q: What are some common problems that can arise when growing cucumbers, and how can I address them?
A: Some common problems that can arise when growing cucumbers include pest infestations, fungal diseases, and nutrient deficiencies. To prevent pest infestations, consider using companion planting techniques or applying organic pest control methods. To prevent fungal diseases, ensure good air circulation around the plants and avoid overwatering. To address nutrient deficiencies, amend the soil with organic fertilizers or soil amendments. Regularly inspect your plants for any signs of problems and address them promptly to prevent them from escalating.
Q: What if I don’t see any improvement in my cucumber yield after trying this DIY trick?
A: If you don’t see any improvement in your cucumber yield after trying this DIY trick, don’t be discouraged. There could be several factors contributing to the lack of results. First, double-check that you have implemented the DIY trick correctly and that you are providing adequate care for your plants. Consider the growing conditions in your area, such as sunlight, temperature, and soil quality. It may also be helpful to consult with a local gardening expert or extension agent to get personalized advice. Remember that gardening is a learning process, and it may take some experimentation to find what works best for your specific situation.
Q: Can this DIY trick be used in conjunction with other gardening techniques?
A: Absolutely! This DIY trick is designed to complement other gardening techniques, not replace them. You can use it in conjunction with companion planting, crop rotation, succession planting, and other methods to create a more sustainable and productive garden. The key is to integrate the DIY trick into your overall gardening strategy and tailor it to your specific needs and preferences.
Q: How does this DIY trick help with cucumber yield increase?
A: This DIY trick helps with cucumber yield increase by addressing several key factors that can limit fruit production. By optimizing pollination, you ensure that more flowers are successfully fertilized, leading to a greater number of cucumbers. By improving nutrient availability, you provide the plants with the essential building blocks they need to grow and produce fruit. By maximizing space utilization, you allow the plants to grow more efficiently and produce more cucumbers in a given area. Together, these factors contribute to a significant increase in cucumber yield.

Leave a Comment