
Growing bean sprouts peanuts at home might sound like a quirky science experiment, but trust me, it’s a surprisingly rewarding and delicious endeavor! Forget those bland, store-bought sprouts – imagine the fresh, nutty flavor of homegrown bean sprouts peanuts adding a delightful crunch to your salads, stir-fries, and sandwiches.
Sprouting, in general, has a rich history, dating back thousands of years in various cultures. Ancient civilizations recognized the nutritional powerhouses hidden within these tiny germinating seeds. In many Asian cuisines, sprouts are not just a food source but also a symbol of vitality and new beginnings. While peanuts might not be the first thing that comes to mind when you think of sprouting, they offer a unique twist on this ancient practice.
Why should you try this DIY trick? Well, for starters, it’s incredibly cost-effective. A handful of peanuts can yield a substantial amount of sprouts. More importantly, it’s about control. You know exactly what’s going into your food – no hidden additives or preservatives. Plus, growing bean sprouts peanuts is a fun and educational project for the whole family. It’s a fantastic way to connect with nature, even if you only have a small kitchen counter. I’m excited to share my easy-to-follow guide, so you can enjoy the fresh, nutty goodness of homegrown peanut sprouts in no time!
DIY: Knackige Sprossen und Erdnüsse selbst ziehen – So einfach geht’s!
Hallo liebe DIY-Freunde! Heute zeige ich euch, wie ihr ganz einfach zu Hause knackige Sprossen und leckere Erdnüsse ziehen könnt. Es ist nicht nur super einfach, sondern auch eine tolle Möglichkeit, frische und gesunde Zutaten direkt aus der eigenen Küche zu ernten. Los geht’s!
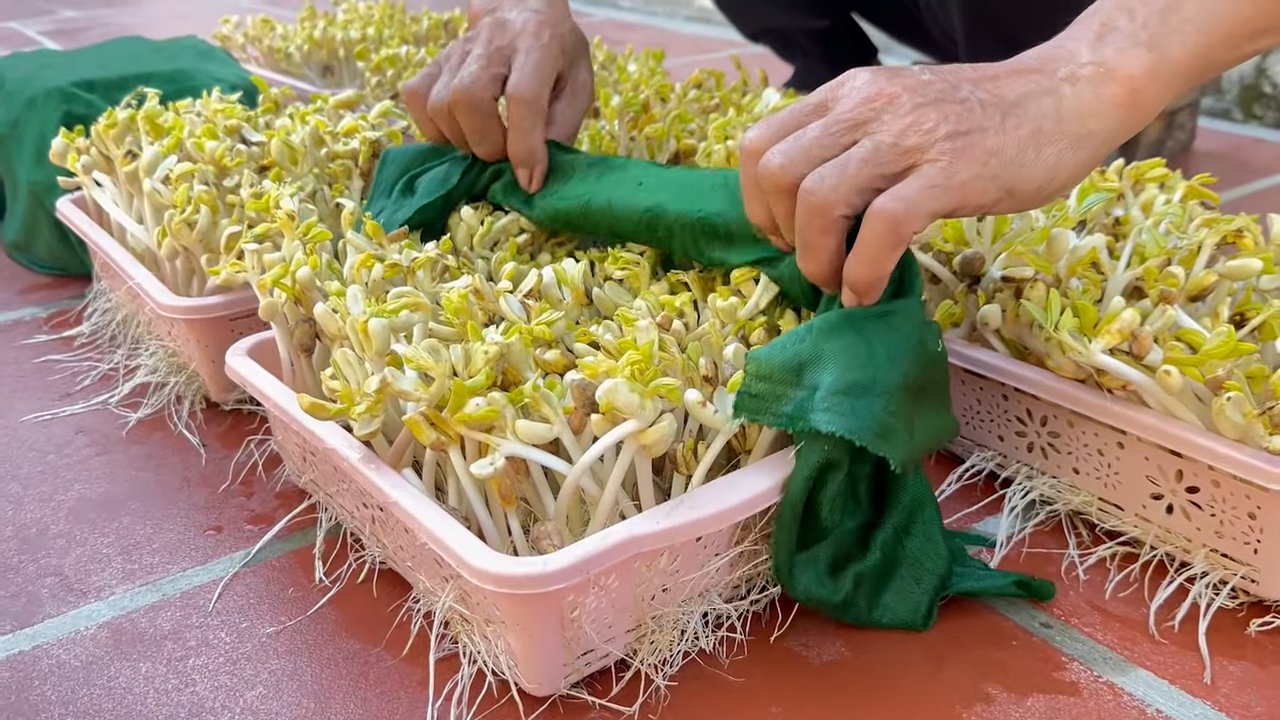
Sprossen ziehen – Der einfache Weg zu frischem Grün
Sprossen sind wahre Nährstoffbomben und lassen sich kinderleicht selbst ziehen. Ich zeige euch zwei Methoden: im Sprossenglas und im Keimgerät.
Methode 1: Sprossen im Sprossenglas ziehen
Was ihr braucht:
* Sprossenglas (oder ein sauberes Einmachglas mit Gaze oder einem speziellen Sprossendeckel)
* Sprossensamen (z.B. Alfalfa, Radieschen, Brokkoli, Mungbohnen)
* Sauberes Wasser
Schritt-für-Schritt-Anleitung:
1. Samen einweichen: Gebt die Sprossensamen in das Sprossenglas und füllt es mit reichlich Wasser. Die Einweichzeit variiert je nach Sorte. Alfalfa und Radieschen brauchen etwa 6-8 Stunden, Mungbohnen 12-24 Stunden. Ich empfehle, die Packungsanleitung zu beachten.
2. Wasser abgießen: Nach der Einweichzeit gießt ihr das Wasser ab. Achtet darauf, dass keine Samen im Abfluss landen!
3. Spülen: Spült die Samen gründlich mit frischem Wasser durch.
4. Abtropfen lassen: Stellt das Sprossenglas schräg auf, sodass überschüssiges Wasser ablaufen kann. Das ist wichtig, damit die Sprossen nicht schimmeln.
5. Regelmäßig spülen: Spült die Sprossen 2-3 Mal täglich mit frischem Wasser. Das hält sie feucht und verhindert Schimmelbildung.
6. Wachsen lassen: Stellt das Sprossenglas an einen hellen, aber nicht direkten Sonnenplatz. Direkte Sonneneinstrahlung kann die Sprossen austrocknen.
7. Ernten: Nach 3-7 Tagen, je nach Sorte, sind eure Sprossen erntereif. Sie sollten knackig und saftig sein. Spült sie vor dem Verzehr noch einmal gründlich ab.
Methode 2: Sprossen im Keimgerät ziehen
Was ihr braucht:
* Keimgerät (mit mehreren Etagen)
* Sprossensamen (wie oben)
* Sauberes Wasser
Schritt-für-Schritt-Anleitung:
1. Samen einweichen: Weicht die Sprossensamen wie oben beschrieben ein.
2. Samen verteilen: Verteilt die eingeweichten Samen gleichmäßig auf den Etagen des Keimgeräts. Achtet darauf, dass sie nicht zu dicht liegen.
3. Wasser einfüllen: Füllt Wasser in die unterste Etage des Keimgeräts.
4. Regelmäßig spülen: Die meisten Keimgeräte haben ein automatisches Bewässerungssystem. Falls nicht, spült die Sprossen 2-3 Mal täglich mit frischem Wasser.
5. Wachsen lassen: Stellt das Keimgerät an einen hellen, aber nicht direkten Sonnenplatz.
6. Ernten: Nach 3-7 Tagen sind eure Sprossen erntereif. Spült sie vor dem Verzehr noch einmal gründlich ab.
Wichtige Tipps für erfolgreiche Sprossenzucht:
* Hygiene: Achtet auf absolute Sauberkeit! Verwendet nur saubere Gläser, Geräte und Wasser.
* Belüftung: Sorgt für gute Belüftung, um Schimmelbildung zu vermeiden.
* Qualität der Samen: Verwendet nur spezielle Sprossensamen, die für den Verzehr geeignet sind.
* Lagerung: Lagert die geernteten Sprossen im Kühlschrank. Sie halten sich dort einige Tage.
Erdnüsse selbst ziehen – Vom Samen zur Nuss
Erdnüsse selbst zu ziehen ist ein spannendes Projekt, das etwas mehr Zeit und Geduld erfordert, aber sich definitiv lohnt!
Vorbereitung: Die richtige Sorte und der richtige Standort
Was ihr braucht:
* Ungesalzene, rohe Erdnüsse (am besten aus dem Bioladen oder Gartencenter)
* Anzuchttöpfe oder -schalen
* Anzuchterde
* Einen sonnigen Standort (drinnen oder draußen)
* Einen größeren Topf oder ein Beet (für später)
Schritt-für-Schritt-Anleitung:
1. Erdnüsse vorbereiten: Wählt gesunde, pralle Erdnüsse aus. Ihr könnt die Schale entfernen, aber es ist nicht unbedingt notwendig.
2. Vorquellen (optional): Um die Keimung zu beschleunigen, könnt ihr die Erdnüsse für 12-24 Stunden in lauwarmem Wasser vorquellen.
3. Aussaat: Füllt die Anzuchttöpfe mit Anzuchterde. Legt die Erdnüsse etwa 2-3 cm tief in die Erde und bedeckt sie leicht.
4. Gießen: Gießt die Erde vorsichtig an, sodass sie feucht, aber nicht nass ist.
5. Standort: Stellt die Anzuchttöpfe an einen warmen und hellen Ort. Eine Temperatur von 20-25°C ist ideal.
6. Feuchtigkeit halten: Haltet die Erde gleichmäßig feucht, aber vermeidet Staunässe.
7. Keimung: Nach etwa 1-3 Wochen sollten die ersten Keimlinge erscheinen.
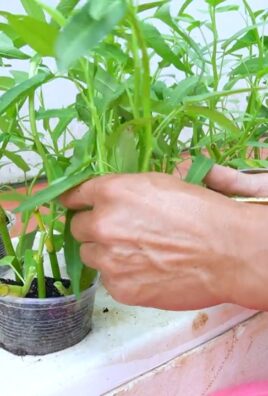
Umpflanzen und Pflege: Vom kleinen Pflänzchen zur Erdnusspflanze
1. Umpflanzen: Sobald die Erdnusspflanzen etwa 10-15 cm hoch sind, könnt ihr sie in größere Töpfe oder ins Beet umpflanzen. Wählt einen sonnigen Standort mit gut durchlässigem Boden.
2. Gießen: Gießt die Erdnusspflanzen regelmäßig, besonders während der Blütezeit.
3. Düngen: Düngt die Pflanzen alle 2-3 Wochen mit einem organischen Dünger.
4. Häufeln: Wenn die Pflanzen blühen, solltet ihr die Erde um die Stängel herum anhäufeln. Das fördert die Bildung der Erdnüsse.
5. Blüte: Die Erdnusspflanze bildet gelbe Blüten. Nach der Befruchtung biegen sich die Blütenstiele zum Boden und bohren sich in die Erde. Dort entwickeln sich die Erdnüsse.
Ernte: Die Belohnung für eure Geduld
1. Erntezeitpunkt: Die Erntezeit ist gekommen, wenn die Blätter der Pflanze gelb werden und absterben. Das ist in der Regel im Spätsommer oder Herbst der Fall.
2. Ernten: Grabt die Pflanzen vorsichtig aus. Die Erdnüsse befinden sich unter der Erde an den Wurzeln.
3. Reinigen: Entfernt die Erde von den Erdnüssen.
4. Trocknen: Lasst die Erdnüsse an einem trockenen und luftigen Ort trocknen. Das kann einige Wochen dauern.
5. Lagern: Lagert die getrockneten Erdnüsse an einem kühlen und trockenen Ort.
Wichtige Tipps für erfolgreiche Erdnusszucht:
* Standort: Erdnüsse brauchen viel Sonne und Wärme.
* Boden: Der Boden sollte gut durchlässig und locker sein.
* Bewässerung: Gießt die Pflanzen regelmäßig, aber vermeidet Staunässe.
* Schädlinge: Achtet auf Schädlinge wie Blattläuse und Schnecken.
* Geduld: Die Erdnusszucht erfordert Geduld. Es dauert einige Monate, bis ihr eure eigenen Erdnüsse ernten könnt.
Ich hoffe, diese Anleitung hilft euch dabei, erfolgreich Sprossen und Erdnüsse selbst zu ziehen. Es ist ein tolles Gefühl, die eigenen, frischen Zutaten zu ernten und zu genießen! Viel Spaß beim Ausprobieren!

Conclusion
So, there you have it! Growing your own bean sprouts from peanuts is not just a fun experiment; it’s a game-changer for anyone looking to add a burst of fresh, nutritious flavor to their meals. We’ve walked you through the simple steps, highlighting the ease and accessibility of this DIY project. Forget those bland, store-bought sprouts that lack character. With this method, you’re in control, cultivating vibrant, crunchy bean sprouts bursting with peanutty goodness right in your own kitchen.
Why is this a must-try? Because it’s economical, sustainable, and incredibly rewarding. Think about it: you’re transforming humble peanuts into a powerhouse of vitamins, minerals, and enzymes. You’re reducing your reliance on commercially produced sprouts, often shipped long distances and potentially treated with chemicals. And you’re experiencing the pure joy of watching something grow from seed (or, in this case, nut!) to table.
But the best part? The possibilities are endless! Once you’ve mastered the basic technique, feel free to experiment. Try different varieties of peanuts – Spanish, Virginia, or even Valencia – to discover subtle variations in flavor and texture. Consider adding a touch of seaweed extract to the soaking water for an extra boost of nutrients. Or, for a spicier kick, sprinkle a pinch of chili flakes into the sprouting jar.
Don’t be afraid to get creative with how you use your homemade peanut bean sprouts. Toss them into salads for a delightful crunch, add them to stir-fries for a nutty flavor, or use them as a garnish for soups and sandwiches. They’re also fantastic in spring rolls and Vietnamese pho. The only limit is your imagination!
We’re confident that once you try growing your own peanut bean sprouts, you’ll be hooked. It’s a simple, satisfying, and delicious way to elevate your cooking and connect with the natural world. So, gather your peanuts, grab a jar, and get sprouting!
We can’t wait to hear about your experiences. Share your photos, tips, and variations in the comments below. Let’s build a community of peanut bean sprout enthusiasts and spread the word about this amazing DIY trick. Happy sprouting!
Frequently Asked Questions (FAQ)
What kind of peanuts should I use for sprouting?
Ideally, you should use raw, unsalted, and unroasted peanuts for sprouting. Roasted peanuts will not sprout, and salted peanuts can inhibit the sprouting process. Organic peanuts are always a good choice to avoid any potential pesticide residue. Make sure the peanuts are fresh and haven’t been sitting in your pantry for too long, as older peanuts may have a lower germination rate.
How long does it take for peanut bean sprouts to grow?
Generally, it takes about 3-5 days for peanut bean sprouts to reach a desirable size for consumption. The exact time will depend on factors such as temperature, humidity, and the freshness of the peanuts. Keep a close eye on your sprouts and harvest them when they are about 2-3 inches long and have a good crunch.
What if my peanuts don’t sprout?
There are several reasons why your peanuts might not sprout. First, ensure that you are using raw, unsalted, and unroasted peanuts. Second, check the freshness of your peanuts. Older peanuts may have a lower germination rate. Third, make sure you are rinsing the peanuts thoroughly at least twice a day to prevent mold growth and provide adequate moisture. Finally, maintain a consistent temperature and humidity level. If you’ve tried all of these steps and your peanuts still aren’t sprouting, try a different batch of peanuts.
How do I prevent mold growth on my peanut bean sprouts?
Mold growth is a common concern when sprouting. To prevent it, rinse your peanuts thoroughly at least twice a day with fresh, cool water. Ensure that the sprouting jar or container has adequate drainage to prevent water from pooling at the bottom. Avoid overcrowding the jar with too many peanuts. Good air circulation is also important, so don’t place the jar in a completely sealed container. If you notice any signs of mold, discard the entire batch of sprouts immediately.
How do I store peanut bean sprouts?
Once your peanut bean sprouts have reached the desired size, rinse them thoroughly and drain them well. Store them in an airtight container lined with a paper towel in the refrigerator. They should last for up to 3-5 days. Check them regularly for any signs of spoilage and discard them if they start to smell or look slimy.
Are peanut bean sprouts safe to eat?
Yes, peanut bean sprouts are generally safe to eat, but it’s important to take precautions to prevent foodborne illnesses. Always use clean water and utensils when sprouting. Rinse the sprouts thoroughly before eating. If you have any allergies to peanuts, avoid consuming peanut bean sprouts. If you are pregnant, breastfeeding, or have a compromised immune system, consult with your doctor before consuming raw sprouts.
Can I grow peanut bean sprouts in soil?
While you can technically grow peanut bean sprouts in soil, it’s not the most efficient or common method. Sprouting in a jar or container with water is much simpler and faster. Growing in soil requires more space and attention to watering and drainage. The taste and texture of soil-grown sprouts may also differ slightly from water-sprouted sprouts.
What are the nutritional benefits of peanut bean sprouts?
Peanut bean sprouts are a nutritional powerhouse. They are rich in vitamins, minerals, and enzymes. They are a good source of protein, fiber, and healthy fats. Sprouting increases the bioavailability of nutrients, making them easier for your body to absorb. Peanut bean sprouts are also low in calories and carbohydrates, making them a healthy addition to any diet.
Can I use peanut butter to grow bean sprouts?
No, you cannot use peanut butter to grow bean sprouts. Peanut butter is a processed product and will not sprout. You need to use raw, unsalted, and unroasted peanuts to grow bean sprouts.
What are some creative ways to use peanut bean sprouts in my cooking?
Peanut bean sprouts are incredibly versatile and can be used in a variety of dishes. Add them to salads for a crunchy texture and nutty flavor. Use them in stir-fries, spring rolls, and Vietnamese pho. They can also be used as a garnish for soups and sandwiches. Try adding them to your favorite Asian-inspired dishes for an extra boost of flavor and nutrition. You can even blend them into smoothies for a healthy and refreshing drink.

Leave a Comment