
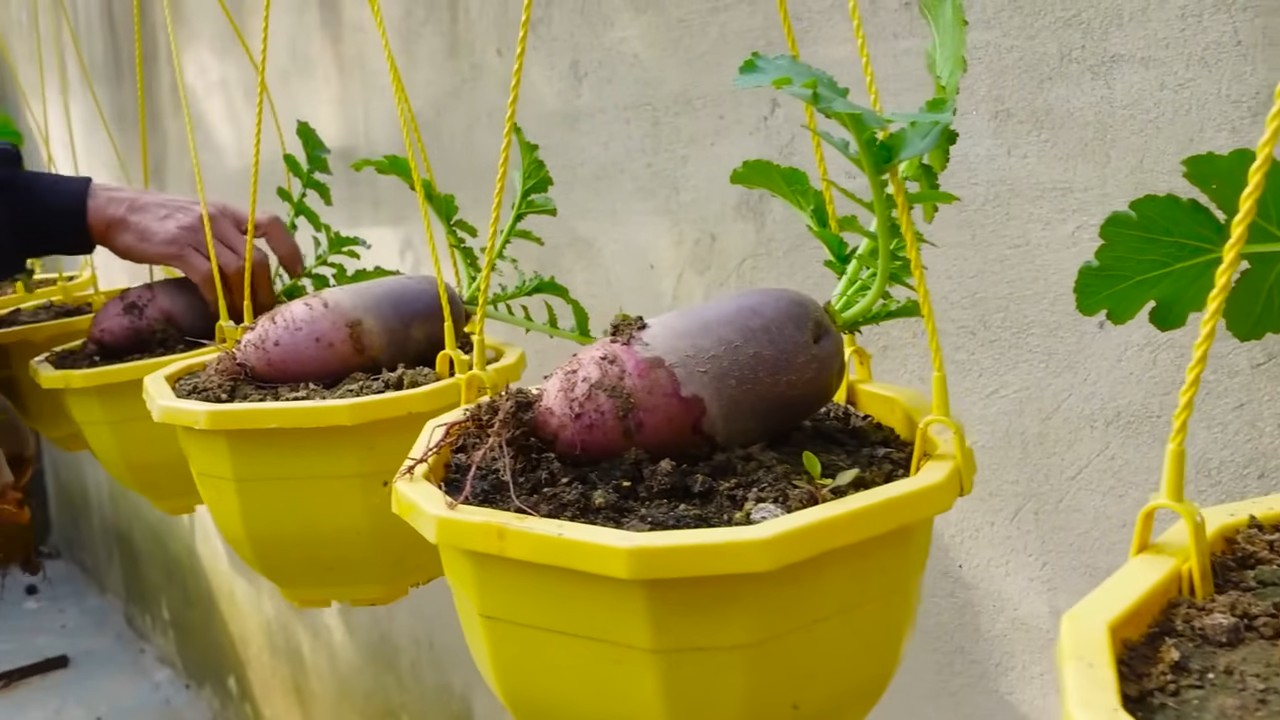
Growing Pink Radish at Home can be surprisingly easy and rewarding, even if you’re a complete beginner! Have you ever dreamed of plucking vibrant, peppery radishes straight from your own garden, adding a pop of color and flavor to your salads and snacks? Well, dream no more! This DIY guide will unlock the secrets to cultivating these delightful root vegetables right in your backyard, balcony, or even on your windowsill.
Radishes have a rich history, dating back to ancient times. They were cultivated in Egypt before the pyramids were even built! Throughout history, they’ve been valued not only for their taste but also for their medicinal properties. Today, they remain a popular and versatile vegetable worldwide.
But why should *you* bother with growing your own radishes? Store-bought radishes often lack the crispness and zing of freshly harvested ones. Plus, by growing pink radish at home, you have complete control over what goes into your food, ensuring it’s organic and free from harmful chemicals. Imagine the satisfaction of serving a salad featuring radishes you nurtured from seed to table! This DIY project is not only fun and educational but also a fantastic way to connect with nature and enjoy the freshest, most flavorful produce possible. Let’s get started!
Rosa Radieschen selbst anbauen: Ein DIY-Leitfaden für Anfänger
Hallo Gartenfreunde! Habt ihr Lust, eure eigenen knackigen, rosa Radieschen zu ziehen? Es ist einfacher als ihr denkt und macht richtig Spaß! Ich zeige euch, wie ihr mit einfachen Mitteln und ein bisschen Geduld eure eigenen Radieschen ernten könnt. Los geht’s!
Was ihr braucht:
* Radieschensamen (Sorte “French Breakfast” oder “Cherry Belle” sind gute Anfängeroptionen)
* Gartenerde oder Anzuchterde
* Einen sonnigen Standort (mindestens 6 Stunden Sonne pro Tag)
* Einen Pflanzkasten, Topf oder ein Beet im Garten
* Eine Gießkanne oder einen Gartenschlauch mit Brausekopf
* Einen kleinen Spaten oder eine Pflanzkelle
* Eventuell: Kompost oder organischen Dünger
Der perfekte Standort:
Radieschen lieben die Sonne! Sucht euch einen Platz, der mindestens 6 Stunden direkte Sonneneinstrahlung pro Tag bekommt. Ein halbschattiger Standort ist auch möglich, aber dann dauert es etwas länger, bis die Radieschen reif sind. Achtet darauf, dass der Boden locker und gut durchlässig ist. Staunässe mögen Radieschen gar nicht.
Aussaat: Schritt für Schritt
1. Bodenvorbereitung: Egal ob im Topf oder im Beet, lockert die Erde gut auf. Entfernt Steine und Unkraut. Wenn ihr im Garten pflanzt, könnt ihr etwas Kompost oder organischen Dünger unter die Erde mischen. Das gibt den Radieschen einen extra Nährstoffschub. Im Topf oder Pflanzkasten verwendet ihr am besten spezielle Anzuchterde.
2. Aussaatrillen ziehen: Mit dem Finger oder einem kleinen Spaten zieht ihr flache Rillen in die Erde. Die Rillen sollten etwa 1 cm tief sein und einen Abstand von 5-10 cm zueinander haben.
3. Samen säen: Legt die Radieschensamen in die Rillen. Achtet darauf, dass die Samen nicht zu dicht liegen. Ein Abstand von 2-3 cm zwischen den Samen ist ideal.
4. Mit Erde bedecken: Bedeckt die Samen vorsichtig mit Erde und drückt sie leicht an.
5. Gießen: Gießt die Erde vorsichtig an, so dass sie gut durchfeuchtet ist. Vermeidet es, die Samen wegzuschwemmen.
6. Geduld haben: Jetzt heißt es warten! Bei guter Pflege keimen die Radieschensamen in der Regel innerhalb von 5-10 Tagen.
Pflege während des Wachstums:
* Gießen: Haltet die Erde feucht, aber nicht nass. Gießt regelmäßig, besonders bei trockenem Wetter. Am besten gießt ihr morgens oder abends, wenn die Sonne nicht so stark scheint.
* Vereinzeln: Wenn die Radieschenpflänzchen etwas größer sind (etwa 2-3 cm hoch), solltet ihr sie vereinzeln. Das bedeutet, dass ihr die schwächsten Pflänzchen entfernt, so dass die verbleibenden Pflanzen genügend Platz zum Wachsen haben. Der Abstand zwischen den Pflanzen sollte etwa 5 cm betragen.
* Unkraut entfernen: Haltet das Beet oder den Topf unkrautfrei. Unkraut konkurriert mit den Radieschen um Nährstoffe und Wasser.
* Düngen (optional): Wenn ihr möchtet, könnt ihr die Radieschen während des Wachstums einmal mit einem organischen Dünger düngen. Achtet aber darauf, dass ihr nicht zu viel düngt, da dies zu einem übermäßigen Wachstum des Laubs und zu kleinen Radieschen führen kann.
Erntezeit:
Radieschen sind schnellwüchsig! Je nach Sorte und Wetterlage sind sie in der Regel innerhalb von 3-6 Wochen erntereif. Ihr erkennt, dass die Radieschen reif sind, wenn sie eine Größe von etwa 2-3 cm erreicht haben. Zieht die Radieschen vorsichtig aus der Erde. Wenn sie sich schwer ziehen lassen, könnt ihr die Erde um die Radieschen herum etwas lockern.
Häufige Probleme und Lösungen:
* Radieschen werden nicht dick: Das kann verschiedene Ursachen haben. Entweder haben die Radieschen zu wenig Sonne bekommen, der Boden ist zu trocken oder zu nährstoffarm. Achtet auf einen sonnigen Standort, regelmäßiges Gießen und eine gute Bodenvorbereitung.
* Radieschen sind scharf: Das kann daran liegen, dass die Radieschen zu lange in der Erde waren oder dass es zu heiß war. Erntet die Radieschen rechtzeitig und achtet auf eine gleichmäßige Bewässerung.
* Radieschen haben Risse: Das kann durch unregelmäßige Bewässerung verursacht werden. Achtet darauf, dass die Erde immer gleichmäßig feucht ist.
* Schädlinge: Radieschen können von verschiedenen Schädlingen befallen werden, wie z.B. Erdflöhen oder Schnecken. Kontrolliert die Pflanzen regelmäßig und entfernt Schädlinge gegebenenfalls von Hand. Bei starkem Befall könnt ihr auch biologische Schädlingsbekämpfungsmittel einsetzen.
Sortenempfehlungen:
Es gibt viele verschiedene Radieschensorten. Hier sind ein paar Empfehlungen für Anfänger:
* “Cherry Belle”: Eine klassische, rote Radieschensorte, die schnellwüchsig und unkompliziert ist.
* “French Breakfast”: Eine längliche, rot-weiße Radieschensorte mit einem milden Geschmack.
* “Eiszapfen”: Eine weiße, längliche Radieschensorte mit einem knackigen Biss.
* “Runder Schwarzer Winter”: Eine robuste, schwarze Radieschensorte, die auch im Herbst und Winter angebaut werden kann.
Radieschen im Topf anbauen:
Auch ohne Garten könnt ihr Radieschen anbauen! Wählt einen ausreichend großen Topf (mindestens 15 cm Durchmesser) und füllt ihn mit Anzuchterde. Achtet darauf, dass der Topf Abzugslöcher hat, damit das Wasser ablaufen kann. Ansonsten geht ihr genauso vor wie bei der Aussaat im Beet. Stellt den Topf an einen sonnigen Standort und gießt regelmäßig.
Radieschenblätter verwenden:
Wusstet ihr, dass man auch die Blätter der Radieschen essen kann? Sie sind reich an Vitaminen und Mineralstoffen und schmecken leicht pfeffrig. Ihr könnt sie zum Beispiel in Salaten, Suppen oder Smoothies verwenden.
Noch ein paar Tipps:
* Staffelweise Aussaat: Um über einen längeren Zeitraum Radieschen ernten zu können, könnt ihr alle 2-3 Wochen neue Samen aussäen.
* Mischkultur: Radieschen sind gute Nachbarn für viele andere Gemüsesorten, wie z.B. Karotten, Salat oder Spinat.
* Radieschen als Gründüngung: Radieschen können auch als Gründüngung verwendet werden. Sie lockern den Boden auf und verbessern die Bodenstruktur.
Zusammenfassung:
Radieschen selbst anzubauen ist ein tolles Projekt für Anfänger. Mit ein bisschen Planung und Pflege könnt ihr schon bald eure eigenen knackigen, rosa Radieschen ernten. Ich hoffe, dieser Leitfaden hat euch geholfen und inspiriert. Viel Spaß beim Gärtnern!

Conclusion
So, there you have it! Growing pink radishes at home is not only achievable, but it’s also a surprisingly rewarding experience. Forget those bland, store-bought radishes that lack that peppery punch and vibrant color. With just a little effort and these simple steps, you can cultivate your own crop of crisp, flavorful, and beautifully pink radishes right in your backyard or even on your balcony.
Why is this DIY trick a must-try? Because it puts you in control. You control the quality of the soil, the amount of sunlight, and the watering schedule, ensuring that your radishes are grown organically and to your exact liking. Plus, there’s nothing quite like the satisfaction of harvesting something you’ve nurtured from seed to table. Imagine the look on your guests’ faces when you serve them a salad featuring radishes you grew yourself!
But the fun doesn’t stop there. Feel free to experiment with different varieties of radish seeds. While we focused on pink radishes, there are countless other colors and shapes to explore, from the classic red globe to the elongated white icicle radish. You can also try succession planting, sowing new seeds every couple of weeks, to ensure a continuous harvest throughout the growing season.
Another variation to consider is companion planting. Radishes are known to be good companions for carrots, lettuce, and cucumbers, as they help to deter pests and improve soil health. Planting these vegetables alongside your radishes can create a thriving and productive garden ecosystem.
And don’t forget about the radish greens! These often-overlooked leaves are packed with nutrients and can be used in salads, stir-fries, or even pesto. Just be sure to harvest them when they’re young and tender for the best flavor.
Ultimately, growing pink radishes at home is more than just a gardening project; it’s a way to connect with nature, eat healthier, and add a touch of beauty to your life. It’s a simple, affordable, and incredibly satisfying way to bring fresh, flavorful produce to your table.
We wholeheartedly encourage you to give this DIY trick a try. Whether you’re a seasoned gardener or a complete beginner, you’ll find that growing radishes is surprisingly easy and rewarding. And once you’ve harvested your first crop of homegrown pink radishes, we’d love to hear about your experience! Share your photos, tips, and stories with us in the comments below. Let’s build a community of radish-loving gardeners and inspire others to discover the joy of growing their own food. Happy gardening!
Frequently Asked Questions (FAQ)
What is the best time of year to plant pink radishes?
Radishes are cool-season crops, meaning they thrive in cooler temperatures. The best time to plant them is in early spring or late summer/early fall. In spring, aim to plant as soon as the soil can be worked, typically a few weeks before the last expected frost. For a fall harvest, plant about 4-6 weeks before the first expected frost. Avoid planting during the heat of summer, as high temperatures can cause radishes to bolt (go to seed) and become bitter.
How much sunlight do pink radishes need?
Radishes need at least 6 hours of sunlight per day to grow properly. Choose a location in your garden that receives full sun for the majority of the day. If you’re growing radishes indoors, you may need to supplement with grow lights to ensure they get enough light.
What kind of soil is best for growing pink radishes?
Radishes prefer well-drained, loose soil that is rich in organic matter. Amend your soil with compost or other organic materials before planting to improve drainage and fertility. Avoid heavy clay soils, as they can become compacted and prevent the radishes from developing properly. A soil pH of 6.0 to 7.0 is ideal.
How often should I water my pink radishes?
Radishes need consistent moisture to grow quickly and develop crisp, flavorful roots. Water deeply whenever the top inch of soil feels dry to the touch. Avoid overwatering, as this can lead to root rot. A good rule of thumb is to water every 2-3 days, depending on the weather and soil conditions.
How long does it take for pink radishes to mature?
One of the great things about radishes is that they mature very quickly. Most varieties are ready to harvest in just 3-4 weeks after planting. Check the seed packet for specific maturity times for the variety you’re growing.
How do I know when my pink radishes are ready to harvest?
Radishes are ready to harvest when the roots are about 1 inch in diameter. Gently loosen the soil around the radish and pull it out of the ground. If the roots are too small, they may not be fully developed. If they’re too large, they may become woody and bitter.
What are some common pests and diseases that affect pink radishes?
Radishes are generally pest-resistant, but they can be susceptible to certain pests and diseases, such as flea beetles, root maggots, and fungal diseases. To prevent these problems, practice good garden hygiene, such as removing weeds and debris, and avoid overwatering. You can also use row covers to protect your radishes from pests.
Can I grow pink radishes in containers?
Yes, radishes are well-suited for container gardening. Choose a container that is at least 6 inches deep and has drainage holes. Fill the container with a well-draining potting mix and plant the radish seeds according to the instructions on the seed packet. Place the container in a sunny location and water regularly.
What can I do with my harvested pink radishes?
Radishes can be eaten raw in salads, sandwiches, or as a crunchy snack. They can also be cooked in stir-fries, soups, or roasted in the oven. The radish greens are also edible and can be used in salads or stir-fries. Radishes can be stored in the refrigerator for up to a week.
How can I prevent my radishes from becoming too spicy?
The spiciness of radishes is influenced by several factors, including the variety, growing conditions, and harvest time. To reduce the spiciness, choose a milder variety, such as French Breakfast or Cherry Belle. Ensure that your radishes receive consistent moisture and avoid harvesting them during hot weather. Harvesting radishes when they are young and tender can also help to reduce their spiciness.
Leave a Comment