
Grow water spinach, also known as Ong Choy or morning glory, right in your backyard! Imagine stepping outside and harvesting fresh, crisp greens for your stir-fries, salads, or soups. Forget those wilted bunches at the grocery store – with a few simple tricks, you can cultivate your own thriving patch of this delicious and nutritious vegetable.
Water spinach has a rich history, deeply rooted in Asian cuisine and culture for centuries. From the bustling markets of Southeast Asia to family gardens across the continent, it’s a staple ingredient celebrated for its versatility and ease of cultivation. Now, you can bring that tradition to your own home!
Why should you learn these DIY tricks for growing water spinach? Well, for starters, it’s incredibly rewarding to nurture your own food. Plus, grow water spinach at home is a fantastic way to save money, reduce your carbon footprint, and ensure you’re eating the freshest, healthiest produce possible. This DIY guide will provide you with all the insider tips and hacks you need to succeed, even if you’re a complete beginner. I’m excited to share my favorite methods for creating the perfect growing environment, maximizing your yield, and troubleshooting common problems. Let’s get our hands dirty and start growing!
Wasserspinat selbst anbauen: Eine einfache DIY-Anleitung
Hallo liebe Gartenfreunde! Habt ihr schon mal Wasserspinat probiert? Dieses knackige, leicht nussige Blattgemüse ist nicht nur super lecker, sondern auch unglaublich einfach selbst anzubauen. Und das Beste: Ihr braucht dafür nicht mal einen Garten! Ich zeige euch, wie ihr Wasserspinat (auch bekannt als Kangkong oder Morning Glory) ganz einfach zu Hause ziehen könnt, egal ob im Topf, im Kübel oder sogar im Aquarium. Los geht’s!
Was ihr für den Anbau von Wasserspinat braucht
Bevor wir loslegen, hier eine Liste mit allen Materialien und Werkzeugen, die ihr benötigt:
* Wasserspinat-Samen: Diese bekommt ihr im gut sortierten Gartenfachhandel oder online. Achtet darauf, dass es sich um frische Samen handelt.
* Behälter: Ihr könnt Töpfe, Kübel, Eimer oder sogar ein Aquarium verwenden. Wichtig ist, dass der Behälter ausreichend groß ist (mindestens 20 cm Durchmesser und Tiefe) und Abzugslöcher hat, falls ihr ihn nicht hydroponisch anbauen wollt.
* Erde: Normale Blumenerde oder eine Mischung aus Gartenerde und Kompost ist ideal. Für den hydroponischen Anbau benötigt ihr keine Erde.
* Wasser: Am besten Regenwasser oder abgestandenes Leitungswasser.
* Dünger: Flüssigdünger für Gemüse oder Komposttee.
* Optional: Ein kleines Gewächshaus oder eine Plastikfolie, um die Keimung zu beschleunigen.
* Optional: Ein sonniger Standort oder eine Pflanzenlampe.
Schritt-für-Schritt-Anleitung: Wasserspinat anbauen
Hier ist eine detaillierte Anleitung, wie ihr Wasserspinat erfolgreich anbauen könnt. Ich habe den Prozess in verschiedene Phasen unterteilt, um es euch noch einfacher zu machen.
Phase 1: Die Vorbereitung
1. Samen vorbereiten: Wasserspinat-Samen haben eine harte Schale, daher ist es ratsam, sie vor dem Aussäen vorzubehandeln. Das beschleunigt die Keimung. Ich mache das immer so:
* Einweichen: Legt die Samen für 24 Stunden in lauwarmes Wasser. Das Wasser sollte die Samen vollständig bedecken.
* Anritzen (optional): Wenn ihr ganz sicher gehen wollt, könnt ihr die Samen vorsichtig mit einer Nagelfeile oder einem Messer anritzen. Achtet darauf, die Samen nicht zu beschädigen!
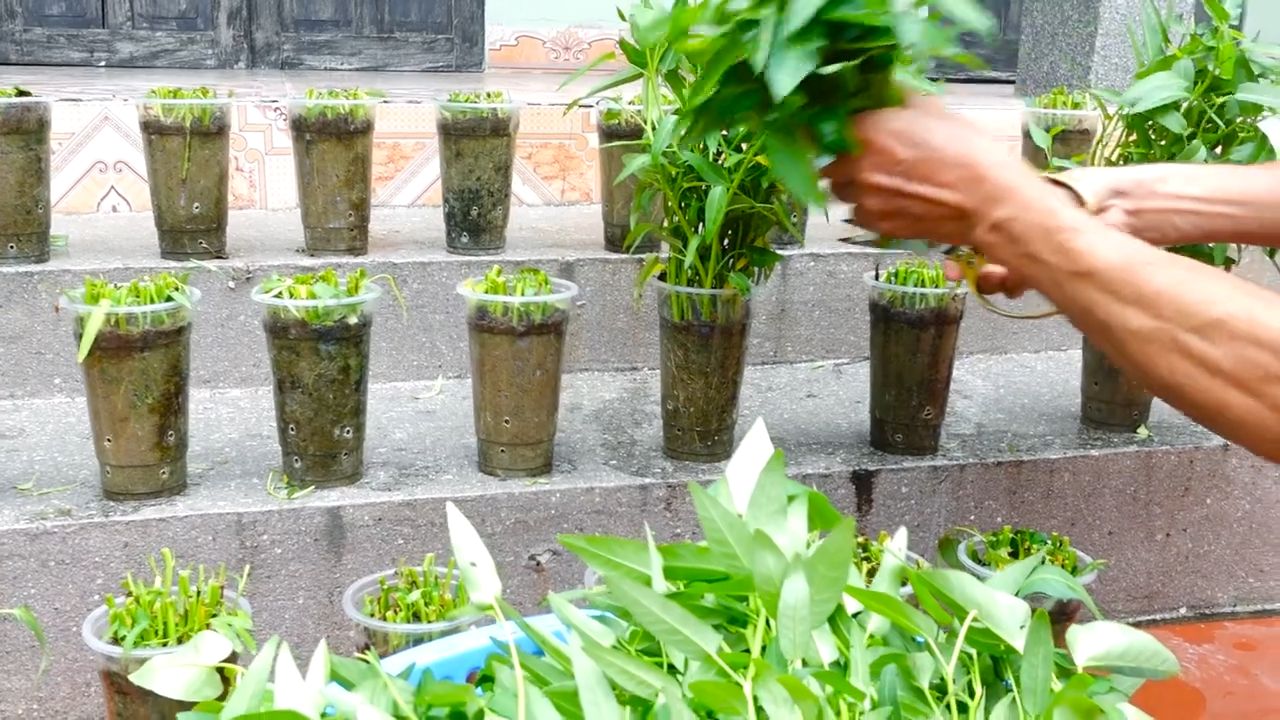
2. Behälter vorbereiten:
* Töpfe/Kübel: Füllt eure Töpfe oder Kübel mit Erde. Lasst etwa 2-3 cm Platz bis zum Rand.
* Aquarium (hydroponischer Anbau): Reinigt das Aquarium gründlich. Füllt es mit Wasser und gebt etwas Flüssigdünger hinzu. Achtet darauf, dass der pH-Wert des Wassers zwischen 6 und 7 liegt.
3. Standort wählen: Wasserspinat liebt die Sonne! Sucht euch einen sonnigen Standort für eure Pflanzen. Wenn ihr keinen sonnigen Platz habt, könnt ihr auch eine Pflanzenlampe verwenden.
Phase 2: Die Aussaat
1. Aussaat in Erde:
* Samen verteilen: Verteilt die Samen gleichmäßig auf der Erde.
* Mit Erde bedecken: Bedeckt die Samen mit einer dünnen Schicht Erde (ca. 1 cm).
* Angießen: Gießt die Erde vorsichtig an, sodass sie feucht, aber nicht nass ist.
2. Aussaat im Aquarium (hydroponischer Anbau):
* Schwimmende Plattform: Ihr benötigt eine schwimmende Plattform, auf der die Samen keimen können. Ihr könnt dafür Styropor oder spezielle Pflanzkörbe verwenden.
* Samen platzieren: Platziert die Samen auf der schwimmenden Plattform, sodass sie Kontakt mit dem Wasser haben.
3. Keimung beschleunigen (optional): Um die Keimung zu beschleunigen, könnt ihr die Töpfe oder das Aquarium mit einer Plastikfolie abdecken oder in ein kleines Gewächshaus stellen. Achtet darauf, dass die Folie oder das Gewächshaus gut belüftet ist, um Schimmelbildung zu vermeiden.
Phase 3: Die Pflege
1. Gießen:
* In Erde: Haltet die Erde feucht, aber nicht nass. Gießt regelmäßig, besonders an heißen Tagen.
* Im Aquarium: Überprüft regelmäßig den Wasserstand und füllt bei Bedarf Wasser nach. Wechselt das Wasser alle paar Wochen, um Algenbildung zu vermeiden.
2. Düngen:
* In Erde: Düngt eure Pflanzen alle 2-3 Wochen mit Flüssigdünger für Gemüse oder Komposttee.
* Im Aquarium: Gebt regelmäßig Flüssigdünger ins Wasser. Achtet auf die Dosierungsanleitung.
3. Licht: Wasserspinat braucht viel Licht. Stellt eure Pflanzen an einen sonnigen Standort oder verwendet eine Pflanzenlampe.
4. Schädlinge und Krankheiten: Wasserspinat ist relativ resistent gegen Schädlinge und Krankheiten. Wenn ihr dennoch Probleme habt, könnt ihr natürliche Schädlingsbekämpfungsmittel verwenden.
Phase 4: Die Ernte
1. Erntezeitpunkt: Ihr könnt Wasserspinat ernten, sobald die Stängel etwa 20-30 cm lang sind. Das dauert in der Regel 4-6 Wochen nach der Aussaat.
2. Erntemethode: Schneidet die Stängel mit einem scharfen Messer oder einer Schere ab. Lasst dabei einige Blätter an der Pflanze, damit sie weiterwachsen kann.
3. Regelmäßige Ernte: Durch regelmäßige Ernte fördert ihr das Wachstum der Pflanze. Ihr könnt den Wasserspinat mehrmals ernten.
Zusätzliche Tipps und Tricks
* Wasserspinat im Winter anbauen: Wenn ihr Wasserspinat auch im Winter anbauen möchtet, benötigt ihr eine Pflanzenlampe und einen warmen Standort.
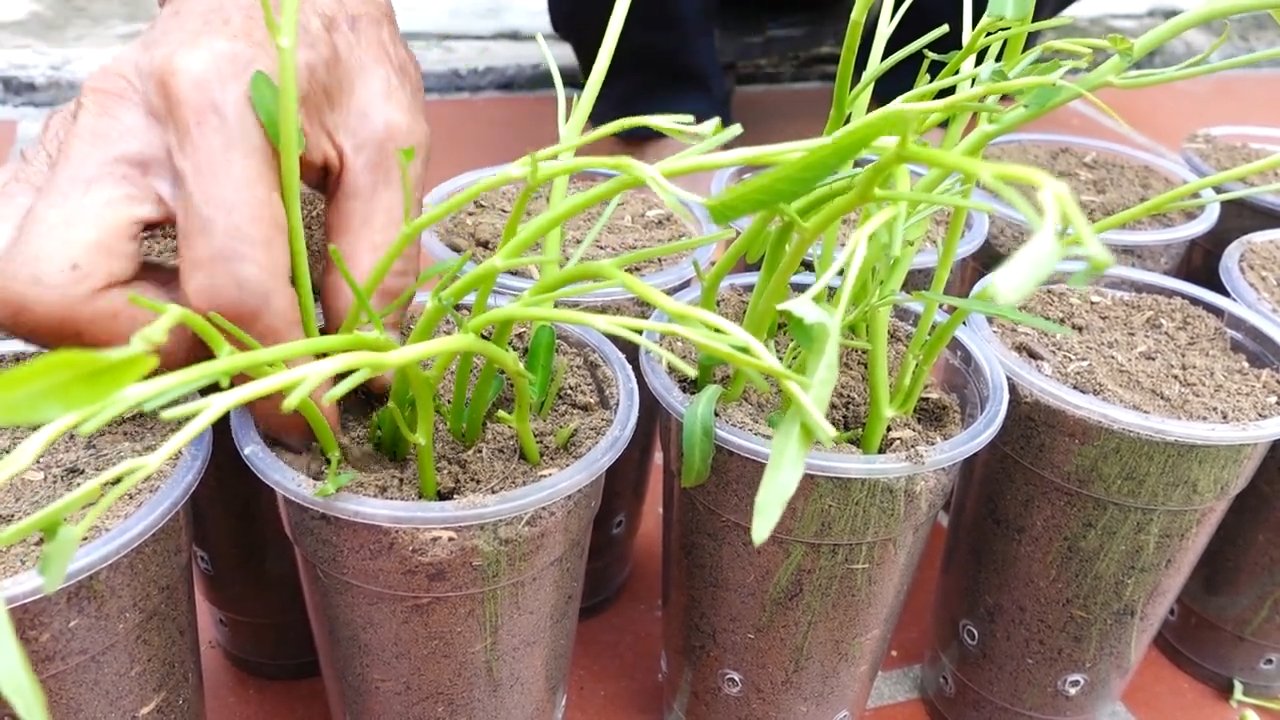
* Wasserspinat vermehren: Ihr könnt Wasserspinat auch durch Stecklinge vermehren. Schneidet einfach einen Stängel ab und stellt ihn ins Wasser. Nach einigen Tagen bilden sich Wurzeln.
* Wasserspinat in der Küche: Wasserspinat ist vielseitig verwendbar. Ihr könnt ihn roh in Salaten essen, kochen, braten oder dünsten. Er schmeckt besonders gut in asiatischen Gerichten.
Häufige Probleme und Lösungen
* Gelbe Blätter: Gelbe Blätter können ein Zeichen für Nährstoffmangel sein. Düngt eure Pflanzen regelmäßig.
* Schimmelbildung: Schimmelbildung kann durch zu hohe Luftfeuchtigkeit entstehen. Sorgt für eine gute Belüftung.
* Langsames Wachstum: Langsames Wachstum kann durch zu wenig Licht oder Nährstoffe verursacht werden. Stellt eure Pflanzen an einen sonnigeren Standort und düngt sie regelmäßig.
Warum Wasserspinat selbst anbauen?
Es gibt viele gute Gründe, Wasserspinat selbst anzubauen:
* Frische und Geschmack: Selbst angebauter Wasserspinat schmeckt einfach besser als gekaufter.
* Nachhaltigkeit: Ihr wisst genau, was in euren Pflanzen steckt und vermeidet lange Transportwege.
* Entspannung: Gärtnern ist eine tolle Möglichkeit, um zu entspannen und Stress abzubauen.
* Kostenersparnis: Auf Dauer spart ihr Geld, wenn ihr euer Gemüse selbst anbaut.
Ich hoffe, diese Anleitung hat euch geholfen, Wasserspinat erfolgreich selbst anzubauen. Viel Spaß beim Gärtnern und guten Appetit!
Conclusion
So, there you have it! Growing your own water spinach, or kangkong, is not only incredibly easy and rewarding, but it also opens up a world of culinary possibilities. Forget trekking to specialty Asian markets or paying exorbitant prices for wilted bunches. With this simple DIY trick, you can have a constant supply of fresh, vibrant, and delicious water spinach right at your fingertips.
This isn’t just about saving money; it’s about connecting with your food, understanding its life cycle, and enjoying the unparalleled flavor of homegrown produce. The difference between store-bought and freshly harvested water spinach is truly remarkable. The texture is crisper, the flavor is more intense, and you have the satisfaction of knowing exactly where your food came from.
But the benefits don’t stop there. Growing your own water spinach is also an environmentally friendly choice. You’re reducing your carbon footprint by eliminating the need for transportation and packaging. Plus, you can control the growing conditions, ensuring that your water spinach is free from harmful pesticides and herbicides.
Why is this DIY trick a must-try? Because it’s accessible to everyone, regardless of their gardening experience or space limitations. Whether you have a sprawling backyard, a sunny balcony, or just a windowsill, you can successfully grow water spinach. It’s a fast-growing plant, so you’ll see results quickly, which is incredibly motivating. And let’s be honest, there’s something deeply satisfying about nurturing a plant from seed to table.
Looking for variations? Experiment with different growing mediums. While we’ve focused on a simple water-based system, you can also grow water spinach in soil, hydroponically, or even in a combination of both. Try adding different nutrients to the water to see how it affects the growth and flavor of your plants. You can also experiment with different varieties of water spinach. Some varieties have broader leaves, while others have thinner stems. Each variety has its own unique flavor and texture.
Consider companion planting. Water spinach pairs well with other vegetables like tomatoes, peppers, and cucumbers. Planting these vegetables together can help to improve the overall health of your garden and deter pests.
Don’t be afraid to get creative with your harvest. Water spinach is incredibly versatile in the kitchen. You can stir-fry it with garlic and chili, add it to soups and stews, or even use it as a leafy green in salads. The possibilities are endless!
We wholeheartedly encourage you to try this DIY trick for growing water spinach. It’s a fun, educational, and delicious experience that you won’t regret. Once you’ve tasted the difference between homegrown and store-bought water spinach, you’ll never go back.
We’re confident that you’ll be amazed by how easy and rewarding it is to grow your own water spinach. So, grab some seeds, find a sunny spot, and get started today!
And most importantly, we want to hear about your experience! Share your photos, tips, and recipes with us in the comments below. Let’s build a community of water spinach enthusiasts and inspire others to grow their own food. We can’t wait to see what you create! Let us know if this DIY trick helped you to grow water spinach.
Frequently Asked Questions (FAQ)
1. What are the ideal growing conditions for water spinach?
Water spinach thrives in warm, humid environments with plenty of sunlight. Aim for at least 6 hours of direct sunlight per day. The ideal temperature range is between 70°F and 90°F (21°C and 32°C). While it prefers consistently moist conditions, avoid waterlogging the roots if growing in soil. If you are growing in water, ensure the water is changed regularly to prevent stagnation and algae growth.
2. How long does it take for water spinach to grow?
One of the best things about water spinach is its rapid growth rate. You can typically expect to harvest your first crop within 4-6 weeks of planting. After the initial harvest, you can continue to harvest regularly, allowing the plant to regrow. With proper care, you can enjoy a continuous supply of water spinach for several months.
3. What kind of water should I use for growing water spinach?
Tap water is generally fine for growing water spinach, but it’s best to let it sit for 24 hours to allow chlorine to dissipate. You can also use rainwater or well water. Avoid using water that is heavily chlorinated or contains high levels of minerals, as this can harm the plants. Regularly changing the water is crucial to prevent the buildup of algae and maintain a healthy growing environment.
4. How do I harvest water spinach?
Harvesting water spinach is simple. Use scissors or a sharp knife to cut the stems about 4-6 inches from the base of the plant. This will encourage new growth. You can harvest individual stems as needed or harvest a larger portion of the plant at once. Be sure to harvest before the stems become too thick and tough.
5. What are some common problems when growing water spinach, and how can I prevent them?
Some common problems include pests like aphids and spider mites, as well as fungal diseases. To prevent pests, regularly inspect your plants and remove any pests you find. You can also use insecticidal soap or neem oil. To prevent fungal diseases, ensure good air circulation and avoid overwatering. If you notice any signs of disease, remove the affected leaves immediately.
6. Can I grow water spinach indoors?
Yes, you can grow water spinach indoors, but you’ll need to provide adequate light. A sunny windowsill or a grow light will work well. Be sure to rotate the plants regularly to ensure even growth. Indoor growing may result in slightly slower growth rates compared to outdoor growing, but it’s still a viable option, especially in colder climates.
7. Is water spinach safe to eat?
Yes, water spinach is generally safe to eat, but it’s important to wash it thoroughly before consuming it. This will help to remove any dirt, debris, or pesticides. If you’re growing water spinach in a container, make sure the container is food-grade and free from harmful chemicals. Avoid growing water spinach in areas that may be contaminated with heavy metals or other pollutants.
8. Can I grow water spinach from cuttings?
Yes, growing water spinach from cuttings is a very effective method. Simply take a stem cutting that is about 4-6 inches long and place it in water. Roots will typically develop within a few days. Once the roots are about an inch long, you can transplant the cutting into soil or continue growing it in water. This is a great way to propagate new plants from your existing water spinach.
9. What are the nutritional benefits of water spinach?
Water spinach is a nutritional powerhouse. It’s a good source of vitamins A and C, as well as iron, calcium, and fiber. It’s also low in calories and fat. Incorporating water spinach into your diet can help to boost your immune system, improve digestion, and promote overall health.
10. How do I store water spinach after harvesting?
To store water spinach, wrap it in a damp paper towel and place it in a plastic bag in the refrigerator. It will typically last for 2-3 days. For longer storage, you can blanch the water spinach for a few minutes and then freeze it. Frozen water spinach will retain its flavor and nutrients for several months.


Leave a Comment