
Easy melon growing – sounds like a dream, right? Imagine biting into a juicy, homegrown melon, bursting with flavor that store-bought ones just can’t match. Well, it doesn’t have to be a dream! I’m here to share some simple, effective DIY tricks that will have you harvesting your own delicious melons in no time, even if you think you have a “brown thumb.”
Melons have been cultivated for thousands of years, with evidence suggesting their presence in ancient Egypt and beyond. They’ve always been a symbol of abundance and sweetness, a treat enjoyed across cultures. But let’s be honest, growing them can seem intimidating. Many gardeners struggle with getting the right conditions, battling pests, or simply knowing when to harvest. That’s where these DIY hacks come in!
This article is packed with practical tips and tricks to make easy melon growing a reality for you. We’ll cover everything from choosing the right varieties for your climate to creating the perfect soil mix and warding off common melon pests. Why spend a fortune on bland supermarket melons when you can enjoy the unparalleled taste of homegrown goodness? Let’s ditch the gardening myths and unlock the secrets to a bountiful melon harvest. Get ready to impress your friends and family with your newfound gardening skills!

Melonenanbau leicht gemacht: Dein DIY-Guide für eine reiche Ernte
Hallo Gartenfreunde! Ich liebe es, frische, saftige Melonen direkt aus meinem eigenen Garten zu ernten. Und wisst ihr was? Es ist gar nicht so schwer, wie man vielleicht denkt! Mit ein paar Tricks und Kniffen könnt auch ihr euch auf eine reiche Melonenernte freuen. In diesem Artikel zeige ich euch, wie ihr Melonen ganz einfach selbst anbauen könnt – von der Aussaat bis zur Ernte. Los geht’s!
Die richtige Melonensorte wählen
Bevor wir loslegen, ist es wichtig, die richtige Melonensorte für euren Garten auszuwählen. Nicht jede Sorte gedeiht in jedem Klima. Achtet auf Sorten, die für eure Region geeignet sind und eine kurze Reifezeit haben, besonders wenn ihr in einer Gegend mit kurzen Sommern wohnt. Hier sind ein paar meiner Favoriten:
* **Wassermelone ‘Sugar Baby’:** Eine klassische, frühreife Sorte mit süßem, rotem Fruchtfleisch. Perfekt für kleinere Gärten.
* **Honigmelone ‘Honey Gold’:** Diese Sorte ist bekannt für ihr aromatisches, goldgelbes Fruchtfleisch und ihre gute Lagerfähigkeit.
* **Cantaloupe-Melone ‘Hales Best Jumbo’:** Eine robuste Sorte mit orangefarbenem Fruchtfleisch und einem intensiven Aroma.
Vorbereitung ist alles: Der perfekte Standort und Boden
Melonen sind Sonnenanbeter! Sie brauchen mindestens 6-8 Stunden direkte Sonneneinstrahlung pro Tag, um optimal zu wachsen und süße Früchte zu entwickeln. Wählt also einen sonnigen Platz in eurem Garten.
Der Boden sollte locker, gut durchlässig und reich an Nährstoffen sein. Melonen sind Starkzehrer, das heißt, sie brauchen viele Nährstoffe, um zu wachsen.
Hier sind meine Tipps für die Bodenvorbereitung:
* Boden testen: Ein Bodentest gibt euch Aufschluss über den pH-Wert und den Nährstoffgehalt eures Bodens. Melonen bevorzugen einen pH-Wert zwischen 6,0 und 6,8.
* Kompost einarbeiten: Mischt reichlich Kompost in den Boden ein. Kompost verbessert die Bodenstruktur, speichert Feuchtigkeit und liefert wichtige Nährstoffe.
* Langzeitdünger verwenden: Gebt einen Langzeitdünger für Gemüse in den Boden. So sind eure Melonen während der gesamten Wachstumsperiode gut versorgt.
Aussaat: Der Start in die Melonensaison
Es gibt zwei Möglichkeiten, Melonen anzubauen: durch Direktsaat im Freien oder durch Vorziehen im Haus. Ich bevorzuge das Vorziehen im Haus, da es die Wachstumsperiode verlängert und die Pflanzen vor Schädlingen schützt.
Vorziehen im Haus:
1. Aussaatgefäße vorbereiten: Füllt kleine Töpfe oder Anzuchtschalen mit Anzuchterde.
2. Samen aussäen: Legt 2-3 Samen pro Topf etwa 2 cm tief in die Erde.
3. Angießen: Gießt die Erde vorsichtig an, sodass sie feucht, aber nicht nass ist.
4. Warm stellen: Stellt die Töpfe an einen warmen, hellen Ort. Eine Temperatur von 20-25°C ist ideal für die Keimung.
5. Feucht halten: Haltet die Erde gleichmäßig feucht, aber vermeidet Staunässe.
6. Pikieren: Sobald die Sämlinge 2-3 echte Blätter haben, könnt ihr sie in größere Töpfe pikieren.
Direktsaat im Freien:
Die Direktsaat im Freien ist nur in Regionen mit langen, warmen Sommern empfehlenswert. Wartet, bis die Bodentemperatur mindestens 18°C beträgt, bevor ihr die Samen aussät.
1. Beet vorbereiten: Lockert den Boden auf und entfernt Unkraut.
2. Samen aussäen: Legt 2-3 Samen pro Pflanzstelle etwa 2 cm tief in die Erde.
3. Angießen: Gießt die Erde vorsichtig an.
4. Schützen: Schützt die jungen Pflanzen vor Schnecken und anderen Schädlingen.
Auspflanzen: Ab ins Beet!
Sobald die Frostgefahr vorüber ist und die Bodentemperatur mindestens 18°C beträgt, könnt ihr die Melonenpflanzen ins Beet auspflanzen.
1. Abhärten: Bevor ihr die Pflanzen auspflanzt, solltet ihr sie einige Tage lang abhärten. Stellt sie tagsüber ins Freie und holt sie nachts wieder herein.
2. Pflanzlöcher vorbereiten: Grabt Pflanzlöcher, die etwas größer sind als die Wurzelballen der Pflanzen.
3. Pflanzen einsetzen: Setzt die Pflanzen vorsichtig in die Pflanzlöcher und füllt sie mit Erde auf.
4. Angießen: Gießt die Pflanzen gründlich an.
5. Mulchen: Mulcht den Boden um die Pflanzen herum mit Stroh oder Holzhackschnitzeln. Das hält den Boden feucht und unterdrückt Unkraut.
6. Pflanzabstand: Achtet auf den richtigen Pflanzabstand. Wassermelonen brauchen etwa 1-1,5 Meter Platz, Honigmelonen und Cantaloupe-Melonen etwa 80-100 cm.
Pflege: Gießen, Düngen, Ausgeizen
Melonen brauchen regelmäßige Pflege, um gut zu wachsen und viele Früchte zu tragen.
* Gießen: Gießt die Pflanzen regelmäßig, besonders während der Fruchtbildung. Achtet darauf, dass der Boden immer feucht, aber nicht nass ist. Vermeidet es, die Blätter zu gießen, da dies Pilzkrankheiten fördern kann.
* Düngen: Düngt die Pflanzen alle 2-3 Wochen mit einem Flüssigdünger für Gemüse.
* Ausgeizen: Entfernt Seitentriebe, die aus den Blattachseln wachsen. Das fördert die Fruchtbildung und sorgt dafür, dass die Pflanze ihre Energie in die Haupttriebe und Früchte steckt.
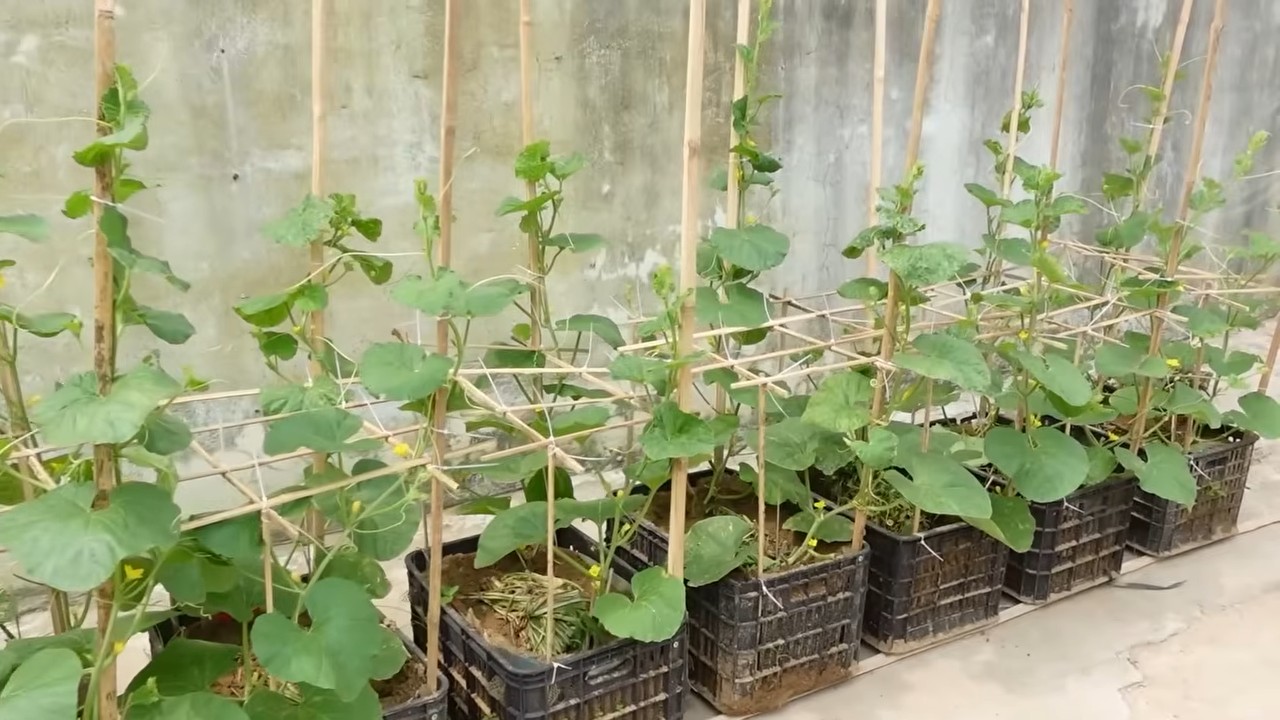
* Rankhilfe: Gebt den Pflanzen eine Rankhilfe, damit sie nicht auf dem Boden liegen. Das verhindert Fäulnis und erleichtert die Ernte.
* Schutz vor Schädlingen: Kontrolliert die Pflanzen regelmäßig auf Schädlinge wie Blattläuse, Schnecken und Gurkenkäfer. Bekämpft die Schädlinge bei Bedarf mit natürlichen Mitteln.
Bestäubung: Hilfe für die Bienen
Melonen sind auf die Bestäubung durch Bienen und andere Insekten angewiesen, um Früchte zu bilden. Wenn ihr wenig Bienen in eurem Garten habt, könnt ihr die Blüten auch selbst bestäuben.
1. Männliche und weibliche Blüten erkennen: Männliche Blüten haben einen dünnen Stiel, während weibliche Blüten einen kleinen Fruchtansatz direkt unter der Blüte haben.
2. Bestäubung durchführen: Nehmt einen weichen Pinsel und streicht damit über die Staubgefäße einer männlichen Blüte. Übertragt den Pollen dann auf die Narbe einer weiblichen Blüte.
3. Zeitpunkt: Die beste Zeit für die Bestäubung ist am frühen Morgen, wenn die Blüten geöffnet sind.
Ernte: Der Lohn der Mühe
Die Erntezeit hängt von der Melonensorte ab. Wassermelonen sind reif, wenn sie beim Abklopfen hohl klingen und der Stielansatz eintrocknet. Honigmelonen und Cantaloupe-Melonen sind reif, wenn sie einen süßen Duft verströmen und sich leicht vom Stiel lösen lassen.
1. Erntezeitpunkt bestimmen: Achtet auf die Reifezeichen der jeweiligen Melonensorte.
2. Ernten: Schneidet die Melonen vorsichtig mit einem scharfen Messer vom Stiel ab.
3. Lagern: Lagert die Melonen an einem kühlen, trockenen Ort. Honigmelonen und Cantaloupe-Melonen können im Kühlschrank bis zu einer Woche gelagert werden. Wassermelonen sollten innerhalb weniger Tage verzehrt werden.
Häufige Probleme und Lösungen
Auch beim Melonenanbau können Probleme auftreten. Hier sind einige der häufigsten Probleme und wie ihr sie lösen könnt:
* Fruchtansatzfäule: Die Früchte faulen am Blütenende. Ursache ist meist ein Calciummangel. Lösung: Düngt die Pflanzen mit einem calcium
Conclusion
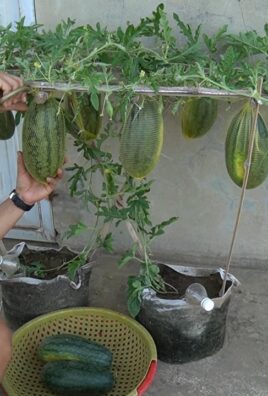
So, there you have it – a simple, effective, and surprisingly rewarding method for easy melon growing right in your own backyard! Forget the sprawling vines taking over your garden and the unpredictable yields. This DIY trick, focusing on vertical growth and strategic support, unlocks a world of juicy, flavorful melons without the usual hassle.
Why is this a must-try? Because it’s about more than just growing melons; it’s about reclaiming your garden space, maximizing your harvest, and enjoying the unparalleled satisfaction of nurturing your own food from seed to table. Imagine biting into a perfectly ripe cantaloupe, knowing you cultivated it with your own two hands, using a method that’s both efficient and environmentally friendly. That’s the power of this technique.
But the beauty of this method lies in its adaptability. Feel free to experiment with different melon varieties. Watermelons, cantaloupes, honeydews – all can thrive with this vertical support system. Just be mindful of the weight each vine will bear and adjust your support structure accordingly. For smaller melon varieties, consider using pantyhose or mesh bags to cradle the developing fruit, providing extra support and preventing them from detaching prematurely.
Consider also experimenting with companion planting. Marigolds can help deter pests, while basil can improve the flavor of your melons. A little research into companion planting can significantly enhance your overall melon-growing experience.
Don’t be afraid to get creative with your support structures. While the instructions outline a basic trellis system, you can adapt it to suit your available materials and aesthetic preferences. Use repurposed wood, bamboo poles, or even sturdy tomato cages to create a unique and functional support system. The key is to ensure that it’s strong enough to bear the weight of the mature melons and that it provides adequate airflow around the plants.
And remember, consistent watering and fertilization are crucial for success. Melons are heavy feeders, so be sure to provide them with a balanced fertilizer throughout the growing season. Monitor the soil moisture regularly and water deeply whenever the top inch feels dry.
We are confident that this DIY trick will revolutionize your melon-growing experience. It’s a game-changer for gardeners of all levels, from beginners to seasoned pros. So, grab your seeds, gather your materials, and get ready to embark on a journey of delicious discovery.
We can’t wait to hear about your successes (and even your challenges!). Share your photos, tips, and experiences in the comments below. Let’s build a community of melon-growing enthusiasts and learn from each other. Your insights could inspire others to try this method and experience the joy of growing their own melons. Happy gardening!
Frequently Asked Questions (FAQ)
What types of melons are best suited for this vertical growing method?
This method works well for a variety of melons, including cantaloupes, honeydews, and smaller watermelon varieties like Sugar Baby. Larger watermelon varieties might require extra sturdy support due to their weight. Consider the mature size and weight of the melon when choosing your variety and designing your support structure. Smaller personal sized melons are ideal for beginners.
How do I ensure my support structure is strong enough to hold the weight of the melons?
The strength of your support structure is crucial. Use sturdy materials like treated lumber, strong metal poles, or thick bamboo. Reinforce the joints with screws or bolts rather than just nails. For heavier melons, consider using multiple support points along the vine. You can also use slings made from pantyhose or mesh bags to cradle the developing melons and distribute the weight more evenly. Regularly inspect your support structure for any signs of weakness or damage and make repairs as needed.
How often should I water my melons grown using this method?
Melons need consistent moisture, especially during fruit development. Water deeply whenever the top inch of soil feels dry. The frequency of watering will depend on your climate, soil type, and the size of your plants. In hot, dry weather, you may need to water daily. Use a soaker hose or drip irrigation to deliver water directly to the roots, minimizing water loss through evaporation. Avoid overhead watering, as this can increase the risk of fungal diseases.
What kind of fertilizer should I use for my melons?
Melons are heavy feeders and benefit from regular fertilization. Use a balanced fertilizer with a ratio of 10-10-10 or 14-14-14. Apply the fertilizer according to the package instructions, typically every 2-3 weeks. You can also supplement with compost or other organic matter to improve soil fertility and drainage. Avoid over-fertilizing, as this can lead to excessive foliage growth at the expense of fruit production.
How do I protect my melons from pests and diseases?
Monitor your plants regularly for signs of pests or diseases. Common melon pests include aphids, squash bugs, and vine borers. Use insecticidal soap or neem oil to control these pests. To prevent fungal diseases, ensure good air circulation around the plants and avoid overhead watering. You can also apply a fungicide if necessary. Consider using row covers to protect young plants from pests and diseases. Companion planting with marigolds can also help deter pests.
When do I know when my melons are ripe and ready to harvest?
The ripeness of melons varies depending on the variety. Generally, look for these signs:
* **Cantaloupes:** The stem will slip easily from the fruit when gently tugged. The skin will turn from green to a tan or yellowish color. The melon will have a sweet aroma.
* **Honeydews:** The skin will turn from green to a creamy yellow color. The blossom end will feel slightly soft.
* **Watermelons:** The underside of the melon (where it rests on the ground) will turn from white to yellow. The tendril closest to the melon stem will turn brown and dry. When thumped, a ripe watermelon will sound hollow.
Can I grow melons in containers using this method?
Yes, you can grow melons in containers using this method, but you’ll need to choose a large container (at least 20 gallons) to accommodate the root system. Use a well-draining potting mix and provide adequate support for the vines. Container-grown melons may require more frequent watering and fertilization than those grown in the ground. Choose smaller melon varieties that are well-suited for container gardening.
What if my melon vines are not producing fruit?
There are several reasons why your melon vines might not be producing fruit. Ensure that your plants are getting enough sunlight (at least 6-8 hours per day). Check for signs of pests or diseases that could be affecting fruit production. Make sure your plants are adequately pollinated. You can hand-pollinate the flowers if necessary. Also, avoid over-fertilizing with nitrogen, as this can promote foliage growth at the expense of fruit production.
How can I improve pollination for my melon plants?
Pollination is crucial for melon production. Attract pollinators to your garden by planting flowers that attract bees and other beneficial insects. Avoid using pesticides that can harm pollinators. You can also hand-pollinate the flowers by transferring pollen from the male flowers to the female flowers using a small brush. Identify female flowers by the small fruit behind the flower.
What are some variations of this DIY melon growing trick?
* **Trellis Design:** Experiment with different trellis designs to find what works best for your space and melon variety.
* **Support Materials:** Use repurposed materials like old ladders or pallets to create a unique and sustainable support system.
* **Companion Planting:** Explore different companion plants to deter pests, attract pollinators, and improve the flavor of your melons.
* **Grafting:** Grafting melon plants onto more vigorous rootstocks can improve disease resistance and yield.
* **Hydroponics:** Adapt this vertical growing method for hydroponic systems for even greater control over nutrient delivery and water usage.

Leave a Comment