
Grow mushrooms at home? Absolutely! Imagine harvesting fresh, flavorful mushrooms right from your own kitchen, ready to elevate your next culinary masterpiece. Forget those bland, store-bought varieties; with a few simple tricks and a little DIY spirit, you can cultivate a thriving mushroom patch indoors.
Mushroom cultivation has a rich history, dating back centuries in various cultures. From ancient China, where mushrooms were revered for their medicinal properties, to European traditions of foraging for wild delicacies, the allure of these fascinating fungi has always been strong. Now, you can tap into that ancient wisdom and bring the magic of mushroom growing into your own home.
Why should you embark on this DIY adventure? Well, for starters, it’s incredibly rewarding! There’s something truly special about nurturing life from scratch and enjoying the fruits (or rather, fungi!) of your labor. Plus, growing your own mushrooms is a sustainable and eco-friendly way to source fresh produce. You’ll reduce your carbon footprint, avoid harmful pesticides, and gain a deeper appreciation for the natural world.
This article is packed with easy-to-follow instructions and insider tips to help you grow mushrooms at home successfully, even if you’re a complete beginner. I’ll guide you through the entire process, from selecting the right mushroom species to creating the perfect growing environment. Get ready to unlock the secrets of indoor mushroom cultivation and enjoy a delicious, homegrown harvest!

Grow Your Own Gourmet Mushrooms: A Beginner’s Guide
Hey there, fellow fungi fanatics! Ever dreamt of harvesting your own delicious mushrooms right in your kitchen? Well, dream no more! Growing mushrooms at home is surprisingly achievable, even for beginners. I’m going to walk you through a simple and effective method using readily available materials. Get ready to impress your friends and family with your newfound mushroom-growing prowess!
Choosing Your Mushroom Variety
Before we dive in, let’s talk about which mushrooms are easiest to grow at home. While you can technically cultivate many varieties, some are much more forgiving than others. For beginners, I highly recommend starting with:
* Oyster Mushrooms (Pleurotus spp.): These are incredibly versatile, fast-growing, and relatively resistant to contamination. They come in a variety of colors, including pearl, blue, and pink.
* Shiitake Mushrooms (Lentinula edodes): A bit more challenging than oyster mushrooms, but still manageable. They have a rich, savory flavor that’s perfect for stir-fries and soups.
* Wine Cap Mushrooms (Stropharia rugosoannulata): These are great for outdoor gardens and can be grown in wood chips.
For this guide, I’ll focus on growing oyster mushrooms, as they’re the most beginner-friendly.
Gathering Your Supplies
Okay, let’s get our hands dirty! Here’s what you’ll need to get started:
* Oyster Mushroom Spawn: This is essentially the “seed” of the mushroom. You can purchase it online or from a local mushroom supplier. Make sure to get a reputable source to avoid contamination.
* Substrate: This is the material the mushrooms will grow on. For oyster mushrooms, pasteurized straw is an excellent choice. You can also use coffee grounds, cardboard, or hardwood sawdust. I’ll be using straw in this guide.
* Large Heat-Resistant Bag or Bucket: This will be used for pasteurizing the straw. A 5-gallon bucket or a large oven bag works well.
* Large Tub or Container: This will be your growing container. A plastic storage tub with a lid is ideal.
* Drill or Knife: For creating ventilation holes in your growing container.
* Spray Bottle: For misting the mushrooms to maintain humidity.
* Bleach or Hydrogen Peroxide: For sanitizing your work area and equipment.
* Gloves: To keep your hands clean and prevent contamination.
* Thermometer: To monitor the temperature of the straw during pasteurization.
Phase 1: Preparing the Substrate (Straw Pasteurization)
This is arguably the most crucial step. Pasteurization eliminates competing organisms that could hinder mushroom growth. We’re not sterilizing (which would kill everything, including beneficial microbes), but rather reducing the competition to give our oyster mushrooms a head start.
1. Chop the Straw: Cut the straw into smaller pieces, about 2-4 inches long. This will make it easier to pack into the container and for the mycelium (mushroom roots) to colonize.
2. Prepare the Pasteurization Container: Line your large bag or bucket with a clean trash bag (optional, but helps with cleanup).
3. Pack the Straw: Tightly pack the chopped straw into the bag or bucket.
4. Add Hot Water: Carefully pour hot (but not boiling) water over the straw until it’s completely submerged. The ideal temperature is around 160-180°F (71-82°C). Use your thermometer to check.
5. Weigh it Down: Place a heavy object (like a brick or a sealed bag of water) on top of the straw to keep it submerged.
6. Pasteurize: Let the straw soak in the hot water for 1-2 hours. This will kill off most of the unwanted organisms.
7. Drain the Straw: After pasteurization, carefully drain the hot water. Be careful, as the straw will be very hot! You can use a colander or strainer to help with this.
8. Cool the Straw: Allow the straw to cool down to room temperature. This is crucial! You don’t want to cook your mushroom spawn. This can take several hours. I usually let it sit overnight. The straw should be damp but not dripping wet. Squeeze a handful; if water pours out, it’s too wet.
Phase 2: Inoculating the Substrate
Now for the fun part – introducing the mushroom spawn to the straw!
1. Sanitize Your Work Area: Clean your work surface with a bleach or hydrogen peroxide solution. This will help prevent contamination.
2. Prepare the Growing Container: Drill or cut several small (about 1/4 inch) ventilation holes in the sides and lid of your growing container. These holes will allow for air exchange, which is essential for mushroom growth.
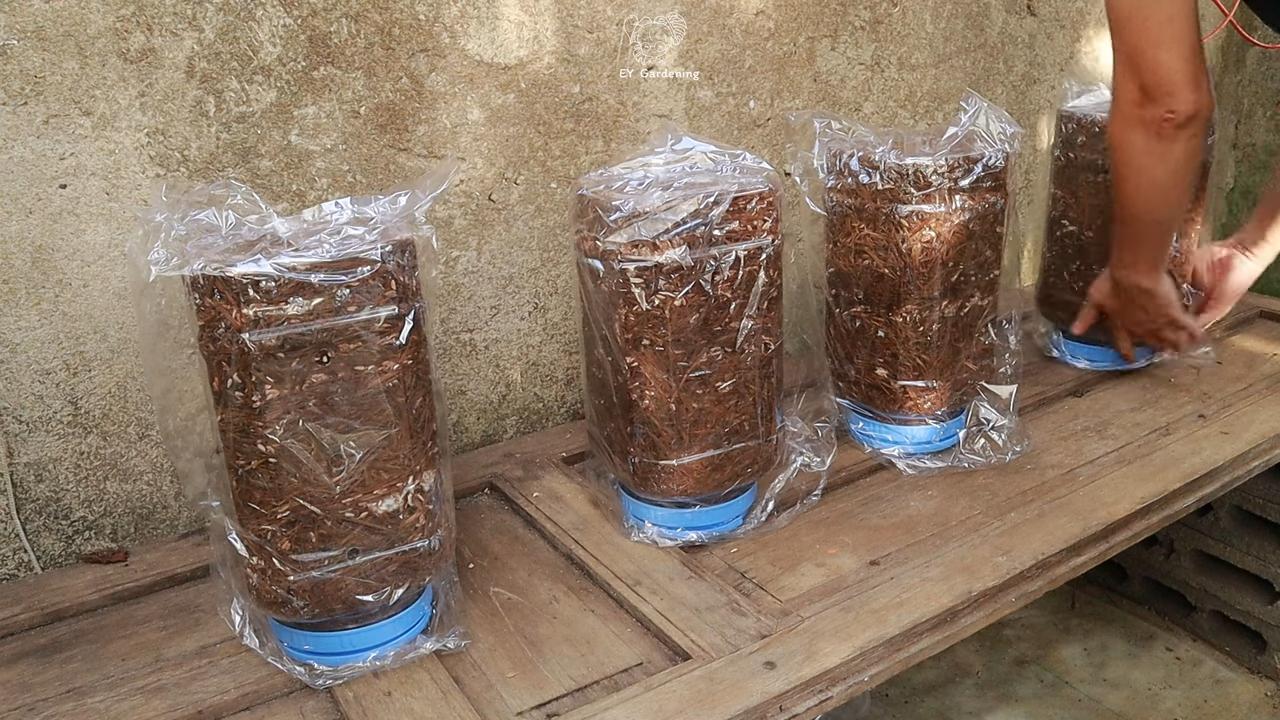
3. Layer the Straw and Spawn: In your growing container, create alternating layers of pasteurized straw and mushroom spawn. Start with a layer of straw, then sprinkle a generous amount of spawn on top. Repeat this process until the container is full, ending with a layer of straw. Aim for about 1 part spawn to 10 parts straw.
4. Mix Thoroughly (Optional): Some growers prefer to mix the spawn and straw thoroughly. This can speed up colonization, but it also increases the risk of contamination. I usually just layer it.
5. Close the Container: Secure the lid on your growing container.
Phase 3: Incubation (Mycelial Colonization)
This is the waiting game! During this phase, the mushroom mycelium will spread throughout the straw, consuming it and preparing to fruit.
1. Find a Suitable Location: Place your growing container in a dark, humid, and well-ventilated location. A basement, closet, or spare room works well. The ideal temperature is around 65-75°F (18-24°C).
2. Monitor Humidity: Keep the humidity high by misting the inside of the container with water every day or two. You want the straw to stay damp but not soaking wet.
3. Wait Patiently: It will take about 2-3 weeks for the mycelium to fully colonize the straw. You’ll know it’s ready when the straw is covered in a white, cottony growth.
Phase 4: Fruiting (Mushroom Formation)
The moment we’ve been waiting for! Now it’s time to encourage the mushrooms to fruit.
1. Increase Airflow: Open the lid of the container slightly or fan it a few times a day to increase airflow. This will stimulate fruiting.
2. Increase Light: Move the container to a location with indirect light. Mushrooms don’t need a lot of light, but some is necessary for proper development.
3. Maintain Humidity: Continue to mist the mushrooms regularly to keep them moist.
4. Wait for Pins: After a few days, you should start to see small mushroom “pins” forming. These are the baby mushrooms!
5. Harvest Your Mushrooms: Once the mushroom caps have fully developed but before they start to drop spores (you’ll see a powdery substance), it’s time to harvest! Gently twist or cut the mushrooms off at the base.
Phase 5: Subsequent Flushes
Congratulations, you’ve harvested your first flush of mushrooms! But the fun doesn’t have to end there. You can often get several more flushes from the same substrate.
1. Soak the Substrate: After harvesting, soak the substrate in water for 12-24 hours. This will rehydrate it and encourage another flush of mushrooms.
2. Repeat the Fruiting Process: Drain the water and repeat the fruiting process as described above.
3. Monitor for Contamination: Keep an eye out for any signs of contamination, such as mold or unusual colors. If you see contamination, it’s best to discard the substrate.
Troubleshooting
Even with the best preparation, things can sometimes go wrong. Here are a few common problems and how to address them:
* Contamination: If you see mold or other unwanted growth, it’s likely due to contamination. This can be caused by improper pasteurization, unsanitary conditions, or poor-quality spawn. Unfortunately, there’s not much you can do to save a contaminated batch. It’s best to discard it and start over, taking extra care to sanitize everything.
* Slow Colonization: If the mycelium is colonizing slowly, it could be due to low temperatures, poor ventilation, or dry conditions. Make sure the temperature is within the ideal range, increase airflow, and mist the substrate more frequently.
* No Fruiting: If the mycelium has fully colonized the substrate but you’re not seeing any pins, it could be due to lack of airflow, insufficient light, or low humidity. Try
Conclusion
So, there you have it! Growing mushrooms at home isn’t just a quirky hobby; it’s a rewarding experience that connects you to the natural world and provides a sustainable source of delicious, nutritious food. From the initial thrill of seeing the first pinheads emerge to the satisfaction of harvesting your own bounty, the process is captivating and surprisingly straightforward.
We’ve demystified the process, breaking down the steps into manageable chunks, and hopefully, dispelled any fears you might have had about tackling this project. Remember, the key to success lies in patience, cleanliness, and a willingness to learn from your experiences. Don’t be discouraged if your first attempt isn’t perfect. Every grow is a learning opportunity, and with each cycle, you’ll refine your technique and become a more skilled mushroom cultivator.
This DIY trick is a must-try for several compelling reasons. First and foremost, it gives you complete control over the quality and freshness of your mushrooms. No more wondering about the origins of your store-bought fungi or worrying about how long they’ve been sitting on the shelf. You’ll be enjoying mushrooms that are bursting with flavor and nutrients, harvested at their peak ripeness.
Secondly, growing your own mushrooms is an incredibly sustainable practice. You can utilize readily available materials like coffee grounds, straw, or wood chips, turning waste into a valuable resource. This reduces your environmental footprint and promotes a more circular economy.
Thirdly, it’s a fantastic way to connect with nature and learn about the fascinating world of fungi. You’ll gain a deeper appreciation for the intricate processes that support life on our planet and develop a newfound respect for the power of nature.
Ready to take your mushroom cultivation to the next level? Consider experimenting with different substrates to see how they affect the flavor and texture of your mushrooms. Try adding supplements like bran or gypsum to boost yields. And don’t be afraid to explore different mushroom varieties! Oyster mushrooms are a great starting point, but there’s a whole world of delicious and exotic fungi waiting to be discovered. Lion’s Mane, Shiitake, and even Wine Cap mushrooms can be successfully grown at home with a little extra effort.
We encourage you to embark on this exciting journey and discover the joys of growing mushrooms at home. It’s a rewarding experience that will enrich your life in countless ways.
Don’t keep your newfound knowledge to yourself! Share your experiences with us and the wider community. Post photos of your mushroom grows, share your tips and tricks, and ask questions. Let’s learn from each other and create a thriving community of home mushroom cultivators. We’re eager to hear about your successes, your challenges, and your creative variations on this DIY trick. Your insights could inspire others to take the plunge and discover the magic of growing their own mushrooms. So, get growing, get sharing, and let’s cultivate a world of delicious, sustainable fungi together!
FAQ
What are the easiest types of mushrooms to grow at home for beginners?
Oyster mushrooms are generally considered the easiest to grow for beginners due to their rapid growth, tolerance of various substrates, and relatively simple cultivation requirements. They are also quite forgiving of minor mistakes, making them an excellent choice for first-time growers. Shiitake mushrooms are another popular option, but they require a bit more patience and attention to detail. Wine Cap mushrooms are also relatively easy and can be grown outdoors in wood chip beds.
What kind of space do I need to grow mushrooms at home?
The space requirements for growing mushrooms depend on the scale of your operation. For small-scale home cultivation, a spare room, basement, closet, or even a corner of your kitchen can suffice. The key is to provide a dark, humid, and well-ventilated environment. Larger-scale operations may require a dedicated grow room or greenhouse. Consider the size of your growing containers and the amount of space you need for each stage of the cultivation process, from inoculation to fruiting.
What are the best substrates to use for growing mushrooms at home?
The best substrate depends on the type of mushroom you’re growing. Oyster mushrooms thrive on a variety of substrates, including straw, coffee grounds, wood chips, and even cardboard. Shiitake mushrooms prefer hardwood logs or sawdust. Wine Cap mushrooms do well in wood chip beds. When choosing a substrate, consider its availability, cost, and suitability for the specific mushroom species you’re cultivating. Ensure the substrate is properly pasteurized or sterilized to eliminate competing organisms.
How do I maintain the proper humidity for growing mushrooms?
Maintaining proper humidity is crucial for successful mushroom cultivation. The ideal humidity level varies depending on the mushroom species, but generally, a range of 80-95% is recommended during the fruiting stage. You can increase humidity by misting the growing area regularly with water, using a humidifier, or placing the growing containers in a humidity tent or greenhouse. Monitor the humidity levels with a hygrometer and adjust your methods accordingly. Avoid over-misting, as this can lead to mold growth.
How long does it take to grow mushrooms at home?
The time it takes to grow mushrooms varies depending on the species, substrate, and environmental conditions. Oyster mushrooms typically fruit within 1-2 weeks after pinning, while Shiitake mushrooms can take several months to fruit on logs. The entire cultivation process, from inoculation to harvest, can range from a few weeks to several months. Be patient and monitor your mushrooms closely for signs of growth and development.
What are some common problems I might encounter when growing mushrooms at home, and how can I fix them?
Common problems include contamination, lack of humidity, insufficient light, and pest infestations. Contamination can be prevented by using sterile techniques and pasteurizing or sterilizing your substrate. Lack of humidity can be addressed by misting regularly or using a humidifier. Insufficient light can be remedied by providing indirect light during the fruiting stage. Pest infestations can be controlled by using organic pesticides or introducing beneficial insects. Regularly inspect your mushrooms for signs of problems and take corrective action promptly.
Can I use spent coffee grounds to grow mushrooms?
Yes, spent coffee grounds are an excellent substrate for growing certain types of mushrooms, particularly oyster mushrooms. Coffee grounds are rich in nutrients and have already been pasteurized during the brewing process, making them a convenient and readily available substrate. However, coffee grounds are also prone to contamination, so it’s important to use them fresh and mix them with other substrates like straw or wood chips to improve drainage and aeration.
Are there any safety precautions I should take when growing mushrooms at home?
Yes, it’s important to take certain safety precautions when growing mushrooms at home. Always wash your hands thoroughly before handling your mushrooms or substrate. Use sterile techniques to prevent contamination. Avoid breathing in mushroom spores, as they can cause allergic reactions in some individuals. Cook your mushrooms thoroughly before eating them to kill any harmful bacteria or toxins. And most importantly, only consume mushrooms that you have positively identified as edible. If you are unsure about the identity of a mushroom, do not eat it.

Leave a Comment