
Grow Yacon at Home: Ever dreamt of harvesting sweet, juicy tubers right from your own backyard? Imagine the satisfaction of digging up a healthy crop of Yacon, a naturally sweet and incredibly versatile root vegetable, without ever stepping foot in a grocery store! This isn’t just a pipe dream; it’s entirely achievable with a few simple tricks and a little DIY spirit.
Yacon, also known as the Peruvian ground apple, has a rich history rooted in the Andes Mountains, where it has been cultivated for centuries. Indigenous communities have long valued it for its nutritional benefits and unique flavor. Now, you can bring a piece of that ancient tradition to your own garden!
Why should you learn how to grow Yacon at home? Well, for starters, it’s a fantastic alternative sweetener, perfect for those looking to reduce their sugar intake. Plus, it’s packed with prebiotics, which are great for gut health. But beyond the health benefits, growing your own Yacon is simply rewarding. It connects you to the earth, provides fresh, healthy food, and offers a fun and engaging DIY project. In this article, I’ll share my favorite tips and tricks to help you successfully cultivate this amazing plant, even if you’re a complete beginner. Let’s get our hands dirty and start growing!
Growing Yacon at Home: A Beginner’s Guide
Hey there, fellow gardening enthusiasts! Ever heard of yacon? It’s this amazing South American root vegetable that tastes like a cross between an apple and a pear, with a hint of watermelon. Plus, it’s naturally sweet and low in calories, making it a fantastic healthy treat. I’ve been growing yacon in my backyard for a few years now, and I’m excited to share my experience and guide you through the process. Trust me, it’s easier than you think!
What is Yacon and Why Grow It?
Before we dive into the how-to, let’s quickly cover the basics. Yacon (Smallanthus sonchifolius) is a perennial plant that produces two types of edible roots:
* Rhizomes: These are the small, knobby roots near the surface, which are used for propagation (planting).
* Storage Roots: These are the large, elongated roots that you harvest and eat. They’re the sweet, juicy treasures we’re after!
Why grow yacon? Well, besides its delicious taste and health benefits, it’s also relatively easy to grow, pest-resistant, and can thrive in various climates. Plus, it’s a conversation starter! Imagine serving yacon to your friends and family – they’ll be amazed!
Getting Started: What You’ll Need
Okay, let’s gather our supplies. Here’s what you’ll need to embark on your yacon-growing adventure:
* Yacon Rhizomes: This is the most crucial part! You can usually find them at local nurseries, online seed suppliers, or even from a friend who already grows yacon. Make sure the rhizomes have visible “eyes” or buds – these are where the new shoots will emerge.
* Well-Draining Soil: Yacon prefers soil that’s rich in organic matter and drains well. You can amend your existing soil with compost, aged manure, or peat moss.
* Large Pots or Raised Beds (Optional): If you don’t have a garden plot, you can grow yacon in large containers or raised beds. Choose pots that are at least 15-20 gallons in size.
* Compost or Aged Manure: This will provide essential nutrients for your yacon plants.
* Watering Can or Hose: For regular watering.
* Gardening Gloves: To protect your hands.
* Shovel or Trowel: For planting.
* Mulch (Optional): To help retain moisture and suppress weeds. Straw, wood chips, or shredded leaves work well.
* Fertilizer (Optional): A balanced fertilizer can give your yacon plants an extra boost.
Step-by-Step Planting Guide
Now for the fun part – planting! Here’s a detailed guide to get your yacon plants off to a great start:
1. Prepare the Soil:
* Choose a sunny location in your garden that receives at least 6-8 hours of sunlight per day.
* Clear the area of any weeds, rocks, or debris.
* Dig a hole that’s about twice the size of the yacon rhizome.
* If your soil is heavy or clay-like, amend it with plenty of compost or aged manure to improve drainage. I usually mix in about a third compost to my existing garden soil.
2. Plant the Rhizomes:
* Place the yacon rhizome in the hole with the “eyes” or buds facing upwards.
* Cover the rhizome with soil, leaving about 2-3 inches of soil on top.
* Gently pat down the soil around the rhizome.
* If you’re planting multiple rhizomes, space them about 18-24 inches apart.
3. Water Thoroughly:
* After planting, water the area thoroughly to settle the soil and provide moisture to the rhizome.
4. Mulch (Optional):
* Apply a layer of mulch around the base of the plant to help retain moisture, suppress weeds, and regulate soil temperature.
5. Growing in Pots:
* If you’re growing yacon in pots, fill the pot with a well-draining potting mix.
* Plant the rhizome as described above, ensuring that the pot is large enough to accommodate the plant’s growth.
* Water regularly and fertilize as needed.
Caring for Your Yacon Plants
Once your yacon plants are in the ground, it’s important to provide them with proper care to ensure a bountiful harvest. Here’s what you need to do:
1. Watering:
* Yacon plants need consistent moisture, especially during hot, dry weather.
* Water deeply whenever the top inch of soil feels dry to the touch.
* Avoid overwatering, as this can lead to root rot.
2. Fertilizing:
* Yacon plants benefit from regular fertilization, especially during the growing season.
* Apply a balanced fertilizer (e.g., 10-10-10) every 4-6 weeks, following the instructions on the fertilizer package.
* You can also use organic fertilizers like compost tea or fish emulsion.
3. Weeding:
* Keep the area around your yacon plants free of weeds, as weeds can compete for nutrients and water.
* Hand-pull weeds regularly or use a hoe to cultivate the soil.
4. Staking (Optional):
* Yacon plants can grow quite tall (up to 6-7 feet), so you may need to stake them to prevent them from falling over, especially in windy areas.
* Use bamboo stakes or tomato cages to provide support.
5. Pest and Disease Control:
* Yacon is generally pest-resistant, but it can occasionally be affected by slugs or snails.
* Use organic pest control methods like beer traps or diatomaceous earth to control these pests.
* Yacon is also relatively disease-resistant, but it’s important to provide good air circulation to prevent fungal diseases.
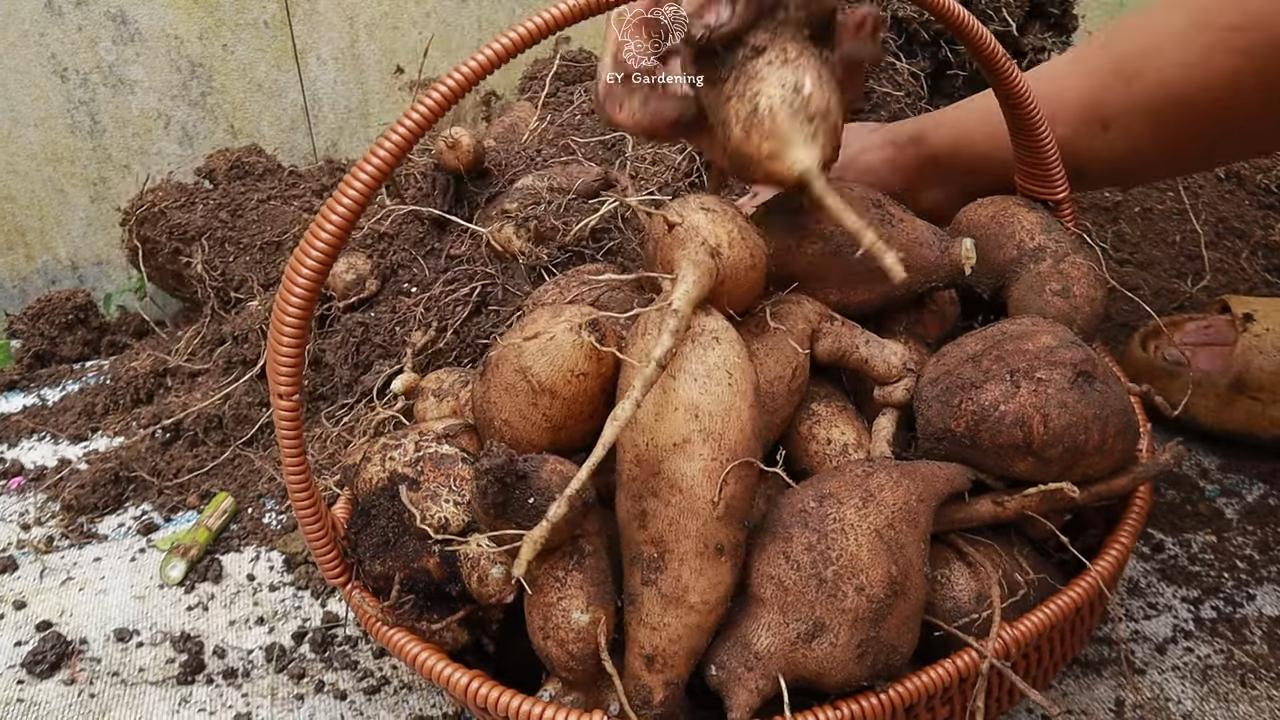
Harvesting Your Yacon Roots
The moment we’ve all been waiting for – harvesting! Yacon roots are typically ready to harvest in the late fall or early winter, after the foliage has died back. Here’s how to harvest your yacon roots:
1. Cut Back the Foliage:
* Once the foliage has turned brown and died back, cut it back to the ground.
2. Dig Up the Roots:
* Carefully dig around the base of the plant, being careful not to damage the roots.
* Use a shovel or garden fork to lift the roots out of the ground.
* The storage roots will be large and elongated, while the rhizomes will be smaller and knobby.
3. Separate the Roots:
* Separate the storage roots from the rhizomes.
* The storage roots are the ones you’ll eat, while the rhizomes can be used to propagate new plants.
4. Curing the Roots:
* After harvesting, yacon roots need to be cured for a few days to a few weeks to develop their sweetness.
* Place the roots in a cool, dry, and well-ventilated area.
* The roots will become sweeter and juicier as they cure. I usually leave mine in a dark corner of my garage for about two weeks.
5. Storing the Roots:
* Once the roots are cured, you can store them in a cool, dry place for several months.
* Wrap the roots in newspaper or store them in a perforated plastic bag to prevent them from drying out.
* You can also store the roots in the refrigerator, but they may not last as long.
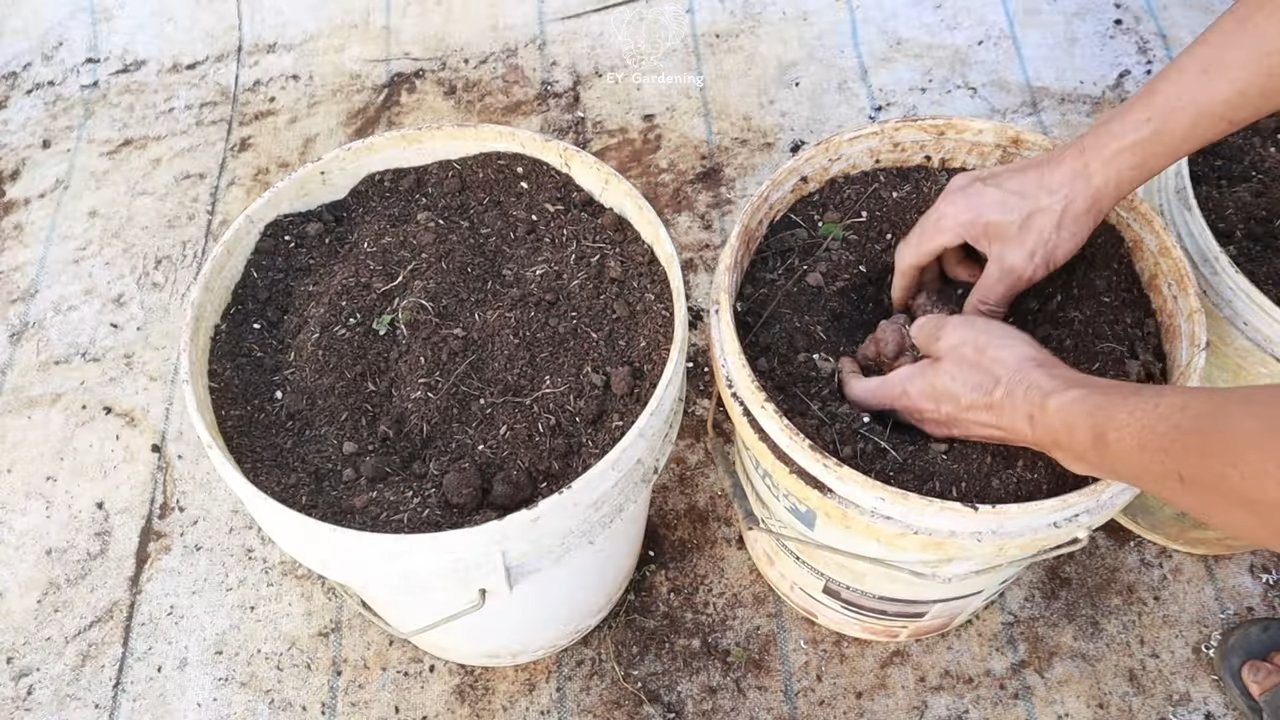
Propagating Yacon from Rhizomes
Don’t throw away those rhizomes! They’re your ticket to growing even more yacon plants next year. Here’s how to propagate yacon from rhizomes:
1. Store the Rhizomes:
* After harvesting, store the rhizomes in a cool, dry place until spring.
* You can store them in a container filled with slightly moist peat moss or vermiculite.
2. Plant the Rhizomes in Spring:
* In the spring, after the last frost, plant the rhizomes as described above.
* Make sure the rhizomes have visible “eyes” or buds before planting.
3. Start Indoors (Optional):
* If you want to get a head start on the growing season, you can start the rhizomes indoors a few weeks before the last frost.
* Plant the rhizomes in small pots filled with potting mix and keep them in a warm, sunny location.
Conclusion
So, there you have it! Growing yacon at home is not only achievable, but it’s a deeply rewarding experience that connects you to the source of your food in a tangible way. Forget the often-expensive and sometimes lackluster yacon you find at the grocery store. Imagine harvesting your own fresh, crisp, and naturally sweet tubers, knowing exactly where they came from and how they were grown. This is the power of DIY gardening, and yacon is a fantastic place to start.
We’ve covered everything from selecting the right growing conditions to understanding the plant’s unique life cycle and harvesting techniques. You now possess the knowledge to cultivate this fascinating plant in your own backyard, balcony, or even a container garden. The slight learning curve is well worth the effort, as the yield of delicious, healthy yacon tubers is substantial.
But the benefits extend beyond just the harvest. Growing yacon at home is an exercise in patience, observation, and connection with nature. You’ll witness the plant’s growth stages, learn about its needs, and develop a deeper appreciation for the intricate processes that bring food to our tables. It’s a therapeutic and educational experience for gardeners of all levels.
Why is this a must-try? Because you’re not just growing a vegetable; you’re growing an experience. You’re taking control of your food source, reducing your carbon footprint, and enjoying the unparalleled flavor of homegrown produce. Plus, yacon is a nutritional powerhouse, packed with prebiotics that promote gut health.
Looking for variations? Consider these ideas:
* Yacon Syrup Experimentation: Once you’ve harvested your yacon, experiment with different methods of making yacon syrup. Some prefer slow-cooking, while others use a dehydrator. Each method yields a slightly different flavor profile.
* Companion Planting: Explore companion planting options to maximize your garden’s efficiency. Yacon reportedly grows well alongside beans, peas, and carrots.
* Container Gardening Challenge: If you’re limited on space, try growing yacon in large containers. This allows you to control the soil composition and move the plants to optimal sunlight conditions.
* Different Varieties: Research different yacon varieties available in your region. Some varieties may be better suited to your climate or have slightly different flavor profiles.
We strongly encourage you to embark on this yacon-growing adventure. Don’t be afraid to experiment, make mistakes, and learn from the process. Every garden is unique, and your experience will be your own.
Most importantly, we want to hear about your journey! Share your successes, challenges, and tips in the comments below. Let’s build a community of yacon enthusiasts and learn from each other. Post pictures of your plants, share your favorite yacon recipes, and let us know what you’ve discovered along the way. Together, we can unlock the full potential of this amazing plant and enjoy the delicious rewards of growing yacon at home.
Frequently Asked Questions (FAQ)
What is the best time of year to plant yacon?
The ideal time to plant yacon is in the spring, after the last frost. This allows the plant to establish itself during the warmer months and develop a strong root system before winter. In regions with mild winters, you may be able to plant in late winter. The key is to ensure the soil temperature is consistently above 50°F (10°C). If you live in an area with a short growing season, starting the rhizomes indoors a few weeks before the last frost can give you a head start.
How much sunlight does yacon need?
Yacon thrives in full sun, requiring at least 6-8 hours of direct sunlight per day. However, in hotter climates, some afternoon shade can be beneficial to prevent the leaves from scorching. If you’re growing yacon in containers, you can easily move them to optimize their sun exposure throughout the day. Insufficient sunlight can lead to reduced tuber production and smaller plants.
What kind of soil is best for growing yacon?
Yacon prefers well-drained, fertile soil that is rich in organic matter. The soil pH should be slightly acidic to neutral, ideally between 6.0 and 7.0. Before planting, amend the soil with compost, aged manure, or other organic materials to improve drainage and fertility. Avoid heavy clay soils, as they can become waterlogged and hinder tuber development. If you have clay soil, consider growing yacon in raised beds or containers with a well-draining potting mix.
How often should I water yacon plants?
Yacon plants need consistent moisture, especially during the growing season. Water deeply and regularly, ensuring the soil remains consistently moist but not waterlogged. The frequency of watering will depend on the climate, soil type, and rainfall. Check the soil moisture regularly by sticking your finger a few inches into the soil. If it feels dry, it’s time to water. Reduce watering in the fall as the plant prepares for dormancy.
How do I harvest yacon tubers?
Yacon tubers are typically harvested in the fall, after the first frost has killed back the foliage. Carefully dig around the base of the plant, being mindful not to damage the tubers. Gently lift the plant from the ground and separate the tubers from the rhizomes. The tubers can be stored in a cool, dark, and dry place for several months. The rhizomes can be replanted the following spring to start a new crop.
Can I eat yacon leaves?
While the tubers are the primary edible part of the yacon plant, the leaves are also edible, though they are not as commonly consumed. Young, tender leaves can be added to salads or stir-fries. However, it’s important to note that yacon leaves contain small amounts of alkaloids, so it’s best to consume them in moderation. Some people may experience a mild laxative effect from eating yacon leaves.
How do I store yacon tubers?
Proper storage is crucial for preserving the quality and sweetness of yacon tubers. After harvesting, gently clean the tubers and allow them to cure for a few days in a cool, dry place. This allows the skins to toughen up and prevents spoilage. Store the cured tubers in a cool, dark, and well-ventilated area, such as a root cellar or unheated garage. Avoid storing them in the refrigerator, as this can cause them to become bitter. Check the tubers periodically for signs of spoilage and discard any that are soft or moldy.
Are there any pests or diseases that affect yacon?
Yacon is generally a relatively pest- and disease-resistant plant. However, it can be susceptible to certain issues, such as slugs, snails, and aphids. These pests can be controlled with organic methods, such as hand-picking, diatomaceous earth, or insecticidal soap. In some cases, fungal diseases like powdery mildew can affect yacon plants. Proper spacing and good air circulation can help prevent these diseases. If necessary, use a fungicide approved for use on edible plants.
Can I grow yacon in containers?
Yes, yacon can be successfully grown in containers, making it a great option for gardeners with limited space. Choose a large container that is at least 18 inches in diameter and depth. Use a well-draining potting mix that is rich in organic matter. Water regularly and fertilize every few weeks with a balanced fertilizer. Place the container in a sunny location that receives at least 6-8 hours of direct sunlight per day.
How do I make yacon syrup?
Yacon syrup is a natural sweetener made from the juice of yacon tubers. To make yacon syrup, peel and chop the tubers into small pieces. Extract the juice using a juicer or by blending the chopped tubers with a small amount of water and then straining the mixture through a cheesecloth. Simmer the juice in a saucepan over low heat until it thickens into a syrup-like consistency. This process can take several hours. Be careful not to burn the syrup. Once it has reached the desired consistency, remove it from the heat and let it cool. Store the yacon syrup in an airtight container in the refrigerator.


Leave a Comment