
Alcohol based cleaning solutions: your secret weapon for a sparkling home, and surprisingly, a thriving garden! Forget harsh chemicals and expensive store-bought products. I’m about to let you in on some amazing DIY tricks using something you probably already have in your medicine cabinet.
The use of alcohol for cleaning and disinfecting has roots stretching back centuries, with various cultures recognizing its potent properties. But its application in the garden? That’s where the real magic begins! We’re not just talking about cleaning surfaces; we’re talking about naturally tackling pests, preventing fungal diseases, and even boosting plant growth.
Let’s face it, gardening can be challenging. Pests nibbling on your precious plants, powdery mildew threatening to take over, and the constant battle against weeds – it can all feel overwhelming. That’s why I’m so excited to share these simple, effective, and budget-friendly alcohol based cleaning solutions for your garden. These DIY hacks will not only save you money but also help you create a healthier, more sustainable garden environment. Ready to ditch the chemicals and embrace the power of alcohol? Let’s get started!
DIY Miracle Cleaner: Harnessing the Power of Alcohol for a Sparkling Home
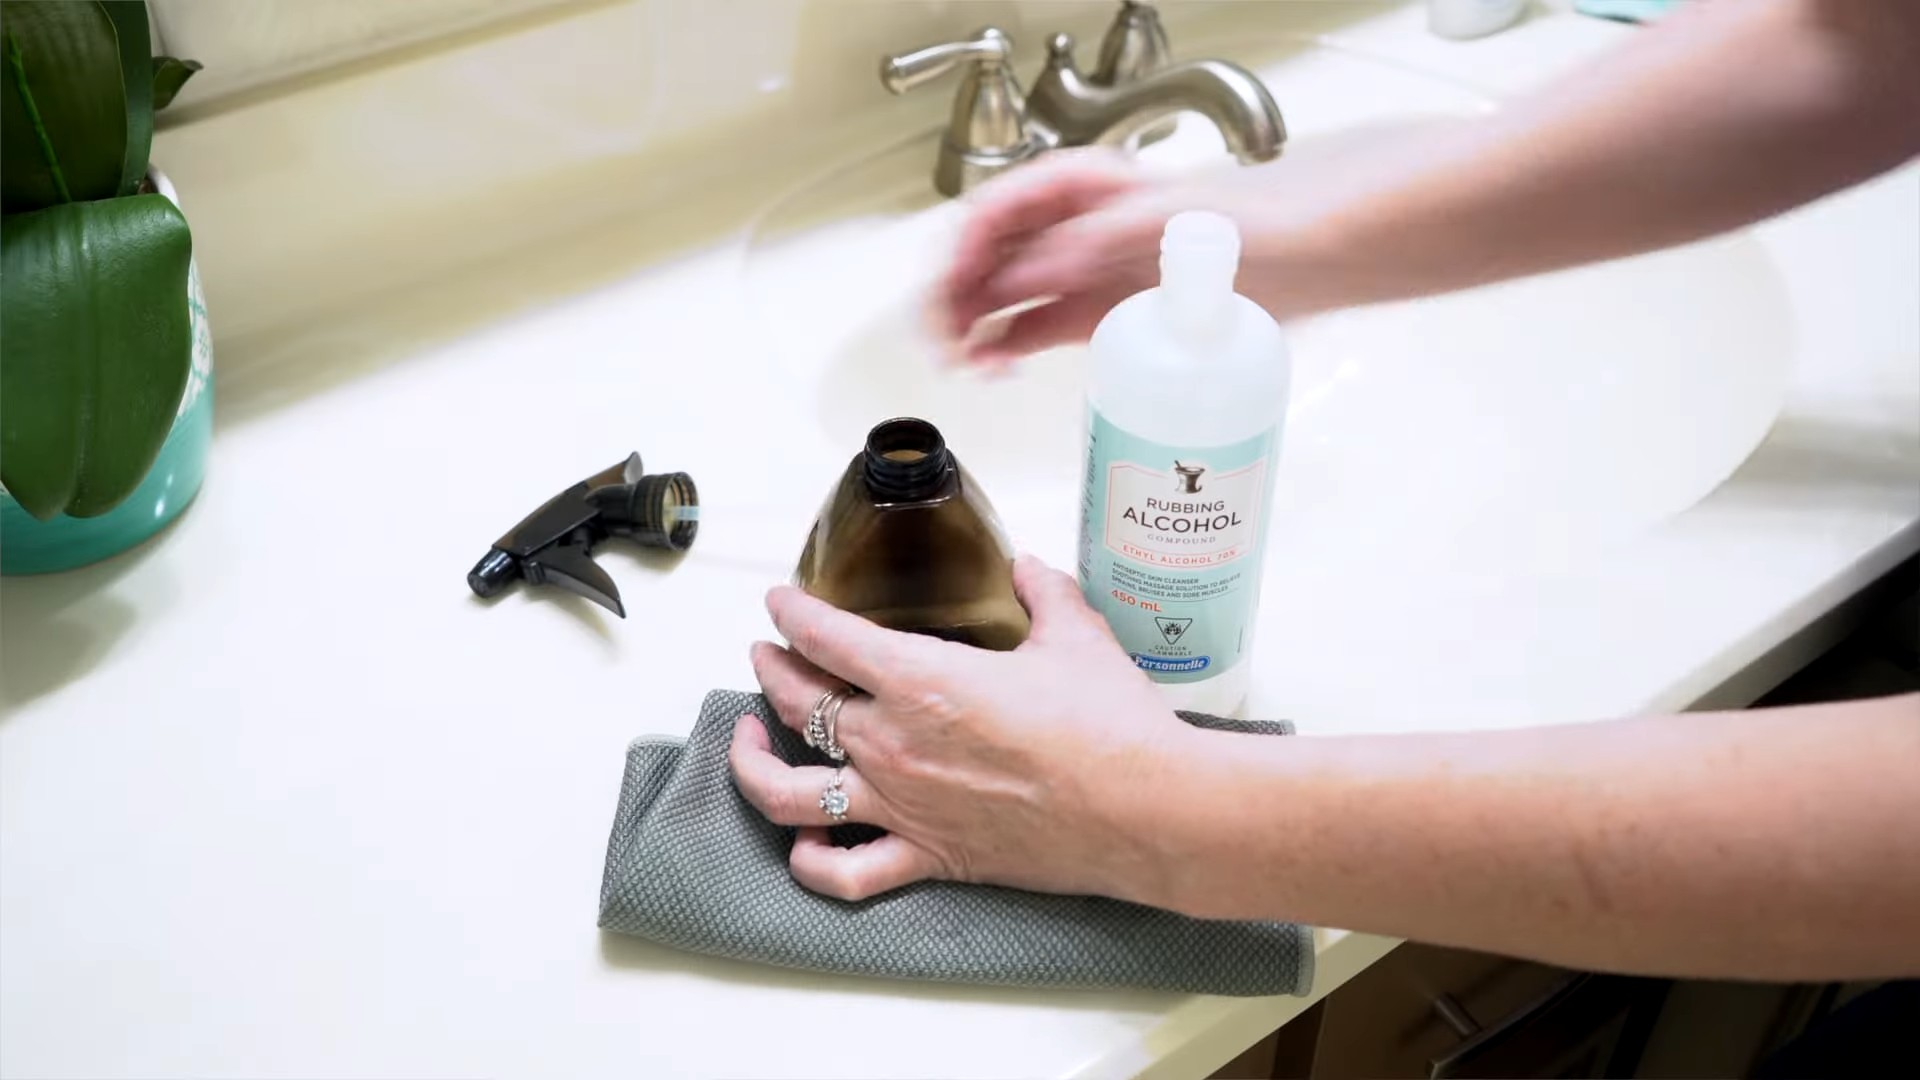
Okay, friends, let’s talk cleaning. We all want a spotless home, but who wants to spend a fortune on fancy cleaning products filled with mystery ingredients? Not me! That’s why I’m so excited to share my go-to DIY miracle cleaner recipe. It’s cheap, effective, and uses ingredients you probably already have in your house. The star of the show? Good old rubbing alcohol (isopropyl alcohol).
This cleaner is fantastic for a variety of surfaces, from glass and mirrors to countertops and even stainless steel. It’s a degreaser, a disinfectant, and leaves everything streak-free. What’s not to love?
What Makes This Cleaner So Great?
Before we dive into the recipe, let’s quickly break down why this cleaner works so well:
* Isopropyl Alcohol: This is the powerhouse. It’s a solvent, meaning it dissolves grease and grime. It also evaporates quickly, which is key to avoiding streaks. Plus, it’s a disinfectant, killing many common household germs.
* White Vinegar: Vinegar is another cleaning superstar. It’s acidic, which helps to cut through hard water stains, soap scum, and mineral deposits. It also helps to deodorize.
* Dish Soap: A small amount of dish soap adds extra cleaning power, helping to lift dirt and grime from surfaces.
* Essential Oils (Optional): These aren’t strictly necessary, but they add a pleasant scent and can even provide additional cleaning benefits. For example, tea tree oil is a natural antiseptic.
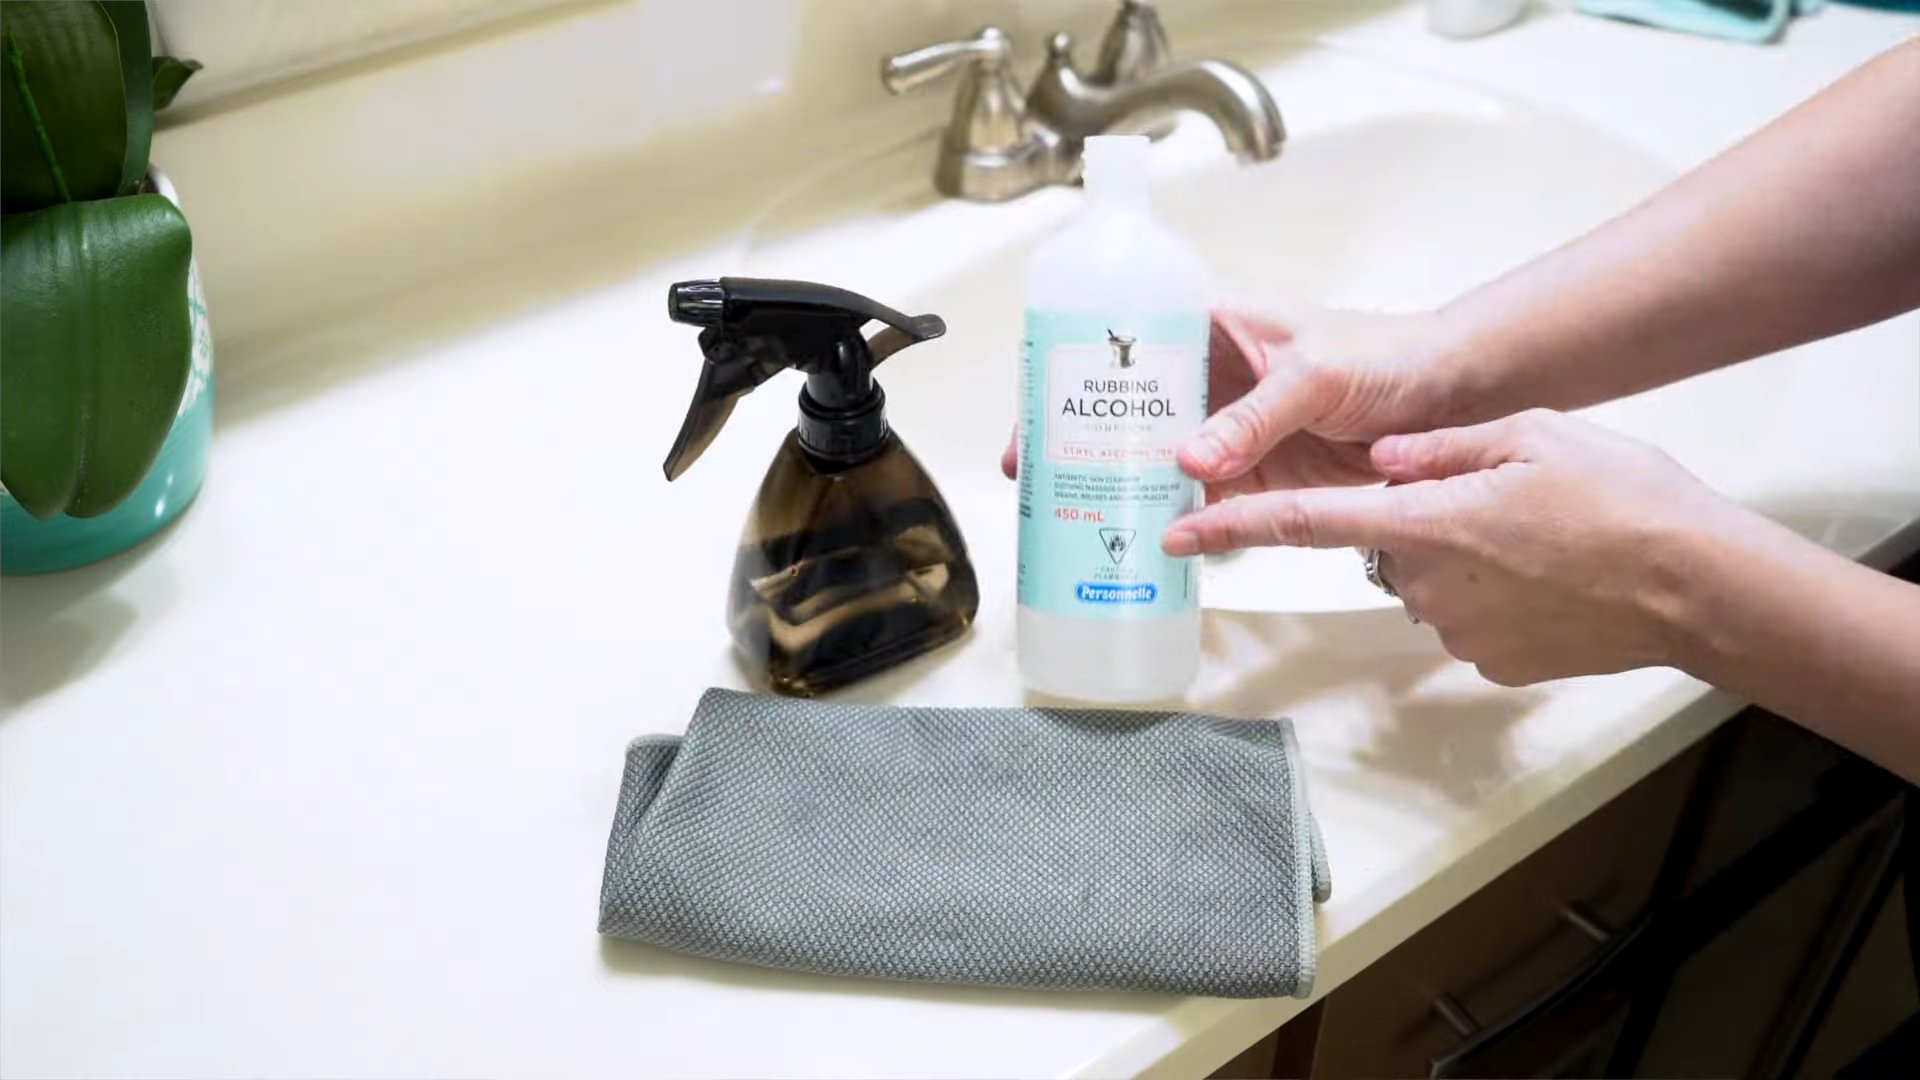
Gathering Your Supplies
Alright, let’s get started! Here’s what you’ll need to make your own miracle cleaner:
* Spray Bottle: A clean, empty spray bottle is essential. I prefer a 16-ounce bottle, but any size will work as long as you adjust the recipe accordingly.
* Isopropyl Alcohol (70% or 91%): You can find this at any drugstore or supermarket. I usually use 70% because it’s readily available and works just fine. 91% is stronger and will evaporate even faster, but it’s not always necessary.
* White Vinegar: Plain white vinegar is what you want here. Don’t use apple cider vinegar or any other type of vinegar.
* Dish Soap: Any liquid dish soap will do. I prefer a clear, unscented variety to avoid any potential discoloration or overpowering scents.
* Essential Oils (Optional): If you want to add essential oils, choose your favorites. Lemon, lavender, tea tree, and eucalyptus are all great options for cleaning.
* Measuring Cups and Spoons: For accurate measuring.
* Funnel (Optional): This makes it easier to pour the ingredients into the spray bottle without spilling.
The Miracle Cleaner Recipe
Okay, here’s the recipe I swear by. Remember, you can adjust the amounts slightly to suit your preferences, but this is a good starting point:
* 1 cup Isopropyl Alcohol (70% or 91%)
* 1 cup White Vinegar
* 1 teaspoon Dish Soap
* 10-20 drops Essential Oils (Optional)
* Water (to fill the rest of the spray bottle)
Step-by-Step Instructions: Making Your Miracle Cleaner
Now for the fun part! Follow these steps to create your own amazing cleaner:
1. Prepare Your Spray Bottle: Make sure your spray bottle is clean and dry. This will prevent any contamination of your cleaner.
2. Add the Isopropyl Alcohol: Using a measuring cup, pour 1 cup of isopropyl alcohol into the spray bottle. If you’re using a funnel, place it in the bottle’s opening to avoid spills.
3. Add the White Vinegar: Next, add 1 cup of white vinegar to the spray bottle. Again, use a measuring cup for accuracy.
4. Add the Dish Soap: Now, add 1 teaspoon of dish soap to the mixture. Be careful not to add too much, as this can make the cleaner too sudsy.
5. Add Essential Oils (Optional): If you’re using essential oils, add 10-20 drops to the spray bottle. Start with a smaller amount and add more if you want a stronger scent. I personally love a combination of lemon and tea tree oil for a fresh, clean smell.
6. Top Off with Water: Fill the rest of the spray bottle with water. Leave a little bit of space at the top to allow for shaking.
7. Shake Well: Secure the spray nozzle onto the bottle and shake well to combine all the ingredients.
8. Label Your Bottle: This is important! Label your spray bottle clearly with the name of the cleaner and the ingredients. This will prevent any confusion or accidental misuse.
Using Your Miracle Cleaner: Tips and Tricks
Now that you’ve made your cleaner, it’s time to put it to work! Here are some tips and tricks for using it effectively:
* Always Test in an Inconspicuous Area: Before using the cleaner on a large surface, test it in a small, hidden area to make sure it doesn’t damage or discolor the material. This is especially important for delicate surfaces like painted wood or natural stone.
* Spray and Wipe: Simply spray the cleaner onto the surface you want to clean and wipe it down with a clean microfiber cloth. Microfiber cloths are great because they’re absorbent and won’t leave streaks.
* For Stubborn Stains: For tough stains or grime, let the cleaner sit on the surface for a few minutes before wiping it away. This will give the ingredients time to break down the dirt and grease.
* Glass and Mirrors: This cleaner is fantastic for glass and mirrors! Spray it on and wipe it off with a clean microfiber cloth for a streak-free shine.
* Countertops: Use this cleaner on your countertops to remove spills, grease, and grime. Be sure to test it in an inconspicuous area first, especially if you have natural stone countertops.
* Stainless Steel: This cleaner works wonders on stainless steel appliances. Spray it on and wipe it off with the grain of the stainless steel to avoid streaks.
* Bathrooms: Use this cleaner to clean your bathroom surfaces, including sinks, toilets, and showers. It’s great for removing soap scum and hard water stains.
* Avoid These Surfaces: While this cleaner is generally safe for most surfaces, avoid using it on waxed wood, unfinished wood, or electronics.
Troubleshooting: Common Issues and Solutions
Sometimes, things don’t go exactly as planned. Here are some common issues you might encounter and how to fix them:
* Streaking: If you’re experiencing streaking, it could be due to a few things. First, make sure you’re using a clean microfiber cloth. Second, try using less dish soap in the recipe. Third, make sure you’re not using too much cleaner. A light mist is usually all you need.
* Strong Vinegar Smell: If you find the vinegar smell too strong, you can reduce the amount of vinegar in the recipe or add more essential oils to mask the scent. The vinegar smell will dissipate quickly as the cleaner dries.
* Cloudy Cleaner: If your cleaner looks cloudy, it could be due to the dish soap. Try using a different brand of dish soap or reducing the amount you use.
* Clogged Spray Nozzle: If your spray nozzle gets clogged, try running it under warm water to clear any blockages. You can also try using a small pin to poke out any debris.
Safety Precautions
While this cleaner is relatively safe, it’s still important to take some precautions:
* Keep Out of Reach of Children and Pets: Store the cleaner in a safe place where children and pets cannot access it.
* Avoid Contact with Eyes: Avoid getting the cleaner in your eyes. If contact occurs, rinse thoroughly with water.
* Ventilation: Use the cleaner in a well-ventilated area.
* Do Not Mix with Bleach: Never mix this cleaner with bleach, as this can create dangerous fumes.
Why I Love This Cleaner
I’ve been using this DIY miracle cleaner for years, and I absolutely love it. It’s effective, affordable, and eco-friendly. Plus, it’s so easy to make! I love knowing exactly what’s in my cleaning products and avoiding harsh chemicals. I hope you give this recipe a try and see for yourself how amazing it is! Happy cleaning!
Conclusion
So, there you have it! Mastering the art of creating your own alcohol based cleaning solutions is not just a cost-effective alternative to store-bought products; it’s a gateway to a cleaner, healthier, and more sustainable lifestyle. We’ve explored the simplicity of the process, the versatility of the solution, and the peace of mind that comes with knowing exactly what ingredients you’re using in your home.
Why is this DIY trick a must-try? Because it empowers you to take control of your cleaning routine. You’re no longer reliant on harsh chemicals and vague ingredient lists. You’re crafting a powerful cleaning agent that’s effective against germs, grease, and grime, all while being gentler on your surfaces and the environment. Think about the savings you’ll accumulate over time, the reduced plastic waste, and the satisfaction of knowing you’re making a positive impact.
But the benefits don’t stop there. The beauty of this DIY approach lies in its adaptability. Feel free to experiment with different essential oils to create custom scents that uplift your mood and freshen your home. Lavender for relaxation, lemon for a burst of energy, or tea tree for its antibacterial properties – the possibilities are endless!
Variations to Explore:
* Citrus Infusion: Add citrus peels (lemon, orange, grapefruit) to your alcohol based cleaning solutions for an extra boost of cleaning power and a refreshing scent. Let the peels infuse for a week before straining and using the solution.
* Herbal Blend: Incorporate dried herbs like rosemary, thyme, or mint for their natural antiseptic and aromatic qualities.
* Vinegar Boost: For tougher cleaning tasks, add a small amount of white vinegar to your alcohol based cleaning solutions. Be cautious when using vinegar on certain surfaces like marble or granite.
* Concentrated Cleaner: Create a concentrated version of your alcohol based cleaning solutions by using a higher ratio of alcohol to water. This is ideal for tackling stubborn stains and grime.
We understand that venturing into the world of DIY cleaning might seem daunting at first, but trust us, it’s easier than you think. With just a few simple ingredients and a little bit of experimentation, you’ll be well on your way to creating your own effective and eco-friendly cleaning solutions.
We wholeheartedly encourage you to give this DIY trick a try. Start with a small batch, experiment with different variations, and discover what works best for your needs and preferences. Once you experience the benefits firsthand, you’ll never go back to store-bought cleaners again.
And most importantly, we want to hear about your experience! Share your tips, tricks, and variations in the comments below. Let’s create a community of DIY cleaning enthusiasts who are passionate about creating a cleaner, healthier, and more sustainable world. Your insights and experiences will inspire others to embrace the power of homemade cleaning solutions. Let us know what essential oil combinations you loved, or if you found a particularly effective ratio of alcohol to water for a specific cleaning task. Your feedback is invaluable!
So, grab your ingredients, put on your DIY hat, and get ready to transform your cleaning routine. The power of alcohol based cleaning solutions is now in your hands. Happy cleaning!
Frequently Asked Questions (FAQ)
Q: What type of alcohol should I use for my alcohol based cleaning solutions?
A: Isopropyl alcohol (also known as rubbing alcohol) is the most commonly used and readily available type of alcohol for cleaning. Look for a concentration of 70% or higher for optimal disinfecting properties. While higher concentrations like 90% or 99% are available, they evaporate more quickly, which can reduce their contact time with surfaces and potentially decrease their effectiveness. Ethanol (grain alcohol) can also be used, but it’s often more expensive and may not be as readily available as isopropyl alcohol. Avoid using denatured alcohol, as it contains additives that can be harmful or leave a residue.
Q: Can I use essential oils in my alcohol based cleaning solutions?
A: Absolutely! Essential oils are a fantastic addition to your DIY cleaning solutions. They not only add a pleasant scent but also offer additional antibacterial, antiviral, and antifungal properties. Some popular choices include lavender, lemon, tea tree, eucalyptus, and peppermint. When using essential oils, start with a small amount (a few drops per cup of solution) and adjust to your preference. Be sure to use high-quality, pure essential oils for the best results. Also, be aware that some essential oils are not safe for use around pets or children, so do your research before incorporating them into your cleaning routine.
Q: What surfaces can I safely clean with alcohol based cleaning solutions?
A: Alcohol based cleaning solutions are generally safe for use on a wide variety of surfaces, including glass, mirrors, stainless steel, tile, and sealed wood. However, it’s always a good idea to test the solution on an inconspicuous area first to ensure it doesn’t damage or discolor the surface. Avoid using alcohol based cleaning solutions on delicate surfaces like painted walls, varnished furniture, or certain types of plastic, as it can potentially strip the finish or cause damage. Also, be cautious when using alcohol on electronics, as excessive moisture can be harmful.
Q: How do I store my homemade alcohol based cleaning solutions?
A: Store your homemade cleaning solutions in a clean, airtight container, preferably a spray bottle for easy application. Label the container clearly with the contents and date of preparation. Keep the solution out of reach of children and pets. Store it in a cool, dark place away from direct sunlight and heat, as these can degrade the alcohol and essential oils over time. Properly stored, your alcohol based cleaning solutions should last for several months.
Q: Are there any safety precautions I should take when making and using alcohol based cleaning solutions?
A: Yes, safety is paramount when working with alcohol. Always work in a well-ventilated area to avoid inhaling fumes. Wear gloves to protect your skin from irritation. Avoid contact with eyes and mucous membranes. Alcohol is flammable, so keep it away from open flames and heat sources. Never mix alcohol with bleach, as this can create toxic fumes. If you accidentally ingest alcohol based cleaning solutions, seek medical attention immediately.
Q: Can I use alcohol based cleaning solutions to disinfect surfaces?
A: Yes, alcohol based cleaning solutions with a concentration of 70% or higher are effective at disinfecting surfaces. To disinfect, apply the solution to the surface and allow it to remain wet for at least 30 seconds to 1 minute before wiping it dry. This contact time is crucial for killing germs and bacteria. Remember that cleaning and disinfecting are two different processes. Cleaning removes dirt and debris, while disinfecting kills germs. For optimal hygiene, it’s best to clean surfaces first and then disinfect them with your alcohol based cleaning solutions.
Q: My alcohol based cleaning solutions smells too strong. What can I do?
A: If the alcohol scent is too overpowering, you can try a few things. First, ensure you’re using the correct ratio of alcohol to water. Adding more water will dilute the scent. Second, increase the amount of essential oils you’re using to mask the alcohol smell. Experiment with different combinations and concentrations until you find a scent that you enjoy. You can also try adding a small amount of vinegar or lemon juice to help neutralize the alcohol odor.
Q: Can I use alcohol based cleaning solutions to clean my hands?
A: While alcohol based cleaning solutions can be used to clean your hands in a pinch, they are not a substitute for proper handwashing with soap and water. Frequent use of alcohol based cleaning solutions on your hands can dry out your skin and cause irritation. If you need to sanitize your hands, opt for a hand sanitizer specifically formulated for that purpose, which typically contains moisturizing ingredients to prevent dryness.
Q: What are some other uses for alcohol based cleaning solutions besides general cleaning?
A: Alcohol based cleaning solutions are incredibly versatile and can be used for a variety of purposes beyond general cleaning. They can be used to remove sticky residue from labels, clean electronics (with caution), disinfect makeup brushes, remove ink stains from clothing, and even polish chrome. The possibilities are endless! Just remember to always test the solution on an inconspicuous area first and use caution when cleaning delicate surfaces.
Leave a Comment