
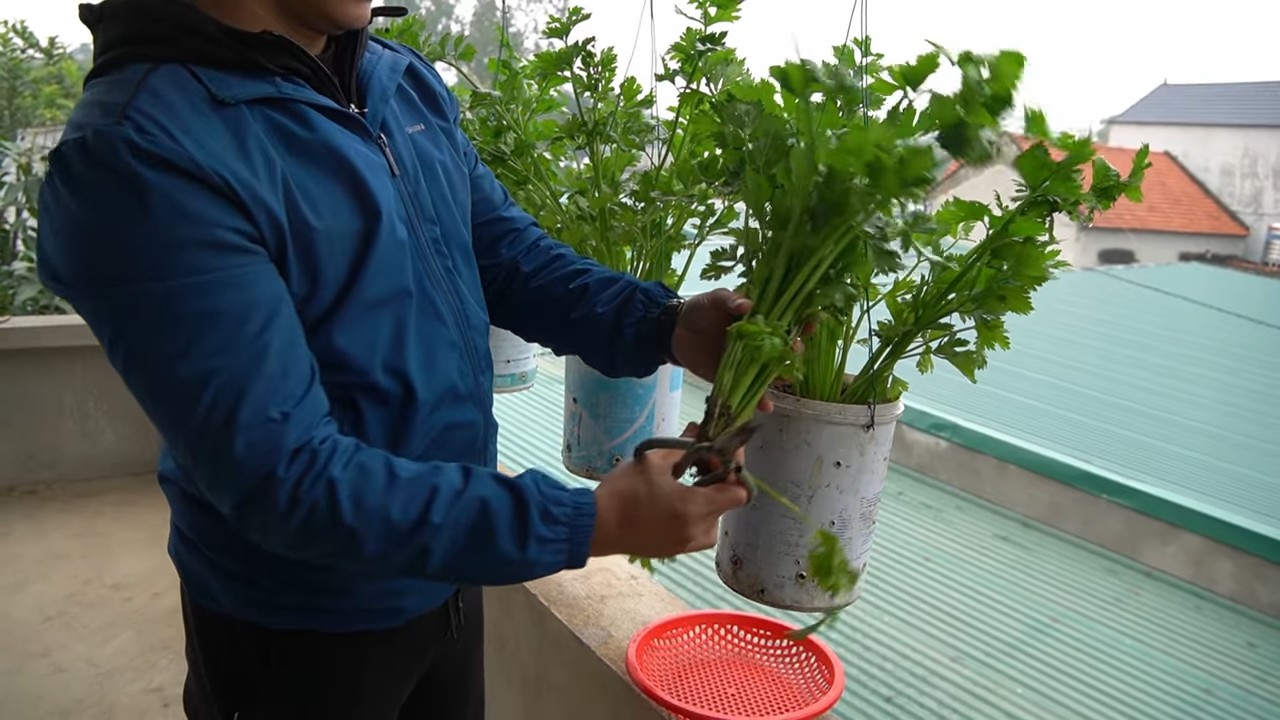
Backyard Celery Growing Hack: Are you dreaming of crisp, refreshing celery sticks straight from your garden, but think it’s too difficult? I used to feel the same way! Celery, with its reputation for being a finicky crop, often intimidates even seasoned gardeners. But what if I told you there’s a simple, almost foolproof trick to achieving celery success right in your own backyard?
For centuries, celery has been cultivated for its culinary and medicinal properties. Originating in the Mediterranean, it was initially valued more for its leaves and seeds than its stalks. Over time, selective breeding transformed it into the crunchy vegetable we know and love today. But even with modern advancements, growing celery can still feel like a challenge.
That’s where this DIY article comes in! I’m going to share a game-changing backyard celery growing hack that will simplify the process and dramatically increase your chances of a bountiful harvest. Forget complicated techniques and endless troubleshooting. This method is designed for busy individuals and beginner gardeners alike. Imagine the satisfaction of snipping fresh celery for salads, soups, or simply enjoying a healthy snack, all grown with your own two hands. This trick will save you time, money, and frustration, allowing you to enjoy the delicious rewards of homegrown celery without the usual headaches. Let’s get started!
Verwandle Küchenabfälle in frisches Gemüse: Dein ultimativer DIY-Leitfaden für den Anbau von Staudensellerie im Garten
Hey Gartenfreunde! Habt ihr euch jemals gefragt, ob ihr eure Küchenabfälle in etwas Nützliches verwandeln könnt? Ich habe da etwas für euch: Staudensellerie aus dem Strunk nachwachsen lassen! Es ist einfacher als ihr denkt und eine super Möglichkeit, euren ökologischen Fußabdruck zu verringern und gleichzeitig frisches Gemüse zu ernten. Lasst uns loslegen!
Was du brauchst:
* Ein Staudensellerie-Strunk (am besten mit einem intakten Herz in der Mitte)
* Ein kleines Glas oder eine Schale
* Wasser
* Blumenerde
* Einen Topf oder ein Beet im Garten
* Geduld (aber keine Sorge, es geht schneller als man denkt!)
Phase 1: Den Strunk vorbereiten und bewurzeln
1. Sellerie vorbereiten: Schneidet den Strunk des Staudenselleries etwa 5-7 cm vom unteren Ende ab. Achtet darauf, dass das Herz des Selleries (die kleinen, helleren Blätter in der Mitte) intakt bleibt. Das ist wichtig, denn daraus wird euer neuer Sellerie wachsen.
2. Ins Wasser stellen: Platziert den Strunk in einem Glas oder einer Schale mit etwa 2-3 cm Wasser. Achtet darauf, dass nur der untere Teil des Strunks im Wasser steht und die Blätter trocken bleiben. Sonst riskieren wir Fäulnis!
3. Der richtige Standort: Stellt das Glas an einen hellen Ort, aber nicht in die pralle Sonne. Ein Fensterbrett ist ideal.
4. Wasserwechsel: Wechselt das Wasser alle 1-2 Tage, um es frisch und sauber zu halten. Das verhindert die Bildung von Bakterien und hält den Strunk gesund.
5. Geduldsprobe: Nach etwa 5-7 Tagen solltet ihr kleine Wurzeln an der Unterseite des Strunks sehen. Außerdem werden die Blätter in der Mitte anfangen zu wachsen. Das ist ein gutes Zeichen!
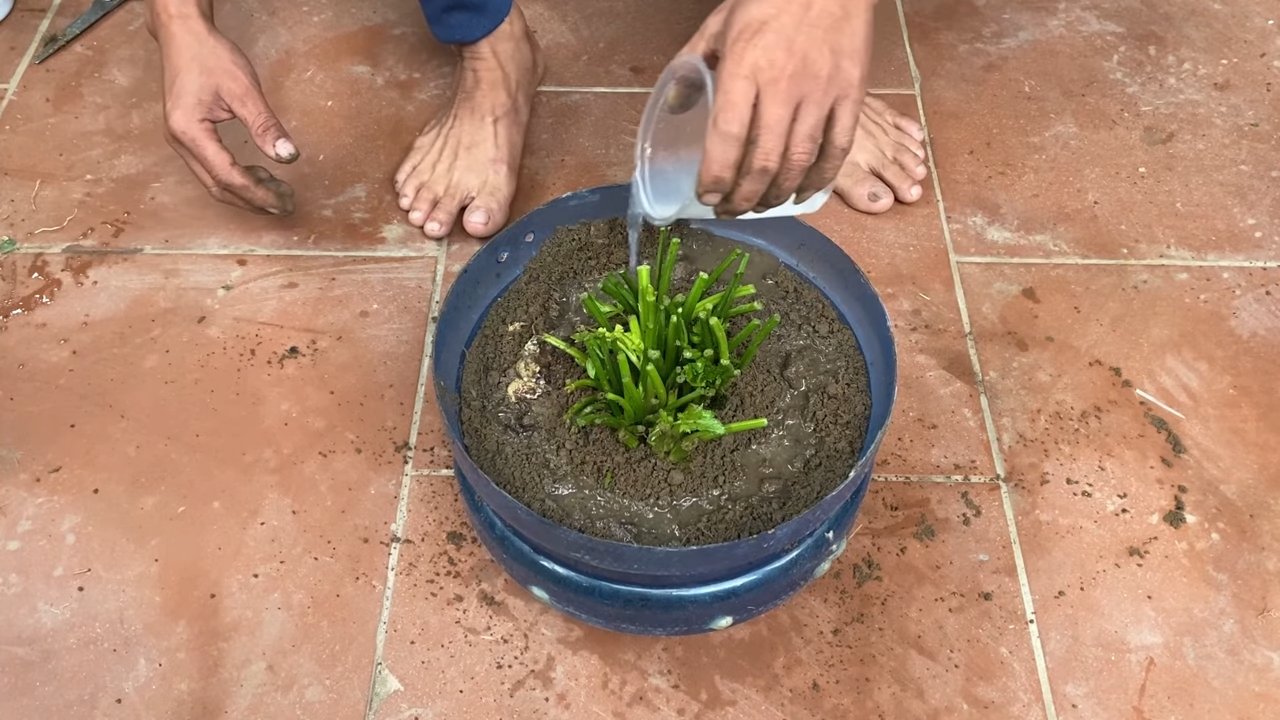
Phase 2: Einpflanzen in Erde
Sobald die Wurzeln etwa 2-3 cm lang sind, ist es Zeit, den Strunk in Erde zu pflanzen.
1. Topf vorbereiten: Füllt einen Topf (Durchmesser ca. 15-20 cm) mit Blumenerde. Achtet darauf, dass die Erde locker und gut durchlässig ist. Staudensellerie mag keine Staunässe.
2. Einpflanzen: Macht ein kleines Loch in die Mitte der Erde und setzt den bewurzelten Strunk vorsichtig hinein. Bedeckt die Wurzeln mit Erde, aber lasst das Herz des Selleries frei.
3. Angießen: Gießt den Sellerie gut an, sodass die Erde feucht, aber nicht nass ist.
4. Standortwahl: Stellt den Topf an einen sonnigen bis halbschattigen Ort. Staudensellerie braucht etwa 6 Stunden Sonnenlicht pro Tag.
Phase 3: Pflege und Wachstum
Jetzt heißt es pflegen und beobachten!
1. Gießen: Haltet die Erde feucht, aber vermeidet Staunässe. Gießt regelmäßig, besonders an heißen Tagen. Ich prüfe immer mit dem Finger, ob die Erde sich trocken anfühlt.
2. Düngen: Düngt den Sellerie alle 2-3 Wochen mit einem organischen Flüssigdünger. Das fördert das Wachstum und sorgt für kräftige Pflanzen.
3. Schädlinge: Achtet auf Schädlinge wie Blattläuse oder Schnecken. Bei Bedarf könnt ihr natürliche Schädlingsbekämpfungsmittel verwenden. Ich habe gute Erfahrungen mit Neemöl gemacht.
4. Ernte: Nach etwa 2-3 Monaten könnt ihr die äußeren Stangen des Selleries ernten. Schneidet sie einfach am unteren Ende ab. Das Herz des Selleries wird weiterwachsen und neue Stangen produzieren.
Zusätzliche Tipps und Tricks für den erfolgreichen Anbau von Staudensellerie
* Direkt ins Beet pflanzen: Wenn ihr einen Garten habt, könnt ihr den bewurzelten Strunk auch direkt ins Beet pflanzen. Achtet darauf, dass der Boden gut vorbereitet ist und genügend Nährstoffe enthält.
* Sellerie bleichen: Um hellere und zartere Selleriestangen zu erhalten, könnt ihr die Pflanzen etwa 2 Wochen vor der Ernte bleichen. Dazu umwickelt ihr die Stangen mit Papier oder Pappe, sodass nur die Blätter herausschauen.
* Sellerie überwintern: In kälteren Regionen kann Staudensellerie im Winter im Haus überwintert werden. Stellt den Topf an einen kühlen, hellen Ort und gießt ihn sparsam.
* Verschiedene Sorten: Es gibt verschiedene Sorten von Staudensellerie. Probiert verschiedene Sorten aus, um herauszufinden, welche euch am besten schmeckt und in eurem Garten am besten wächst.
* Sellerie als Begleitpflanze: Staudensellerie ist eine gute Begleitpflanze für viele andere Gemüsesorten. Er soll Schädlinge abwehren und das Wachstum anderer Pflanzen fördern.
* Aussaat: Ihr könnt Staudensellerie auch aus Samen ziehen, aber das ist etwas aufwendiger. Die Samen brauchen viel Licht und Wärme zum Keimen.
* Erde: Staudensellerie bevorzugt einen humusreichen, gut durchlässigen Boden mit einem pH-Wert zwischen 6,0 und 6,8.
* Sonne: Staudensellerie benötigt mindestens 6 Stunden Sonnenlicht pro Tag, um optimal zu wachsen.
* Wasser: Staudensellerie benötigt viel Wasser, besonders während der heißen Sommermonate. Achtet darauf, dass der Boden immer feucht ist, aber nicht nass.
* Dünger: Staudensellerie ist ein Starkzehrer und benötigt regelmäßige Düngung. Verwendet einen organischen Dünger, der reich an Stickstoff, Phosphor und Kalium ist.
* Schädlinge und Krankheiten: Staudensellerie kann von verschiedenen Schädlingen und Krankheiten befallen werden, wie z.B. Blattläusen, Schnecken, Selleriefleckenkrankheit und Wurzelfäule. Achtet auf Anzeichen von Befall und behandelt die Pflanzen bei Bedarf mit geeigneten Mitteln.
* Ernte: Staudensellerie kann geerntet werden, sobald die Stangen die gewünschte Größe erreicht haben. Schneidet die Stangen am unteren Ende ab und lasst das Herz der Pflanze stehen, damit sie weiterwachsen kann.
* Lagerung: Staudensellerie kann im Kühlschrank bis zu zwei Wochen gelagert werden. Wickelt die Stangen in ein feuchtes Tuch oder eine Plastiktüte, um sie frisch zu halten.
* Verwendung: Staudensellerie kann roh, gekocht oder gebraten gegessen werden. Er ist eine vielseitige Zutat für Suppen, Salate, Eintöpfe und andere Gerichte.
Häufige Fehler und wie man sie vermeidet
* Fäulnis: Wenn der Strunk fault, liegt das meistens daran, dass er zu lange im Wasser stand oder das Wasser nicht regelmäßig gewechselt wurde. Achtet darauf, das Wasser alle 1-2 Tage zu wechseln und den Strunk nicht zu tief ins Wasser zu stellen.
* Keine Wurzeln: Wenn der Strunk keine Wurzeln bildet, kann das daran liegen, dass er nicht genug Licht bekommt oder das Wasser zu kalt ist. Stellt das Glas an einen helleren Ort und verwendet lauwarmes Wasser.
* Gelbe Blätter: Gelbe Blätter können ein Zeichen für Nährstoffmangel sein. Düngt den Sellerie regelmäßig mit einem organischen Flüssigdünger.
* Schlechter Geschmack: Wenn der Sellerie bitter schmeckt, kann das daran liegen, dass er zu wenig Wasser bekommen hat oder zu viel Sonne ausgesetzt war. Achtet darauf, den Sellerie regelmäßig zu gießen und ihn vor der prallen Mittagssonne zu schützen.
Warum Staudensellerie selbst anbauen?
* Frische: Selbst angebauter Staudensellerie ist viel frischer und aromatischer als gekaufter.
* Nachhaltigkeit: Ihr reduziert euren ökologischen Fußabdruck, indem ihr Küchenabfälle wiederverwertet und auf Pestizide verzichtet.
* Kostenersparnis: Ihr spart Geld, indem ihr weniger Gemüse kaufen müsst.
* Befriedigung: Es ist
Conclusion
So, there you have it! This backyard celery growing hack isn’t just a clever trick; it’s a game-changer for anyone who loves fresh, crisp celery but is tired of the unpredictable quality and high prices at the grocery store. We’ve shown you how to transform those often-discarded celery ends into thriving plants, giving you a continuous supply of this versatile vegetable right outside your door.
Why is this a must-try? Because it’s sustainable, cost-effective, and incredibly rewarding. Imagine the satisfaction of harvesting your own celery, knowing exactly where it came from and how it was grown. No more wilted, bitter stalks – just fresh, flavorful celery ready to be enjoyed in salads, soups, smoothies, or as a healthy snack.
But don’t stop there! This method is just the beginning. Experiment with different celery varieties to find your favorite flavor profile. Try planting your celery in raised beds or containers for easier management. Consider companion planting with herbs like parsley or basil to deter pests and enhance the flavor of your celery. You can even try blanching your celery stalks by mounding soil around them as they grow, resulting in a milder, sweeter flavor.
This backyard celery growing hack is more than just a gardening tip; it’s an invitation to connect with nature, reduce food waste, and enjoy the simple pleasure of growing your own food. It’s a fantastic project for families, a great way to teach children about where their food comes from, and a satisfying hobby for anyone who loves to garden.
We’re confident that once you try this method, you’ll be amazed at how easy and rewarding it is. So, grab those celery ends, follow our simple steps, and get ready to enjoy a bountiful harvest of fresh, homegrown celery.
Don’t forget to share your experiences with us! We’d love to hear about your successes, challenges, and any variations you’ve tried. Post pictures of your celery plants on social media and tag us so we can see your amazing results. Let’s create a community of backyard celery growers and inspire others to embrace this simple, sustainable, and delicious way to enjoy fresh celery. Happy growing!
Frequently Asked Questions (FAQ)
1. What kind of celery works best for this backyard celery growing hack?
Any commercially grown celery stalk with a root end will work. However, organic celery is often preferred as it hasn’t been treated with systemic pesticides that could hinder regrowth. Look for celery with a healthy, intact root base for the best chance of success. Different varieties of celery, such as Pascal or Utah, can be used, but the growing time and flavor may vary slightly. Experiment to see which variety thrives best in your local climate and soil conditions.
2. How long does it take to grow celery from a celery end?
Initially, you’ll see new growth within a week or two after placing the celery base in water. Once transplanted into soil, it typically takes around 75-90 days to harvest mature celery stalks. However, this can vary depending on factors such as sunlight, soil quality, and temperature. Be patient and provide consistent care, and you’ll be rewarded with a bountiful harvest. Remember that the initial growth is focused on root development, so don’t be discouraged if you don’t see rapid stalk growth right away.
3. What are the best soil conditions for growing celery?
Celery thrives in rich, well-drained soil that is high in organic matter. Amend your garden soil with compost or well-rotted manure before planting to improve its fertility and drainage. Celery prefers a slightly acidic to neutral soil pH (around 6.0 to 7.0). You can test your soil pH with a home testing kit and adjust it accordingly. Consistent moisture is crucial for celery growth, so ensure the soil remains consistently damp but not waterlogged. Mulching around the plants can help retain moisture and suppress weeds.
4. How much sunlight does celery need?
Celery needs at least six hours of sunlight per day to thrive. Choose a location in your garden that receives full sun for the majority of the day. However, in hotter climates, some afternoon shade can be beneficial to prevent the celery from bolting (going to seed prematurely). If you’re growing celery indoors, provide supplemental lighting with grow lights to ensure adequate light exposure. Rotate the plants regularly to ensure even growth on all sides.
5. How often should I water my celery plants?
Celery requires consistent moisture to grow properly. Water your celery plants deeply and regularly, especially during hot, dry weather. Aim to keep the soil consistently moist but not waterlogged. Check the soil moisture regularly by sticking your finger into the soil a few inches deep. If the soil feels dry, it’s time to water. Consider using a soaker hose or drip irrigation system to provide consistent moisture directly to the roots.
6. What are some common pests and diseases that affect celery, and how can I prevent them?
Celery can be susceptible to pests such as aphids, celery leaf tiers, and carrot rust flies. Diseases like early blight, late blight, and pink rot can also affect celery plants. To prevent these problems, practice good garden hygiene by removing any diseased or infested plant debris. Encourage beneficial insects like ladybugs and lacewings to control aphids and other pests. Use row covers to protect your plants from pests. Ensure good air circulation around the plants to prevent fungal diseases. If necessary, use organic pesticides or fungicides to control pests and diseases.
7. Can I grow celery in containers?
Yes, celery can be successfully grown in containers. Choose a large container that is at least 12 inches deep and wide to accommodate the celery’s root system. Use a high-quality potting mix that is well-draining and rich in organic matter. Ensure the container has drainage holes to prevent waterlogging. Water the plants regularly and fertilize them with a balanced fertilizer every few weeks. Place the container in a sunny location that receives at least six hours of sunlight per day.
8. How do I know when my celery is ready to harvest?
Celery is ready to harvest when the stalks are at least 6-8 inches long and have reached the desired thickness. The stalks should be firm and crisp. You can harvest individual stalks as needed or harvest the entire plant at once. To harvest, simply cut the stalks at the base of the plant with a sharp knife.
9. Can I regrow celery multiple times from the same base?
While you can regrow celery from the base multiple times, the subsequent harvests may be smaller and less robust than the initial growth. The plant’s energy reserves will eventually deplete, resulting in weaker stalks. For the best results, it’s recommended to start with a fresh celery base each time.
10. What are some creative ways to use my homegrown celery?
Beyond the usual salads and soups, homegrown celery can be used in a variety of creative ways. Use it to make celery juice, which is a popular health drink. Add it to smoothies for a boost of vitamins and minerals. Use it as a base for homemade vegetable broth. Pickle it for a tangy snack. Or, try grilling celery stalks for a unique and flavorful side dish. The possibilities are endless!
Leave a Comment