
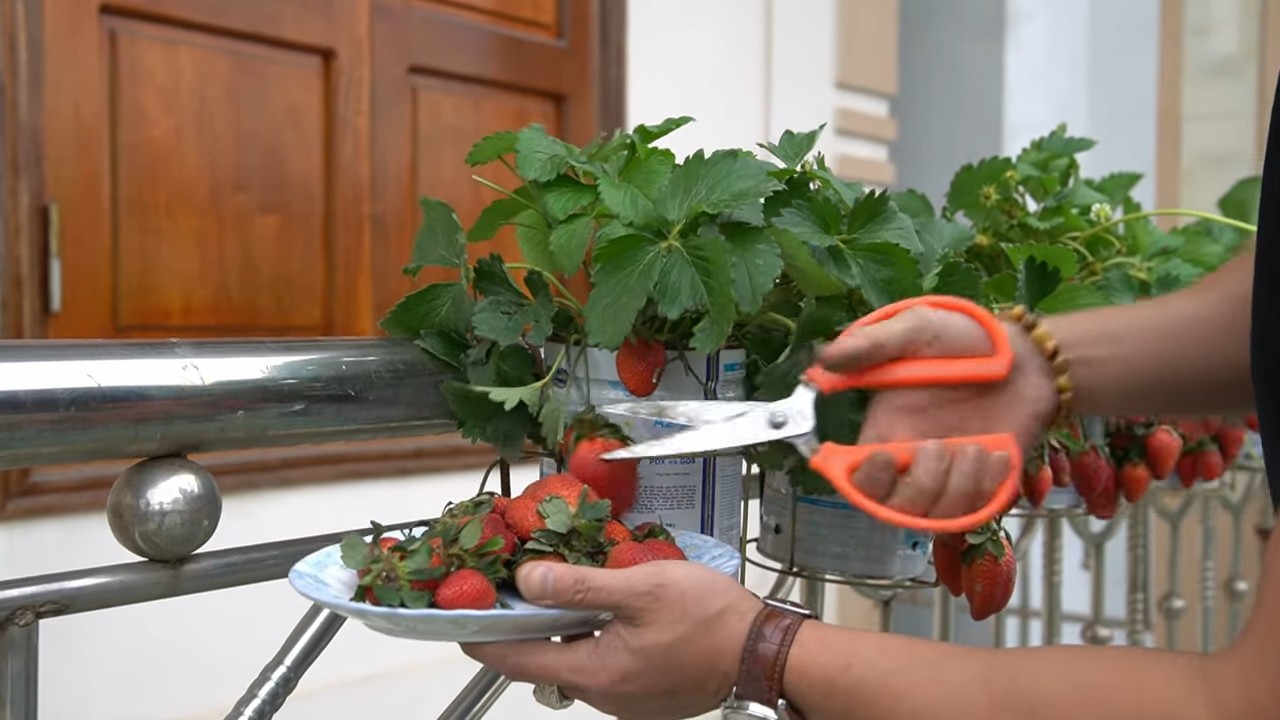
Balcony strawberry growing no soil? Sounds impossible, right? Well, get ready to have your gardening world turned upside down! I’m about to share some incredible DIY tricks that will have you harvesting juicy, red strawberries from your balcony, even if you don’t have a single speck of soil.
For centuries, people have cultivated strawberries, cherishing their sweet taste and vibrant color. From ancient Roman gardens to modern-day farms, strawberries have always held a special place in our hearts (and stomachs!). But what if you live in an apartment with limited space? Does that mean you have to miss out on the joy of growing your own fresh berries? Absolutely not!
That’s where these ingenious DIY hacks come in. Imagine stepping onto your balcony and plucking a sun-ripened strawberry straight from the vine. No more trips to the grocery store, no more worrying about pesticides – just pure, homegrown goodness. Balcony strawberry growing no soil is not only possible, but it’s also a fantastic way to save money, reduce your environmental impact, and add a touch of natural beauty to your urban oasis. Plus, it’s incredibly rewarding to nurture something from a tiny seedling to a thriving plant that provides delicious fruit. So, let’s dive in and discover the secrets to successful soilless strawberry gardening on your balcony!
DIY Balcony Strawberry Garden: Soil-Free Success!
Hey there, fellow balcony gardeners! Dreaming of juicy, homegrown strawberries but short on space and soil? Well, you’ve come to the right place! I’m going to show you how to create a thriving strawberry garden right on your balcony, completely soil-free. This method is perfect for small spaces, reduces the mess, and can even be easier to manage than traditional soil gardening. Get ready to enjoy fresh, delicious strawberries all season long!
Why Soil-Free Strawberries?
Before we dive in, let’s talk about why going soil-free is a great option for balcony strawberries:
* Less Mess: No more lugging heavy bags of soil or dealing with muddy spills.
* Space Saving: Hydroponic systems can be very compact, ideal for small balconies.
* Water Conservation: Hydroponics uses water more efficiently than traditional soil gardening.
* Reduced Pests and Diseases: Soil can harbor pests and diseases. Eliminating soil reduces these risks.
* Faster Growth: Plants in hydroponic systems often grow faster due to readily available nutrients.
Choosing Your Hydroponic System
There are several hydroponic systems you can use for strawberries. For balconies, I recommend these:
* Vertical Tower Systems: These are fantastic for maximizing space. Strawberries are planted in pockets along the tower, and nutrient solution is pumped from the bottom to the top.
* Deep Water Culture (DWC): This is a simple and affordable option. Strawberries are suspended in net pots with their roots submerged in a nutrient solution. An air pump provides oxygen to the roots.
* Nutrient Film Technique (NFT): A thin film of nutrient solution flows continuously over the roots of the strawberries. This requires a pump and a slightly sloped channel.
* Kratky Method: This is a passive hydroponic system, meaning it doesn’t require pumps or electricity. The roots are partially submerged in nutrient solution, and the plant absorbs what it needs. This is great for beginners!
For this guide, I’m going to focus on a simplified version of the Kratky method because it’s the easiest and most beginner-friendly. It’s also very budget-friendly!
Materials You’ll Need
Okay, let’s gather our supplies! Here’s what you’ll need to build your soil-free strawberry garden:
* Containers: Opaque plastic containers (buckets, tubs, or even repurposed storage bins) are perfect. Dark colors prevent algae growth. The size depends on how many strawberry plants you want to grow. I recommend at least a 5-gallon container per plant.
* Net Pots: These are small, mesh pots that will hold your strawberry plants. You can find them at most garden centers or online. Choose a size that fits comfortably in the holes you’ll make in your container lids.
* Growing Medium: Inert growing media like coco coir, perlite, or rockwool cubes are essential. These provide support for the roots without adding nutrients. I prefer coco coir because it’s sustainable and holds moisture well.
* Strawberry Plants: Bare-root strawberry plants are the most economical, but you can also use established plants from a nursery. Day-neutral varieties are best for continuous fruiting throughout the season.
* Hydroponic Nutrients: You’ll need a balanced hydroponic nutrient solution specifically formulated for strawberries. Look for a two-part nutrient solution (A and B) for optimal results.
* pH Meter and pH Up/Down: Maintaining the correct pH is crucial for nutrient absorption. A pH meter will help you monitor the pH of your nutrient solution, and pH up/down solutions will allow you to adjust it as needed.
* Drill and Hole Saw: You’ll need these to create holes in the container lids for the net pots.
* Measuring Cups and Spoons: For accurately measuring nutrients.
* Water: Use clean, dechlorinated water. Tap water is fine if it’s been left out for 24 hours to allow chlorine to evaporate.
* Optional:
* Air Pump and Air Stone: While not strictly necessary for the Kratky method, an air pump can provide extra oxygen to the roots, promoting faster growth.
* Timer: If you choose to use an air pump, a timer can automate its operation.
* Grow Lights: If your balcony doesn’t receive enough sunlight, you may need to supplement with grow lights.
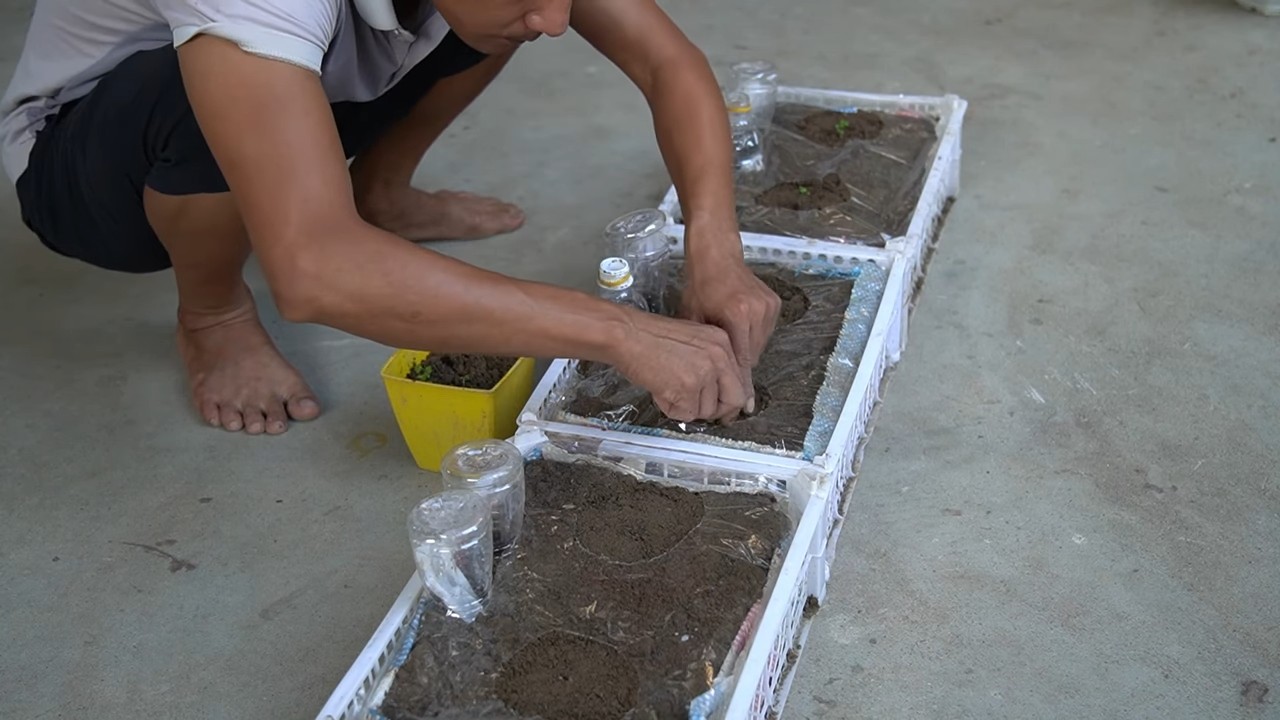
Step-by-Step Instructions: Building Your Kratky Strawberry Garden
Alright, let’s get building! Follow these steps to create your soil-free strawberry paradise:
1. Prepare the Containers
1. Clean the Containers: Thoroughly wash the plastic containers with soap and water to remove any dirt or debris. Rinse well.
2. Drill Holes: Using the hole saw attachment on your drill, create holes in the container lids that are slightly smaller than the diameter of your net pots. The net pots should fit snugly in the holes. The number of holes depends on the size of your container and how many strawberry plants you want to grow. Space the holes evenly to allow for adequate airflow and sunlight penetration.
3. Optional: Paint the Containers: While not essential, painting the outside of the containers with a light-colored, reflective paint can help keep the nutrient solution cooler, especially in hot climates.
2. Prepare the Net Pots and Growing Medium
1. Rinse the Growing Medium: If you’re using coco coir, rinse it thoroughly with water to remove any excess salts. This is important to prevent nutrient imbalances.
2. Fill the Net Pots: Fill each net pot with the rinsed coco coir, perlite, or rockwool cubes. Pack it lightly to provide support for the strawberry plants.
3. Prepare the Strawberry Plants
1. Bare-Root Plants: If you’re using bare-root strawberry plants, soak the roots in water for about 30 minutes before planting. This will help rehydrate them.
2. Established Plants: If you’re using established plants from a nursery, gently remove them from their pots, being careful not to damage the roots.
4. Plant the Strawberries
1. Place the Plants in Net Pots: Carefully place each strawberry plant in a net pot filled with the growing medium. Ensure that the crown of the plant (where the leaves emerge) is above the growing medium to prevent rot.
2. Secure the Plants: Gently pack more growing medium around the roots to secure the plant in the net pot.
5. Prepare the Nutrient Solution
1. Mix the Nutrients: Follow the instructions on your hydroponic nutrient solution to mix the A and B components with water. Use the recommended dosage for strawberries.
2. Check the pH: Use your pH meter to check the pH of the nutrient solution. Strawberries thrive in a pH range of 5.5 to 6.5.
3. Adjust the pH: If the pH is too high or too low, use pH up or pH down solutions to adjust it to the optimal range. Add the pH adjusting solutions gradually and recheck the pH after each addition.
6. Assemble the System
1. Fill the Containers: Pour the prepared nutrient solution into the plastic containers, leaving about an inch or two of air gap between the solution and the bottom of the net pots. This air gap is crucial for providing oxygen to the roots in the Kratky method.
2. Place the Net Pots in the Lids: Carefully place the net pots containing the strawberry plants into the holes in the container lids.
3. Secure the Lids: Place the lids securely on the containers.
7. Provide Light and Air
1. Sunlight: Place your strawberry garden in a location that receives at least 6-8 hours of direct sunlight per day.
2. Air Circulation: Ensure good air circulation around the plants to prevent fungal diseases.
3. Optional: Air Pump: If you’re using an air pump, place the air stone in the nutrient solution and connect the pump to a timer. Run the pump for a few hours each day to provide extra oxygen to the roots.
Maintaining Your Soil-Free Strawberry Garden
Congratulations! You’ve built your soil-free strawberry garden. Now, here’s how to keep it thriving:
* Monitor the Nutrient Solution: Check the nutrient solution level regularly and replenish it as needed. As the plants grow, they will absorb water and nutrients, so you’ll need to top it off periodically.
* Check the pH: Monitor the pH of the nutrient solution weekly and adjust it as needed to maintain the optimal range of 5.5 to 6.5.
* Change the Nutrient Solution: Every 2-3 weeks, completely replace the nutrient solution with a fresh batch. This will prevent nutrient imbalances and the buildup of harmful salts.
* Prune the Plants
Conclusion
So, there you have it! Growing luscious, vibrant strawberries on your balcony without the hassle of soil is not only possible, but surprisingly simple and incredibly rewarding. This DIY, no-soil method opens up a world of possibilities for urban gardeners, apartment dwellers, and anyone looking for a cleaner, more manageable way to enjoy fresh, homegrown berries.
Why is this a must-try? Because it tackles the common challenges of traditional strawberry gardening head-on. No more lugging heavy bags of soil up flights of stairs. No more battling soilborne pests and diseases. No more worrying about proper drainage and nutrient imbalances in the earth. This method is cleaner, lighter, and often yields a surprisingly abundant harvest. Plus, the visual appeal of strawberries cascading from hanging baskets or stacked planters adds a touch of rustic charm to any balcony.
But the beauty of this technique lies in its adaptability. Feel free to experiment with different hydroponic solutions to find what works best for your local climate and water quality. Consider adding companion plants like basil or marigolds to your setup to naturally deter pests and attract pollinators. You can also adjust the size and style of your containers to fit your available space and aesthetic preferences. Think vertical towers, repurposed plastic bottles, or even stylish hanging planters – the possibilities are endless!
Don’t be afraid to get creative and personalize your balcony strawberry garden.
We’ve shown you the basic framework for successful balcony strawberry growing no soil, but the real magic happens when you put your own spin on it. Try different strawberry varieties to discover your favorites. Experiment with different lighting conditions to maximize fruit production. And most importantly, don’t be discouraged if you encounter a few bumps along the road. Gardening is a learning process, and every challenge is an opportunity to refine your technique and become a more skilled grower.
We are confident that once you taste the difference between store-bought berries and the sun-ripened sweetness of your own balcony-grown strawberries, you’ll be hooked. This method is not just about growing food; it’s about connecting with nature, fostering a sense of accomplishment, and enjoying the simple pleasures of life.
So, what are you waiting for? Gather your supplies, follow our simple steps, and embark on your own balcony strawberry adventure today! We can’t wait to hear about your experiences. Share your photos, tips, and triumphs in the comments below. Let’s build a community of balcony strawberry growers and inspire others to discover the joy of homegrown goodness. Happy growing!
Frequently Asked Questions (FAQ)
1. What exactly is “no-soil” strawberry growing, and how does it work?
No-soil strawberry growing, often referred to as hydroponics or soilless culture, involves growing strawberries in a nutrient-rich water solution instead of traditional soil. This method provides the plants with all the essential elements they need to thrive, delivered directly to their roots. The roots are typically supported by an inert medium like coco coir, perlite, or rockwool, which provides stability and aeration without contributing any nutrients. The nutrient solution is carefully formulated to provide the correct balance of nitrogen, phosphorus, potassium, and micronutrients, ensuring optimal growth and fruit production. This approach eliminates many of the problems associated with soil-based gardening, such as soilborne diseases, pests, and nutrient deficiencies.
2. What are the best strawberry varieties to grow on a balcony using this method?
While many strawberry varieties can be grown hydroponically, some are better suited for balcony gardening due to their compact size and disease resistance. Everbearing varieties, which produce fruit throughout the growing season, are often a good choice for continuous harvests. Some popular options include:
* Albion: Known for its large, flavorful berries and disease resistance.
* Seascape: Another everbearing variety with excellent flavor and good yields.
* Tristan: A day-neutral variety that produces beautiful pink flowers and delicious berries.
* Mara des Bois: A French variety with a unique, intense flavor reminiscent of wild strawberries.
* Chandler: A June-bearing variety that produces a large crop of berries in a short period. (Less ideal for continuous harvest, but good for a concentrated yield).
Consider your local climate and growing conditions when selecting your strawberry varieties. Research which varieties are known to thrive in your area and choose those that are best suited for your balcony’s sunlight exposure and temperature range.
3. What kind of nutrient solution should I use for my balcony strawberries?
You can purchase pre-mixed hydroponic nutrient solutions specifically formulated for strawberries, or you can mix your own using individual nutrient salts. Pre-mixed solutions are generally easier for beginners, as they take the guesswork out of formulating the correct nutrient balance. Look for solutions that are designed for fruiting plants and have a balanced N-P-K ratio (nitrogen, phosphorus, potassium).
If you prefer to mix your own solution, you’ll need to research the specific nutrient requirements of strawberries and carefully measure and mix the individual salts according to a reputable recipe. Be sure to use high-quality nutrient salts and distilled or reverse osmosis water to avoid introducing impurities.
Regardless of whether you use a pre-mixed or homemade solution, it’s important to monitor the pH and EC (electrical conductivity) of the solution regularly. Strawberries prefer a pH between 5.5 and 6.5, and the EC should be within the recommended range for your chosen nutrient solution. Adjust the pH and EC as needed to maintain optimal growing conditions.
4. How often should I water my strawberries in a no-soil system?
The frequency of watering depends on several factors, including the type of growing medium you’re using, the size of your containers, the temperature, and the humidity. In general, you’ll need to water more frequently in hot, dry weather and less frequently in cool, humid weather.
With coco coir, you’ll want to keep it consistently moist but not waterlogged. Water when the top inch or two of the coir feels dry to the touch. With perlite, you may need to water more frequently, as it drains very quickly.
A good rule of thumb is to check the moisture level of your growing medium daily and water as needed. You can also use a moisture meter to get a more accurate reading.
5. How much sunlight do balcony strawberries need?
Strawberries need at least 6-8 hours of direct sunlight per day to produce abundant fruit. If your balcony doesn’t receive enough direct sunlight, you may need to supplement with artificial grow lights. LED grow lights are a good option, as they are energy-efficient and produce very little heat.
Position your strawberry plants in the sunniest spot on your balcony and rotate them regularly to ensure that all sides receive adequate sunlight. If you’re using grow lights, position them close enough to the plants to provide sufficient light intensity, but not so close that they burn the leaves.
6. How do I protect my balcony strawberries from pests and diseases?
While no-soil growing reduces the risk of soilborne pests and diseases, strawberries can still be susceptible to certain problems. Common pests include aphids, spider mites, and slugs. Common diseases include powdery mildew and gray mold.
To prevent pest and disease problems, start with healthy, disease-resistant strawberry plants. Inspect your plants regularly for signs of pests or diseases and take action promptly if you spot any problems.
You can use organic pest control methods, such as insecticidal soap, neem oil, or diatomaceous earth, to control aphids, spider mites, and other pests. To prevent fungal diseases, ensure good air circulation around your plants and avoid overwatering. You can also use a fungicide if necessary, but be sure to choose one that is safe for use on edible plants.
7. How do I overwinter my balcony strawberries?
Strawberries are perennial plants, meaning they can live for several years. However, they may need some protection during the winter months, especially in colder climates.
If you live in a mild climate, you may be able to leave your strawberry plants outdoors during the winter. Simply mulch around the plants with straw or leaves to protect the roots from freezing.
If you live in a colder climate, you’ll need to bring your strawberry plants indoors or provide them with extra protection. You can move the plants to a cool, dark location, such as a garage or basement, and water them sparingly throughout the winter. Alternatively, you can wrap the containers with burlap or bubble wrap to insulate the roots from the cold.
In the spring, gradually acclimate your strawberry plants to outdoor conditions before moving them back to their sunny balcony location.
8. Can I grow other plants alongside my strawberries in a no-soil system?
Yes, you can grow companion plants alongside your strawberries in a no-soil system. Companion planting can help to deter pests, attract pollinators, and improve the overall health of your plants.
Good companion plants for strawberries include:
* Basil: Repels aphids and other pests.
* Marigolds: Repel nematodes and other soil pests.
* Garlic: Repels aphids and other pests.
* Onions: Repel aphids and other pests.
* Borage: Attracts pollinators and beneficial insects.
* Thyme: Repels cabbage moths and other pests.
Avoid planting strawberries near members of the cabbage family, such as broccoli, cabbage, and kale, as they can attract pests that also attack
Leave a Comment