
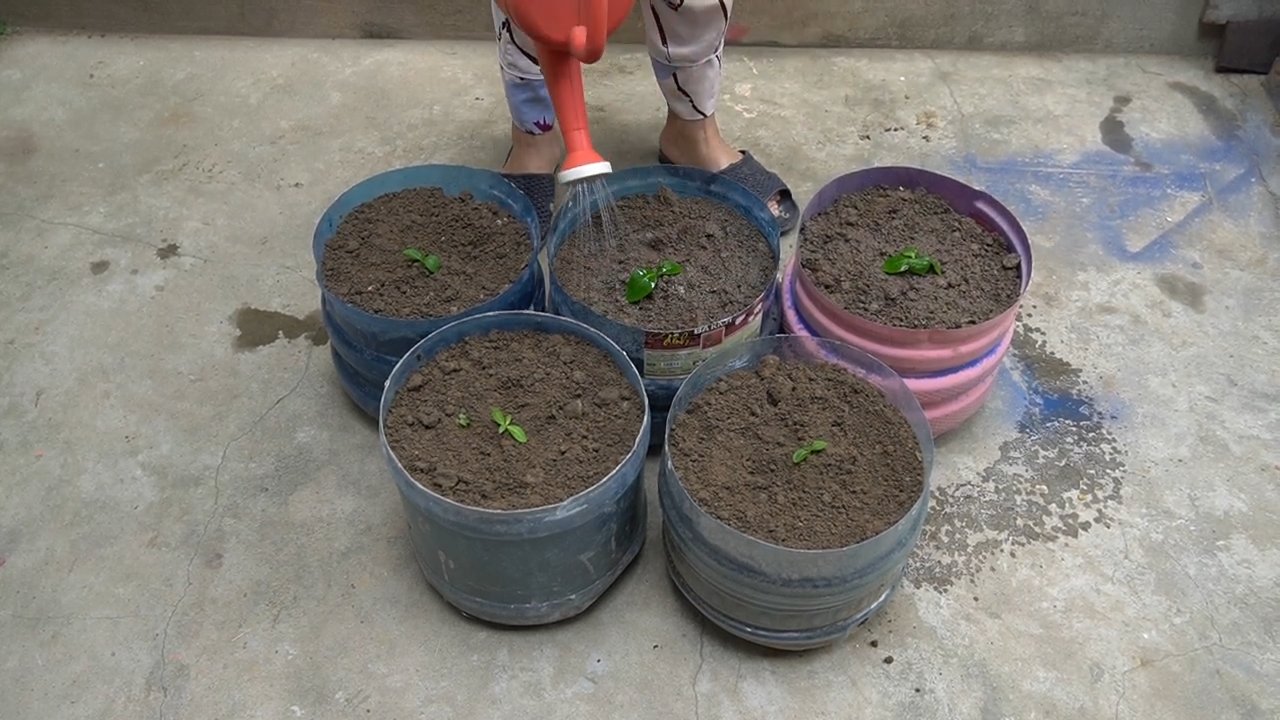
Bottle Cabbage Patch DIY: Ever dreamt of harvesting plump, juicy cabbages right from your own backyard, even if you’re short on space or gardening experience? I know I have! Forget those sprawling fields; we’re bringing the farm to you with a clever and surprisingly simple DIY project. This isn’t just about growing vegetables; it’s about embracing a sustainable lifestyle and connecting with nature, one cabbage at a time.
The concept of container gardening, a close relative to our bottle cabbage patch, has roots stretching back centuries. From the Hanging Gardens of Babylon to the humble window boxes of Victorian England, people have always found creative ways to cultivate plants in limited spaces. But what makes this particular DIY so appealing? Well, it’s the ingenious repurposing of plastic bottles, transforming waste into a thriving mini-garden.
Let’s face it, modern life can be hectic. Finding the time, space, and resources for a traditional garden can feel overwhelming. That’s where the Bottle Cabbage Patch DIY comes in. It’s a fantastic solution for apartment dwellers, busy families, or anyone looking to dip their toes into the world of gardening without a huge commitment. Plus, it’s a fantastic way to teach kids about where their food comes from and the importance of recycling. Get ready to roll up your sleeves and discover how to create your own miniature cabbage haven!

DIY Cabbage Patch Doll Bottle Babies: A Nostalgic Craft Project
Hey there, fellow crafters! Remember the Cabbage Patch Kids craze? I do! I was obsessed. Well, today, we’re going to tap into that nostalgia and create adorable, miniature Cabbage Patch-inspired “bottle babies” using recycled plastic bottles. This project is perfect for using up scrap fabric, yarn, and other craft supplies. Plus, it’s a fun way to introduce kids to the joy of crafting and upcycling. Let’s get started!
Materials You’ll Need:
* Empty plastic bottles (small water bottles or juice bottles work best)
* Fabric scraps (cotton, felt, fleece – anything goes!)
* Yarn (for the hair)
* Stuffing (cotton balls, fiberfill, or even fabric scraps)
* Felt scraps (for facial features)
* Buttons (for decoration, optional)
* Embroidery floss (for details, optional)
* Hot glue gun and glue sticks
* Scissors
* Pencil or marker
* Ruler
* Needle and thread (optional, for sewing details)
* Acrylic paint (optional, for painting bottle details)
* Paintbrushes (if using acrylic paint)
Preparing the Bottles
This is a crucial first step. We need to make sure our bottles are clean and ready to be transformed.
1. Clean and Dry the Bottles: Thoroughly wash the empty plastic bottles with soap and water. Remove any labels and adhesive residue. Make sure they are completely dry before moving on to the next step. I usually let mine air dry overnight just to be sure.
2. Cut the Bottle (Optional): Depending on the size you want your bottle baby to be, you might want to cut the bottle down. I usually cut mine about two-thirds of the way up, keeping the bottom portion. This creates a shorter, sturdier base. If you’re keeping the full bottle length, skip this step. Be careful when cutting the plastic – use sharp scissors or a craft knife and protect your work surface.
3. Smooth the Edges (If Cut): If you cut the bottle, the edges might be a bit sharp. You can smooth them down with sandpaper or by carefully applying a thin line of hot glue around the rim. The hot glue creates a soft, rounded edge that’s safe to handle.
Creating the Body
Now for the fun part – dressing up our bottle!
1. Measure and Cut the Fabric: Measure the circumference and height of the bottle (or the portion you’re covering). Add about an inch to both measurements for seam allowance. Cut a piece of fabric according to these measurements. This will be the body covering.
2. Wrap the Bottle: Wrap the fabric around the bottle, overlapping the edges slightly. Use hot glue to secure the fabric in place. Start by gluing along the bottom edge, then wrap the fabric tightly around the bottle, gluing as you go. Make sure the fabric is smooth and wrinkle-free.
3. Secure the Top Edge: Fold the top edge of the fabric inward and glue it to the inside of the bottle. This creates a clean, finished edge. If you prefer, you can sew a hem along the top edge before gluing it down for a more professional look.
4. Add a Bottom (Optional): If you want to create a completely enclosed body, cut a circle of fabric slightly larger than the bottom of the bottle. Glue the circle to the bottom, folding the edges inward for a clean finish. This step is optional, but it can make the bottle baby look more polished.
Making the Head
This is where the Cabbage Patch magic really starts to happen!
1. Create the Basic Head Shape: Cut a circle of fabric (fleece or felt works well) that’s about twice the size of the bottle opening. Gather the edges of the circle using a running stitch with a needle and thread. Leave a small opening.
2. Stuff the Head: Stuff the fabric circle with cotton balls, fiberfill, or fabric scraps until it’s firm and round. Don’t overstuff it, or it will be difficult to close the opening.
3. Close the Opening: Pull the thread tight to close the opening and secure it with a knot. This creates a rounded head shape.
4. Attach the Head to the Body: Apply a generous amount of hot glue to the top of the bottle (where the fabric covering ends). Carefully attach the fabric head to the bottle, pressing firmly until the glue sets. Make sure the head is centered and securely attached.
Adding the Hair
The hair is what gives each bottle baby its unique personality!
1. Cut the Yarn: Cut strands of yarn to the desired length for the hair. I usually cut mine about 6-8 inches long, depending on the style I’m going for.
2. Attach the Yarn: There are a few ways to attach the yarn. You can either glue the yarn directly to the head, or you can create a “wig” by gluing the yarn to a small circle of felt and then gluing the felt circle to the head. I prefer the “wig” method because it allows you to easily reposition the hair if needed.
3. Style the Hair: Once the yarn is attached, you can style the hair however you like. You can leave it long and flowing, braid it, or create pigtails. Use small pieces of yarn to tie off braids or pigtails. Get creative and have fun with it!
Creating the Facial Features
Time to bring your bottle baby to life!
1. Cut the Felt Shapes: Cut out small felt shapes for the eyes, nose, and mouth. You can use different colors of felt to create different expressions. I like to use white felt for the eyes, pink or red felt for the cheeks, and black or brown felt for the pupils and mouth.
2. Attach the Facial Features: Use hot glue to attach the felt shapes to the head. Experiment with different placements until you’re happy with the expression. Remember, each Cabbage Patch Kid is unique, so don’t be afraid to get creative!
3. Add Details (Optional): You can add extra details to the face using embroidery floss or acrylic paint. For example, you can embroider eyelashes or paint rosy cheeks.
Adding the Finishing Touches
These little details can really make your bottle baby stand out!
1. Add Buttons or Embellishments: Glue buttons, beads, or other embellishments to the body or head for added decoration. You can use these to create a cute outfit or add a touch of sparkle.
2. Create a Pacifier (Optional): You can create a simple pacifier by gluing a small bead or button to a piece of felt and then gluing the felt to the bottle baby’s mouth.
3. Personalize Your Bottle Baby: Give your bottle baby a name and write it on a small tag. You can also add a birthmark (a small dot of felt or paint) to the cheek, just like the original Cabbage Patch Kids.
4. Display Your Creation: Now that your bottle baby is complete, find a special place to display it! These little creations make adorable decorations for nurseries, playrooms, or even your desk.
Tips and Tricks:
* Use a low-temperature hot glue gun: This will prevent the plastic bottle from melting or warping.
* Experiment with different fabrics and colors: Don’t be afraid to mix and match different materials to create unique looks.
* Get the kids involved: This is a great project to do with children, but make sure to supervise them when using hot glue and scissors.
* Add a rattle: Before attaching the head, place a few small beads or pebbles inside the bottle to create a rattle sound.
* Make a whole family: Create a collection of bottle babies in different sizes and styles to represent a whole family.
* Consider using fabric markers: If you’re not comfortable cutting felt shapes, you can use fabric markers to draw the facial features directly onto the head.
* Safety First: Always supervise children when using hot glue and scissors. Make sure all materials are non-toxic and safe for children to handle.
I hope you enjoyed this DIY project! It’s a fun and creative way to recycle plastic bottles and create adorable, nostalgic keepsakes. Happy crafting!
Conclusion
So, there you have it! The Bottle Cabbage Patch DIY – a simple, cost-effective, and surprisingly charming way to add a touch of whimsy and practicality to your garden or even your indoor space. We’ve walked you through the steps, highlighting how easy it is to transform discarded plastic bottles into miniature greenhouses perfect for nurturing seedlings, protecting delicate plants, or even creating a unique decorative feature.
But why is this DIY trick a must-try? Beyond its undeniable cuteness factor, the Bottle Cabbage Patch offers a multitude of benefits. First and foremost, it’s an incredibly sustainable solution. By repurposing plastic bottles, you’re actively reducing waste and contributing to a more eco-conscious lifestyle. Think of all those bottles that would otherwise end up in landfills – now, they have a purpose, a second life as protectors of your precious plants.
Secondly, it’s incredibly budget-friendly. Forget expensive cloches or mini-greenhouses; this DIY project costs next to nothing. You likely already have the bottles on hand, and the other materials are easily sourced and inexpensive. This makes it an accessible project for gardeners of all levels, regardless of their budget.
Thirdly, it’s remarkably effective. The plastic bottle creates a mini-greenhouse environment, trapping heat and moisture, which is ideal for seed germination and protecting young plants from harsh weather conditions, pests, and even hungry critters. This can significantly improve your success rate when starting seeds or transplanting delicate seedlings.
But the beauty of this DIY lies in its versatility. Don’t limit yourself to just cabbage! You can use this technique for a wide variety of plants, from herbs and vegetables to flowers and succulents. Experiment with different bottle sizes to accommodate different plant types.
Here are a few suggestions and variations to spark your creativity:
* Vertical Garden: Create a vertical Bottle Cabbage Patch by attaching multiple bottle greenhouses to a wall or fence. This is a great option for small spaces and adds a visually appealing element to your garden.
* Herb Garden: Dedicate a Bottle Cabbage Patch to growing your favorite herbs. This allows you to have fresh herbs readily available, even in the off-season.
* Seed Starting Station: Use the Bottle Cabbage Patch as a dedicated seed starting station. The controlled environment will help your seeds germinate quickly and successfully.
* Decorative Feature: Get creative with the design of your Bottle Cabbage Patch. Paint the bottles, add decorative elements, or arrange them in unique patterns to create a visually stunning feature in your garden.
* Winter Protection: Use larger bottles to protect more established plants during the winter months. This will help them survive the cold and be ready to thrive in the spring.
We truly believe that the Bottle Cabbage Patch DIY is a game-changer for gardeners of all levels. It’s a sustainable, affordable, and effective way to protect your plants and add a touch of charm to your garden.
So, what are you waiting for? Gather your bottles, grab your gardening tools, and give this DIY trick a try! We’re confident that you’ll be amazed by the results. And most importantly, we want to hear about your experience. Share your photos, tips, and variations with us in the comments below. Let’s create a community of Bottle Cabbage Patch enthusiasts and inspire others to embrace this simple yet powerful DIY project. Happy gardening!
Frequently Asked Questions (FAQ)
What type of plastic bottles are best for this DIY?
Ideally, you want to use clear plastic bottles for the Bottle Cabbage Patch DIY. Clear bottles allow the maximum amount of sunlight to reach your plants, which is essential for photosynthesis and healthy growth. Avoid using colored or opaque bottles, as they will block sunlight and hinder plant development. Soda bottles, water bottles, and juice bottles are all excellent choices. Make sure to thoroughly clean the bottles before using them to remove any residue or contaminants. Also, consider the size of the bottle in relation to the plant you intend to grow. Larger bottles are suitable for larger plants or for providing more extensive protection.
How do I prevent condensation from building up inside the bottle?
Condensation can be a common issue in enclosed environments like the Bottle Cabbage Patch. While some condensation is normal and even beneficial, excessive buildup can lead to fungal diseases and other problems. To prevent excessive condensation, you can try a few different strategies. First, ensure that the soil is well-draining to prevent waterlogging. Second, provide adequate ventilation by occasionally removing the bottle cap or creating small holes in the bottle. This will allow air to circulate and reduce humidity levels. Third, avoid overwatering your plants. Only water when the soil feels dry to the touch. Finally, consider placing a small amount of silica gel inside the bottle to absorb excess moisture.
What plants are best suited for growing in a Bottle Cabbage Patch?
The Bottle Cabbage Patch is a versatile growing environment that can accommodate a wide variety of plants. However, some plants are particularly well-suited for this method. Seedlings and young plants benefit greatly from the protected environment, as it helps them establish strong roots and grow quickly. Herbs like basil, mint, and oregano thrive in the Bottle Cabbage Patch, as the warm and humid conditions promote vigorous growth. Vegetables like lettuce, spinach, and kale are also good choices, as they appreciate the protection from pests and harsh weather. Succulents and cacti can also be grown in a Bottle Cabbage Patch, but be sure to provide adequate drainage and ventilation to prevent root rot. Ultimately, the best plants for your Bottle Cabbage Patch will depend on your climate, growing conditions, and personal preferences.
How often should I water the plants in my Bottle Cabbage Patch?
Watering frequency will depend on several factors, including the type of plant, the climate, and the soil moisture. As a general rule, you should water your plants when the soil feels dry to the touch. Avoid overwatering, as this can lead to root rot and other problems. When watering, be sure to apply water directly to the soil, avoiding the leaves. This will help prevent fungal diseases. You may need to water more frequently during hot, dry weather and less frequently during cool, wet weather. Monitor your plants closely and adjust your watering schedule accordingly. Also, remember that the Bottle Cabbage Patch creates a more humid environment, so plants may require less frequent watering than they would in an open garden.
How do I protect my Bottle Cabbage Patch from strong winds?
Strong winds can easily topple over or damage your Bottle Cabbage Patch, especially if it’s lightweight. To protect it from strong winds, you can take a few simple precautions. First, choose a sheltered location for your Bottle Cabbage Patch, such as near a wall or fence. Second, weigh down the bottles with rocks, pebbles, or sand. This will add stability and prevent them from being blown over. Third, secure the bottles to the ground or to each other using stakes, twine, or zip ties. This will create a more stable structure that can withstand strong winds. Finally, consider using larger, more durable bottles for your Bottle Cabbage Patch, as they are less likely to be damaged by wind.
Can I use this method for indoor plants?
Absolutely! The Bottle Cabbage Patch DIY is not limited to outdoor gardening. It can be equally effective for growing plants indoors. In fact, it can be particularly beneficial for indoor plants, as it helps to create a more humid environment, which many indoor plants prefer. When using the Bottle Cabbage Patch indoors, be sure to provide adequate light, either from a sunny window or from artificial grow lights. Also, monitor the humidity levels inside the bottle and provide ventilation as needed to prevent condensation buildup. The Bottle Cabbage Patch can be a great way to propagate cuttings or start seeds indoors, as it provides a warm and humid environment that promotes root growth.
How long will the Bottle Cabbage Patch last?
The lifespan of your Bottle Cabbage Patch will depend on the quality of the plastic bottles you use and the environmental conditions. Generally, plastic bottles can last for several years, especially if they are protected from direct sunlight and extreme temperatures. However, over time, the plastic may become brittle and crack. To extend the lifespan of your Bottle Cabbage Patch, choose high-quality, durable plastic bottles. Also, protect the bottles from direct sunlight by placing them in a shaded area or by painting them with a UV-resistant paint. Regularly inspect the bottles for cracks or damage and replace them as needed. With proper care and maintenance, your Bottle Cabbage Patch can last for many years, providing a sustainable and cost-effective way to grow your plants.
Leave a Comment