
Bottle gardening kale: sounds a bit quirky, doesn’t it? But trust me, it’s a game-changer for anyone who dreams of fresh, homegrown greens, even if you’re short on space or time! I’m so excited to share this simple yet incredibly effective DIY trick with you.
Humans have been cultivating kale for over 2,000 years, with its origins tracing back to the eastern Mediterranean. From humble peasant food to a modern-day superfood, kale’s journey is a testament to its resilience and nutritional power. But let’s be honest, not everyone has the luxury of a sprawling garden to grow this leafy green. That’s where the magic of bottle gardening comes in!
Are you tired of buying wilted, overpriced kale from the grocery store? Do you yearn for the satisfaction of harvesting your own food, but lack the space or green thumb? This DIY bottle gardening kale hack is your answer! It’s a fantastic way to recycle plastic bottles, reduce your carbon footprint, and enjoy a constant supply of fresh, organic kale right on your windowsill or balcony. I’ll walk you through each step, making it so easy that even a complete beginner can succeed. Get ready to unleash your inner gardener and enjoy the delicious rewards!
DIY Bottle Gardening: Grow Kale Indoors!
Hey there, fellow gardening enthusiasts! Ever thought about growing your own kale but don’t have the space or a traditional garden? Well, I’ve got a fantastic solution for you: bottle gardening! It’s a fun, eco-friendly, and surprisingly effective way to cultivate fresh kale right in your home. Plus, it’s a great project to do with kids! Let’s dive in!
What You’ll Need
Before we get started, let’s gather all the necessary materials. This will make the process smooth and enjoyable.
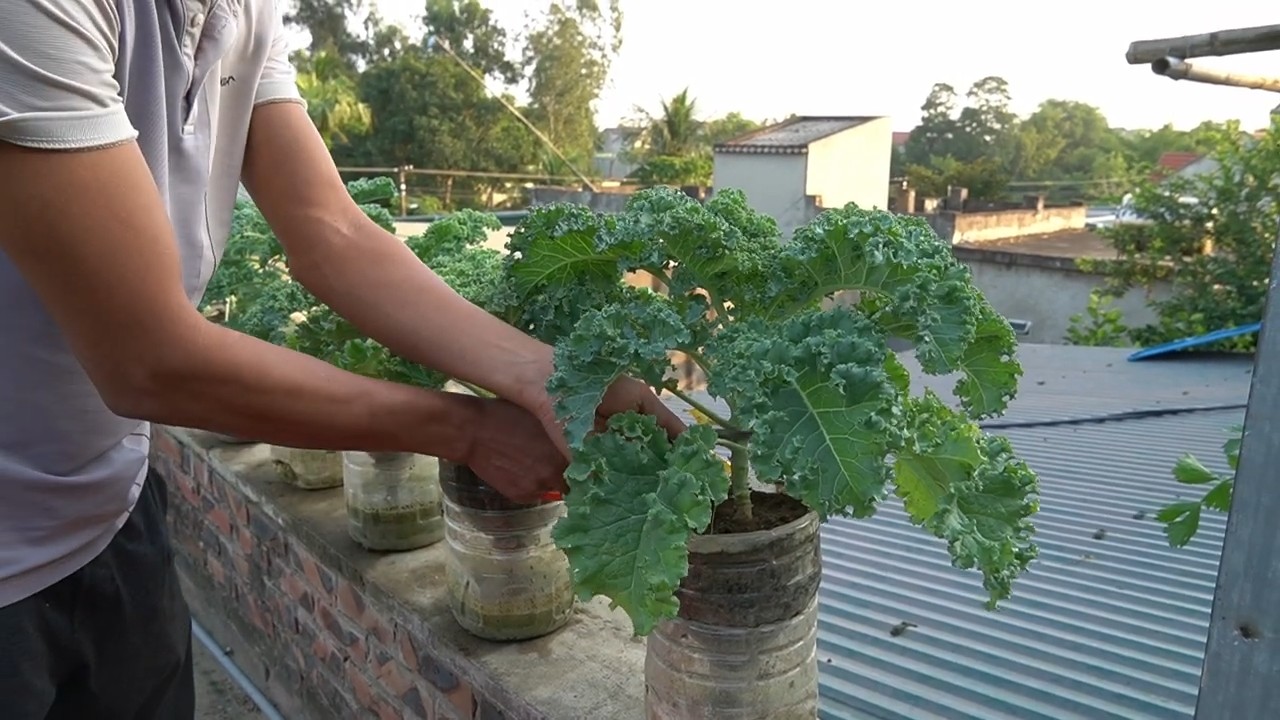
* Large Plastic Bottles: Think 2-liter soda bottles, water bottles, or even larger juice containers. The bigger, the better, as it gives your kale more room to grow. You’ll need at least one bottle per kale plant you want to grow.
* Potting Soil: Use a good quality potting mix that’s well-draining. Kale needs nutrients, so a mix with added compost is ideal.
* Kale Seeds: Choose your favorite variety of kale! There are so many options, from curly kale to dinosaur kale (lacinato).
* Scissors or a Utility Knife: For cutting the plastic bottles. Be careful!
* Water: For watering your kale.
* Gravel or Small Stones: For drainage at the bottom of the bottle.
* Spray Bottle (Optional): For misting the kale seedlings.
* Measuring Cup or Spoon: For measuring soil and water.
* Permanent Marker: For labeling your bottles.
* Gloves (Optional): To keep your hands clean.
Preparing the Bottles
This is a crucial step to ensure your bottle garden functions properly. We need to create a suitable environment for the kale roots to thrive.
1. Clean the Bottles: Thoroughly wash the plastic bottles with soap and water to remove any residue. Rinse them well and let them dry completely. This prevents mold or bacteria from affecting your kale.
2. Cut the Bottles: Decide how you want to cut your bottles. There are a couple of options:
* Option 1 (Horizontal Cut): Cut the bottle horizontally about two-thirds of the way up from the bottom. This creates a larger opening for planting and easier access for watering. You’ll essentially have a “pot” and a “lid.”
* Option 2 (Vertical Cut): Cut the bottle vertically down the middle, stopping a few inches from the bottom. This creates two separate halves that you can use as individual planters. This is a good option if you want to grow multiple varieties of kale.
3. Create Drainage Holes: If you chose Option 1 (horizontal cut), you’ll need to create drainage holes in the bottom of the “pot” section. Use scissors or a utility knife to carefully poke several holes. If you chose Option 2 (vertical cut), each half will need drainage holes.
4. Smooth the Edges: Use sandpaper or a lighter (carefully!) to smooth any sharp edges on the cut plastic. This prevents you from accidentally cutting yourself.
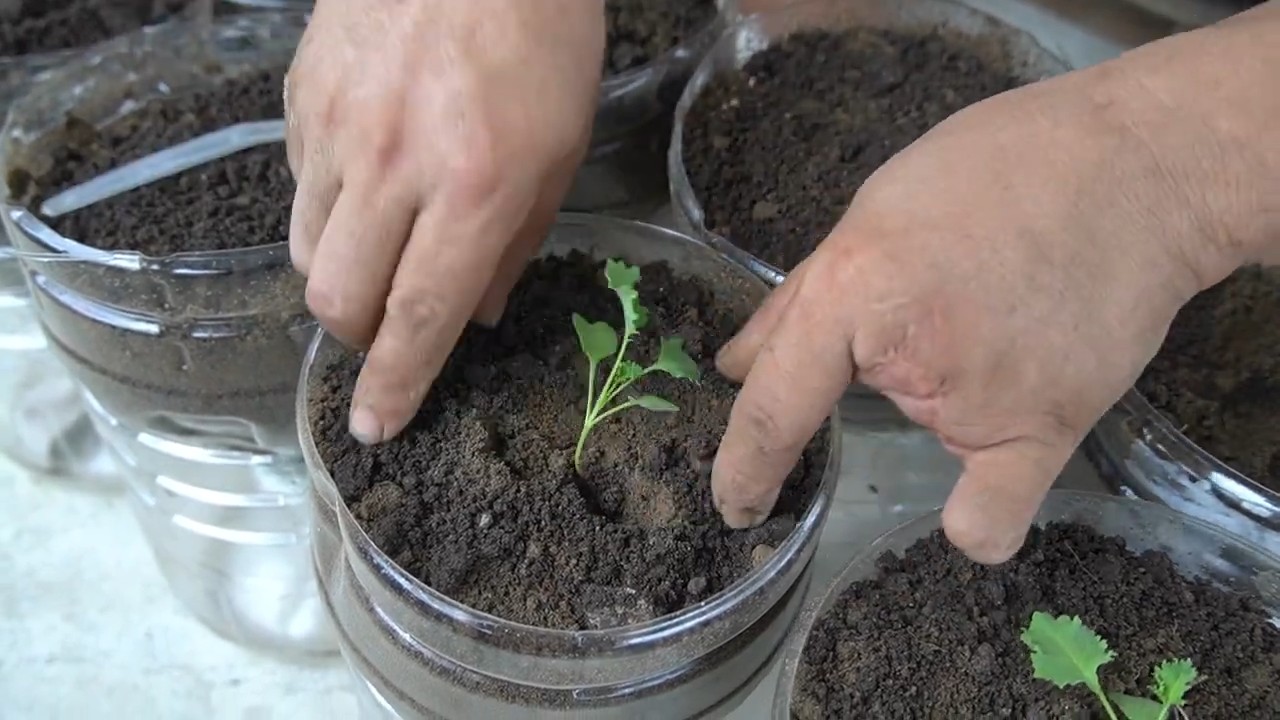
Planting the Kale Seeds
Now for the fun part! Let’s get those kale seeds into the soil.
1. Add Drainage Layer: Place a layer of gravel or small stones at the bottom of the bottle (about an inch or two). This helps with drainage and prevents the soil from becoming waterlogged.
2. Fill with Potting Soil: Fill the bottle with potting soil, leaving about an inch of space at the top. Gently pat down the soil to remove any air pockets.
3. Sow the Seeds: Sprinkle the kale seeds evenly over the surface of the soil. Follow the instructions on your seed packet for spacing recommendations. Generally, you’ll want to space them about an inch apart.
4. Cover the Seeds: Lightly cover the seeds with a thin layer of potting soil (about ¼ inch).
5. Water Gently: Use a watering can or spray bottle to gently water the soil. Be careful not to dislodge the seeds. The soil should be moist but not soggy.
6. Label the Bottle: Use a permanent marker to label the bottle with the date and the variety of kale you planted. This helps you keep track of your progress.
Caring for Your Kale Seedlings
This is where patience comes in. Kale needs the right conditions to germinate and grow.
1. Provide Light: Place the bottle garden in a sunny location, such as a windowsill that receives at least 6 hours of sunlight per day. If you don’t have enough natural light, you can use a grow light.
2. Maintain Moisture: Keep the soil consistently moist but not waterlogged. Check the soil moisture daily and water as needed. Use a spray bottle to mist the seedlings if the air is dry.
3. Thin the Seedlings: Once the seedlings have developed a few sets of true leaves (the leaves that look like miniature kale leaves), you’ll need to thin them out. This means removing some of the seedlings to give the remaining ones more space to grow. Choose the strongest-looking seedlings and gently pull out the weaker ones. Aim for a spacing of about 2-3 inches between plants.
4. Fertilize (Optional): If you’re using a potting mix that doesn’t contain fertilizer, you may need to fertilize your kale seedlings. Use a liquid fertilizer diluted to half strength and apply it every few weeks. Follow the instructions on the fertilizer label.
Transplanting (If Necessary)
If your kale plants outgrow their bottle, you may need to transplant them into a larger container or into your garden.
1. Choose a Larger Container: Select a pot that’s at least 6 inches in diameter.
2. Prepare the New Pot: Fill the new pot with potting soil.
3. Gently Remove the Kale Plant: Carefully remove the kale plant from the bottle, being careful not to damage the roots. You may need to gently loosen the soil around the edges of the bottle.
4. Plant in the New Pot: Place the kale plant in the new pot and fill in around the roots with potting soil.
5. Water Thoroughly: Water the plant thoroughly after transplanting.
Harvesting Your Kale
The best part! You can start harvesting kale leaves once they are about 4-6 inches long.
1. Harvest Outer Leaves: Harvest the outer leaves first, leaving the inner leaves to continue growing.
2. Cut or Snap Off Leaves: You can either cut the leaves off with scissors or snap them off with your fingers.
3. Harvest Regularly: Harvest your kale regularly to encourage new growth.
Troubleshooting
Even with the best care, you might encounter some problems. Here are a few common issues and how to address them:
* Yellowing Leaves: This could be a sign of overwatering, underwatering, or nutrient deficiency. Check the soil moisture and adjust your watering accordingly. If the soil is dry, water more frequently. If the soil is soggy, water less frequently. You may also need to fertilize your kale.
* Pests: Kale can be susceptible to pests such as aphids, cabbage worms, and flea beetles. Inspect your plants regularly for signs of pests. If you find pests, you can try spraying them with insecticidal soap or neem oil.
* Leggy Growth: This means your kale plants are stretching towards the light. Move them to a sunnier location or use a grow light.
* Slow Growth: This could be due to a lack of nutrients, insufficient light, or cold temperatures. Fertilize your kale, provide more light, and keep them in a warm location.
Tips for Success
Here are a few extra tips to help you succeed with bottle gardening kale:
* Use a good quality potting mix. This is essential for providing your kale with the nutrients it needs.
* Don’t overwater. Overwatering can lead to root rot.
* Provide plenty of light. Kale needs at least 6 hours of sunlight per day.
* Harvest regularly. This will encourage new growth.
* Experiment with different varieties of kale. Find the ones that you like best.
* Rotate your bottles. If you’re growing your kale on a windowsill, rotate the bottles regularly to ensure that all sides of the plant receive equal sunlight.
* Consider using a self-watering bottle system. This can help to prevent overwatering and underwatering. You can find instructions for making a self-watering bottle system online.
* Have fun! Gardening should be enjoyable. Don’t be afraid to experiment and learn as you go.
Bottle gardening kale is a rewarding and sustainable way to grow your own fresh produce. With a little bit of effort and attention, you can enjoy delicious and nutritious kale right from your own home. Happy gardening!
Conclusion
So there you have it! Transforming a simple plastic bottle into a thriving kale garden is not just a fun project; it’s a sustainable, space-saving, and incredibly rewarding way to enjoy fresh, homegrown greens. We’ve walked you through the process, highlighting the ease and accessibility of this DIY trick. But why is bottle gardening kale a must-try?
Firstly, it’s incredibly efficient. Whether you have a sprawling backyard or a tiny apartment balcony, bottle gardening allows you to maximize your growing space. Imagine the satisfaction of harvesting crisp, vibrant kale leaves just steps from your kitchen, all thanks to repurposed plastic bottles.
Secondly, it’s eco-friendly. By upcycling plastic bottles, you’re actively reducing waste and contributing to a more sustainable lifestyle. You’re giving these discarded containers a new purpose, preventing them from ending up in landfills and minimizing your environmental footprint. Plus, growing your own kale reduces your reliance on store-bought produce, which often involves transportation and packaging that contribute to carbon emissions.
Thirdly, it’s cost-effective. Starting a bottle garden requires minimal investment. You likely already have the bottles on hand, and the other materials, like soil and seeds, are relatively inexpensive. Compared to buying kale regularly from the grocery store, you’ll save money in the long run while enjoying fresher, more nutritious greens.
But the benefits don’t stop there. Bottle gardening kale is also a fantastic educational opportunity, especially for children. It teaches them about plant life cycles, the importance of sustainability, and the rewards of growing their own food. It’s a hands-on learning experience that fosters a connection with nature and promotes healthy eating habits.
Now, let’s talk about variations. While we’ve focused on kale, the possibilities are endless! You can adapt this technique to grow other leafy greens like spinach, lettuce, or even herbs like basil and parsley. Experiment with different bottle sizes and configurations to create unique and visually appealing vertical gardens. Consider adding drainage holes to the bottom of your bottles to prevent waterlogging, especially in humid climates. You can also use different types of soil mixes depending on the specific needs of the plants you’re growing. For example, adding compost to your soil mix will provide extra nutrients for your kale.
Don’t be afraid to get creative and personalize your bottle garden. Paint the bottles with vibrant colors, add decorative elements, or even create a themed garden. The only limit is your imagination!
We wholeheartedly encourage you to try this DIY trick and experience the joy of bottle gardening kale for yourself. It’s a simple, sustainable, and satisfying way to grow your own food and connect with nature.
Once you’ve set up your bottle garden and started harvesting your own kale, we’d love to hear about your experience! Share your photos, tips, and stories with us in the comments section below. Let’s inspire each other to embrace sustainable gardening practices and create a greener, healthier world, one bottle at a time. We are confident that you will find this method of growing kale to be a rewarding experience.
Frequently Asked Questions (FAQ)
What kind of bottles are best for bottle gardening kale?
The best bottles for bottle gardening kale are sturdy plastic bottles, such as those used for water, soda, or juice. Look for bottles that are relatively clear to allow sunlight to reach the plants. Avoid bottles that are heavily colored or opaque, as they may block too much light. The size of the bottle will depend on the variety of kale you’re growing and the amount of space you have available. Smaller bottles are suitable for smaller kale varieties, while larger bottles can accommodate larger plants. Thoroughly clean the bottles before using them to remove any residue or contaminants. Make sure to remove any labels that might block sunlight.
How often should I water my bottle garden kale?
The frequency of watering will depend on several factors, including the climate, the type of soil you’re using, and the size of the bottles. As a general rule, water your bottle garden kale when the top inch of soil feels dry to the touch. Avoid overwatering, as this can lead to root rot. Ensure that the bottles have adequate drainage to prevent water from accumulating at the bottom. During hot, dry weather, you may need to water your kale more frequently. Check the soil moisture levels regularly and adjust your watering schedule accordingly. A good way to tell if your kale needs water is to observe the leaves. If they start to droop, it’s a sign that the plant is thirsty.
What kind of soil should I use for bottle gardening kale?
The ideal soil for bottle gardening kale is a well-draining potting mix that is rich in organic matter. You can purchase a pre-made potting mix from a garden center or create your own by combining equal parts of garden soil, compost, and perlite or vermiculite. The compost will provide essential nutrients for the kale, while the perlite or vermiculite will improve drainage and aeration. Avoid using heavy clay soil, as it can become waterlogged and suffocate the roots. Before planting, amend the soil with a slow-release fertilizer to provide a steady supply of nutrients throughout the growing season.
How much sunlight does bottle garden kale need?
Kale thrives in full sun, which means it needs at least six hours of direct sunlight per day. If you’re growing your bottle garden kale indoors, place it near a sunny window or supplement with artificial grow lights. Insufficient sunlight can lead to leggy growth and reduced yields. If you live in a hot climate, provide some afternoon shade to protect the plants from scorching. Rotate the bottles regularly to ensure that all sides of the plants receive adequate sunlight.
How do I fertilize my bottle garden kale?
Kale is a heavy feeder, so it’s important to fertilize it regularly to ensure healthy growth and abundant yields. You can use a liquid fertilizer, a slow-release fertilizer, or compost tea. Liquid fertilizers should be diluted according to the package instructions and applied every two to three weeks. Slow-release fertilizers can be mixed into the soil at planting time and will gradually release nutrients over several months. Compost tea is a natural fertilizer that can be made by steeping compost in water. Apply fertilizer after watering to prevent burning the roots.
How do I protect my bottle garden kale from pests and diseases?
Bottle gardening can help to minimize pest and disease problems, but it’s still important to take precautions. Inspect your plants regularly for signs of pests, such as aphids, cabbage worms, or slugs. Handpick any pests that you find or use insecticidal soap or neem oil to control infestations. To prevent diseases, ensure that the plants have good air circulation and avoid overwatering. Remove any diseased leaves promptly to prevent the spread of infection. You can also use organic fungicides to protect your kale from fungal diseases.
Can I grow kale in bottles indoors during the winter?
Yes, you can grow kale in bottles indoors during the winter, provided that you have adequate light and warmth. Place the bottles near a sunny window or supplement with artificial grow lights. Maintain a consistent temperature of around 60-70°F (15-21°C). Water the plants regularly and fertilize them as needed. Indoor kale may not grow as quickly as outdoor kale, but you can still enjoy fresh greens throughout the winter months.
How long does it take for kale to grow in bottles?
The time it takes for kale to grow in bottles will depend on the variety of kale, the growing conditions, and the size of the bottles. Generally, you can expect to start harvesting kale leaves about 6-8 weeks after planting. You can harvest individual leaves as needed, or you can harvest the entire plant at once. Regular harvesting will encourage the plant to produce more leaves.
What are some good kale varieties to grow in bottles?
Some good kale varieties to grow in bottles include Dwarf Blue Curled Vates, Red Russian, and Lacinato (Dinosaur) kale. These varieties are relatively compact and well-suited for container gardening. They also have a good flavor and are easy to grow. Experiment with different varieties to find your favorites.
How do I harvest kale from my bottle garden?
To harvest kale from your bottle garden, simply cut off the outer leaves with a sharp knife or scissors. Leave the inner leaves intact to continue growing. You can harvest individual leaves as needed, or you can harvest the entire plant at once. Regular harvesting will encourage the plant to produce more leaves. Wash the kale leaves thoroughly before eating.
Leave a Comment