
Bottle Grown Peppers: Imagine plucking fresh, vibrant peppers right from your windowsill, even if you don’t have a sprawling garden! Sounds like a dream? Well, it’s a dream that can easily become reality with this incredibly simple and rewarding DIY project. For centuries, resourceful gardeners have sought innovative ways to cultivate their favorite plants in limited spaces, and this method is a modern twist on that age-old tradition.
Growing peppers in bottles isn’t just a quirky gardening hack; it’s a practical solution for urban dwellers, apartment residents, or anyone looking to maximize their yield in a small area. I know I’ve always wanted fresh peppers on hand for cooking, and this method makes it so accessible! Plus, it’s a fantastic way to recycle those plastic bottles that might otherwise end up in a landfill.
This DIY guide will walk you through every step of the process, from selecting the right pepper variety to ensuring your bottle-grown beauties thrive. You’ll learn how to create the perfect growing environment, provide essential nutrients, and even troubleshoot common issues. So, get ready to unleash your inner gardener and discover the joy of harvesting your very own bottle grown peppers. Let’s get started!
Turning Plastic Bottles into Pepper Powerhouses: A DIY Guide
Hey there, fellow gardening enthusiasts! Ever thought about turning those empty plastic bottles cluttering your recycling bin into mini pepper paradises? Well, get ready, because I’m about to show you how! This is a fantastic way to recycle, save space, and grow delicious peppers right on your balcony, patio, or even windowsill. Let’s dive in!
What You’ll Need: The Pepper Power-Up Arsenal
Before we get our hands dirty (literally!), let’s gather our supplies. Here’s what you’ll need to transform those bottles into pepper-growing machines:
* Plastic Bottles: The stars of the show! Look for bottles that are at least 2 liters in size. Clear or slightly translucent bottles work best, as they allow sunlight to reach the soil. Avoid dark-colored bottles, as they can overheat.
* Pepper Seeds or Seedlings: Choose your favorite pepper varieties! Bell peppers, jalapenos, chili peppers – the choice is yours. If you’re starting from seeds, you’ll need to germinate them first (more on that later). Seedlings offer a quicker route to pepper production.
* Potting Soil: Use a high-quality potting mix that drains well. Avoid using garden soil, as it can become compacted in containers.
* Scissors or a Utility Knife: For cutting the plastic bottles. Be careful!
* Drill or Nail and Hammer: To create drainage holes.
* Watering Can or Spray Bottle: For keeping your pepper plants hydrated.
* Optional:
* Gloves: To protect your hands.
* Measuring Cup: For accurate watering.
* Fertilizer: A balanced liquid fertilizer to boost pepper growth.
* Small Rocks or Gravel: To improve drainage at the bottom of the bottle.
* Labels: To identify your pepper varieties.
Phase 1: Bottle Prep – Laying the Foundation
This is where we transform those humble plastic bottles into potential pepper homes.
1. Clean the Bottles: Thoroughly wash the plastic bottles with soap and water to remove any residue. Rinse them well and let them dry completely. This is important to prevent any unwanted bacteria or mold from affecting your pepper plants.
2. Cut the Bottles: There are a couple of ways to cut the bottles, depending on the design you want. I prefer the self-watering method, which I’ll describe below.
* Self-Watering Method: Cut the bottle in half horizontally. The cut should be about two-thirds of the way up from the bottom. You’ll be inverting the top half into the bottom half, creating a reservoir for water.
* Simple Container Method: Cut off the top portion of the bottle, creating a simple open-top container. This is the easiest method, but it requires more frequent watering.
3. Create Drainage Holes: This is crucial! Peppers don’t like soggy roots. If you’re using the self-watering method, drill or poke several drainage holes in the bottom of the top half of the bottle (the part that will hold the soil). If you’re using the simple container method, drill or poke holes in the bottom of the bottle. I usually make about 5-6 holes, each about ¼ inch in diameter.
4. Optional: Add Gravel: For the simple container method, adding a layer of small rocks or gravel to the bottom of the bottle can further improve drainage. This helps prevent the soil from becoming waterlogged.
Phase 2: Planting the Peppers – Giving Life to Your Bottle Garden
Now for the fun part – planting your pepper seeds or seedlings!
1. Prepare the Soil: Moisten the potting soil slightly before filling the bottles. This helps prevent the soil from becoming compacted.
2. Fill the Bottles:
* Self-Watering Method: Place the top half of the bottle (with the drainage holes) upside down into the bottom half. Fill the top half with potting soil, leaving about an inch of space at the top.
* Simple Container Method: Fill the bottle with potting soil, leaving about an inch of space at the top.
3. Plant the Seeds or Seedlings:
* Seeds: If you’re starting from seeds, sow them according to the instructions on the seed packet. Generally, you’ll want to plant them about ¼ inch deep. Gently cover the seeds with soil and water lightly.
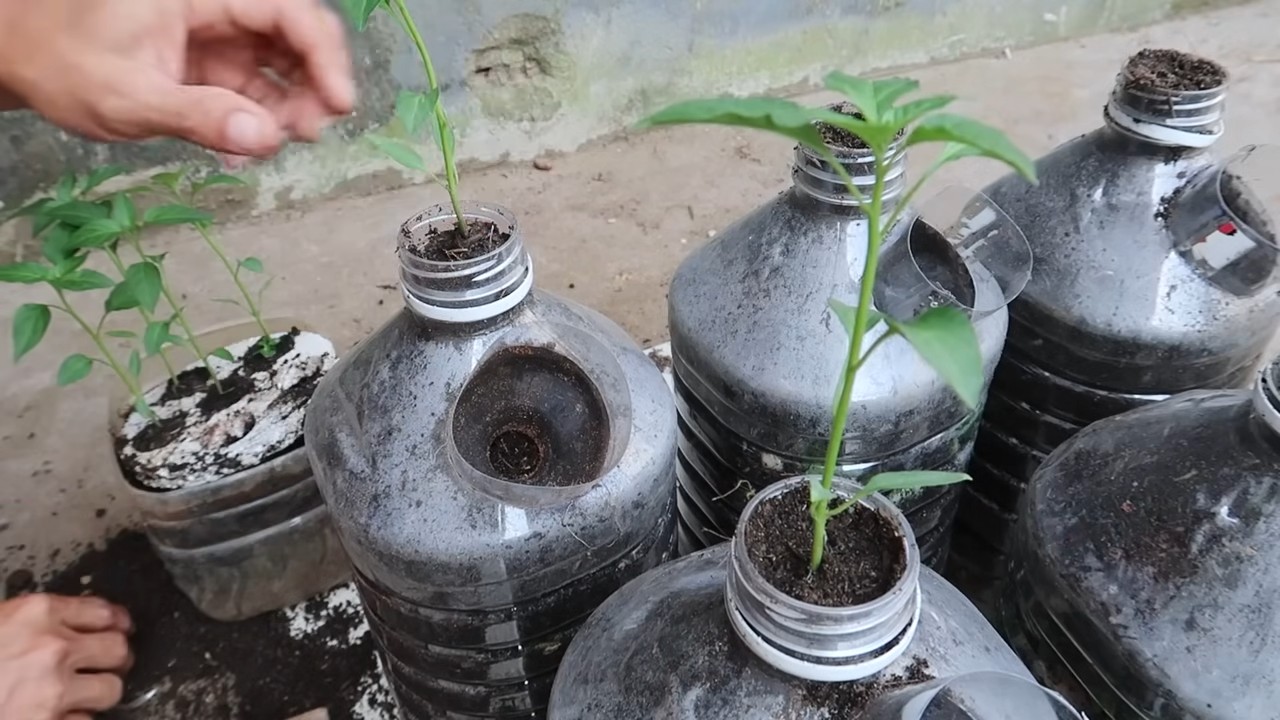
* Seedlings: If you’re using seedlings, gently remove them from their containers. Loosen the roots slightly and place the seedling in the center of the bottle. Fill in around the seedling with soil, making sure the top of the root ball is level with the soil surface. Water thoroughly.
4. Label Your Peppers: Use labels to identify the different pepper varieties you’ve planted. This will help you keep track of which peppers are which.
Phase 3: Pepper Care – Nurturing Your Spicy Friends
Now that your peppers are planted, it’s time to provide them with the care they need to thrive.
1. Watering:
* Self-Watering Method: Fill the bottom reservoir with water. The soil will absorb water from the reservoir as needed. Check the reservoir regularly and refill it when it’s empty. Avoid overwatering, as this can lead to root rot.
* Simple Container Method: Water the peppers regularly, keeping the soil moist but not soggy. Water when the top inch of soil feels dry to the touch. Avoid overwatering.
2. Sunlight: Peppers need plenty of sunlight to grow and produce fruit. Place your bottle garden in a location that receives at least 6-8 hours of direct sunlight per day. If you don’t have enough sunlight, you can supplement with grow lights.
3. Fertilizing: Feed your pepper plants with a balanced liquid fertilizer every 2-3 weeks. Follow the instructions on the fertilizer label. This will provide your peppers with the nutrients they need to grow strong and produce lots of peppers.
4. Pest Control: Keep an eye out for pests, such as aphids, spider mites, and whiteflies. If you notice any pests, treat them with an insecticidal soap or neem oil.
5. Support: As your pepper plants grow, they may need support to prevent them from falling over. You can use stakes or cages to support the plants.
6. Pollination: Peppers are self-pollinating, but you can help them along by gently shaking the plants or using a small brush to transfer pollen from one flower to another. This is especially important if you’re growing your peppers indoors.
Troubleshooting: Addressing Common Pepper Problems
Even with the best care, you might encounter some problems along the way. Here are a few common issues and how to address them:
* Yellowing Leaves: This can be caused by overwatering, underwatering, nutrient deficiencies, or pests. Check the soil moisture and adjust your watering accordingly. Fertilize your plants with a balanced fertilizer. Inspect the plants for pests and treat them as needed.
* Blossom End Rot: This is a condition where the bottom of the pepper fruit turns black and rotten. It’s caused by a calcium deficiency. Add calcium to the soil by using bone meal or eggshells. Ensure consistent watering, as fluctuations in soil moisture can also contribute to blossom end rot.
* Lack of Fruit: This can be caused by insufficient sunlight, poor pollination, or nutrient deficiencies. Make sure your plants are getting enough sunlight. Help with pollination by shaking the plants or using a small brush. Fertilize your plants with a fertilizer that’s high in phosphorus.
* Pests: Aphids, spider mites, and whiteflies are common pepper pests. Treat them with insecticidal soap or neem oil. You can also try introducing beneficial insects, such as ladybugs, to your garde
Hey there, fellow gardening enthusiasts! Ever thought about turning those empty plastic bottles cluttering your recycling bin into mini pepper paradises? Well, get ready, because I’m about to show you how! This is a fantastic way to recycle, save space, and grow delicious peppers right on your balcony, patio, or even windowsill. Let’s dive in!
What You’ll Need: The Pepper Power-Up Arsenal
Before we get our hands dirty (literally!), let’s gather our supplies. Here’s what you’ll need to transform those bottles into pepper-growing machines:
* Plastic Bottles: The stars of the show! Look for bottles that are at least 2 liters in size. Clear or slightly translucent bottles work best, as they allow sunlight to reach the soil. Avoid dark-colored bottles, as they can overheat.
* Pepper Seeds or Seedlings: Choose your favorite pepper varieties! Bell peppers, jalapenos, chili peppers – the choice is yours. If you’re starting from seeds, you’ll need to germinate them first (more on that later). Seedlings offer a quicker route to pepper production.
* Potting Soil: Use a high-quality potting mix that drains well. Avoid using garden soil, as it can become compacted in containers.
* Scissors or a Utility Knife: For cutting the plastic bottles. Be careful!
* Drill or Nail and Hammer: To create drainage holes.
* Watering Can or Spray Bottle: For keeping your pepper plants hydrated.
* Optional:
* Gloves: To protect your hands.
* Measuring Cup: For accurate watering.
* Fertilizer: A balanced liquid fertilizer to boost pepper growth.
* Small Rocks or Gravel: To improve drainage at the bottom of the bottle.
* Labels: To identify your pepper varieties.
Phase 1: Bottle Prep – Laying the Foundation
This is where we transform those humble plastic bottles into potential pepper homes.
1. Clean the Bottles: Thoroughly wash the plastic bottles with soap and water to remove any residue. Rinse them well and let them dry completely. This is important to prevent any unwanted bacteria or mold from affecting your pepper plants.
2. Cut the Bottles: There are a couple of ways to cut the bottles, depending on the design you want. I prefer the self-watering method, which I’ll describe below.
* Self-Watering Method: Cut the bottle in half horizontally. The cut should be about two-thirds of the way up from the bottom. You’ll be inverting the top half into the bottom half, creating a reservoir for water.
* Simple Container Method: Cut off the top portion of the bottle, creating a simple open-top container. This is the easiest method, but it requires more frequent watering.
3. Create Drainage Holes: This is crucial! Peppers don’t like soggy roots. If you’re using the self-watering method, drill or poke several drainage holes in the bottom of the top half of the bottle (the part that will hold the soil). If you’re using the simple container method, drill or poke holes in the bottom of the bottle. I usually make about 5-6 holes, each about ¼ inch in diameter.
4. Optional: Add Gravel: For the simple container method, adding a layer of small rocks or gravel to the bottom of the bottle can further improve drainage. This helps prevent the soil from becoming waterlogged.
Phase 2: Planting the Peppers – Giving Life to Your Bottle Garden
Now for the fun part – planting your pepper seeds or seedlings!
1. Prepare the Soil: Moisten the potting soil slightly before filling the bottles. This helps prevent the soil from becoming compacted.
2. Fill the Bottles:
* Self-Watering Method: Place the top half of the bottle (with the drainage holes) upside down into the bottom half. Fill the top half with potting soil, leaving about an inch of space at the top.
* Simple Container Method: Fill the bottle with potting soil, leaving about an inch of space at the top.
3. Plant the Seeds or Seedlings:
* Seeds: If you’re starting from seeds, sow them according to the instructions on the seed packet. Generally, you’ll want to plant them about ¼ inch deep. Gently cover the seeds with soil and water lightly.
* Seedlings: If you’re using seedlings, gently remove them from their containers. Loosen the roots slightly and place the seedling in the center of the bottle. Fill in around the seedling with soil, making sure the top of the root ball is level with the soil surface. Water thoroughly.
4. Label Your Peppers: Use labels to identify the different pepper varieties you’ve planted. This will help you keep track of which peppers are which.
Phase 3: Pepper Care – Nurturing Your Spicy Friends
Now that your peppers are planted, it’s time to provide them with the care they need to thrive.
1. Watering:
* Self-Watering Method: Fill the bottom reservoir with water. The soil will absorb water from the reservoir as needed. Check the reservoir regularly and refill it when it’s empty. Avoid overwatering, as this can lead to root rot.
* Simple Container Method: Water the peppers regularly, keeping the soil moist but not soggy. Water when the top inch of soil feels dry to the touch. Avoid overwatering.
2. Sunlight: Peppers need plenty of sunlight to grow and produce fruit. Place your bottle garden in a location that receives at least 6-8 hours of direct sunlight per day. If you don’t have enough sunlight, you can supplement with grow lights.
3. Fertilizing: Feed your pepper plants with a balanced liquid fertilizer every 2-3 weeks. Follow the instructions on the fertilizer label. This will provide your peppers with the nutrients they need to grow strong and produce lots of peppers.
4. Pest Control: Keep an eye out for pests, such as aphids, spider mites, and whiteflies. If you notice any pests, treat them with an insecticidal soap or neem oil.
5. Support: As your pepper plants grow, they may need support to prevent them from falling over. You can use stakes or cages to support the plants.
6. Pollination: Peppers are self-pollinating, but you can help them along by gently shaking the plants or using a small brush to transfer pollen from one flower to another. This is especially important if you’re growing your peppers indoors.
Troubleshooting: Addressing Common Pepper Problems
Even with the best care, you might encounter some problems along the way. Here are a few common issues and how to address them:
* Yellowing Leaves: This can be caused by overwatering, underwatering, nutrient deficiencies, or pests. Check the soil moisture and adjust your watering accordingly. Fertilize your plants with a balanced fertilizer. Inspect the plants for pests and treat them as needed.
* Blossom End Rot: This is a condition where the bottom of the pepper fruit turns black and rotten. It’s caused by a calcium deficiency. Add calcium to the soil by using bone meal or eggshells. Ensure consistent watering, as fluctuations in soil moisture can also contribute to blossom end rot.
* Lack of Fruit: This can be caused by insufficient sunlight, poor pollination, or nutrient deficiencies. Make sure your plants are getting enough sunlight. Help with pollination by shaking the plants or using a small brush. Fertilize your plants with a fertilizer that’s high in phosphorus.
* Pests: Aphids, spider mites, and whiteflies are common pepper pests. Treat them with insecticidal soap or neem oil. You can also try introducing beneficial insects, such as ladybugs, to your garden.
Harvesting: Reaping the Rewards of Your Labor
The moment you’ve been waiting for – harvesting your delicious peppers!
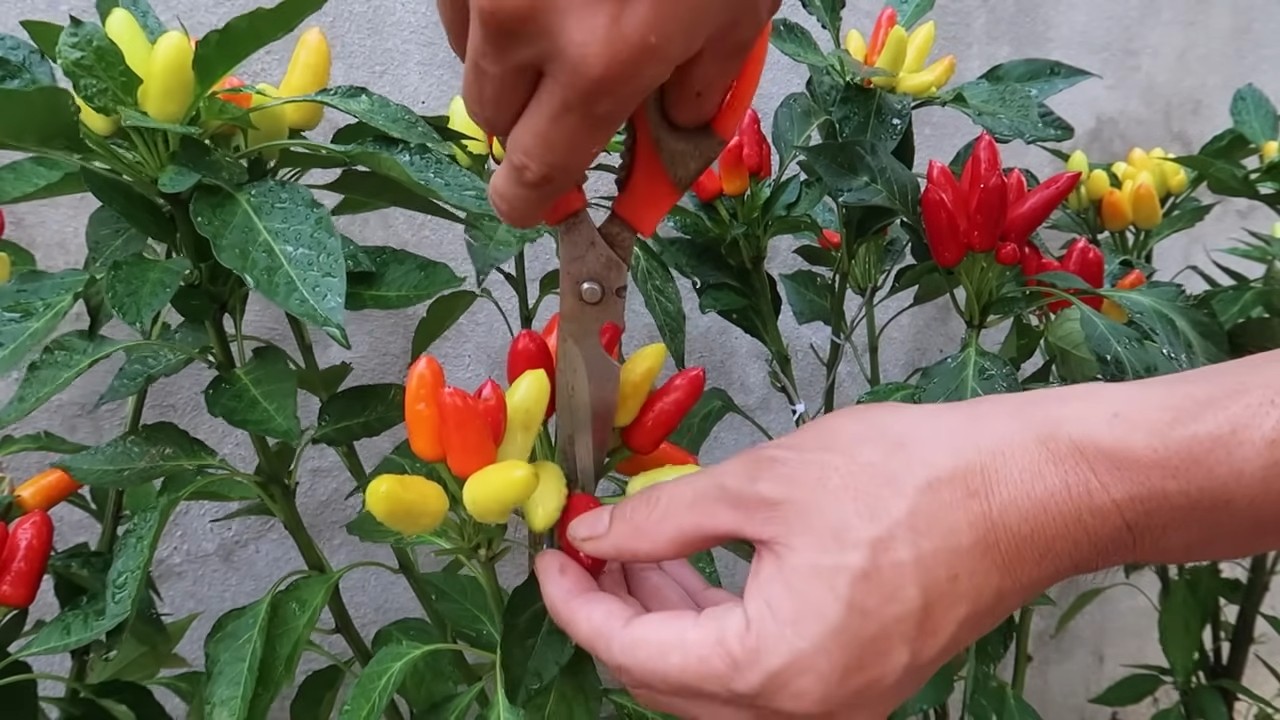
1. When to Harvest: Peppers are typically ready to harvest when they’ve reached their mature size and color. The exact time will vary depending on the pepper variety. Bell peppers are usually harvested when they’re green, red, yellow, or orange. Jalapenos are usually harvested when they’re green or red. Chili peppers are usually harvested when they’re red.
2. How to Harvest: Use scissors or pruning shears to cut the peppers from the plant. Leave a small stem attached to the pepper.
3. Enjoy Your Peppers: Use your freshly harvested peppers in your favorite recipes! They’re delicious in salads, salsas, stir-fries, and more. You can also freeze or dry your peppers for later use.
And there you have it! You’ve successfully transformed plastic bottles into pepper-growing powerhouses. Enjoy your homegrown peppers and the satisfaction of knowing you’ve recycled and grown something delicious! Happy gardening!
Conclusion
So, there you have it! Growing peppers in bottles isn’t just a quirky gardening experiment; it’s a genuinely effective and rewarding way to cultivate your own fresh, flavorful peppers, even with limited space or resources. We’ve explored the simplicity and accessibility of this method, highlighting how it transforms readily available plastic bottles into miniature pepper paradises.
The beauty of this DIY trick lies in its adaptability. Whether you’re a seasoned gardener or a complete beginner, the bottle-grown pepper method offers a low-risk, high-reward entry point into the world of home gardening. Imagine the satisfaction of harvesting vibrant, juicy peppers that you nurtured from seed to fruit, all within the confines of a recycled plastic bottle.
But the benefits extend beyond mere convenience. Bottle growing offers a degree of control over the growing environment that traditional gardening often lacks. You can easily move your bottle gardens to chase the sun, protect them from harsh weather, or even bring them indoors during colder months, extending your growing season and ensuring a consistent supply of fresh peppers.
Ready to take your pepper growing to the next level? Consider experimenting with different types of peppers. From the fiery heat of habaneros to the sweet crunch of bell peppers, the possibilities are endless. You can also explore different soil mixes to optimize growth and flavor. Try adding compost or other organic matter to enrich the soil and provide your peppers with the nutrients they need to thrive.
Another exciting variation is to create a vertical bottle garden. By stacking multiple bottles on top of each other, you can maximize your growing space and create a visually stunning display. This is a particularly great option for those with very limited space, such as apartment dwellers or balcony gardeners.
Don’t be afraid to get creative with your bottle gardens. Decorate your bottles with paint, markers, or other embellishments to add a personal touch. You can even use different colored bottles to create a rainbow effect. The possibilities are truly endless!
This method is also incredibly sustainable. By repurposing plastic bottles, you’re reducing waste and contributing to a more environmentally friendly lifestyle. It’s a win-win situation: you get to enjoy fresh, homegrown peppers while also doing your part to protect the planet.
We are confident that once you experience the joy of harvesting your own bottle-grown peppers, you’ll be hooked. It’s a simple, satisfying, and sustainable way to add fresh flavor to your meals and connect with nature.
So, what are you waiting for? Gather your supplies, follow our simple instructions, and embark on your own bottle-grown pepper adventure today! We encourage you to share your experiences with us and the wider gardening community. Post photos of your bottle gardens on social media, tag us in your posts, and let us know what varieties of peppers you’re growing. We can’t wait to see what you create! Your insights and experiences will help inspire others to embrace this innovative and rewarding gardening technique. Let’s grow together!
Frequently Asked Questions (FAQ)
What types of peppers grow best in bottles?
While you can technically grow any type of pepper in a bottle, some varieties are better suited for this method than others. Smaller pepper varieties, such as chili peppers, jalapeños, and bell peppers, tend to thrive in bottle gardens due to their compact size and relatively shallow root systems. Larger pepper varieties, such as banana peppers or poblano peppers, can also be grown in bottles, but they may require larger bottles and more frequent watering and fertilization. Ultimately, the best type of pepper to grow in a bottle depends on your personal preferences and the size of the bottle you’re using. Experiment with different varieties to see what works best for you!
How often should I water my bottle-grown peppers?
Watering frequency depends on several factors, including the size of the bottle, the type of soil, the weather conditions, and the size of the pepper plant. As a general rule, you should water your bottle-grown peppers whenever the top inch of soil feels dry to the touch. During hot, dry weather, you may need to water them daily, while during cooler, wetter weather, you may only need to water them every few days. Be careful not to overwater your peppers, as this can lead to root rot. Ensure the bottle has adequate drainage to prevent water from pooling at the bottom. A good way to check if your peppers need watering is to lift the bottle. If it feels light, it’s likely time to water.
What kind of soil should I use for bottle-grown peppers?
The ideal soil for bottle-grown peppers is a well-draining potting mix that is rich in organic matter. Avoid using garden soil, as it can be too heavy and compacted, which can hinder root growth and drainage. A good potting mix will provide the necessary nutrients and aeration for healthy pepper growth. You can also amend your potting mix with compost or other organic matter to further improve its fertility and drainage. Consider adding perlite or vermiculite to the mix to enhance drainage and aeration.
Do bottle-grown peppers need fertilizer?
Yes, bottle-grown peppers benefit from regular fertilization, especially during the growing season. Peppers are heavy feeders and require a steady supply of nutrients to produce abundant fruit. Use a balanced fertilizer that is specifically formulated for vegetables, following the instructions on the label. You can also use organic fertilizers, such as compost tea or fish emulsion. Fertilize your peppers every two to four weeks, depending on the type of fertilizer you’re using and the needs of your plants. Look for fertilizers with a higher phosphorus content to encourage flowering and fruit production.
How much sunlight do bottle-grown peppers need?
Peppers need at least six to eight hours of direct sunlight per day to thrive. Place your bottle gardens in a sunny location where they will receive ample sunlight throughout the day. If you don’t have a sunny spot, you can supplement with artificial grow lights. Rotate your bottles regularly to ensure that all sides of the plants receive equal sunlight. Insufficient sunlight can lead to leggy growth and reduced fruit production.
How do I protect my bottle-grown peppers from pests and diseases?
Bottle-grown peppers are susceptible to the same pests and diseases as peppers grown in the ground. Common pests include aphids, spider mites, and whiteflies. Common diseases include powdery mildew, blossom end rot, and fungal infections. To protect your peppers from pests and diseases, inspect them regularly for signs of infestation or infection. If you spot any problems, take action immediately. You can use insecticidal soap or neem oil to control pests, and you can use fungicides to control diseases. Ensure good air circulation around your plants to prevent fungal problems.
Can I grow bottle-grown peppers indoors?
Yes, you can grow bottle-grown peppers indoors, but you will need to provide them with adequate light and ventilation. Place your bottle gardens near a sunny window or use artificial grow lights to provide the necessary light. Ensure good air circulation to prevent fungal problems. You may also need to hand-pollinate your peppers if you don’t have any pollinators indoors. Growing peppers indoors can be a great way to extend your growing season and enjoy fresh peppers year-round.
How long does it take for bottle-grown peppers to produce fruit?
The time it takes for bottle-grown peppers to produce fruit depends on the variety of pepper, the growing conditions, and the size of the plant. Generally, it takes about 60 to 90 days from transplanting seedlings to harvesting mature peppers. Some varieties, such as chili peppers, may mature faster than others, such as bell peppers. Provide your peppers with optimal growing conditions, including plenty of sunlight, water, and fertilizer, to encourage faster fruit production.
What size bottle is best for growing peppers?
The best bottle size depends on the type of pepper you are growing. For smaller peppers like chilies or jalapeños, a 2-liter bottle may suffice. However, for larger peppers like bell peppers, a 3-liter or even a gallon-sized bottle is preferable to provide adequate root space. Ensure the bottle is sturdy enough to support the weight of the plant and soil.
How do I prevent blossom end rot in my bottle-grown peppers?
Blossom end rot is a common problem in peppers, caused by a calcium deficiency. To prevent blossom end rot in your bottle-grown peppers, ensure that your soil is rich in calcium. You can add lime or bone meal to the soil to increase its calcium content. Also, avoid overwatering or underwatering your peppers, as this can interfere with calcium uptake. Consistent watering is key to preventing this issue.

Leave a Comment