
Bowl Grown Mushrooms at Home: Imagine harvesting fresh, flavorful mushrooms right from your kitchen counter! Forget those expensive grocery store trips and embrace the rewarding experience of cultivating your own fungi. This isn’t some futuristic fantasy; it’s a surprisingly simple and satisfying DIY project that anyone can undertake.
For centuries, mushroom cultivation has been shrouded in mystery, often associated with ancient traditions and specialized knowledge. From the shiitake logs of East Asia to the truffle hunts of Europe, the art of growing mushrooms has always held a certain allure. Now, we’re bringing that magic into your home, demystifying the process and making it accessible to everyone.
Why should you try bowl grown mushrooms at home? Well, beyond the sheer joy of growing your own food, it’s incredibly practical. Store-bought mushrooms can be pricey and often lack the freshness and flavor of homegrown varieties. Plus, this DIY project is a fantastic way to reduce your environmental footprint by minimizing transportation and packaging waste. I’m excited to show you how easy it is to transform a simple bowl into a thriving mushroom farm, providing you with a constant supply of delicious, healthy ingredients for your culinary creations. Let’s get started!
Growing Mushrooms in a Bowl: A Beginner’s Guide
Hey there, fellow fungi enthusiasts! Ever dreamt of harvesting your own delicious mushrooms right from your kitchen counter? Well, dream no more! Growing mushrooms at home can seem intimidating, but with this simple bowl method, it’s surprisingly easy and rewarding. I’m going to walk you through everything you need to know to cultivate your own little mushroom farm in a bowl. Let’s get started!
Choosing Your Mushroom Variety
Before we dive into the nitty-gritty, let’s talk about which mushrooms are best suited for bowl cultivation. Some varieties are simply easier to grow indoors than others. Here are a few of my top recommendations:
* Oyster Mushrooms (Pleurotus spp.): These are arguably the easiest mushrooms to grow for beginners. They’re fast-growing, adaptable, and come in a variety of colors and flavors. You can find pink, blue, yellow, and even pearl oyster mushroom spawn.
* Shiitake Mushrooms (Lentinula edodes): While traditionally grown on logs, shiitakes can also be grown in bowls using a supplemented sawdust substrate. They take a bit longer than oysters but offer a rich, savory flavor.
* Lion’s Mane (Hericium erinaceus): This unique-looking mushroom, resembling a cascading waterfall of white spines, is gaining popularity for its culinary and potential health benefits. It’s a bit more challenging than oysters, but definitely doable with patience.
Once you’ve chosen your mushroom, you’ll need to source your spawn. Spawn is essentially mushroom “seeds” – a material that has been inoculated with mushroom mycelium (the vegetative part of the fungus). You can find spawn online from reputable mushroom suppliers or at some local garden centers.
Gathering Your Supplies
Okay, now that we’ve picked our mushroom and secured our spawn, let’s gather the necessary supplies. Here’s what you’ll need:
* A Bowl: Choose a bowl that’s at least 6 inches deep and 8 inches in diameter. A plastic or ceramic bowl works well. Make sure it’s clean!
* Substrate: This is the material the mushrooms will grow in. For oyster mushrooms, pasteurized straw, coffee grounds, or hardwood sawdust are excellent choices. For shiitakes, a supplemented sawdust mix is recommended. Lion’s Mane also thrives on supplemented sawdust.
* Spawn: As mentioned earlier, this is your mushroom “seed.” Make sure it’s fresh and from a reliable source. The amount of spawn you need will depend on the size of your bowl and the type of mushroom. A good rule of thumb is to use about 10-20% spawn by weight of the substrate.
* Spray Bottle: You’ll need this to keep the substrate moist.
* Plastic Wrap or a Clear Plastic Bag: To create a humid environment.
* Rubbing Alcohol: For sanitizing your work area and tools.
* Gloves: To maintain cleanliness and prevent contamination.
* Optional: Hydrogen Peroxide (3%): Can be used to help prevent mold.
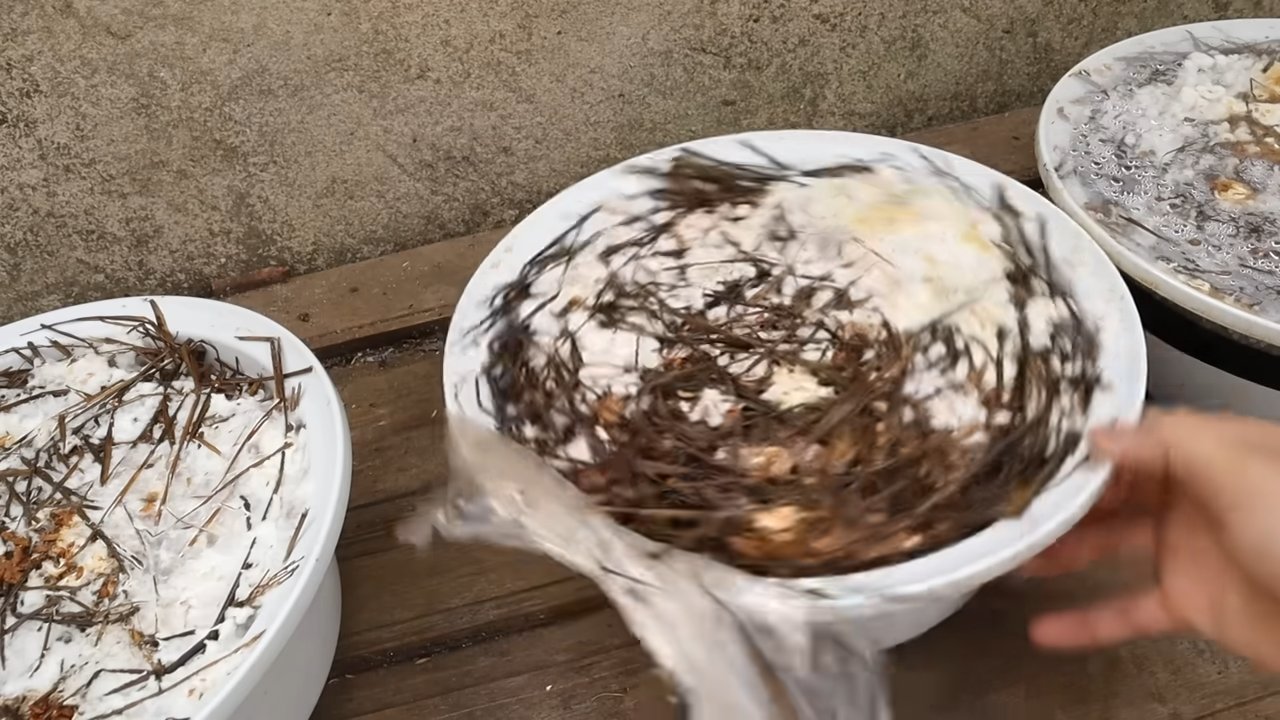
Preparing the Substrate
The substrate is the food source for your mushrooms, so it’s crucial to prepare it properly. This usually involves pasteurization or sterilization to kill off any competing organisms.
Pasteurizing Straw (for Oyster Mushrooms)
1. Chop the Straw: Cut the straw into small pieces, about 2-3 inches long. This will make it easier for the mycelium to colonize.
2. Soak the Straw: Place the chopped straw in a large pot or container and cover it with water.
3. Heat the Water: Bring the water to a temperature of 160-180°F (71-82°C) and maintain that temperature for about 1-2 hours. You can use a thermometer to monitor the temperature. This process kills off most of the unwanted microorganisms without completely sterilizing the straw, which can actually be beneficial for oyster mushrooms.
4. Drain and Cool: Carefully drain the hot water and let the straw cool down to room temperature. You want it to be moist but not dripping wet. Squeeze out any excess water.
Pasteurizing Coffee Grounds (for Oyster Mushrooms)
1. Collect Coffee Grounds: Gather used coffee grounds from your coffee maker. Make sure they are relatively fresh (within a day or two) to minimize the risk of contamination.
2. Pasteurize (Optional): While coffee grounds are naturally somewhat pasteurized by the brewing process, you can further pasteurize them by microwaving them for a few minutes or pouring boiling water over them and letting them sit for 30 minutes.
3. Cool and Drain: Let the coffee grounds cool down to room temperature and drain off any excess water.
Preparing Supplemented Sawdust (for Shiitake and Lion’s Mane)
1. Gather Sawdust: Use hardwood sawdust (oak, maple, beech) that is free of chemicals and preservatives. Avoid cedar or pine sawdust, as they contain oils that can inhibit mushroom growth.
2. Supplement the Sawdust: Add a supplement such as wheat bran or rice bran to provide additional nutrients for the mushrooms. A common ratio is 80% sawdust and 20% supplement.
3. Hydrate the Mixture: Add water to the sawdust and supplement mixture until it is moist but not dripping wet. You should be able to squeeze a handful of the mixture and have a few drops of water come out.
4. Sterilize the Mixture: This is crucial for shiitake and lion’s mane, as they are more susceptible to contamination. You can sterilize the mixture in a pressure cooker at 15 PSI for 90 minutes. Alternatively, you can use a specialized mushroom grow bag with a filter patch and sterilize it in the pressure cooker.
5. Cool Completely: Allow the sterilized sawdust mixture to cool completely before inoculating it with spawn.
Inoculating the Substrate
Now for the fun part – introducing the mushroom spawn to the prepared substrate!
1. Sanitize Everything: Before you begin, thoroughly sanitize your work area, the bowl, and your hands with rubbing alcohol. Wear gloves to minimize the risk of contamination.
2. Layer the Substrate and Spawn: In the bowl, create a layer of substrate, then sprinkle a layer of spawn on top. Repeat this process, layering substrate and spawn, until the bowl is almost full. The final layer should be substrate.
3. Mix Thoroughly (Optional): Some growers prefer to mix the spawn and substrate together thoroughly. This can help the mycelium colonize the substrate more quickly.
4. Cover the Bowl: Cover the bowl with plastic wrap or place it inside a clear plastic bag. This will help to maintain a humid environment.
5. Poke Air Holes: If using plastic wrap, poke a few small holes in it to allow for air exchange. If using a plastic bag, leave it slightly open.
Incubation
This is the period where the mushroom mycelium colonizes the substrate.
1. Find a Suitable Location: Place the bowl in a dark, warm location with a temperature between 65-75°F (18-24°C). A closet, basement, or under the sink are all good options.
2. Monitor the Colonization: Check the bowl regularly for signs of colonization. You should see white, fuzzy mycelium spreading throughout the substrate.
3. Maintain Humidity: If the substrate appears dry, lightly mist it with water using a spray bottle. You want to keep it moist but not soggy.
4. Be Patient: Colonization can take anywhere from 2-4 weeks, depending on the mushroom variety and the environmental conditions.
Fruiting
Once the substrate is fully colonized, it’s time to initiate fruiting – the process of the mushrooms actually growing.
1. Introduce Light: Move the bowl to a location with indirect light. Direct sunlight can dry out the substrate and inhibit mushroom growth.
2. Increase Humidity: Mushrooms need high humidity to fruit properly. You can increase humidity by misting the bowl several times a day or by placing it inside a humidity tent (a clear plastic container with a lid).
3. Maintain Airflow: While high humidity is important, good airflow is also essential to prevent mold growth. Make sure there is some ventilation in the area.
4. Monitor for Pinning: After a few days, you should start to see small mushroom “pins” forming on the surface of the substrate. These are the baby mushrooms!
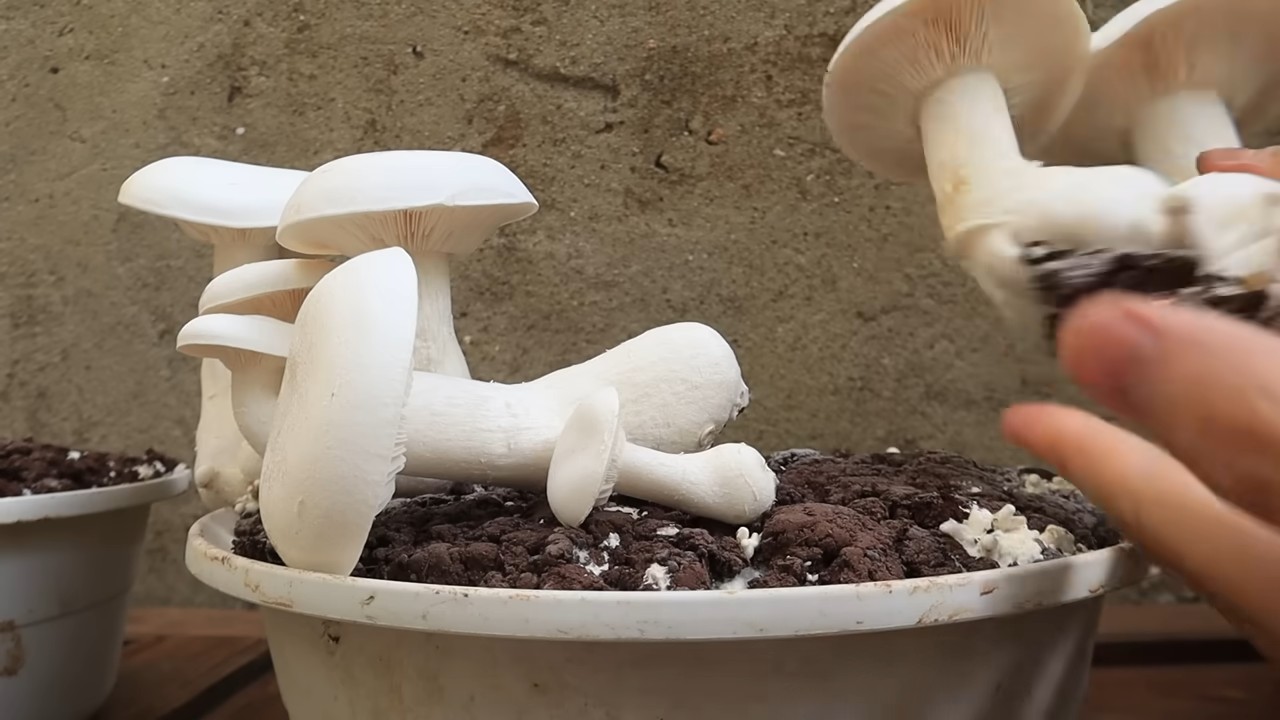
5. Harvest the Mushrooms: Harvest the mushrooms when they are fully developed but before they start to drop spores. For oyster mushrooms, harvest them when the caps are still slightly curled downwards. For shiitakes, harvest them when the caps have fully opened. For Lion’s Mane, harvest when the spines are fully developed and start to turn slightly brown.
Harvesting and Subsequent Flushes
1. Harvesting: To harvest,
Conclusion
So, there you have it! Cultivating your own mushrooms in a bowl isn’t just a fun project; it’s a gateway to fresh, flavorful fungi right at your fingertips. We’ve walked you through the simple steps, demystifying the process and proving that you don’t need a fancy setup or extensive gardening knowledge to enjoy the satisfaction of harvesting your own homegrown goodness.
Why is this DIY trick a must-try? Because it empowers you to take control of your food source, reduces your reliance on store-bought options (often shipped long distances and lacking in freshness), and offers a sustainable way to enjoy a culinary delicacy. Imagine the pride you’ll feel serving a dish featuring mushrooms you nurtured from spawn to plate! Beyond the practical benefits, it’s also an incredibly rewarding experience to witness the fascinating life cycle of these incredible organisms. It’s a mini-science experiment, a culinary adventure, and a sustainable practice all rolled into one.
But the beauty of bowl-grown mushrooms lies not only in its simplicity but also in its adaptability. Feel free to experiment with different types of mushrooms. While we’ve focused on varieties like oyster mushrooms and shiitake (using plug spawn), you can explore other options depending on availability and your personal preferences. Consider trying different substrates too. While pasteurized straw is a common choice, you might experiment with coffee grounds (for oyster mushrooms), hardwood sawdust, or even cardboard. Just remember to research the specific needs of the mushroom variety you choose.
Don’t be afraid to get creative with your growing environment. While a dark, humid space is ideal, you can adjust conditions to suit your needs. A simple humidity tent made from a plastic bag can work wonders in drier climates. Monitor the temperature and humidity levels regularly, and adjust as needed. Remember, patience is key. Mushroom cultivation takes time, but the reward is well worth the wait.
We strongly encourage you to embark on this exciting journey of growing your own mushrooms. It’s a fantastic way to connect with nature, learn new skills, and enjoy the unparalleled flavor of freshly harvested fungi. And most importantly, we want to hear about your experiences! Share your successes, your challenges, and your creative variations with us. Post pictures of your mushroom bowls, tell us about the dishes you’ve created, and let us know what you’ve learned along the way. Your feedback will not only inspire others but also help us refine and improve this guide for future mushroom enthusiasts. So, grab a bowl, some substrate, and some spawn, and get ready to experience the magic of bowl-grown mushrooms! Let’s cultivate a community of mushroom growers, one bowl at a time. This method of **bowl grown mushrooms** is a great way to start your journey into the world of mycology.
Frequently Asked Questions (FAQ)
What kind of mushrooms can I grow in a bowl?
The best mushrooms for bowl cultivation are generally those that thrive on readily available substrates and don’t require highly specialized conditions. Oyster mushrooms (various strains like pearl, blue, pink, and golden) are excellent choices for beginners because they are relatively easy to grow and tolerate a wide range of conditions. Shiitake mushrooms can also be grown in bowls, but they typically require hardwood sawdust or supplemented sawdust blocks. Other possibilities include wine cap mushrooms (also known as garden giants), which can be grown in a mix of straw and wood chips, and even some types of button mushrooms, although these are more challenging. Research the specific needs of the mushroom you choose to ensure the best results.
What is the best substrate to use for bowl-grown mushrooms?
The ideal substrate depends on the type of mushroom you’re growing. For oyster mushrooms, pasteurized straw is a popular and readily available option. You can also use coffee grounds (especially for oyster mushrooms), but make sure they are fresh and haven’t been sitting for too long. Shiitake mushrooms prefer hardwood sawdust or supplemented sawdust blocks. Wine cap mushrooms thrive in a mix of straw and wood chips. Regardless of the substrate you choose, it’s crucial to pasteurize it properly to kill any competing organisms that could hinder mushroom growth. Pasteurization can be done by soaking the substrate in hot water (around 160-180°F) for an hour or steaming it.
How do I pasteurize the substrate?
Pasteurizing the substrate is a crucial step to eliminate competing molds and bacteria that can prevent your mushrooms from growing. There are a few methods you can use:
* **Hot Water Pasteurization:** This is the most common method. Fill a large pot or container with water and heat it to around 160-180°F (71-82°C). Submerge the substrate completely in the hot water and let it soak for at least one hour. Use a weight to keep the substrate submerged. After an hour, drain the water and let the substrate cool down to room temperature before using it.
* **Steaming:** You can also pasteurize the substrate by steaming it. Place the substrate in a heat-resistant container with holes for steam to circulate. Place the container over a pot of boiling water and steam for at least one hour. Make sure the steam reaches all parts of the substrate.
* **Microwave Pasteurization (for small batches):** For small quantities of substrate, you can microwave it. Place the substrate in a microwave-safe container with a little water. Microwave on high for a few minutes until the substrate is steaming. Be careful not to overheat it and dry it out.
Always allow the substrate to cool down completely before inoculating it with mushroom spawn.
How do I maintain the humidity for my mushroom bowl?
Maintaining adequate humidity is essential for successful mushroom cultivation. Mushrooms need a humid environment to thrive. Here are a few ways to maintain humidity in your mushroom bowl:
* **Humidity Tent:** The simplest method is to create a humidity tent using a clear plastic bag. Place the bag over the bowl, making sure it doesn’t touch the substrate directly. You can use skewers or chopsticks to create a frame to support the bag. Mist the inside of the bag with water regularly to maintain humidity.
* **Misting:** Mist the substrate and the surrounding air with water several times a day, especially if you live in a dry climate. Use a spray bottle with a fine mist setting.
* **Humidifier:** If you have a humidifier, you can place it near the mushroom bowl to increase the overall humidity in the area.
* **Humidity Tray:** Place the mushroom bowl on a tray filled with water and pebbles. The water will evaporate and increase the humidity around the bowl.
Monitor the humidity levels regularly using a hygrometer. Aim for a humidity level of around 80-90%.
How long does it take for mushrooms to grow in a bowl?
The time it takes for mushrooms to grow depends on several factors, including the type of mushroom, the substrate, the environmental conditions, and the quality of the spawn. Generally, you can expect to see pins (small mushroom formations) within 1-3 weeks after inoculation. The mushrooms will then mature and be ready for harvest within a few days to a week. Oyster mushrooms tend to grow faster than shiitake mushrooms. Maintaining optimal temperature and humidity levels will also speed up the growth process.
How do I know when to harvest my mushrooms?
Knowing when to harvest your mushrooms is crucial for optimal flavor and texture. Here are some general guidelines:
* **Oyster Mushrooms:** Harvest oyster mushrooms when the caps are fully formed but before they start to release spores. The edges of the caps will start to curl upwards slightly when they are ready to harvest.
* **Shiitake Mushrooms:** Harvest shiitake mushrooms when the caps have fully opened and the edges are slightly curled downwards. The caps should be firm and slightly spongy to the touch.
* **Wine Cap Mushrooms:** Harvest wine cap mushrooms when the caps are fully opened and the gills are visible. The caps should be firm and slightly moist.
To harvest, gently twist or cut the mushrooms from the substrate. Avoid pulling them out, as this can damage the mycelium and prevent future flushes.
Can I get multiple harvests from a single bowl?
Yes, you can typically get multiple harvests (flushes) from a single bowl of mushrooms. After harvesting the first flush, allow the substrate to rest for a few days. Mist the substrate regularly to maintain humidity. You may need to rehydrate the substrate by soaking it in water for a few hours. After a few days, you should see new pins forming, leading to a second flush of mushrooms. You can usually get 2-3 flushes from a single bowl, but the yield may decrease with each subsequent flush.
What if my mushroom bowl gets moldy?
Mold contamination is a common problem in mushroom cultivation. If you see mold growing in your mushroom bowl, it’s important to take action immediately to prevent it from spreading.
* **Small Mold Patches:** If the mold is localized to a small area, you can try to remove it by carefully scraping it off with a clean spoon or knife. Then, spray the area with a diluted hydrogen peroxide solution (3% concentration).
* **Extensive Mold Contamination:** If the mold is widespread, it’s best to discard the entire bowl to prevent the mold from spreading to other areas.
To prevent mold contamination, ensure that you pasteurize the substrate properly, maintain good hygiene, and provide adequate ventilation.

Leave a Comment