
Chili pepper plant propagation: Ever dreamt of an endless supply of fiery chilies right at your fingertips? Imagine never having to run to the store for that crucial ingredient to spice up your favorite dish! Well, stop dreaming and start doing! This DIY guide is your passport to a thriving chili pepper garden, bursting with flavor and color.
For centuries, chili peppers have been more than just a spice; they’ve been woven into the fabric of cultures worldwide. From the ancient Aztecs using them in rituals to the vibrant street food of Southeast Asia, these fiery fruits have a rich and fascinating history. Today, growing your own chilies connects you to that heritage, allowing you to cultivate a piece of culinary history in your own backyard.
But why should you bother with chili pepper plant propagation? Simple! It’s cost-effective, sustainable, and incredibly rewarding. Instead of constantly buying peppers, you can multiply your plants from a single source. Plus, you get to choose the exact varieties you love and control the growing process, ensuring the freshest, most flavorful chilies possible. I’m going to show you some easy-to-follow tricks and hacks that will have you propagating chili pepper plants like a pro in no time. Get ready to unleash your inner gardener and turn your home into a chili pepper paradise!
Chili Pflanzen Vermehren: Dein DIY Guide für eine reiche Ernte!
Hey Chili-Liebhaber! Du hast eine Chili-Pflanze, die du liebst und möchtest mehr davon? Oder vielleicht hast du eine besonders scharfe Sorte entdeckt und willst sie unbedingt vermehren? Keine Sorge, das ist einfacher als du denkst! Ich zeige dir hier, wie du deine Chili-Pflanzen ganz einfach selbst vermehren kannst, und zwar mit verschiedenen Methoden. Los geht’s!
Samen gewinnen: Der Startpunkt für deine Chili-Zucht
Bevor wir mit dem eigentlichen Vermehren loslegen, müssen wir erstmal an die Samen kommen. Hier sind ein paar Tipps, wie du das am besten machst:
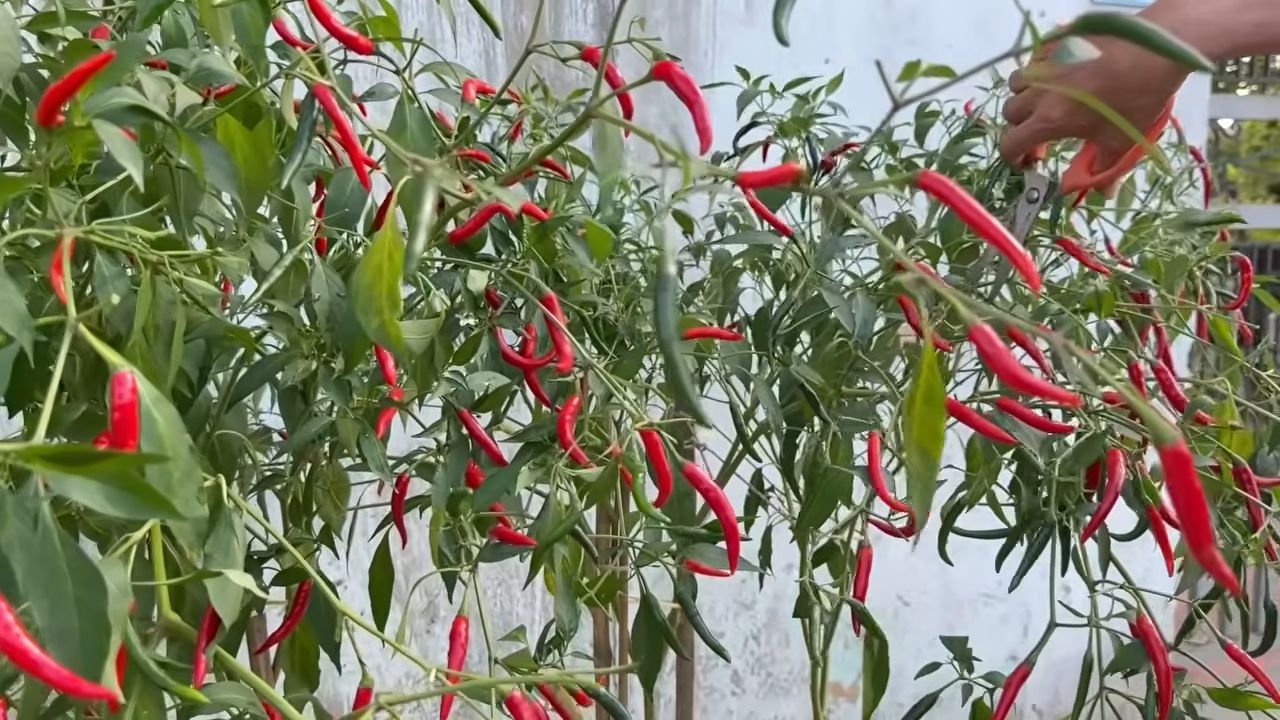
* Wähle die richtigen Chilis aus: Nimm nur reife, gesunde Chilis von gesunden Pflanzen. Die Chilis sollten ihre endgültige Farbe erreicht haben (rot, gelb, orange, braun, je nach Sorte) und sich leicht weich anfühlen.
* Schneide die Chili auf: Trage am besten Handschuhe, denn die Schärfe kann ganz schön brennen! Schneide die Chili vorsichtig längs auf.
* Entferne die Samen: Kratze die Samen mit einem Messer oder Löffel heraus. Achte darauf, dass du nur die gesunden, prallen Samen nimmst. Kleine, verkrüppelte Samen sind meist nicht keimfähig.
* Trockne die Samen: Lege die Samen auf ein Stück Küchenpapier oder einen Teller und lasse sie an einem warmen, trockenen Ort für ein paar Tage trocknen. Wichtig: Die Samen müssen wirklich komplett trocken sein, sonst schimmeln sie!
* Lagere die Samen richtig: Bewahre die getrockneten Samen in einem luftdichten Behälter (z.B. einem kleinen Glas oder einer Filmdose) an einem kühlen, dunklen und trockenen Ort auf. So bleiben sie bis zu mehreren Jahren keimfähig. Beschrifte den Behälter unbedingt mit der Chilisorte und dem Datum!
Aussaat: Der Weg zum kleinen Chili-Pflänzchen
Jetzt haben wir unsere Samen und können mit der Aussaat beginnen. Hier sind die Schritte, die du beachten solltest:
1. Der richtige Zeitpunkt: Der beste Zeitpunkt für die Aussaat von Chili-Samen ist in der Regel von Januar bis März. So haben die Pflanzen genügend Zeit, um bis zum Sommer groß und stark zu werden.
2. Das richtige Substrat: Verwende am besten spezielle Anzuchterde. Diese ist nährstoffarm und locker, was die Keimung der Samen fördert. Du kannst auch Kokos-Quellerde verwenden. Vermeide normale Blumenerde, da diese oft zu viele Nährstoffe enthält und die Keimlinge verbrennen können.
3. Die Aussaatgefäße: Du kannst kleine Töpfe, Anzuchtschalen oder sogar Eierkartons verwenden. Wichtig ist, dass die Gefäße Löcher im Boden haben, damit überschüssiges Wasser ablaufen kann.
4. Die Aussaat: Fülle die Gefäße mit Anzuchterde und drücke sie leicht an. Lege dann die Chili-Samen mit etwas Abstand zueinander auf die Erde. Bedecke die Samen mit einer dünnen Schicht Erde (ca. 0,5 cm).
5. Bewässerung: Befeuchte die Erde vorsichtig mit einer Sprühflasche. Die Erde sollte feucht, aber nicht nass sein. Vermeide Staunässe!
6. Der richtige Standort: Stelle die Aussaatgefäße an einen warmen, hellen Ort. Die ideale Keimtemperatur liegt zwischen 22 und 28 Grad Celsius. Du kannst die Gefäße auch mit einer durchsichtigen Folie oder einem Deckel abdecken, um die Luftfeuchtigkeit zu erhöhen. Achte aber darauf, dass du regelmäßig lüftest, um Schimmelbildung zu vermeiden.
7. Geduld ist gefragt: Die Keimung von Chili-Samen kann je nach Sorte und Temperatur zwischen einer und drei Wochen dauern. Halte die Erde feucht und warte geduldig ab.
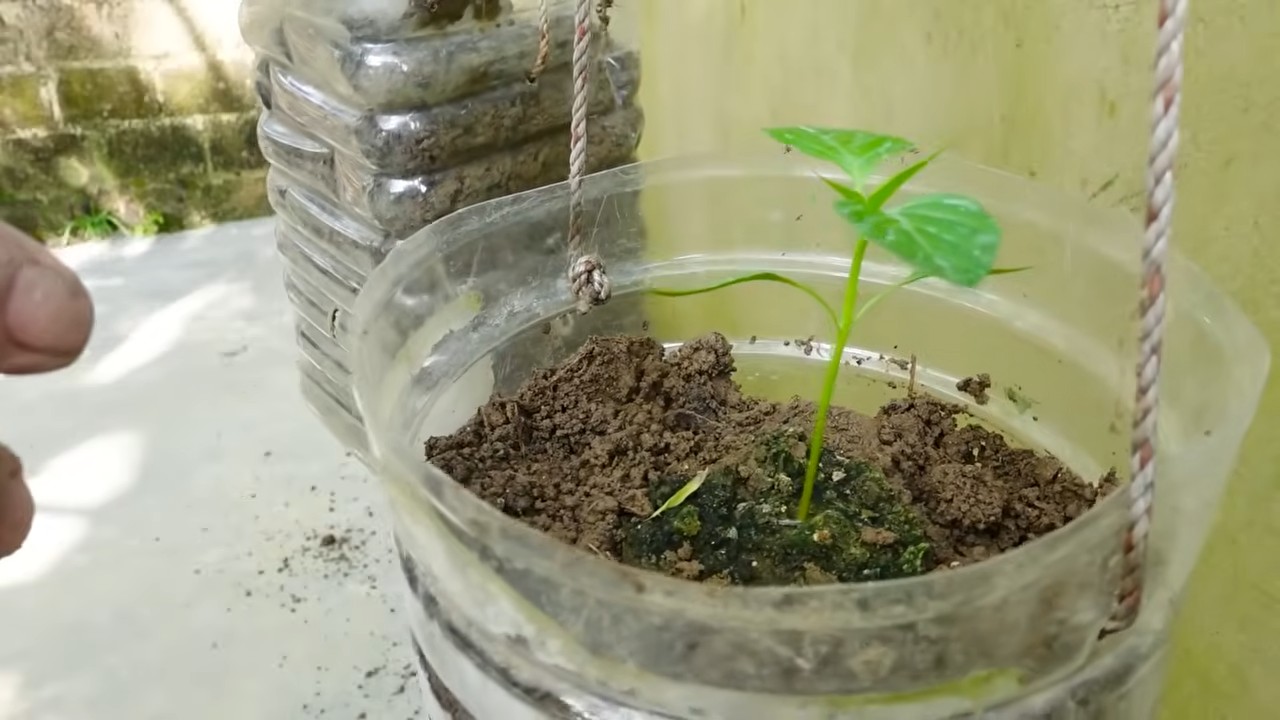
8. Pikieren: Sobald die Keimlinge ihre ersten richtigen Blätter (nach den Keimblättern) entwickelt haben, ist es Zeit zum Pikieren. Das bedeutet, dass du die kleinen Pflänzchen vorsichtig aus den Anzuchtgefäßen nimmst und in größere Töpfe umpflanzt. Verwende dafür normale Blumenerde. Achte darauf, dass du die Wurzeln nicht beschädigst.
Stecklingsvermehrung: Eine schnelle Methode für Ungeduldige
Wenn du nicht so lange warten möchtest, bis deine Chili-Pflanzen aus Samen gewachsen sind, kannst du sie auch über Stecklinge vermehren. Das geht schneller und ist besonders gut geeignet, wenn du eine bestimmte Sorte erhalten möchtest.
1. Der richtige Zeitpunkt: Die beste Zeit für die Stecklingsvermehrung ist im Frühjahr oder Sommer, wenn die Pflanzen aktiv wachsen.
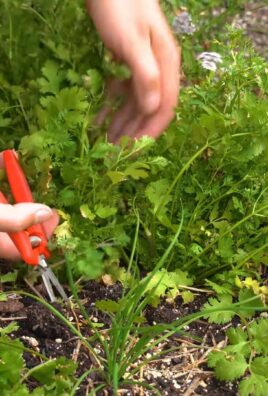
2. Die Auswahl der Stecklinge: Wähle gesunde, kräftige Triebe von deiner Chili-Pflanze aus. Die Triebe sollten ca. 10-15 cm lang sein und mindestens 2-3 Blattknoten haben.
3. Das Schneiden der Stecklinge: Schneide die Triebe mit einem scharfen Messer oder einer Schere direkt unterhalb eines Blattknotens ab. Entferne die unteren Blätter, so dass nur noch die oberen 2-3 Blätter übrig bleiben.
4. Die Bewurzelung: Es gibt verschiedene Möglichkeiten, Stecklinge zu bewurzeln:
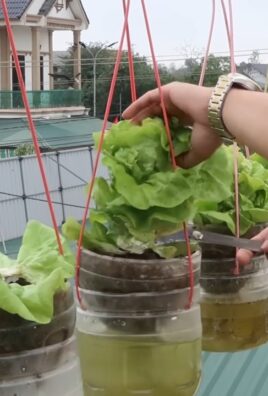
* Im Wasser: Stelle die Stecklinge in ein Glas Wasser. Achte darauf, dass nur der untere Teil des Stiels im Wasser ist und die Blätter nicht nass werden. Wechsle das Wasser regelmäßig. Nach einigen Tagen bis Wochen sollten sich Wurzeln bilden.
* In Anzuchterde: Stecke die Stecklinge direkt in Anzuchterde. Befeuchte die Erde gut und stelle die Stecklinge an einen warmen, hellen Ort. Du kannst die Stecklinge auch mit einer durchsichtigen Folie oder einem Deckel abdecken, um die Luftfeuchtigkeit zu erhöhen. Lüfte aber regelmäßig, um Schimmelbildung zu vermeiden.
* Mit Bewurzelungspulver: Tauche die Schnittfläche der Stecklinge in Bewurzelungspulver, bevor du sie in Anzuchterde steckst. Das Pulver fördert die Wurzelbildung.
5. Das Umpflanzen: Sobald die Stecklinge ausreichend Wurzeln gebildet haben, kannst du sie in größere Töpfe mit normaler Blumenerde umpflanzen.
Veredelung: Für Profis und Experimentierfreudige
Die Veredelung ist eine etwas anspruchsvollere Methode, um Chili-Pflanzen zu vermehren. Dabei werden zwei verschiedene Pflanzen miteinander verbunden, so dass sie zusammenwachsen. Das kann zum Beispiel sinnvoll sein, wenn du eine robuste Unterlage mit einer besonders schmackhaften Chili-Sorte kombinieren möchtest.
1. Die Auswahl der Pflanzen: Du brauchst eine Unterlage (die Pflanze, die die Wurzeln liefert) und einen Edelreiser (die Pflanze, die die Früchte liefert). Die Unterlage sollte robust und widerstandsfähig gegen Krankheiten sein. Der Edelreiser sollte die Chili-Sorte sein, die du vermehren möchtest.
2. Der richtige Zeitpunkt: Die beste Zeit für die Veredelung ist im Frühjahr, wenn die Pflanzen aktiv wachsen.
3. Die Veredelungsmethode: Es gibt verschiedene Veredelungsmethoden, z.B. die Geißfußveredelung oder die Kopulation. Informiere dich am besten im Internet oder in Fachbüchern über die verschiedenen Methoden und wähle diejenige aus, die dir am besten liegt.
4. Die Durchführung: Die Veredelung erfordert etwas Geschick und Übung. Schneide die Unterlage und den Edelreiser so zu, dass sie gut zusammenpassen. Verbinde die beiden Teile fest miteinander und fixiere sie mit einem Veredelungsband oder einer Klammer.
5. Die Nachsorge: Stelle die veredelte Pflanze an einen warmen, hellen Ort und halte die Erde feucht. Nach einigen Wochen sollten die beiden Teile zusammenwachsen sein. Entferne dann das Veredelungsband oder die Klammer.
Pflege der jungen Chili-Pflanzen: Damit sie groß und stark werden
Egal, welche Vermehrungsmethode du gewählt hast, die jungen Chili-Pflanzen brauchen jetzt die richtige Pflege, damit sie groß und stark werden.
* Licht: Chili-Pflanzen brauchen viel Licht, besonders in der Anz
Conclusion
So, there you have it! Mastering chili pepper plant propagation isn’t just about saving money; it’s about connecting with the growing process, understanding the life cycle of these fiery fruits, and ultimately, creating a sustainable source of delicious heat right in your own home or garden. This DIY trick is a must-try for anyone who loves chili peppers, whether you’re a seasoned gardener or a complete beginner. The satisfaction of nurturing a tiny seedling into a thriving plant, laden with peppers you can use in your favorite dishes, is truly unparalleled.
Think about the possibilities! Imagine rows of vibrant chili pepper plants, each one a testament to your green thumb. You could cultivate a rainbow of colors and heat levels, from mild jalapeños to scorching habaneros, all propagated from a single, beloved plant. This method allows you to preserve your favorite varieties and experiment with different growing conditions to see how they affect the flavor and yield.
Beyond the basic method outlined, there are plenty of ways to customize your chili pepper plant propagation. For example, you could experiment with different rooting mediums. While we recommended a well-draining potting mix, you could also try using perlite, vermiculite, or even a combination of these. Some gardeners swear by using rooting hormones to speed up the process, although it’s not strictly necessary. Another variation is to try propagating from stem cuttings instead of seeds. This method can be faster and allows you to clone an exact replica of the parent plant, ensuring you get the same pepper characteristics.
Don’t be afraid to get creative and adapt the process to suit your own needs and preferences. The most important thing is to provide your cuttings or seedlings with the right conditions: warmth, moisture, and plenty of light. With a little patience and care, you’ll be rewarded with a bountiful harvest of chili peppers.
We wholeheartedly encourage you to give this DIY trick a try. It’s a rewarding and cost-effective way to expand your chili pepper collection and deepen your connection with the natural world. And most importantly, don’t forget to share your experiences with us! We’d love to hear about your successes, your challenges, and any tips or tricks you’ve discovered along the way. Post pictures of your propagated chili pepper plants on social media and tag us. Let’s create a community of chili pepper enthusiasts who are passionate about growing their own food and sharing their knowledge with others. Happy propagating!
Frequently Asked Questions (FAQ)
1. What is the best time of year to propagate chili pepper plants?
The ideal time to propagate chili pepper plants is in the spring or early summer. This is when the plants are actively growing and the weather is warm and sunny, providing the optimal conditions for rooting and growth. However, with the right indoor setup (grow lights and a warm environment), you can propagate chili peppers year-round. Just be aware that the process might be slower during the colder months.
2. How long does it take for chili pepper cuttings to root?
The time it takes for chili pepper cuttings to root can vary depending on several factors, including the variety of chili pepper, the temperature, and the humidity. Generally, you can expect to see roots forming within 2-4 weeks. It’s important to be patient and avoid disturbing the cuttings too much during this time. You can gently tug on the cutting after a couple of weeks to feel if there is resistance, indicating root development.
3. What kind of soil should I use for propagating chili pepper plants?
A well-draining potting mix is essential for propagating chili pepper plants. Avoid using garden soil, as it can be too heavy and may contain pathogens that can harm the cuttings. A good mix would be a combination of peat moss, perlite, and vermiculite. You can also use a commercially available seed starting mix. The key is to ensure that the soil is light and airy, allowing for good drainage and aeration.
4. How much light do chili pepper cuttings need?
Chili pepper cuttings need bright, indirect light to thrive. Avoid placing them in direct sunlight, as this can scorch the leaves. A north-facing window or a spot under a grow light is ideal. If you’re using a grow light, keep it about 6-12 inches away from the cuttings and provide 12-16 hours of light per day.
5. How often should I water chili pepper cuttings?
It’s important to keep the soil consistently moist, but not waterlogged. Water the cuttings when the top inch of soil feels dry to the touch. Avoid overwatering, as this can lead to root rot. A good way to check the moisture level is to stick your finger into the soil. If it feels dry, it’s time to water.
6. Can I propagate chili pepper plants from seeds I saved from store-bought peppers?
Yes, you can propagate chili pepper plants from seeds saved from store-bought peppers, but there are a few things to keep in mind. First, the peppers may be hybrids, which means that the offspring may not be true to type. In other words, the peppers you get from the new plants may not be exactly the same as the peppers you saved the seeds from. Second, some store-bought peppers may have been treated with chemicals that can affect seed germination. Despite these potential issues, it’s still worth a try! Just be aware that the results may vary.
7. What are some common problems I might encounter when propagating chili pepper plants?
Some common problems you might encounter include root rot, damping off, and pest infestations. Root rot is caused by overwatering and can be prevented by using a well-draining potting mix and avoiding overwatering. Damping off is a fungal disease that can kill seedlings and can be prevented by using sterile potting mix and providing good ventilation. Pest infestations can be controlled by using insecticidal soap or neem oil.
8. How do I harden off my chili pepper seedlings before transplanting them outdoors?
Hardening off is the process of gradually acclimating your chili pepper seedlings to outdoor conditions before transplanting them. This is important to prevent shock and ensure that the plants can thrive in their new environment. To harden off your seedlings, start by placing them outdoors in a sheltered location for a few hours each day, gradually increasing the amount of time they spend outdoors over a period of 1-2 weeks. Also, gradually expose them to more sunlight and wind.
9. What kind of fertilizer should I use for my chili pepper plants?
Chili pepper plants benefit from a balanced fertilizer that is rich in nitrogen, phosphorus, and potassium. A good option is a 10-10-10 fertilizer, applied according to the package directions. You can also use a fertilizer specifically formulated for tomatoes or peppers. Avoid over-fertilizing, as this can lead to excessive foliage growth and reduced pepper production.
10. How can I increase the yield of my chili pepper plants?
There are several things you can do to increase the yield of your chili pepper plants. First, make sure they are getting plenty of sunlight (at least 6-8 hours per day). Second, provide them with well-draining soil and regular watering. Third, fertilize them regularly with a balanced fertilizer. Fourth, prune them to encourage branching and more pepper production. Finally, protect them from pests and diseases. By following these tips, you can maximize the yield of your chili pepper plants and enjoy a bountiful harvest.
Leave a Comment