
Chili pepper soil bag growing – sounds intriguing, right? I’m so excited to share this incredibly simple and rewarding DIY trick with you! Forget those complicated gardening setups and expensive pots. We’re going back to basics, embracing a method that’s both budget-friendly and surprisingly effective for cultivating fiery chili peppers.
Humans have been cultivating chili peppers for over 6,000 years, with evidence suggesting their domestication began in South America. From adding a kick to ancient cuisines to being used in traditional medicines, chili peppers have a rich and vibrant history. Now, you can easily participate in this long-standing tradition, even if you have limited space or gardening experience.
Why is this chili pepper soil bag growing method so essential? Well, let’s face it, not everyone has a sprawling garden. Apartment dwellers, balcony enthusiasts, and even those with limited mobility can struggle to grow their own fresh produce. This DIY hack eliminates those barriers. It’s a fantastic way to recycle those large soil bags, reduce waste, and enjoy a bountiful harvest of delicious chili peppers right at your doorstep. Plus, it’s incredibly satisfying to nurture your own plants and add a personal touch to your meals. So, let’s dive in and discover how easy it is to grow your own chili peppers using this simple yet effective technique!
Chili-Pflanzen im Pflanzsack: Dein DIY-Guide für eine reiche Ernte
Hey Chili-Liebhaber! Du träumst von einer reichen Chili-Ernte direkt von deinem Balkon oder deiner Terrasse? Dann bist du hier genau richtig! Ich zeige dir, wie du mit einem Pflanzsack und ein paar einfachen Tricks deine eigenen Chili-Pflanzen erfolgreich anbauen kannst. Keine Angst, es ist einfacher als du denkst!
Was du für dein Chili-Pflanzsack-Projekt brauchst:
* Ein Pflanzsack: Wähle einen Pflanzsack mit ausreichend Volumen (mindestens 20 Liter pro Pflanze). Stoffpflanzsäcke sind atmungsaktiver und fördern ein gesundes Wurzelwachstum.
* Chili-Samen oder Jungpflanzen: Du kannst entweder mit Samen starten oder bereits vorgezogene Jungpflanzen kaufen. Ich persönlich finde es spannend, die Pflanzen von Anfang an zu begleiten.
* Hochwertige Pflanzerde: Verwende spezielle Gemüseerde oder mische deine eigene Erde mit Kompost und Perlit für eine gute Drainage.
* Dünger: Chili-Pflanzen sind Starkzehrer und benötigen regelmäßige Düngergaben. Flüssigdünger für Tomaten oder Chili ist ideal.
* Gießkanne oder Schlauch: Zum Bewässern deiner Pflanzen.
* Pflanzschaufel: Zum Umtopfen der Pflanzen.
* Pflanzstäbe (optional): Für größere Chili-Sorten, die Unterstützung benötigen.
* Geduld und Liebe: Das Wichtigste!
Schritt-für-Schritt-Anleitung: Chili-Pflanzen im Pflanzsack anbauen
1. Vorbereitung des Pflanzsacks
1. Pflanzsack auswählen: Entscheide dich für einen Pflanzsack, der groß genug für deine Chili-Sorte ist. Bedenke, dass größere Pflanzen mehr Platz für ihre Wurzeln benötigen. Ein Pflanzsack mit mindestens 20 Litern Volumen pro Pflanze ist ein guter Richtwert.
2. Pflanzsack vorbereiten: Stelle den Pflanzsack an den Ort, wo deine Chili-Pflanzen später stehen sollen. Gefüllte Pflanzsäcke sind schwer zu bewegen.
3. Drainage verbessern: Um Staunässe zu vermeiden, kannst du eine Schicht Blähton oder Kies auf den Boden des Pflanzsacks geben. Das sorgt für eine bessere Drainage.
2. Chili-Samen aussäen (optional)
Wenn du mit Samen startest, musst du diese zunächst vorziehen.
1. Aussaatgefäße vorbereiten: Fülle kleine Anzuchttöpfe oder eine Anzuchtschale mit Anzuchterde.
2. Samen aussäen: Lege die Chili-Samen in die Erde und bedecke sie leicht mit Erde.
3. Feucht halten: Befeuchte die Erde vorsichtig mit einer Sprühflasche. Die Erde sollte feucht, aber nicht nass sein.
4. Warm stellen: Stelle die Anzuchttöpfe an einen warmen Ort (ca. 22-25°C). Ein Mini-Gewächshaus oder eine Heizmatte kann helfen, die Temperatur konstant zu halten.
5. Licht: Sobald die Samen keimen, benötigen die Keimlinge viel Licht. Stelle sie an einen hellen Ort oder verwende eine Pflanzenlampe.
6. Pikieren: Wenn die Keimlinge ihre ersten richtigen Blätter (nach den Keimblättern) entwickelt haben, kannst du sie in größere Töpfe pikieren.
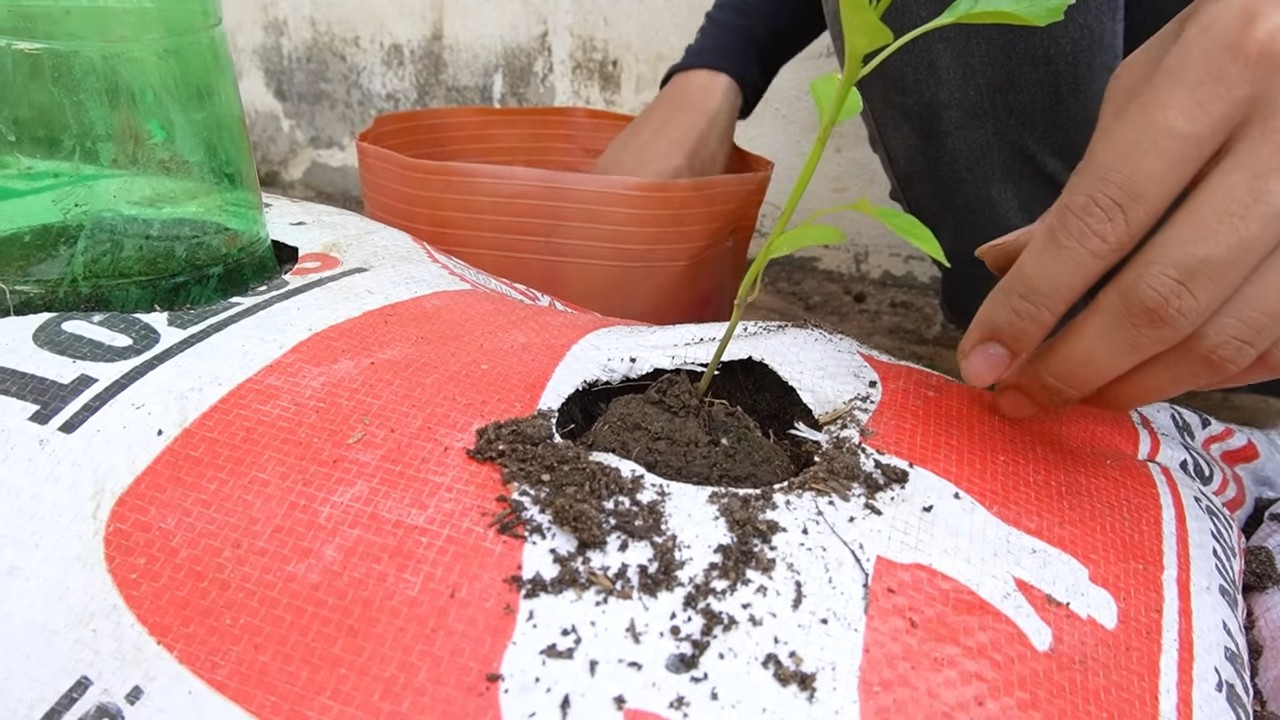
3. Chili-Pflanzen einpflanzen
1. Pflanzsack befüllen: Fülle den Pflanzsack mit Pflanzerde. Lasse oben einen Rand von ca. 5 cm frei.
2. Pflanzlöcher vorbereiten: Grabe mit einer Pflanzschaufel Löcher in die Erde, die groß genug für die Wurzelballen der Chili-Pflanzen sind.
3. Pflanzen einsetzen: Nimm die Chili-Pflanzen vorsichtig aus ihren Töpfen und setze sie in die Pflanzlöcher. Achte darauf, dass die Oberseite des Wurzelballens mit der Erdoberfläche abschließt.
4. Mit Erde auffüllen: Fülle die Pflanzlöcher mit Erde auf und drücke sie leicht an.
5. Angießen: Gieße die Pflanzen gründlich an.
4. Pflege deiner Chili-Pflanzen
1. Bewässerung: Chili-Pflanzen benötigen regelmäßige Bewässerung, besonders während der heißen Sommermonate. Die Erde sollte immer leicht feucht sein, aber nicht nass. Vermeide Staunässe.
2. Düngung: Dünge deine Chili-Pflanzen regelmäßig mit einem Flüssigdünger für Tomaten oder Chili. Beginne mit der Düngung ca. 2-3 Wochen nach dem Einpflanzen. Befolge die Anweisungen auf der Düngerpackung.
3. Standort: Chili-Pflanzen lieben die Sonne! Stelle den Pflanzsack an einen sonnigen Standort mit mindestens 6 Stunden direkter Sonneneinstrahlung pro Tag.
4. Schutz vor Schädlingen: Kontrolliere deine Pflanzen regelmäßig auf Schädlinge wie Blattläuse oder Spinnmilben. Bei Bedarf kannst du biologische Schädlingsbekämpfungsmittel einsetzen.
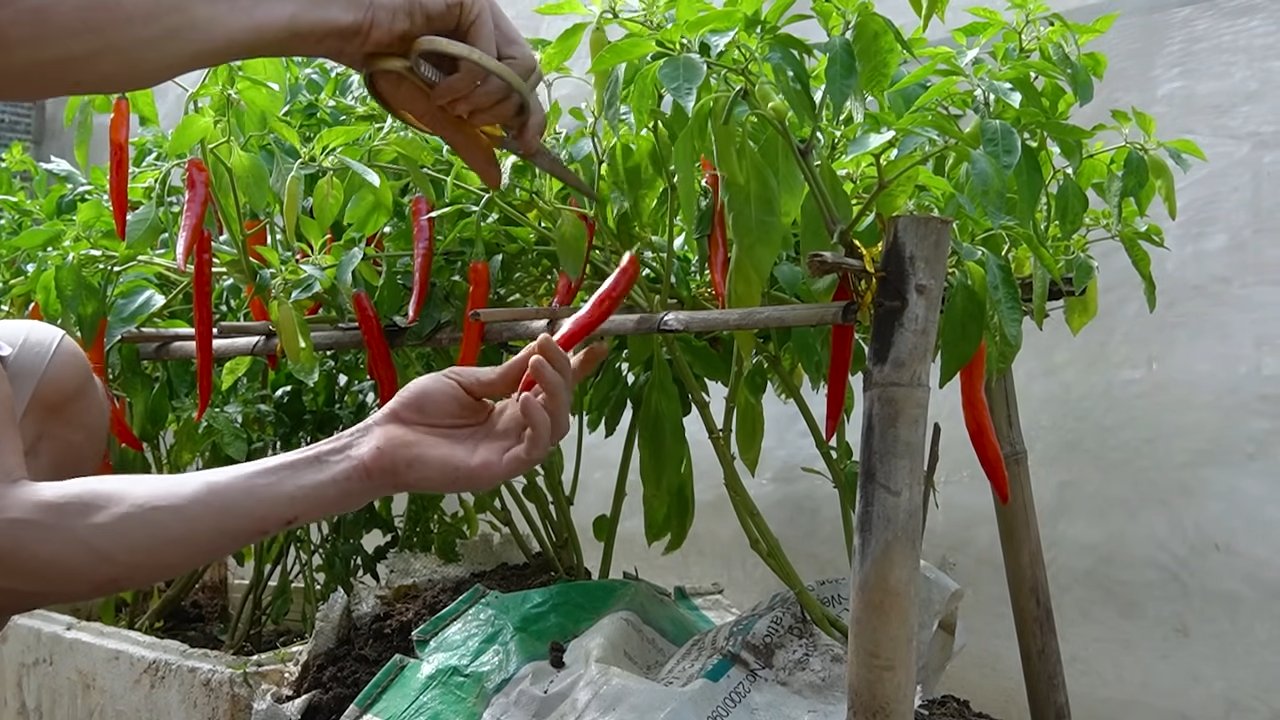
5. Ausgeizen (optional): Bei einigen Chili-Sorten kann es sinnvoll sein, die Seitentriebe (Geiztriebe) auszugeizen, um die Bildung von Früchten zu fördern. Informiere dich, ob deine Chili-Sorte ausgegeizt werden sollte.
6. Stützen (optional): Größere Chili-Sorten können durch das Gewicht der Früchte umknicken. Verwende Pflanzstäbe, um die Pflanzen zu stützen.
7. Ernte: Die Erntezeit hängt von der Chili-Sorte ab. Die Früchte sind reif, wenn sie ihre endgültige Farbe erreicht haben und sich leicht vom Stiel lösen lassen.
Zusätzliche Tipps für eine erfolgreiche Chili-Ernte
* Sortenwahl: Wähle Chili-Sorten, die für den Anbau im Pflanzsack geeignet sind. Kleinere, buschige Sorten sind oft besser geeignet als sehr große, ausladende Sorten.
* Bodenverbesserung: Mische Kompost oder Hornspäne unter die Pflanzerde, um die Nährstoffversorgung zu verbessern.
* Mulchen: Eine Mulchschicht aus Stroh oder Holzhackschnitzeln hilft, die Feuchtigkeit im Boden zu halten und Unkraut zu unterdrücken.
* Regelmäßige Kontrolle: Kontrolliere deine Pflanzen regelmäßig auf Schädlinge und Krankheiten. Je früher du Probleme erkennst, desto besser kannst du sie bekämpfen.
* Bestäubung: Chili-Pflanzen sind Selbstbestäuber, aber du kannst die Bestäubung unterstützen, indem du die Blüten vorsichtig schüttelst oder mit einem Pinsel bestäubst. Besonders bei Indoor-Anbau ist das hilfreich.
* Überwinterung: Wenn du deine Chili-Pflanzen überwintern möchtest, schneide sie im Herbst zurück und stelle sie an einen hellen, kühlen Ort (ca. 10-15°C). Gieße sie nur sparsam.
Häufige Fehler beim Chili-Anbau im Pflanzsack und wie du sie vermeidest
* Zu wenig Wasser: Chili-Pflanzen benötigen regelmäßige Bewässerung, besonders während der heißen Sommermonate. Achte darauf, dass die Erde immer leicht feucht ist.
* Zu viel Wasser: Staunässe kann zu Wurzelfäule führen. Achte auf eine gute Drainage und vermeide es, die Pflanzen zu übergießen.
* Falscher Standort: Chili-Pflanzen benötigen viel Sonne. Stelle den Pflanzsack an einen sonnigen Standort mit mindestens 6 Stunden direkter Sonneneinstrahlung pro Tag.
* Falsche Düngung: Chili-Pflanzen sind Starkzehrer und benötigen regelmäßige Düngergaben. Verwende einen speziellen Dünger für Tomaten oder Chili und befolge die Anweisungen auf der Düngerpackung.
* Schädlinge und Krankheiten: Kontrolliere deine Pflanzen regelmäßig auf Schädlinge und Krankheiten. Je früher du Probleme erkennst, desto besser kannst du sie bekämpfen.
Chili-Sorten für den Pflanzsack: Meine Empfehlungen
* Jalapeño: Eine klassische Chili-Sorte mit milderer Schärfe
Conclusion
So, there you have it! Creating your own chili pepper soil bag growing system is not just a cost-effective alternative to pre-made solutions, it’s a gateway to a more rewarding and personalized gardening experience. We’ve walked you through the steps, highlighting the benefits of tailoring your soil mix to the specific needs of your chili plants. From controlling drainage to ensuring optimal nutrient availability, this DIY approach puts you firmly in the driver’s seat.
Why is this a must-try? Because it empowers you to cultivate healthier, more vibrant chili plants that yield a more abundant and flavorful harvest. Store-bought mixes, while convenient, often lack the specific amendments that chili peppers crave. By crafting your own soil bag, you can incorporate ingredients like perlite for aeration, compost for slow-release nutrients, and even a touch of bone meal for phosphorus, all contributing to robust root development and fiery fruit production.
But the beauty of this method lies in its adaptability. Feel free to experiment with variations! For example, if you’re growing super-hot varieties like ghost peppers or Scotch bonnets, consider adding a small amount of Epsom salts to the mix to provide magnesium, which can enhance pepper production. Or, if you’re dealing with heavy clay soil in your garden, incorporate more coarse sand or gravel into your bag to improve drainage and prevent waterlogging. You can also try different types of compost, such as worm castings or mushroom compost, to further enrich the soil and boost microbial activity.
Don’t be afraid to get creative and tailor the recipe to your specific growing conditions and chili pepper varieties. The key is to observe your plants closely and adjust the mix as needed. Are the leaves turning yellow? Perhaps they need more nitrogen. Are the peppers small and underdeveloped? They might benefit from more phosphorus.
We are confident that once you experience the satisfaction of growing your own chili peppers in a custom-made soil bag, you’ll never go back to store-bought mixes again. The vibrant colors, the intense flavors, and the sheer pride of harvesting your own homegrown chilies are all within your reach.
So, what are you waiting for? Gather your supplies, follow our simple steps, and embark on your own chili pepper soil bag growing adventure. We encourage you to try this DIY trick and share your experiences with us! Post photos of your chili plants, share your favorite soil mix variations, and let us know what challenges you faced and how you overcame them. Your insights will not only inspire other gardeners but also help us refine and improve this method for future generations of chili pepper enthusiasts. Let’s build a community of passionate growers, one chili pepper soil bag at a time! Happy growing!
FAQ
What are the benefits of using a soil bag for growing chili peppers?
Using a soil bag offers several advantages over traditional in-ground planting or using pots. First, it provides excellent drainage, which is crucial for chili peppers as they don’t like to sit in soggy soil. The bag allows excess water to escape, preventing root rot and other moisture-related problems. Second, it’s portable. You can easily move the bag to a sunnier location or protect it from frost or extreme weather. Third, it’s a contained environment, which means you have more control over the soil composition and nutrient levels. This allows you to create the perfect growing medium specifically tailored to the needs of your chili peppers. Finally, soil bags are generally more affordable than large pots, making them a budget-friendly option for gardeners.
What type of soil is best for growing chili peppers in a soil bag?
Chili peppers thrive in well-draining, nutrient-rich soil with a slightly acidic to neutral pH (around 6.0 to 7.0). A good mix typically includes a combination of:
* **Potting mix:** Provides a light and airy base.
* **Compost:** Adds organic matter, improves drainage, and provides slow-release nutrients.
* **Perlite or vermiculite:** Enhances drainage and aeration.
* **Coco coir:** Helps retain moisture while still providing good drainage.
You can also add amendments like bone meal for phosphorus, which promotes root development and flowering, and Epsom salts for magnesium, which can enhance pepper production. Avoid using garden soil directly in the bag, as it can be too heavy and compact, leading to drainage problems.
How often should I water my chili peppers grown in a soil bag?
Watering frequency depends on several factors, including the weather, the size of the plant, and the type of soil mix you’re using. Generally, you should water your chili peppers when the top inch of soil feels dry to the touch. Avoid overwatering, as this can lead to root rot. When you water, water deeply until water drains out of the bottom of the bag. During hot, dry weather, you may need to water daily, while during cooler, wetter periods, you may only need to water every few days. Monitor your plants closely and adjust your watering schedule accordingly.
How much sunlight do chili peppers need when grown in a soil bag?
Chili peppers need at least 6-8 hours of direct sunlight per day to thrive. Choose a location for your soil bag that receives plenty of sunlight throughout the day. If you live in a particularly hot climate, you may need to provide some afternoon shade to prevent the plants from getting scorched. You can also use grow lights to supplement sunlight, especially if you’re starting your plants indoors or if you live in an area with limited sunlight.
What kind of fertilizer should I use for chili peppers in a soil bag?
Chili peppers are heavy feeders and benefit from regular fertilization. Start with a balanced fertilizer (e.g., 10-10-10) when planting, and then switch to a fertilizer with a higher phosphorus content (e.g., 5-10-5) once the plants start to flower. Phosphorus promotes flowering and fruit production. You can also use organic fertilizers like compost tea or fish emulsion. Apply fertilizer according to the package directions, and avoid over-fertilizing, as this can burn the roots.
How do I prevent pests and diseases from affecting my chili peppers in a soil bag?
Prevention is key when it comes to pests and diseases. Start by using a high-quality soil mix and providing your plants with proper care, including adequate sunlight, water, and nutrients. Regularly inspect your plants for signs of pests or diseases. Common pests that affect chili peppers include aphids, spider mites, and whiteflies. You can control these pests with insecticidal soap, neem oil, or by introducing beneficial insects like ladybugs. Common diseases include fungal infections like powdery mildew and blossom end rot. You can prevent these diseases by ensuring good air circulation, avoiding overwatering, and using a fungicide if necessary.
Can I reuse the soil bag for growing chili peppers next year?
Yes, you can reuse the soil bag, but it’s important to amend the soil before planting again. Remove any old plant debris and add fresh compost and other amendments to replenish the nutrients. You may also want to sterilize the soil to kill any lingering pests or diseases. You can do this by solarizing the soil (covering it with clear plastic in the sun for several weeks) or by using a soil sterilizer.
What are some common problems I might encounter when growing chili peppers in a soil bag?
Some common problems include:
* **Blossom end rot:** Caused by calcium deficiency. Add calcium to the soil or use a calcium-rich fertilizer.
* **Aphids:** Small, sap-sucking insects. Control with insecticidal soap or neem oil.
* **Leaf curl:** Can be caused by aphids, viruses, or environmental stress. Address the underlying cause.
* **Lack of fruit:** Can be caused by insufficient sunlight, poor pollination, or nutrient deficiencies. Ensure adequate sunlight, hand-pollinate if necessary, and fertilize appropriately.
By being aware of these potential problems and taking proactive steps to prevent or address them, you can ensure a successful chili pepper harvest.
Leave a Comment