
Clean Burnt Pots and Pans – the bane of every home cook’s existence! Let’s face it, we’ve all been there. You’re whipping up a culinary masterpiece, get distracted by a phone call or a chat with a friend, and suddenly… the unmistakable smell of something burning fills the air. Disaster! Now you’re left with a pot or pan that looks like it’s been through a war zone. But don’t despair! Before you resign yourself to endless scrubbing or, worse, throwing it away, I’m here to tell you there’s hope.
Throughout history, resourceful cooks have sought ways to salvage their cookware. From ancient civilizations using natural abrasives like sand and ash to modern innovations in cleaning products, the quest to clean burnt pots and pans has been a constant. But you don’t need harsh chemicals or expensive gadgets.
Why is this DIY trick so essential? Because nobody wants to spend hours scrubbing away at stubborn burnt food! Not only is it time-consuming and frustrating, but aggressive scrubbing can also damage the surface of your precious cookware. This article is your guide to simple, effective, and budget-friendly methods to restore your burnt pots and pans to their former glory. I’m going to share my favorite DIY hacks that will save you time, money, and a whole lot of elbow grease. Get ready to say goodbye to burnt-on messes and hello to sparkling clean cookware!

How to Banish Burnt Food: My Foolproof Guide to Cleaning Burnt Pots and Pans
Okay, let’s face it, we’ve all been there. You’re multitasking, maybe catching up on your favorite show while cooking, and BAM! Suddenly, you smell that dreaded burnt odor. You rush to the stove, and there it is: a pot or pan with a thick, black, stubborn layer of burnt food clinging to the bottom. Don’t panic! Before you resign yourself to scrubbing for hours (or worse, throwing it away!), I’m going to share my tried-and-true methods for rescuing even the most severely burnt cookware. These techniques are gentle on your pots and pans, and they use common household ingredients you probably already have.
Understanding the Enemy: Burnt Food
Before we dive into the cleaning methods, it’s helpful to understand what we’re dealing with. Burnt food is essentially carbonized organic matter. The intense heat causes the food to undergo a chemical change, creating a hard, crusty layer that’s incredibly difficult to remove. The key to cleaning it effectively is to loosen this bond between the burnt food and the surface of the pan. We’ll achieve this through a combination of soaking, boiling, and gentle abrasion.
Method 1: The Baking Soda and Vinegar Power Couple
This is my go-to method for most burnt pots and pans. It’s effective, gentle, and uses ingredients that are readily available.
What You’ll Need:
* Baking soda
* White vinegar
* Water
* A non-abrasive sponge or scrub brush
* A soft cloth
Step-by-Step Instructions:
1. Assess the Damage: Take a good look at the burnt area. How thick is the layer? This will help you determine how long to soak and boil the solution.
2. Cover the Burnt Area: Pour a generous layer of baking soda directly onto the burnt food. You want to completely cover the affected area. Don’t be shy!
3. Vinegar Time!: Slowly pour white vinegar over the baking soda. You’ll see it fizz and bubble – that’s the magic happening! The chemical reaction between the baking soda and vinegar helps to loosen the burnt food.
4. Let it Fizz: Allow the mixture to fizz and bubble for a few minutes. This gives the baking soda and vinegar time to work their magic.
5. Add Water and Boil: Add enough water to cover the burnt area completely. Place the pot or pan on the stove and bring the mixture to a boil.
6. Simmer Gently: Once boiling, reduce the heat to a simmer and let it simmer for about 10-15 minutes. Keep an eye on it to make sure the water doesn’t boil away completely. You might see some of the burnt food starting to lift off the bottom.
7. Cool Down: Remove the pot or pan from the heat and let it cool completely. This is important! Trying to scrub a hot pan is not only dangerous but also less effective.
8. Scrub Gently: Once the pan is cool enough to handle, use a non-abrasive sponge or scrub brush to gently scrub away the loosened burnt food. You should find that it comes off much easier than before.
9. Repeat if Necessary: If some stubborn burnt food remains, repeat steps 2-8. Sometimes, a second round is all it takes to completely remove the burnt residue.
10. Wash and Dry: Once you’ve removed all the burnt food, wash the pot or pan with soap and water as usual. Dry it thoroughly with a soft cloth to prevent water spots.
Method 2: The Salt and Potato Powerhouse
This method is surprisingly effective, especially for stainless steel pots and pans. The salt acts as a gentle abrasive, while the potato helps to lift the burnt food.
What You’ll Need:
* Coarse salt (like kosher salt or sea salt)
* A raw potato (cut in half)
* Water
* A non-abrasive sponge or scrub brush
* A soft cloth
Step-by-Step Instructions:
1. Coat with Salt: Sprinkle a generous layer of coarse salt over the burnt area of the pot or pan. Make sure the entire burnt surface is covered.
2. Potato Power: Take a raw potato half and use it as a scrubber. With the cut side down, rub the potato firmly over the salt and the burnt food. The potato’s natural acids and the salt’s abrasive texture will help to loosen the burnt residue.
3. Add Water (If Needed): If the potato starts to dry out, add a little bit of water to the pan to keep it moist. This will help the potato glide more easily and prevent it from sticking.
4. Scrub, Scrub, Scrub: Continue scrubbing with the potato for several minutes, applying firm pressure. You should start to see the burnt food lifting off the surface.
5. Rinse and Repeat: Rinse the pan with water to remove the loosened burnt food and salt. If some stubborn areas remain, repeat steps 2-4.
6. Final Scrub: Use a non-abrasive sponge or scrub brush to give the pan a final scrub. This will remove any remaining residue and leave the surface clean.
7. Wash and Dry: Wash the pot or pan with soap and water as usual. Dry it thoroughly with a soft cloth.
Method 3: The Boiling Water and Dish Soap Solution
This is a simpler method that works well for less severe cases of burnt food. It’s a good first step to try before resorting to more aggressive techniques.
What You’ll Need:
* Dish soap
* Water
* A non-abrasive sponge or scrub brush
* A soft cloth
Step-by-Step Instructions:
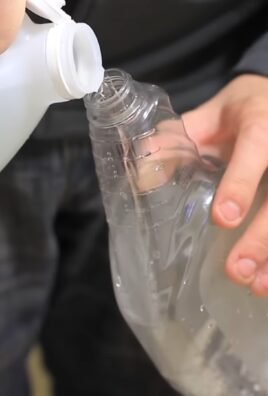
1. Fill with Water: Fill the burnt pot or pan with enough water to completely cover the burnt area.
2. Add Dish Soap: Add a generous squirt of dish soap to the water.
3. Boil Away: Place the pot or pan on the stove and bring the water to a boil.
4. Simmer and Scrape: Let the soapy water simmer for about 15-20 minutes. As the water simmers, use a wooden spoon or spatula to gently scrape the bottom of the pan. You might see some of the burnt food starting to lift off.
5. Cool and Scrub: Remove the pot or pan from the heat and let it cool slightly. Once it’s cool enough to handle, use a non-abrasive sponge or scrub brush to scrub away the loosened burnt food.
6. Wash and Dry: Wash the pot or pan with soap and water as usual. Dry it thoroughly with a soft cloth.
Method 4: The Dryer Sheet Secret Weapon
This might sound strange, but dryer sheets can actually help to loosen burnt food! This method works best for pots and pans that have a non-stick coating.
What You’ll Need:
* Dryer sheets (used or new)
* Water
* A non-abrasive sponge or scrub brush
* A soft cloth
Step-by-Step Instructions:
1. Line the Pan: Place a dryer sheet (or several, depending on the size of the pan) over the burnt area.
2. Fill with Water: Fill the pot or pan with enough water to completely cover the dryer sheet and the burnt food.
3. Soak Overnight: Let the pot or pan soak overnight. The chemicals in the dryer sheet will help to loosen the burnt residue.
4. Scrub Gently: The next day, remove the dryer sheet and use a non-abrasive sponge or scrub brush to gently scrub away the loosened burnt food.
5. Wash and Dry: Wash the pot or pan with soap and water as usual. Dry it thoroughly with a soft cloth.
Important Considerations and Tips:
* Pan Material Matters: Different cleaning methods are better suited for different types of cookware. For example, abrasive cleaners can scratch non-stick surfaces, while harsh chemicals can damage cast iron. Always check the manufacturer’s instructions before using any cleaning method.
* Avoid Abrasive Cleaners: Steel wool, scouring pads, and other abrasive cleaners can scratch and damage your pots and pans. Stick to non-abrasive sponges, scrub brushes, and gentle cleaning solutions.
* Don’t Use Metal Utensils: When scraping burnt food, avoid using metal utensils, as they can scratch the surface of the pan. Use wooden spoons, spatulas, or silicone utensils instead.
* Prevention is Key: The best way to avoid burnt pots and pans is to prevent food from burning in the first place. Keep a close eye on your cooking, stir frequently, and use the appropriate heat setting.
* Cast Iron Care: For cast iron, avoid using soap unless absolutely necessary, as it can

Conclusion
So, there you have it! This simple, yet incredibly effective, DIY trick for cleaning burnt pots and pans is a game-changer in the kitchen. Forget spending hours scrubbing tirelessly or resorting to harsh chemicals that can damage your cookware and potentially leach harmful substances into your food. This method, using readily available household ingredients, offers a gentle yet powerful solution to restore your beloved pots and pans to their former glory.
Why is this a must-try? Because it saves you time, money, and effort. Think about all the times you’ve considered throwing away a perfectly good pan just because it was covered in stubborn burnt residue. This DIY trick breathes new life into those neglected kitchen essentials, extending their lifespan and reducing waste. Plus, it’s a much healthier alternative to harsh chemical cleaners, ensuring a safer cooking environment for you and your family.
But the beauty of this method lies not only in its effectiveness but also in its adaptability. Feel free to experiment with variations to suit your specific needs and preferences. For instance, if you’re dealing with particularly stubborn burnt-on food, you can increase the amount of baking soda or vinegar used. You can also let the mixture simmer for a longer period, allowing it to penetrate and loosen the burnt residue more effectively. Another variation involves adding a few drops of lemon essential oil to the simmering water for a refreshing scent and added cleaning power. Some people also swear by using a dryer sheet soaked in warm water to gently scrub away the loosened residue after simmering.
Don’t be afraid to get creative and find what works best for you and your cookware. The key is to be patient and persistent. Remember, even the most challenging burnt messes can be conquered with a little bit of elbow grease and the power of this amazing DIY trick.
We are confident that once you try this method, you’ll be amazed by the results. It’s a simple, cost-effective, and environmentally friendly way to keep your pots and pans looking their best. So, ditch the harsh chemicals and embrace the power of DIY!
We wholeheartedly encourage you to try this clean burnt pots and pans method and share your experience with us. Let us know in the comments below how it worked for you, what variations you tried, and any tips or tricks you discovered along the way. Your feedback is invaluable and helps us refine and improve our recipes and techniques. Together, we can create a community of happy, clean-pan-loving cooks!
Frequently Asked Questions (FAQ)
1. What types of pots and pans can I use this DIY cleaning method on?
This method is generally safe for most types of pots and pans, including stainless steel, enamel-coated cast iron, and even some non-stick surfaces. However, it’s always a good idea to test a small, inconspicuous area first, especially if you’re unsure about the material of your cookware. Avoid using abrasive scrubbers on non-stick surfaces, as they can damage the coating. For cast iron, be sure to re-season the pan after cleaning to prevent rusting.
2. Can I use this method on aluminum pots and pans?
While this method can be used on aluminum pots and pans, it’s important to be cautious. Vinegar can sometimes react with aluminum, causing discoloration or pitting. If you choose to use this method on aluminum, use a diluted vinegar solution and avoid prolonged simmering. Rinse thoroughly after cleaning.
3. How much baking soda and vinegar should I use?
The recommended ratio is typically 1 tablespoon of baking soda and 1/2 cup of vinegar per pot or pan. However, you can adjust the amounts depending on the severity of the burnt residue. For heavily burnt pots and pans, you may need to double or even triple the amounts.
4. How long should I simmer the mixture?
The simmering time will vary depending on the severity of the burnt residue. Start with 15 minutes and check the pot or pan periodically. If the burnt residue is still stubborn, continue simmering for another 15-30 minutes. In some cases, you may need to simmer for up to an hour.
5. What if the burnt residue is still stuck after simmering?
If the burnt residue is still stuck after simmering, don’t despair! Let the pot or pan cool slightly, then use a non-abrasive sponge or scrubber to gently scrub away the loosened residue. You can also try using a paste of baking soda and water to scrub the stubborn areas. For particularly tough spots, you can use a plastic scraper or spatula to gently lift the residue.
6. Can I use this method to clean burnt food on the outside of my pots and pans?
Yes, this method can also be used to clean burnt food on the outside of your pots and pans. Simply apply the baking soda and vinegar mixture to the affected areas, let it sit for a few minutes, and then scrub with a non-abrasive sponge or scrubber. You may need to repeat the process several times for heavily burnt areas.
7. Is it safe to use this method on non-stick cookware?
While this method can be used on some non-stick cookware, it’s important to be extra cautious. Avoid using abrasive scrubbers, as they can damage the non-stick coating. Instead, use a soft sponge or cloth to gently scrub away the loosened residue. Also, avoid simmering the mixture for too long, as this can also damage the non-stick coating.
8. Can I use this method to clean burnt sugar?
Yes, this method is particularly effective for cleaning burnt sugar. The vinegar helps to dissolve the sugar, making it easier to remove. You may need to simmer the mixture for a longer period to fully dissolve the sugar.
9. What are some alternative cleaning agents I can use if I don’t have baking soda or vinegar?
If you don’t have baking soda or vinegar, you can try using other cleaning agents such as lemon juice, cream of tartar, or even a dishwasher detergent tablet. Simply add the cleaning agent to the pot or pan with water and simmer for a few minutes.
10. How can I prevent my pots and pans from burning in the first place?
Prevention is always better than cure! To prevent your pots and pans from burning, be sure to use the correct heat setting for the type of food you’re cooking. Avoid leaving food unattended while cooking, and stir frequently to prevent sticking. Also, be sure to use enough liquid when cooking foods that are prone to burning.


Leave a Comment