
Collard green steady harvest – that’s the dream, isn’t it? Imagine stepping into your garden, not just once, but week after week, and plucking fresh, vibrant collard greens for your dinner table. No more relying on wilted grocery store greens! This isn’t just a pipe dream; it’s an achievable reality with a few simple DIY tricks and hacks.
For generations, collard greens have been a staple in Southern cuisine, symbolizing prosperity and good fortune. They’re more than just a vegetable; they’re a cultural icon, passed down through families and celebrated in countless recipes. But achieving that consistent, bountiful harvest can sometimes feel like a challenge. That’s where I come in!
Let’s face it, we all lead busy lives. Who has time to constantly replant and fuss over their garden? That’s why I’m so excited to share these easy-to-implement DIY strategies for a collard green steady harvest. These aren’t complicated techniques requiring a green thumb; they’re practical tips that anyone, regardless of their gardening experience, can use to maximize their yield and enjoy fresh collard greens all season long. I’m going to show you how to get the most out of your plants, ensuring a continuous supply of this nutritious and delicious leafy green. Get ready to ditch the store-bought greens and embrace the joy of a thriving, self-sustaining collard green patch!
DIY: Never Buy Collard Greens Again – A Guide to Continuous Harvest
Hey there, fellow gardeners! Are you tired of buying collard greens at the store? I know I was! That’s why I decided to figure out a way to have a steady supply of these leafy greens right in my own backyard. And guess what? It’s totally doable! This guide will walk you through how to achieve a continuous harvest of collard greens, meaning you’ll have fresh greens all season long (and maybe even longer, depending on your climate!).
Understanding Continuous Harvest
Before we dive into the nitty-gritty, let’s talk about what “continuous harvest” actually means. It’s not about getting one massive harvest and then waiting for the plant to regrow. Instead, it’s about strategically harvesting leaves over time, encouraging the plant to keep producing new growth. Think of it as a “cut-and-come-again” approach.
Here’s what makes this method so awesome:
* Fresh Greens on Demand: No more trips to the store when you’re craving collard greens.
* Extended Harvest: You’ll be harvesting for a much longer period than if you just waited for the whole plant to mature.
* Healthier Plants: Regular harvesting can actually stimulate growth and keep your plants healthier.
* Space Saving: You don’t need a huge garden to grow a lot of collard greens. A few well-managed plants can provide a surprising amount of food.
Choosing the Right Collard Green Variety
While most collard green varieties will work with this method, some are better suited for continuous harvesting than others. I’ve found that these varieties tend to be particularly productive:
* ‘Georgia Southern’: This is a classic variety known for its large, flavorful leaves and vigorous growth.
* ‘Champion’: A fast-growing variety that’s resistant to bolting (going to seed).
* ‘Vates’: A compact variety that’s great for smaller gardens.
* ‘Top Bunch’: This variety is known for its high yields and tolerance to heat and cold.
Getting Started: Planting Your Collard Greens
Okay, let’s get our hands dirty! Here’s how to plant your collard greens for continuous harvest:
1. Start with Healthy Seedlings or Seeds: You can either start your collard greens from seeds indoors or purchase seedlings from a local nursery. Starting indoors gives you a head start, especially if you have a short growing season. If starting from seed, sow them about 6-8 weeks before the last expected frost.
2. Prepare the Soil: Collard greens thrive in well-drained soil that’s rich in organic matter. Before planting, amend your soil with compost or well-rotted manure. This will provide the nutrients your plants need to grow strong and produce lots of leaves. Aim for a soil pH between 6.0 and 7.5.
3. Choose a Sunny Location: Collard greens need at least 6 hours of sunlight per day. Choose a spot in your garden that gets plenty of sun.
4. Plant Your Seedlings or Seeds: If you’re planting seedlings, space them about 18-24 inches apart. If you’re planting seeds, sow them about ½ inch deep and thin them to 18-24 inches apart once they’ve sprouted.
5. Water Thoroughly: After planting, water your collard greens thoroughly. Keep the soil consistently moist, but not waterlogged.
The Secret to Continuous Harvest: Strategic Harvesting
This is where the magic happens! The key to continuous harvest is to harvest the leaves in a way that encourages the plant to keep producing new growth.
1. Wait for Maturity: Don’t start harvesting until your collard green plants have reached a decent size. You want them to have several mature leaves before you start picking. Generally, this is when the leaves are about 6-8 inches long.
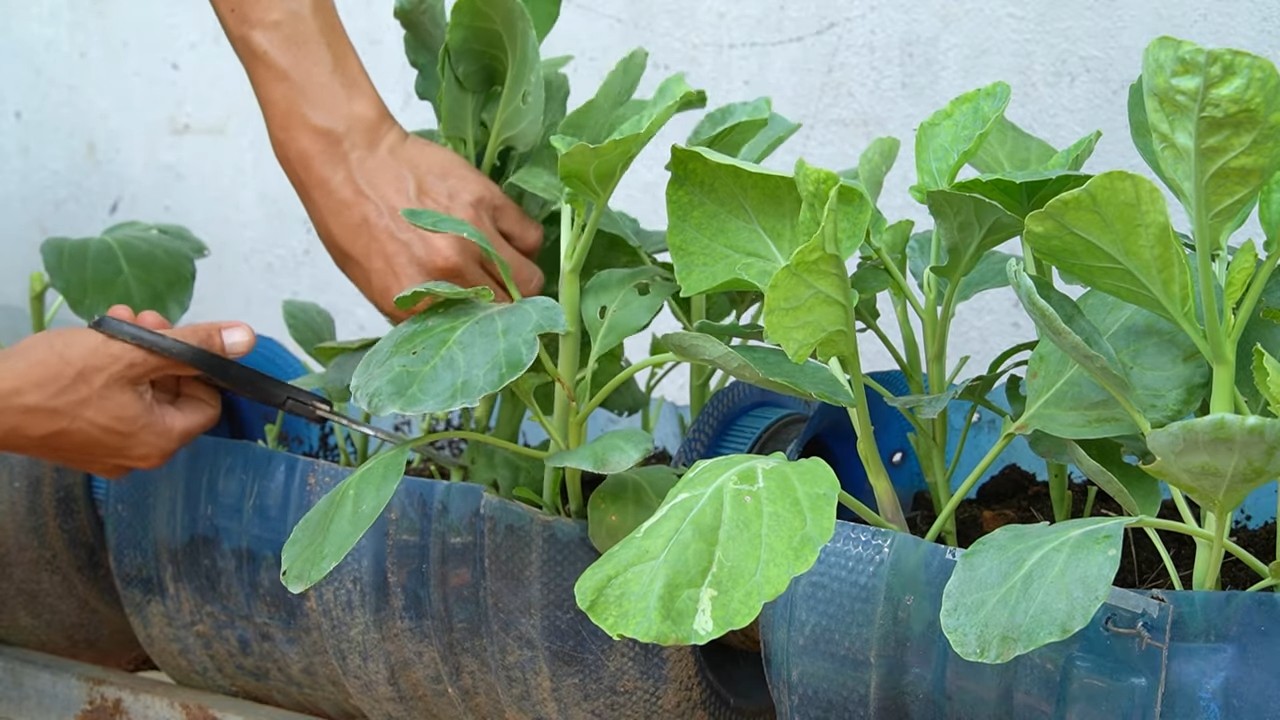
2. Harvest Outer Leaves First: Always harvest the oldest, outer leaves first. These are the leaves that are closest to the ground. Leave the younger, inner leaves to continue growing.
3. Use Sharp Scissors or a Knife: Cut the leaves cleanly at the base of the stem. This will help prevent disease and encourage new growth. Avoid tearing the leaves, as this can damage the plant.
4. Don’t Over-Harvest: Be careful not to remove too many leaves at once. As a general rule, don’t remove more than one-third of the plant’s leaves at any given time. This will give the plant enough energy to continue growing.
5. Harvest Regularly: The more often you harvest, the more your plants will produce. Aim to harvest leaves every week or two.
6. Remove Yellowing or Damaged Leaves: As you harvest, be sure to remove any yellowing or damaged leaves. These leaves are no longer productive and can attract pests and diseases.
Caring for Your Collard Greens for Maximum Production
To keep your collard greens producing a steady supply of leaves, you’ll need to provide them with proper care.
1. Water Regularly: Collard greens need consistent moisture to thrive. Water them deeply whenever the soil feels dry to the touch.
2. Fertilize Regularly: Collard greens are heavy feeders, meaning they need a lot of nutrients. Fertilize them every few weeks with a balanced fertilizer or compost tea. I personally love using fish emulsion – it works wonders!
3. Control Pests and Diseases: Collard greens can be susceptible to pests like aphids, cabbage worms, and flea beetles. Keep an eye out for these pests and take action to control them if necessary. You can use organic pest control methods like insecticidal soap or neem oil. Also, be aware of diseases like black rot and downy mildew. Ensure good air circulation around your plants to help prevent these diseases.
4. Mulch Around Your Plants: Mulching around your collard green plants will help retain moisture, suppress weeds, and regulate soil temperature. Use organic mulch like straw, wood chips, or shredded leaves.
5. Consider Succession Planting: To ensure a continuous harvest throughout the entire growing season, consider succession planting. This means planting new collard green plants every few weeks. This way, you’ll always have plants at different stages of maturity.
Extending Your Harvest into the Cooler Months
Even if you live in a colder climate, you can still extend your collard green harvest into the fall and winter.
1. Plant Cold-Hardy Varieties: Choose collard green varieties that are known for their cold hardiness, such as ‘Georgia Southern’ or ‘Vates’.
2. Provide Protection: Protect your collard green plants from frost and freezing temperatures by covering them with row covers, blankets, or plastic sheeting.
3. Move Plants Indoors: If you have limited space, you can move your collard green plants indoors to a sunny location.
Troubleshooting Common Problems
Even with the best care, you may encounter some problems with your collard greens. Here are some common issues and how to address them:
* Yellowing Leaves: This can be caused by a variety of factors, including nutrient deficiencies, overwatering, or underwatering. Make sure you’re fertilizing your plants regularly and watering them properly.
* Holes in Leaves: This is usually caused by pests like cabbage worms or flea beetles. Inspect your plants regularly and take action to control these pests if necessary.
* Bolting (Going to Seed): Bolting can be caused by hot weather or stress. Choose bolt-resistant varieties and provide your plants with plenty of water and shade during hot weather.
* Slow Growth: This can be caused by nutrient deficiencies, poor soil, or lack of sunlight. Amend your soil with compost or well-rotted manure and make sure your plants are getting at least 6 hours of sunlight per day.
Enjoying Your Homegrown Collard Greens
Now for the best part – enjoying the fruits (or rather, the leaves!) of your labor. Freshly harvested collard greens are incredibly versatile and can be used in a variety of dishes.
Here are some of my favorite ways to enjoy them:
* Steamed or Sautéed: Simply steam or sauté your collard greens with a little garlic and olive oil.
* Braised: Braised collard greens are a classic Southern dish. Cook them slowly with bacon or ham hocks for a rich, flavorful side dish.
* In Soups and Stews: Add chopped collard greens to soups and stews for extra flavor and nutrients.
* In Salads: Young, tender collard green leaves can be used in salads.
* As Wraps: Use large collard green leaves as wraps for your favorite fillings.
So there you have it! With a little bit of planning and effort, you can enjoy a continuous harvest of collard greens from your own garden. Happy gardening!

Conclusion
So, there you have it! Mastering the art of a collard green steady harvest is not just about getting more greens; it’s about maximizing the potential of your garden, minimizing waste, and enjoying a continuous supply of fresh, nutritious leaves throughout the growing season. This method transforms your collard plants from a one-time harvest into a living, breathing, leafy green machine.
Think of it this way: instead of chopping down the entire plant and hoping for a second flush (which may or may not happen), you’re strategically selecting the most mature leaves, encouraging the plant to focus its energy on producing even more. It’s like giving your collard greens a gentle nudge in the right direction.
But the benefits extend beyond just quantity. By consistently harvesting the outer leaves, you’re also improving the overall health of the plant. Removing older leaves allows for better air circulation, reducing the risk of fungal diseases. Plus, it encourages new growth from the center, resulting in tender, more flavorful leaves.
Don’t be afraid to experiment with variations! Try different harvesting frequencies to see what works best for your specific climate and growing conditions. Some gardeners find that harvesting a few leaves every other day yields the best results, while others prefer a weekly harvest of a larger quantity. You can also adjust the number of leaves you harvest at a time, depending on your needs. If you’re planning a big collard green feast, go ahead and take a larger harvest. If you just need a handful for a side dish, a smaller harvest will do.
Consider companion planting to further enhance your collard green harvest. Planting herbs like rosemary or thyme nearby can help deter pests, while legumes like beans or peas can fix nitrogen in the soil, providing your collards with a natural fertilizer boost.
And remember, the key to a successful collard green steady harvest is observation. Pay attention to your plants. Notice how they respond to different harvesting techniques. Adjust your approach as needed. Gardening is a learning process, and every season brings new opportunities to refine your skills.
We wholeheartedly encourage you to give this DIY trick a try. It’s simple, effective, and incredibly rewarding. Imagine the satisfaction of stepping out into your garden and harvesting fresh, vibrant collard greens whenever you need them. It’s a game-changer for any home gardener.
Once you’ve tried it, we’d love to hear about your experience! Share your tips, tricks, and successes in the comments below. Let’s create a community of collard green enthusiasts and learn from each other. What varieties of collard greens are you growing? What harvesting schedule works best for you? What are your favorite ways to prepare your homegrown collard greens? Your insights could help other gardeners achieve their own bountiful harvests. So, get out there, get your hands dirty, and start enjoying the fruits (or rather, the leaves) of your labor! Happy gardening!
Frequently Asked Questions (FAQ)
What exactly does “steady harvest” mean in the context of collard greens?
A steady harvest refers to a harvesting method where you selectively pick mature outer leaves from your collard green plants over an extended period, rather than harvesting the entire plant at once. This allows the plant to continue producing new leaves, providing you with a continuous supply of fresh collard greens throughout the growing season. It’s a sustainable and efficient way to maximize your yield.
How do I know which leaves are ready to be harvested?
Look for the largest, outermost leaves on the plant. They should be a deep green color and feel firm to the touch. Avoid harvesting leaves that are yellowing, damaged, or showing signs of disease. The ideal leaves will be fully developed but still tender. Generally, leaves that are 6-8 inches long are ready for harvesting.
Will harvesting leaves regularly hurt my collard green plants?
No, quite the opposite! Regular harvesting actually encourages the plant to produce more leaves. By removing the older leaves, you’re signaling to the plant to focus its energy on new growth. Think of it as pruning – it stimulates the plant to become bushier and more productive. Just be sure not to harvest too many leaves at once, as this could stress the plant.
How many leaves can I harvest at a time without harming the plant?
A good rule of thumb is to harvest no more than one-third of the plant’s leaves at any given time. This ensures that the plant has enough foliage to continue photosynthesizing and producing energy. If you’re unsure, start with a smaller harvest and observe how the plant responds. If it continues to thrive, you can gradually increase the number of leaves you harvest each time.
What tools do I need for a collard green steady harvest?
You’ll need a sharp knife or a pair of scissors or pruning shears. Make sure your tools are clean to prevent the spread of disease. Simply cut the leaf stem close to the main stalk of the plant. Avoid tearing the leaves, as this can damage the plant and make it more susceptible to infection.
How often should I harvest my collard greens?
The frequency of harvesting depends on several factors, including the variety of collard greens you’re growing, the growing conditions, and your personal needs. In general, you can harvest leaves every week or two. During peak growing season, you may be able to harvest more frequently. Monitor your plants closely and adjust your harvesting schedule accordingly.
What if my collard greens start to bolt (flower)?
Bolting is a sign that the plant is stressed, usually due to heat or lack of water. Once a collard green plant bolts, the leaves will become bitter and less palatable. To prevent bolting, make sure your plants are well-watered, especially during hot weather. You can also try planting bolt-resistant varieties of collard greens. If your plants do start to bolt, you can still harvest the leaves, but be aware that they may not taste as good.
Can I use fertilizer to improve my collard green harvest?
Yes, collard greens benefit from regular fertilization. Use a balanced fertilizer that is rich in nitrogen, phosphorus, and potassium. You can also amend the soil with compost or other organic matter to improve its fertility. Be sure to follow the instructions on the fertilizer package and avoid over-fertilizing, as this can damage the plants.
How do I store harvested collard greens?
To store harvested collard greens, wash them thoroughly and pat them dry. Wrap them in a damp paper towel and store them in a plastic bag in the refrigerator. They should last for up to a week. You can also freeze collard greens for longer storage. To freeze them, blanch them in boiling water for a few minutes, then plunge them into ice water to stop the cooking process. Drain them well and store them in freezer bags.
What are some common pests and diseases that affect collard greens, and how can I prevent them?
Common pests of collard greens include aphids, cabbage worms, and flea beetles. Common diseases include black rot and downy mildew. To prevent pests and diseases, practice good garden hygiene. Remove any dead or diseased leaves from the plants. Rotate your crops each year to prevent the buildup of soilborne diseases. You can also use insecticidal soap or neem oil to control pests. For diseases, use a copper-based fungicide. Companion planting with herbs like rosemary and thyme can also help deter pests.

Leave a Comment