
Container Squash Gardening: Ever dreamt of harvesting plump, juicy squash right from your own patio or balcony? I know I have! Forget sprawling garden beds and endless weeding – with a few clever tricks, you can absolutely cultivate a thriving squash patch in containers, no matter how limited your space might be.
For centuries, humans have found ingenious ways to grow food in confined spaces. From the hanging gardens of Babylon to the modern-day urban farming movement, the desire to nurture life and reap its rewards is deeply ingrained in our history. Growing squash in containers is a modern adaptation of this ancient practice, allowing us to reconnect with nature and enjoy fresh, homegrown produce even in the heart of the city.
But why should you bother with container squash gardening? Well, for starters, it’s incredibly rewarding! There’s nothing quite like the satisfaction of watching a tiny seed transform into a bountiful harvest. Plus, it’s a fantastic way to control soil quality, manage pests, and extend your growing season. Many people struggle with poor soil conditions or limited sunlight in their yards, making traditional gardening a challenge. Container gardening bypasses these obstacles, giving you complete control over the growing environment. So, if you’re ready to unlock the secrets to successful container squash gardening and enjoy a delicious harvest, keep reading! I’m going to share some simple yet effective DIY tricks and hacks that will have you growing squash like a pro in no time.
Container Squash Gardening: A Bountiful Harvest in Small Spaces
Hey there, fellow gardening enthusiasts! Ever dreamt of growing your own squash but thought you didn’t have the space? Well, I’m here to tell you that container squash gardening is totally doable, and it’s a fantastic way to enjoy fresh, homegrown goodness even if you’re working with a balcony, patio, or small yard. I’ve been container gardening for years, and squash is one of my favorite things to grow. Let me walk you through everything you need to know to get started!
Choosing the Right Squash Variety
First things first, not all squash varieties are created equal when it comes to container gardening. You’ll want to opt for bush varieties rather than vining types, as they’re more compact and manageable. Vining squash can take over your entire space!
Here’s a breakdown of some excellent container-friendly squash options:
* Bush Zucchini: These are super productive and come in various colors, from classic green to golden yellow. Black Beauty and Gold Rush are popular choices.
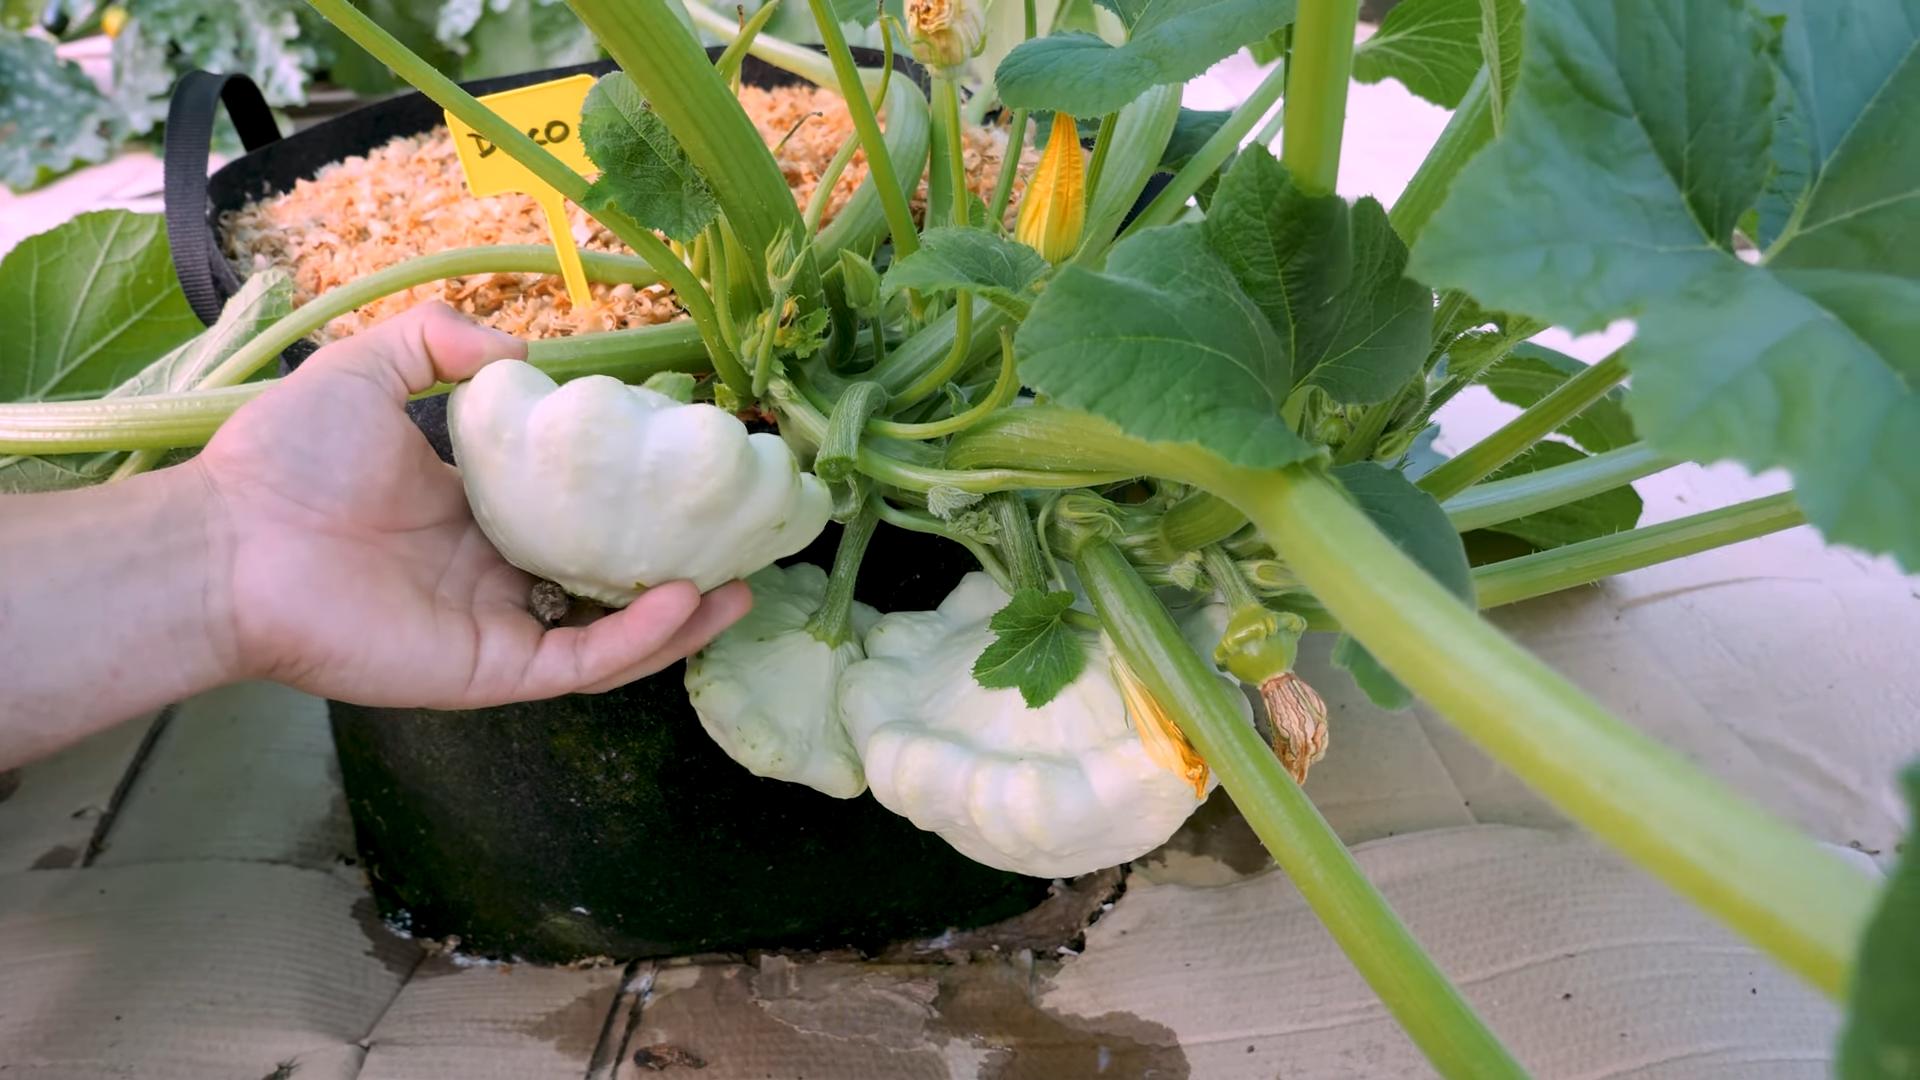
* Patty Pan Squash: These adorable, saucer-shaped squash are not only fun to grow but also delicious. Sunburst and Peter Pan are great options.
* Bush Butternut Squash: While butternut squash is typically a vining variety, there are bush types available that are perfect for containers. Butterbush is a well-known example.
* Acorn Squash: Similar to butternut, look for bush varieties like Table Bush Acorn.
* Spaghetti Squash: Again, opt for a bush variety like Bush Delicata.
Important Tip: Always check the seed packet or plant label for information on the plant’s mature size and growth habit. This will help you choose the right variety for your container.
Gathering Your Supplies
Okay, now that we’ve got our squash variety picked out, let’s gather the necessary supplies. Here’s what you’ll need:
* Large Containers: This is crucial! Squash plants need plenty of room for their roots to grow. I recommend containers that are at least 24 inches in diameter and 18 inches deep. The bigger, the better, really.
* High-Quality Potting Mix: Don’t skimp on the potting mix! Use a well-draining mix that’s specifically formulated for containers. Avoid using garden soil, as it can become compacted and doesn’t drain well in containers.
* Squash Seeds or Seedlings: You can start your squash from seeds or purchase seedlings from a local nursery. If you’re starting from seeds, sow them indoors a few weeks before the last expected frost.
* Fertilizer: Squash plants are heavy feeders, so you’ll need to fertilize them regularly. Use a balanced fertilizer (e.g., 10-10-10) or one specifically formulated for vegetables.
* Watering Can or Hose: You’ll need a way to water your plants regularly.
* Trowel or Shovel: For planting and transplanting.
* Mulch (Optional): Mulch helps retain moisture in the soil and suppress weeds. Straw, wood chips, or shredded bark are all good options.
* Support Structure (Optional): While bush varieties are more compact, they can still benefit from some support, especially when the fruits start to develop. A tomato cage or sturdy stakes can help prevent the plants from sprawling too much.
Planting Your Squash
Alright, let’s get our hands dirty! Here’s how to plant your squash in containers:
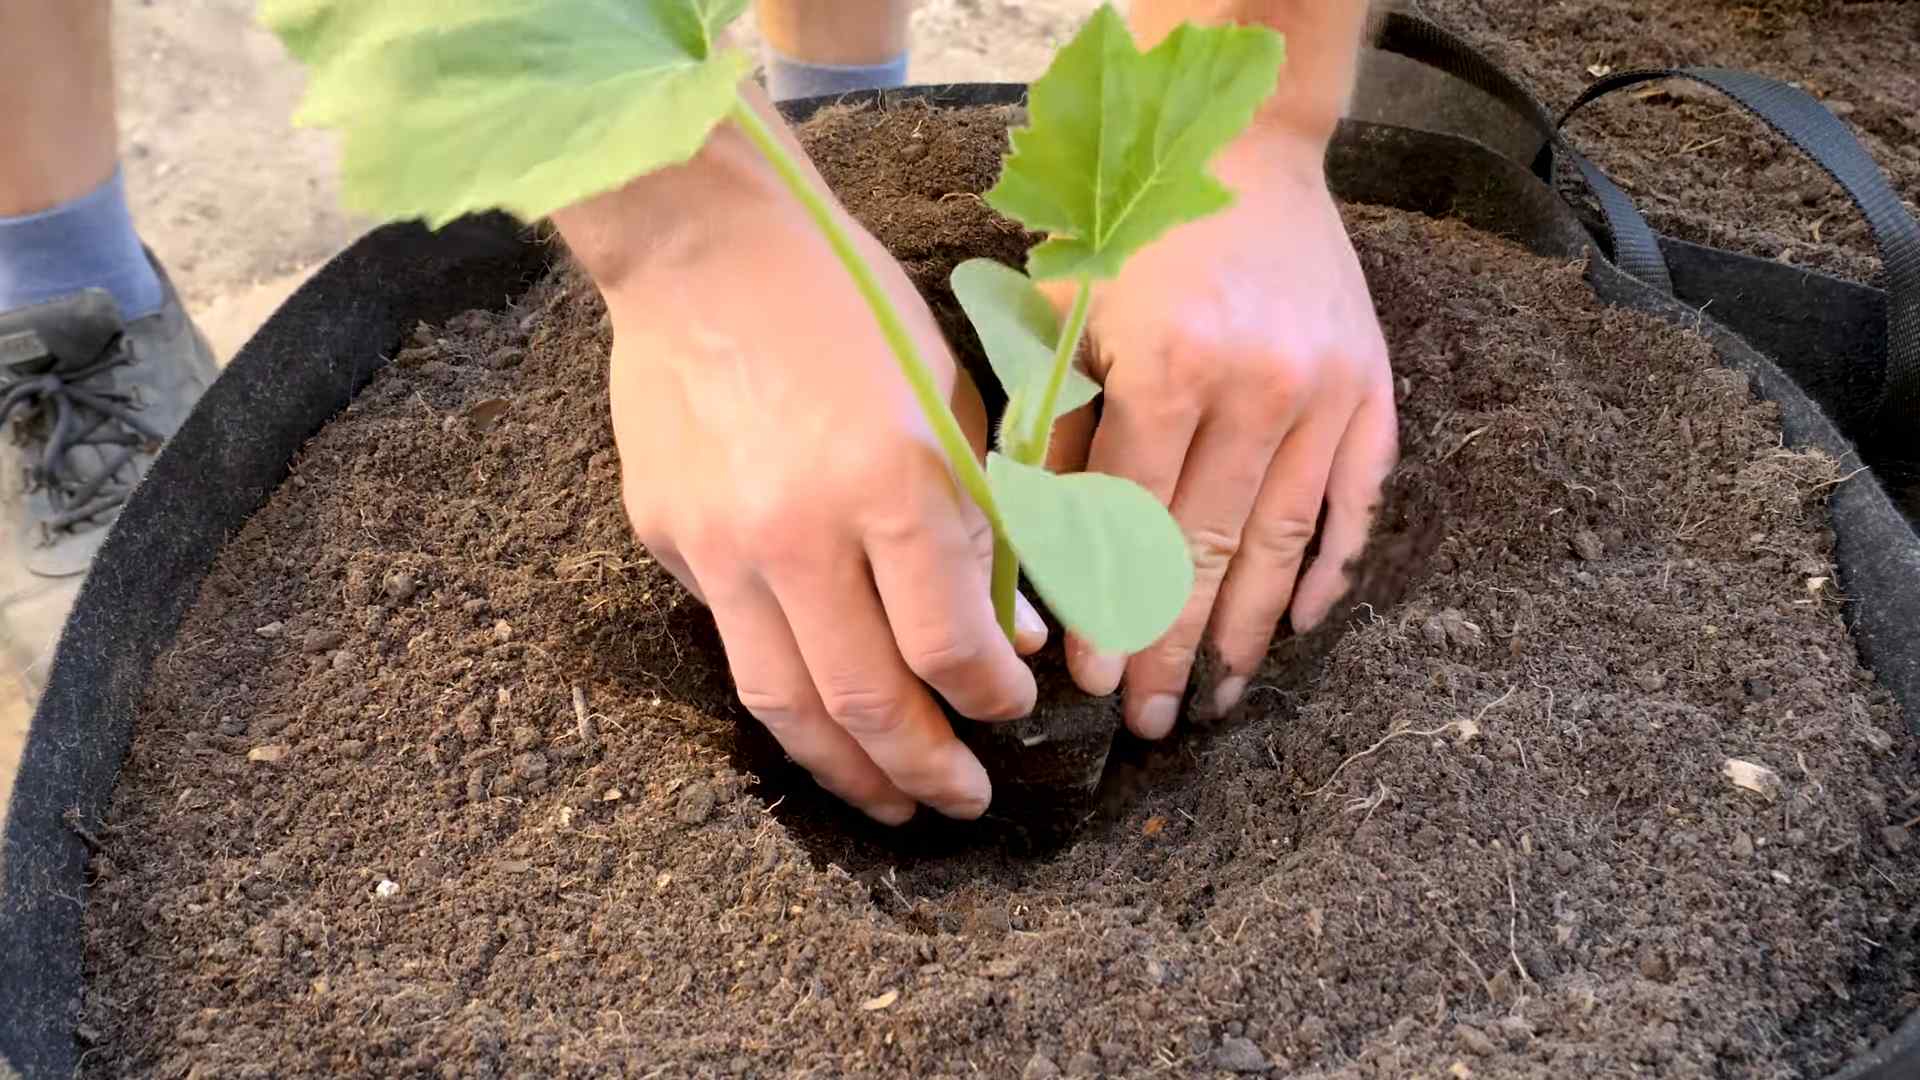
1. Prepare the Container: Make sure your container has drainage holes. If not, drill some! Then, fill the container with potting mix, leaving a few inches of space at the top.
2. Plant the Seeds or Seedlings: If you’re starting from seeds, sow them directly into the container, following the instructions on the seed packet. Usually, this means planting them about an inch deep. If you’re using seedlings, gently remove them from their nursery pots and plant them in the container, making sure the top of the root ball is level with the soil surface.
3. Water Thoroughly: After planting, water the soil thoroughly until water drains out of the drainage holes. This helps settle the soil around the roots.
4. Mulch (Optional): If you’re using mulch, spread a layer around the base of the plant, being careful not to cover the stem.
5. Provide Support (Optional): If you’re using a support structure, install it now.
Caring for Your Container Squash
Now that your squash is planted, it’s time to provide the care it needs to thrive.
1. Watering: Squash plants need consistent moisture, especially during hot weather. Water deeply whenever the top inch of soil feels dry to the touch. Avoid overhead watering, as this can lead to fungal diseases. Instead, water at the base of the plant.
2. Fertilizing: As I mentioned earlier, squash plants are heavy feeders. Fertilize them every two to three weeks with a balanced fertilizer or one specifically formulated for vegetables. Follow the instructions on the fertilizer package.
3. Sunlight: Squash plants need at least six hours of sunlight per day. Place your containers in a sunny location where they’ll receive plenty of light.
4. Pest and Disease Control: Keep an eye out for common squash pests like squash bugs, squash vine borers, and aphids. You can control these pests with insecticidal soap, neem oil, or by handpicking them off the plants. Also, watch out for fungal diseases like powdery mildew. Improve air circulation around the plants and avoid overhead watering to prevent these diseases. If you do notice signs of disease, treat the plants with a fungicide.
5. Pollination: Squash plants have separate male and female flowers. The female flowers need to be pollinated in order to produce fruit. If you’re not seeing any fruit develop, you may need to hand-pollinate the flowers. To do this, use a small paintbrush to transfer pollen from the male flowers to the female flowers. You can identify the female flowers by the small fruit that’s already forming at the base of the flower.
6. Pruning: While bush varieties are more compact, they can still get a bit unruly. You can prune the plants to improve air circulation and encourage fruit production. Remove any yellowing or damaged leaves.
Harvesting Your Squash
The moment we’ve all been waiting for – harvesting! The time to harvest your squash will depend on the variety you’re growing.
* Zucchini and Patty Pan Squash: These are typically harvested when they’re young and tender, about 6-8 inches long for zucchini and 3-4 inches in diameter for patty pan squash.
* Butternut, Acorn, and Spaghetti Squash: These are harvested when they’re fully mature and the skin is hard. The stem should also be dry and brown.
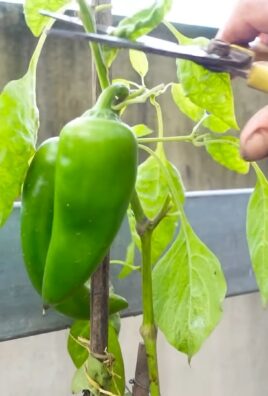
To harvest your squash, use a sharp knife or pruning shears to cut the stem close to the fruit. Be careful not to damage the fruit.
Troubleshooting Common Problems
Even with the best care, you might encounter some problems while growing squash in containers. Here are a few common issues and how to address them:
* Yellowing Leaves: This could be a sign of overwatering, underwatering, nutrient deficiency, or pest infestation. Check the soil moisture, fertilize the plants, and inspect them for pests.
* Lack of Fruit Production: This could be due to poor pollination, insufficient sunlight, or nutrient deficiency. Hand-pollinate the flowers, move the containers to a sunnier location, and fertilize the plants.
* Powdery Mildew: This fungal disease can cause a white, powdery coating on the leaves. Improve air circulation around the plants and treat them with a fungicide.
* Squash Bugs: These pests can suck the sap from the leaves and stems, causing them to wilt and die. Handpick the bugs off the plants or spray them with insecticidal soap.
* Squash Vine Borers: These pests can bore into the stems of the plants, causing them to wilt and die. Wrap the stems with aluminum foil or netting to prevent the borers from entering.
Extending the Growing Season
Want to enjoy fresh squash for even longer? Here are a few tips for extending the growing season:
* Start Seeds Indoors: Start your squash seeds indoors a few weeks before the last expected frost to get a head start on the growing season.
* Use Row Covers: Row covers can protect your plants from frost and extend the growing season in the fall.
* Choose Early-Maturing Varieties: Select squash varieties that mature quickly to ensure you have a harvest before the first frost.
Enjoying Your Harvest
Finally, the best part – enjoying your homegrown squash! There are endless ways to prepare squash, from grilling and roasting to sautéing and baking. You can also use it in soups, stews, and casseroles.
My favorite way to enjoy zucchini is to
Conclusion
So, there you have it! Mastering container squash gardening is not only achievable but also incredibly rewarding. We’ve walked through the essential steps, from selecting the right squash variety and container size to nurturing your plants for a bountiful harvest. The beauty of this DIY approach lies in its accessibility and adaptability. Whether you have a sprawling backyard or a small balcony, you can enjoy the satisfaction of growing your own delicious squash.
Why is this a must-try? Because it empowers you to take control of your food source, reduces your reliance on store-bought produce (often laden with pesticides), and connects you with the natural world in a tangible way. Plus, the flavor of homegrown squash, picked at its peak ripeness, is simply unmatched. It’s a taste of summer sunshine that you can savor in countless dishes.
But the journey doesn’t end here! Feel free to experiment with different squash varieties. Zucchinis and yellow squash are excellent choices for beginners, but don’t be afraid to venture into the world of bush butternut squash or even smaller pumpkin varieties. Consider companion planting to enhance growth and deter pests. Marigolds, nasturtiums, and basil are all excellent companions for squash.
Don’t limit yourself to just one container! Create a mini-squash garden with a variety of plants, each offering its unique flavor and texture. You can also explore different soil amendments to optimize nutrient availability. Compost, worm castings, and bone meal can all contribute to healthier, more productive plants.
And remember, container squash gardening is a learning process. Don’t be discouraged if you encounter challenges along the way. Every season brings new opportunities to refine your techniques and improve your results. The key is to observe your plants closely, listen to their needs, and adapt your approach accordingly.
We wholeheartedly encourage you to embark on this exciting adventure. Start small, learn as you go, and most importantly, have fun! Once you’ve experienced the joy of harvesting your own homegrown squash, you’ll be hooked.
We’re eager to hear about your experiences! Share your successes, your challenges, and your favorite container squash gardening tips in the comments below. Let’s create a community of passionate gardeners who are dedicated to growing their own food and sharing their knowledge with others. Together, we can transform even the smallest spaces into thriving edible landscapes. So, grab your seeds, your soil, and your containers, and let’s get growing! Your delicious, homegrown squash awaits!
Frequently Asked Questions (FAQ)
What are the best squash varieties for container gardening?
The best squash varieties for container gardening are typically bush varieties, as they are more compact and don’t require as much space as vining varieties. Some excellent choices include:
* Zucchini (Bush Varieties): These are prolific producers and come in various colors, including green, yellow, and even striped. Look for varieties specifically labeled as “bush” or “compact.”
* Yellow Squash (Bush Varieties): Similar to zucchini, bush yellow squash varieties are easy to grow and offer a mild, versatile flavor.
* Patty Pan Squash: These unique, saucer-shaped squash are both ornamental and delicious. They come in various colors, including yellow, green, and white.
* Bush Butternut Squash: While butternut squash is typically a vining variety, there are now bush varieties available that are well-suited for containers.
* Acorn Squash (Smaller Varieties): Look for smaller acorn squash varieties that are specifically bred for container gardening.
* Spaghetti Squash (Dwarf Varieties): Similar to butternut squash, dwarf spaghetti squash varieties are available that are more manageable in containers.
When selecting your squash variety, be sure to read the seed packet or plant label carefully to ensure that it is a bush variety and that it is suitable for container gardening.
What size container do I need for squash?
The ideal container size for squash depends on the specific variety you are growing, but a general rule of thumb is to use a container that is at least 24 inches in diameter and 12 inches deep. Larger containers are always better, as they provide more room for the roots to grow and allow for better water retention. A 5-gallon bucket is the absolute minimum, but a 10-gallon or larger container is preferable.
How often should I water my container squash plants?
Container squash plants need consistent watering, especially during hot, dry weather. Water deeply whenever the top inch of soil feels dry to the touch. This may mean watering daily or even twice a day during the peak of summer. Be sure to water at the base of the plant to avoid wetting the foliage, which can lead to fungal diseases.
What kind of soil should I use for container squash gardening?
Use a high-quality potting mix that is well-draining and rich in organic matter. Avoid using garden soil, as it can become compacted in containers and doesn’t drain well. You can amend your potting mix with compost, worm castings, or other organic materials to improve its fertility and drainage.
How much sunlight do squash plants need?
Squash plants need at least 6-8 hours of direct sunlight per day to thrive. Choose a location for your containers that receives plenty of sunlight throughout the day. If you live in a particularly hot climate, you may need to provide some afternoon shade to prevent the plants from overheating.
How do I fertilize my container squash plants?
Squash plants are heavy feeders and require regular fertilization. Start fertilizing your plants a few weeks after they emerge, using a balanced fertilizer that is specifically formulated for vegetables. Follow the instructions on the fertilizer label carefully. You can also supplement with organic fertilizers such as compost tea or fish emulsion.
How do I deal with pests and diseases in my container squash garden?
Monitor your plants regularly for signs of pests and diseases. Common pests that affect squash plants include squash bugs, squash vine borers, and aphids. Common diseases include powdery mildew and squash mosaic virus.
To prevent pests and diseases, practice good sanitation by removing any dead or diseased leaves. You can also use organic pest control methods such as insecticidal soap or neem oil. For diseases, ensure good air circulation and avoid overhead watering.
How do I know when my squash is ready to harvest?
The time it takes for squash to mature depends on the specific variety. Generally, summer squash (such as zucchini and yellow squash) is ready to harvest when it is young and tender, typically about 6-8 inches long. Winter squash (such as butternut squash and acorn squash) is ready to harvest when the skin is hard and the stem is dry.
Can I grow squash in a hanging basket?
While it’s possible to grow certain very compact squash varieties in a large, sturdy hanging basket, it’s generally not recommended. The weight of the mature squash can be significant, potentially causing the basket to break or the plant to become stressed. It’s best to stick to traditional containers for most squash varieties.
What if my squash plant is producing flowers but no fruit?
This is a common problem known as blossom drop. It can be caused by several factors, including:
* Lack of pollination: Squash plants have separate male and female flowers. Pollination is necessary for fruit to develop. You can hand-pollinate the flowers by transferring pollen from the male flower to the female flower using a small brush.
* High temperatures: Extreme heat can interfere with pollination and fruit set.
* Nutrient deficiencies: A lack of essential nutrients can also contribute to blossom drop. Ensure your plants are adequately fertilized.
* Water stress: Inconsistent watering can also cause blossom drop. Maintain consistent soil moisture.
By addressing these potential issues, you can increase your chances of successful fruit production.
Leave a Comment