
Shaving Foam Tricks DIY: Unleash the Unexpected Power in Your Bathroom Cabinet!
Have you ever looked at that can of shaving foam and thought, “There has to be more to this than just shaving?” Well, you’re absolutely right! For generations, shaving foam has been a staple in men’s grooming routines, but its uses extend far beyond just softening whiskers. Think of it as a secret weapon for tackling household chores and creative projects 鈥?a true DIY superstar hiding in plain sight.
I’m here to tell you that shaving foam is more than just a grooming product; it’s a versatile tool that can simplify your life and spark your creativity. In this article, we’ll dive into some amazing shaving foam tricks DIY projects that will leave you wondering why you didn’t discover these sooner. From cleaning hacks that will save you time and money to fun art projects that will unleash your inner artist, we’ve got something for everyone.
Why do you need these DIY tricks? Because life is busy! We’re all looking for ways to streamline our routines, save money, and add a little bit of fun to our everyday lives. These shaving foam hacks are easy, affordable, and surprisingly effective. So, grab that can of shaving foam and get ready to be amazed at the hidden potential within. Let’s get started!

Shaving Foam: Your Unexpected DIY Superhero!
Okay, friends, let’s talk about shaving foam. Yes, the stuff you (or your partner) use to get a smooth shave. But trust me, this isn’t just for the bathroom anymore! I’m going to show you some amazing DIY hacks using shaving foam that will blow your mind and save you money. Get ready to be amazed!
Cleaning Powerhouse: Shaving Foam to the Rescue!
Shaving foam is surprisingly effective as a cleaner. Its foamy texture helps lift dirt and grime, and it’s gentle enough for many surfaces.
Cleaning Carpets and Upholstery
Got a stain on your carpet or sofa? Don’t panic! Shaving foam might be your answer.
What you’ll need:
* Shaving foam (the regular, non-gel kind works best)
* A clean, damp cloth
* A vacuum cleaner
Step-by-step instructions:
1. Apply the Shaving Foam: Generously apply shaving foam directly onto the stain. Make sure you cover the entire affected area. Don’t be shy!
2. Let it Sit: Allow the shaving foam to sit on the stain for about 15-20 minutes. This gives it time to penetrate the stain and break it down. I usually use this time to grab a coffee or catch up on a quick chore.
3. Blot, Don’t Rub: Using your clean, damp cloth, gently blot the shaving foam and the stain. Avoid rubbing vigorously, as this can spread the stain or damage the fibers. Work from the outside of the stain inwards.
4. Repeat if Necessary: If the stain is particularly stubborn, you might need to repeat steps 1-3.
5. Let it Dry: Once you’ve removed as much of the stain as possible, allow the area to dry completely. This might take a few hours, depending on the humidity.
6. Vacuum: Once the area is dry, vacuum it thoroughly to remove any remaining residue. And voila! Hopefully, your stain is gone (or at least significantly reduced).
Shining Stainless Steel
Stainless steel appliances looking dull? Shaving foam can bring back their shine!
What you’ll need:
* Shaving foam
* A soft cloth
Step-by-step instructions:
1. Apply the Shaving Foam: Apply a thin layer of shaving foam to the stainless steel surface.
2. Wipe it Down: Using a soft cloth, gently wipe the surface in a circular motion.
3. Rinse (if needed): If there’s any residue, lightly dampen the cloth and wipe again.
4. Dry and Buff: Dry the surface with a clean, dry cloth. Buff gently to bring out the shine. You’ll be amazed at how easily it removes fingerprints and smudges!
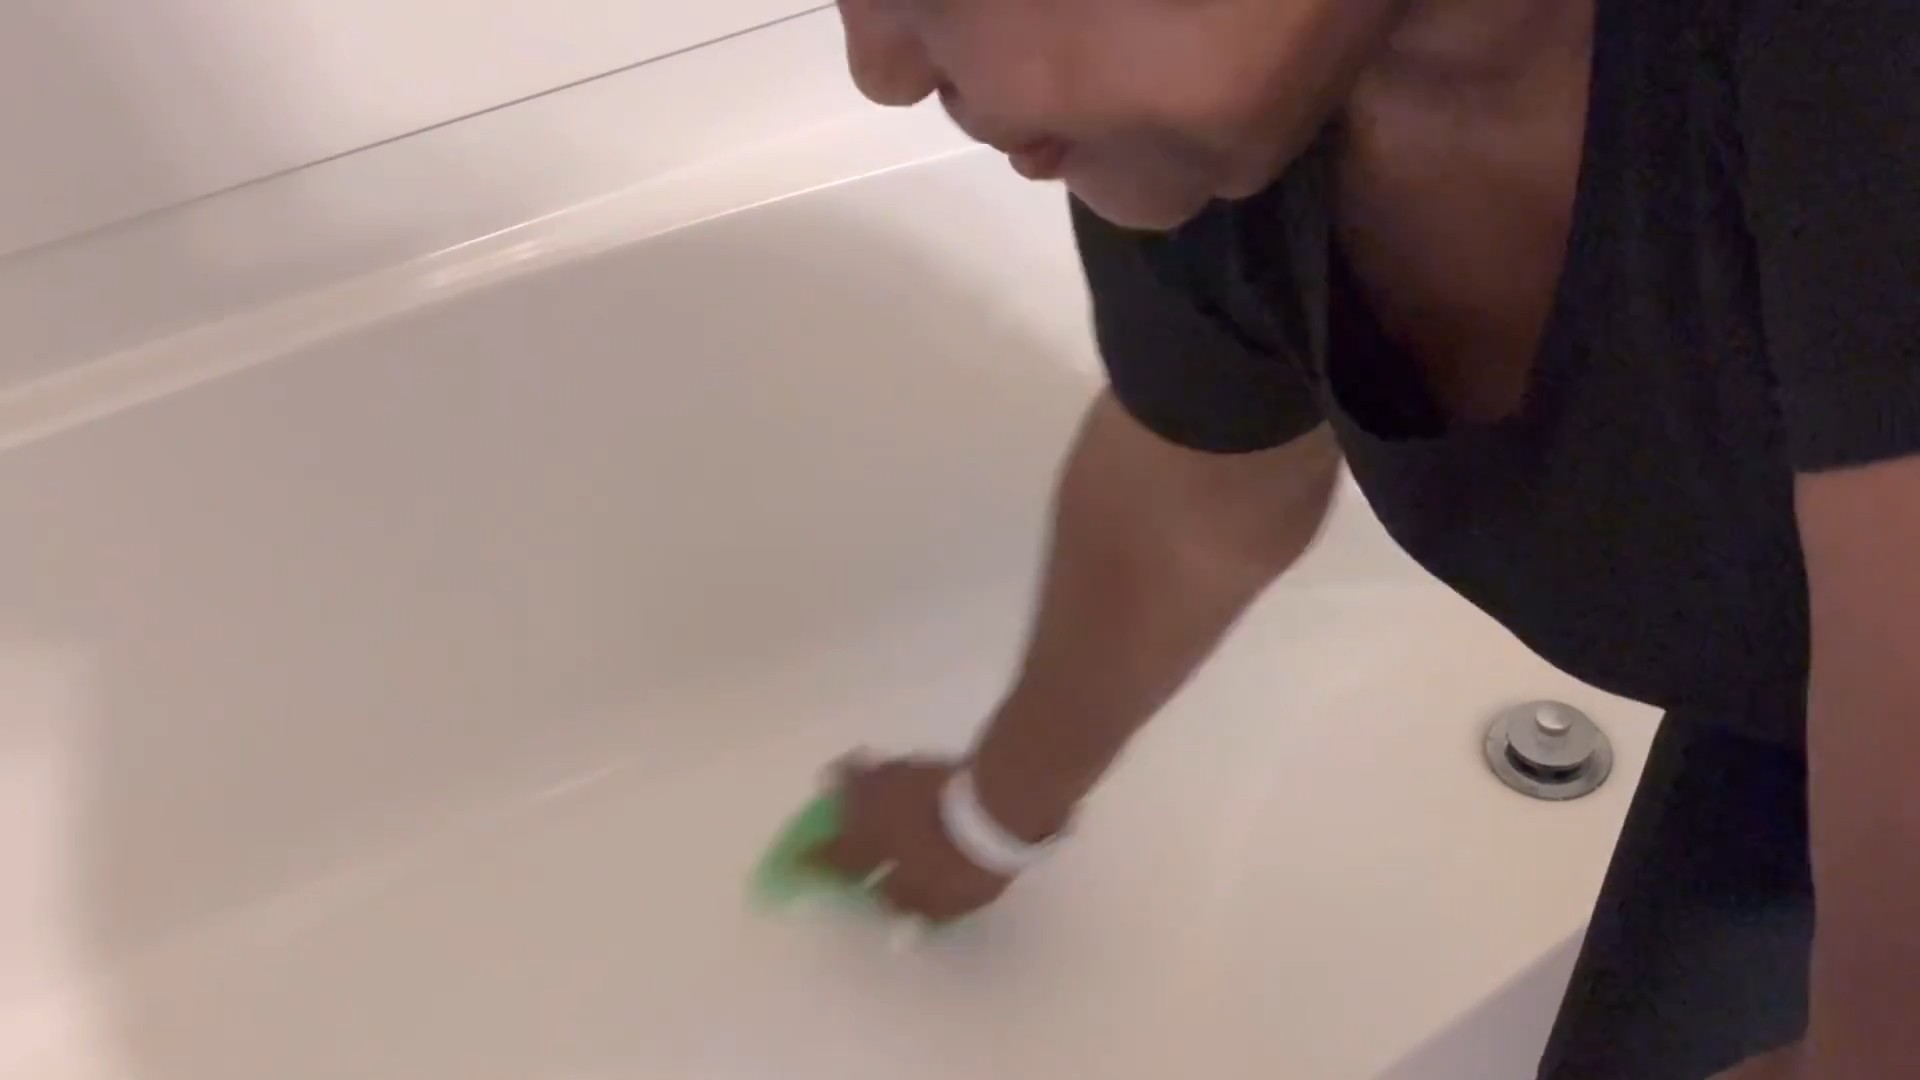
Cleaning Bathroom Mirrors
Foggy mirrors driving you crazy? Shaving foam to the rescue! This is one of my favorite tricks.
What you’ll need:
* Shaving foam
* A clean, dry cloth
Step-by-step instructions:
1. Apply the Shaving Foam: Apply a thin layer of shaving foam to the entire surface of the mirror.
2. Wipe it Down: Using a clean, dry cloth, wipe the shaving foam off the mirror. Make sure to remove all the foam.
3. Enjoy a Fog-Free Mirror: The shaving foam creates a protective barrier that prevents the mirror from fogging up. This is especially handy after a hot shower!
Creative Crafts: Shaving Foam Fun!
Shaving foam isn’t just for cleaning; it’s also a fantastic crafting material!
Shaving Cream Marbling
This is a super fun and easy way to create beautiful marbled paper or fabric. It’s a great activity for kids (and adults!).
What you’ll need:
* Shaving foam
* Food coloring or liquid watercolors
* A shallow dish or tray
* Paper or fabric
* A ruler or scraper
* Paper towels
Step-by-step instructions:
1. Prepare the Shaving Foam: Fill your shallow dish or tray with shaving foam. Spread it out evenly.
2. Add the Color: Drop food coloring or liquid watercolors onto the shaving foam. Use different colors for a more vibrant effect.
3. Swirl the Colors: Use a toothpick, skewer, or the end of a paintbrush to swirl the colors through the shaving foam. Don’t overmix, or you’ll end up with a muddy mess. The goal is to create interesting patterns.
4. Lay the Paper or Fabric: Gently lay your paper or fabric onto the surface of the shaving foam. Press it down lightly to ensure it makes contact with the colored foam.
5. Lift and Scrape: Carefully lift the paper or fabric from the shaving foam.
6. Scrape Off Excess Foam: Use a ruler or scraper to remove the excess shaving foam from the paper or fabric. This will reveal the marbled pattern.
7. Let it Dry: Lay the marbled paper or fabric flat on paper towels to dry completely. The colors will become more vibrant as it dries.
8. Iron (for Fabric): Once the fabric is dry, iron it on
Okay, friends, let’s talk about shaving foam. Yes, the stuff you (or your partner) use to get a smooth shave. But trust me, this isn’t just for the bathroom anymore! I’m going to show you some amazing DIY hacks using shaving foam that will blow your mind and save you money. Get ready to be amazed!
Cleaning Powerhouse: Shaving Foam to the Rescue!
Shaving foam is surprisingly effective as a cleaner. Its foamy texture helps lift dirt and grime, and it’s gentle enough for many surfaces.
Cleaning Carpets and Upholstery
Got a stain on your carpet or sofa? Don’t panic! Shaving foam might be your answer.
What you’ll need:
* Shaving foam (the regular, non-gel kind works best)
* A clean, damp cloth
* A vacuum cleaner
Step-by-step instructions:
1. Apply the Shaving Foam: Generously apply shaving foam directly onto the stain. Make sure you cover the entire affected area. Don’t be shy!
2. Let it Sit: Allow the shaving foam to sit on the stain for about 15-20 minutes. This gives it time to penetrate the stain and break it down. I usually use this time to grab a coffee or catch up on a quick chore.
3. Blot, Don’t Rub: Using your clean, damp cloth, gently blot the shaving foam and the stain. Avoid rubbing vigorously, as this can spread the stain or damage the fibers. Work from the outside of the stain inwards.
4. Repeat if Necessary: If the stain is particularly stubborn, you might need to repeat steps 1-3.
5. Let it Dry: Once you’ve removed as much of the stain as possible, allow the area to dry completely. This might take a few hours, depending on the humidity.
6. Vacuum: Once the area is dry, vacuum it thoroughly to remove any remaining residue. And voila! Hopefully, your stain is gone (or at least significantly reduced).
Shining Stainless Steel
Stainless steel appliances looking dull? Shaving foam can bring back their shine!
What you’ll need:
* Shaving foam
* A soft cloth
Step-by-step instructions:
1. Apply the Shaving Foam: Apply a thin layer of shaving foam to the stainless steel surface.
2. Wipe it Down: Using a soft cloth, gently wipe the surface in a circular motion.
3. Rinse (if needed): If there’s any residue, lightly dampen the cloth and wipe again.
4. Dry and Buff: Dry the surface with a clean, dry cloth. Buff gently to bring out the shine. You’ll be amazed at how easily it removes fingerprints and smudges!
Cleaning Bathroom Mirrors
Foggy mirrors driving you crazy? Shaving foam to the rescue! This is one of my favorite tricks.
What you’ll need:
* Shaving foam
* A clean, dry cloth
Step-by-step instructions:
1. Apply the Shaving Foam: Apply a thin layer of shaving foam to the entire surface of the mirror.
2. Wipe it Down: Using a clean, dry cloth, wipe the shaving foam off the mirror. Make sure to remove all the foam.
3. Enjoy a Fog-Free Mirror: The shaving foam creates a protective barrier that prevents the mirror from fogging up. This is especially handy after a hot shower!
Creative Crafts: Shaving Foam Fun!
Shaving foam isn’t just for cleaning; it’s also a fantastic crafting material!
Shaving Cream Marbling
This is a super fun and easy way to create beautiful marbled paper or fabric. It’s a great activity for kids (and adults!).
What you’ll need:
* Shaving foam
* Food coloring or liquid watercolors
* A shallow dish or tray
* Paper or fabric
* A ruler or scraper
* Paper towels
Step-by-step instructions:
1. Prepare the Shaving Foam: Fill your shallow dish or tray with shaving foam. Spread it out evenly.
2. Add the Color: Drop food coloring or liquid watercolors onto the shaving foam. Use different colors for a more vibrant effect.
3. Swirl the Colors: Use a toothpick, skewer, or the end of a paintbrush to swirl the colors through the shaving foam. Don’t overmix, or you’ll end up with a muddy mess. The goal is to create interesting patterns.
4. Lay the Paper or Fabric: Gently lay your paper or fabric onto the surface of the shaving foam. Press it down lightly to ensure it makes contact with the colored foam.
5. Lift and Scrape: Carefully lift the paper or fabric from the shaving foam.
6. Scrape Off Excess Foam: Use a ruler or scraper to remove the excess shaving foam from the paper or fabric. This will reveal the marbled pattern.
7. Let it Dry: Lay the marbled paper or fabric flat on paper towels to dry completely. The colors will become more vibrant as it dries.
8. Iron (for Fabric): Once the fabric is dry, iron it on a low setting to set the colors.
Puffy Paint
Make your own puffy paint with shaving foam! It’s a fun and textured way to create art.
What you’ll need:
* Shaving foam
* White school glue
* Food coloring or paint
* Bowls or containers for mixing
* Spoons or stir sticks
* Paper or cardboard
Step-by-step instructions:
1. Mix the Paint: In a bowl, mix equal parts shaving foam and white school glue.
2. Add Color: Add a few drops of food coloring or paint to the mixture and stir until you achieve your desired color. You can create multiple colors by dividing the mixture into separate bowls.
3. Create Your Art: Use a spoon, paintbrush, or even your fingers to apply the puffy paint to paper or cardboard. The thicker you apply the paint, the puffier it will be.
4. Let it Dry: Allow the paint to dry completely. This may take several hours or even overnight. As it dries, the paint will puff up and create a raised, textured effect.
Household Helpers: Unexpected Uses for Shaving Foam
Beyond cleaning and crafting, shaving foam has some surprising uses around the house.
Unsticking Zippers
A stuck zipper can be frustrating. Shaving foam can help!
What you’ll need:
* Shaving foam
* A cotton swab or your finger
Step-by-step instructions:
1. Apply the Shaving Foam: Apply a small amount of shaving foam to the zipper teeth around the stuck area.
2. Work it In: Use a cotton swab or your finger to gently work the shaving foam into the zipper teeth.
3. Gently Wiggle: Gently wiggle the zipper pull up and down. The shaving foam will lubricate the teeth and help to loosen the zipper.
4. Wipe Away Excess: Once the zipper is unstuck, wipe away any excess shaving foam with a clean cloth.
Soothing Minor Burns
While not a substitute for medical treatment, shaving foam can provide temporary relief for minor burns.
What you’ll need:
* Shaving foam
* Cool water
Step-by-step instructions:
1. Cool the Burn: Immediately cool the burn under cool running water for several minutes.
2. Apply Shaving Foam: Gently apply a thin layer of shaving foam to the burn. The cooling sensation of the foam can help to soothe the pain.
3. Leave it On: Leave the shaving foam on the burn for a few minutes.
4. Rinse Gently: Gently rinse the shaving foam off with cool water.
5. Seek Medical Attention: If the burn is severe, blistered, or covers a large area, seek medical attention immediately.
Important Note: This is only for minor burns. For serious burns, always consult a doctor.
Preventing Bathroom Mirror Fog
I mentioned this earlier in the cleaning section, but it’s worth repeating because it’s so effective!
What you’ll need:
* Shaving foam
* A clean, dry cloth
Step-by-step instructions:
1. Apply the Shaving Foam: Apply a thin layer of shaving foam to the entire surface of the bathroom mirror.
2. Wipe it Down: Using a clean, dry cloth, wipe the shaving foam off the mirror completely.
3. Enjoy a Fog-Free Mirror: The shaving foam creates
Conclusion
So, there you have it! This deep dive into the world of shaving foam tricks proves that this humble bathroom staple is far more versatile than you ever imagined. From banishing stubborn stains to creating mesmerizing marbled art, the possibilities are truly endless. But why is this DIY approach a must-try?
Firstly, it’s incredibly cost-effective. Instead of purchasing a multitude of specialized cleaning products or expensive art supplies, you can unlock a treasure trove of solutions with a single can of shaving foam. Think of the money you’ll save! Secondly, it’s readily accessible. Most households already have shaving foam on hand, making it a convenient and immediate solution for unexpected problems. No need to run to the store 鈥?the answer is likely already in your bathroom cabinet. Thirdly, it’s surprisingly effective. The unique properties of shaving foam, particularly its ability to lift dirt and grime, make it a powerful cleaning agent and a fantastic medium for creative projects.
But the real magic lies in the experimentation. Don’t be afraid to tweak these techniques to suit your specific needs and preferences. For example, when using shaving foam to clean carpets, consider adding a few drops of essential oil, like lavender or lemon, for a refreshing scent. If you’re creating marbled paper, experiment with different colors of food coloring or liquid watercolors to achieve unique and vibrant effects. For cleaning stainless steel, try using a microfiber cloth for an extra polished finish.
Consider these variations to elevate your shaving foam experience:
* Scented Shaving Foam: Opt for scented shaving foam to add a pleasant fragrance to your cleaning or crafting projects.
* Sensitive Skin Formula: If you have sensitive skin, choose a shaving foam specifically designed for sensitive skin to avoid irritation when using it for cleaning or other applications.
* Gel-Based Shaving Foam: While foam is generally preferred, gel-based shaving foam can also work for some applications, offering a different texture and consistency.
* DIY Shaving Foam: For the truly adventurous, you can even create your own shaving foam using ingredients like castile soap, water, and essential oils. This allows for complete control over the ingredients and scent.
Ultimately, the best way to discover the full potential of these shaving foam tricks is to try them out for yourself. We encourage you to embrace your inner DIY enthusiast and explore the many ways this versatile product can simplify your life and spark your creativity.
We’re confident that you’ll be amazed by the results. So, grab a can of shaving foam, choose a project that piques your interest, and get started! And most importantly, don’t forget to share your experiences with us. We’d love to hear about your successes, your challenges, and any new and innovative ways you’ve discovered to use shaving foam. Share your photos, videos, and tips in the comments section below. Let’s build a community of shaving foam enthusiasts and unlock even more of its hidden potential together! Your insights could inspire others and help us all discover even more amazing uses for this everyday product. Let the shaving foam adventures begin!
Frequently Asked Questions (FAQ)
What type of shaving foam works best for these tricks?
Generally, a basic, non-gel shaving foam works best for most of these DIY tricks. The foamy consistency is ideal for lifting dirt, creating marbled effects, and providing a good base for cleaning. Avoid using shaving creams or gels, as they may not produce the same results. Look for a shaving foam that is primarily composed of water, stearic acid, triethanolamine, isobutane, and butane. These ingredients contribute to the foam’s structure and cleaning properties. Scented shaving foams are fine to use, but be mindful of the scent if you’re sensitive to fragrances.
Is shaving foam safe to use on all surfaces?
While shaving foam is generally safe for most surfaces, it’s always a good idea to test it in an inconspicuous area first, especially on delicate or valuable items. Avoid using it on surfaces that are easily damaged by moisture, such as unfinished wood or certain types of fabric. When cleaning electronics, be extremely cautious and avoid getting any moisture inside the device. For delicate fabrics, consider diluting the shaving foam with water before applying it. Always wipe away any excess foam thoroughly after cleaning.
Can I use shaving foam to remove tough stains like grease or ink?
Yes, shaving foam can be surprisingly effective at removing tough stains like grease, ink, and even some types of food stains. Apply a generous amount of shaving foam to the stain, let it sit for a few minutes to penetrate the fibers, and then gently rub it with a clean cloth or sponge. Rinse the area with water and repeat if necessary. For stubborn stains, you may need to use a stain remover in conjunction with the shaving foam. Remember to test the shaving foam on a hidden area of the fabric first to ensure it doesn’t cause any discoloration.
How long should I leave shaving foam on a surface before wiping it off?
The amount of time you leave shaving foam on a surface depends on the specific application. For cleaning, a few minutes is usually sufficient to allow the foam to lift dirt and grime. For stain removal, you may need to leave it on for a longer period, up to 15-20 minutes, depending on the severity of the stain. For art projects like marbling, the timing is crucial and will depend on the specific technique you’re using. Always monitor the surface and wipe off the shaving foam before it dries completely, as this can make it more difficult to remove.
Does shaving foam have an expiration date?
While shaving foam doesn’t necessarily have a strict expiration date, its effectiveness may decrease over time. The propellant in the can can lose its pressure, making it difficult to dispense the foam properly. The ingredients may also separate or degrade, affecting the foam’s consistency and cleaning properties. If the shaving foam is discolored, has an unusual odor, or doesn’t dispense properly, it’s best to discard it.
Can I use shaving foam to clean my car’s interior?
Yes, shaving foam can be used to clean certain parts of your car’s interior, such as fabric seats and carpets. It can help remove stains and freshen up the upholstery. However, avoid using it on leather surfaces, as it can dry them out. Always test the shaving foam on a small, inconspicuous area first to ensure it doesn’t damage the material. Use a clean, damp cloth to wipe away any excess foam and allow the area to dry completely.
Is shaving foam safe for children to use in art projects?
While shaving foam is generally safe, it’s important to supervise children when they’re using it for art projects. Avoid letting them ingest the foam, and ensure they wash their hands thoroughly after handling it. If a child has sensitive skin, consider using a shaving foam specifically designed for sensitive skin. It’s also a good idea to protect their clothing with an apron or old t-shirt.
Can I use shaving foam to clean my bathroom mirrors and windows?
Yes, shaving foam is an excellent cleaner for bathroom mirrors and windows. It helps prevent fogging and leaves a streak-free shine. Simply apply a thin layer of shaving foam to the surface, let it sit for a minute or two, and then wipe it off with a clean, dry cloth. For best results, use a microfiber cloth.
What are the environmental considerations when using shaving foam?
Most shaving foams come in aerosol cans, which can have an environmental impact. Look for shaving foams that use environmentally friendly propellants or consider using a shaving soap or cream instead. Dispose of empty aerosol cans properly according to your local recycling guidelines. You can also explore making your own DIY shaving foam using natural ingredients to reduce your environmental footprint.

Leave a Comment