
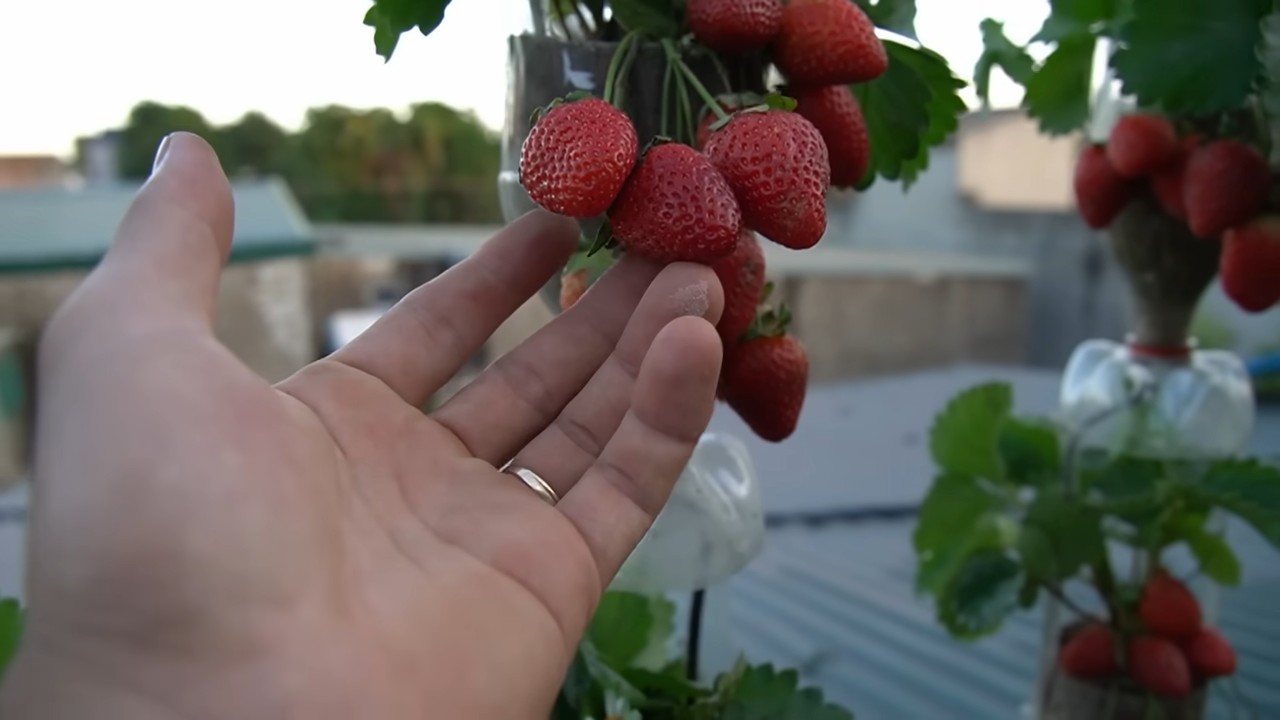
DIY Strawberry Tower: Imagine plucking juicy, sun-ripened strawberries right from your own backyard, even if you’re short on space! That’s the magic a DIY strawberry tower can bring to your life. For centuries, gardeners have sought innovative ways to maximize their yields, and vertical gardening, in particular, has a rich history, dating back to the Hanging Gardens of Babylon. While we might not be building wonders of the ancient world, we *can* create our own little edible paradise.
Let’s be honest, who *doesn’t* love fresh strawberries? But not everyone has acres of land to dedicate to a sprawling strawberry patch. That’s where this DIY trick comes in! A strawberry tower is a fantastic solution for apartment dwellers, balcony gardeners, or anyone simply looking to add a touch of whimsy and productivity to their outdoor space. Plus, it’s a fun and rewarding project that even beginner gardeners can tackle.
This article will guide you step-by-step through creating your very own DIY Strawberry Tower, transforming a small area into a thriving source of delicious berries. We’ll cover everything from choosing the right materials to planting and caring for your strawberry plants, ensuring you’ll be enjoying a bountiful harvest in no time. Get ready to roll up your sleeves and create a beautiful and productive addition to your home!
Erdbeerturm selber bauen: Eine Schritt-für-Schritt Anleitung
Hallo liebe Gartenfreunde! Ich zeige euch heute, wie ihr einen wunderschönen und platzsparenden Erdbeerturm selber bauen könnt. Das ist nicht nur ein toller Hingucker, sondern auch eine super Möglichkeit, viele Erdbeeren auf kleinem Raum anzubauen. Los geht’s!
Was du brauchst:
* Ein großes Kunststoffrohr (ca. 1,20m – 1,50m lang, Durchmesser ca. 20-30cm). Ich habe ein Abwasserrohr aus dem Baumarkt verwendet.
* Ein kleineres Kunststoffrohr (ca. 1,20m – 1,50m lang, Durchmesser ca. 5-8cm). Dieses dient zur Bewässerung.
* Bohrmaschine mit Lochsäge (Durchmesser ca. 8-10cm, je nach Größe deiner Erdbeerpflanzen)
* Bohrmaschine mit kleinem Bohrer (ca. 5-6mm)
* Gartenvlies oder Unkrautvlies
* Erde (am besten spezielle Erdbeererde)
* Kies oder Blähton zur Drainage
* Erdbeerpflanzen (so viele, wie Löcher in deinen Turm passen)
* Maßband oder Zollstock
* Stift oder Marker
* Handschuhe (optional, aber empfehlenswert)
* Schere oder Messer
* Etwas Klebeband (optional)
Vorbereitung ist alles:
Bevor wir loslegen, ist es wichtig, alles vorzubereiten. Das spart Zeit und Nerven!
1. Rohre zuschneiden: Überprüfe, ob deine Rohre die richtige Länge haben. Ich habe meine Rohre im Baumarkt direkt zuschneiden lassen, das spart Zeit und Mühe. Wenn du es selbst machst, achte auf einen sauberen Schnitt.
2. Materialien bereitlegen: Lege alle Materialien und Werkzeuge bereit. So hast du alles griffbereit und musst nicht ständig suchen.
3. Arbeitsplatz vorbereiten: Suche dir einen geeigneten Arbeitsplatz. Am besten draußen, da beim Bohren Staub entsteht. Lege etwas unter, um den Boden zu schützen.
Löcher bohren für die Erdbeerpflanzen:
Das ist der wichtigste Schritt, denn hier entstehen die “Fenster” für deine Erdbeeren.
1. Abstände markieren: Miss mit dem Maßband gleichmäßige Abstände auf dem großen Rohr aus. Ich habe ca. 20-25cm zwischen den Löchern gelassen. Markiere die Stellen mit dem Stift. Achte darauf, dass die Löcher versetzt angeordnet sind, damit die Pflanzen genügend Platz haben.
2. Löcher bohren: Setze die Lochsäge auf die Bohrmaschine und bohre vorsichtig die Löcher an den markierten Stellen. Übe nicht zu viel Druck aus, damit das Rohr nicht reißt. Trage am besten Handschuhe, um deine Hände zu schützen.
3. Kanten entgraten: Entferne eventuelle scharfe Kanten an den Löchern mit einem Messer oder einer Feile. So verhinderst du, dass die Pflanzen beschädigt werden.
Bewässerungsrohr vorbereiten:
Damit deine Erdbeeren auch von innen bewässert werden, brauchen wir das kleinere Rohr.
1. Löcher bohren: Bohre mit dem kleinen Bohrer viele kleine Löcher in das kleinere Rohr. Die Löcher sollten gleichmäßig über die gesamte Länge des Rohres verteilt sein. So wird das Wasser gleichmäßig verteilt.
2. Vlies umwickeln: Umwickle das kleinere Rohr mit Gartenvlies oder Unkrautvlies. Das verhindert, dass die Erde die Löcher verstopft. Fixiere das Vlies mit etwas Klebeband, damit es nicht verrutscht.
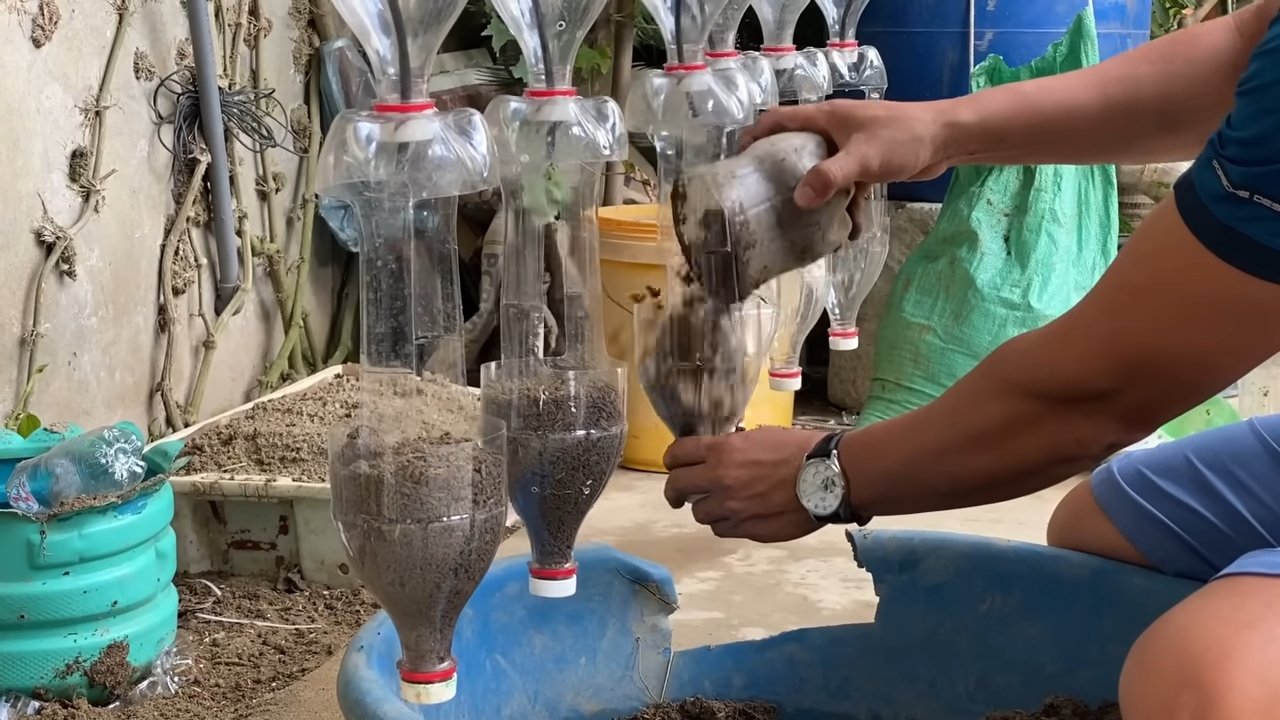
Den Erdbeerturm befüllen:
Jetzt kommt der spannende Teil: Wir befüllen den Turm mit Erde und pflanzen die Erdbeeren ein.
1. Drainage einfüllen: Stelle das große Rohr an den gewünschten Standort. Fülle eine Schicht Kies oder Blähton (ca. 10-15cm) in das Rohr. Das sorgt für eine gute Drainage und verhindert Staunässe.
2. Bewässerungsrohr platzieren: Stelle das vorbereitete kleinere Rohr mittig in das große Rohr.
3. Erde einfüllen: Fülle nun die Erde in das große Rohr. Achte darauf, dass das Bewässerungsrohr mittig bleibt. Fülle die Erde schichtweise ein und drücke sie leicht an.
4. Erdbeeren einpflanzen: Setze die Erdbeerpflanzen vorsichtig in die Löcher. Achte darauf, dass die Wurzeln gut mit Erde bedeckt sind. Drücke die Erde um die Pflanzen herum leicht an.
5. Gießen: Gieße die Erdbeeren nach dem Einpflanzen gründlich. Gieße auch in das Bewässerungsrohr, damit die Erde gleichmäßig durchfeuchtet wird.
Pflege deines Erdbeerturms:
Damit du lange Freude an deinem Erdbeerturm hast, ist die richtige Pflege wichtig.
* Gießen: Gieße die Erdbeeren regelmäßig, besonders an heißen Tagen. Achte darauf, dass die Erde immer leicht feucht ist. Gieße sowohl von oben als auch in das Bewässerungsrohr.
* Düngen: Dünge die Erdbeeren regelmäßig mit einem speziellen Erdbeerdünger. So bekommen sie alle wichtigen Nährstoffe.
* Schädlinge kontrollieren: Kontrolliere die Erdbeeren regelmäßig auf Schädlinge wie Schnecken oder Blattläuse. Bei Bedarf kannst du biologische Schädlingsbekämpfungsmittel einsetzen.
* Ausputzen: Entferne regelmäßig abgestorbene Blätter und Früchte. So verhinderst du die Ausbreitung von Krankheiten.
* Überwintern: Im Winter solltest du den Erdbeerturm vor Frost schützen. Stelle ihn an einen geschützten Ort oder decke ihn mit Vlies ab.
Zusätzliche Tipps und Tricks:
* Standort: Wähle einen sonnigen Standort für deinen Erdbeerturm. Erdbeeren brauchen viel Sonne, um gut zu wachsen und süße Früchte zu bilden.
* Erdbeersorten: Es gibt viele verschiedene Erdbeersorten. Wähle Sorten, die für den Anbau im Topf geeignet sind.
* Dekoration: Du kannst deinen Erdbeerturm zusätzlich dekorieren. Bemalen das Rohr mit bunten Farben oder beklebe es mit Mosaiksteinen.
* Alternative Materialien: Statt eines Kunststoffrohrs kannst du auch andere Materialien verwenden, z.B. alte Autoreifen oder Pflanzkübel.
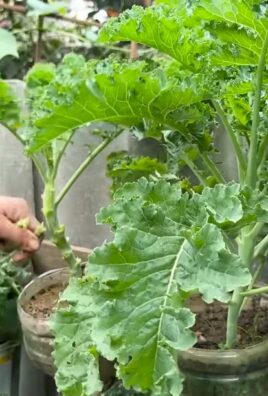
* Vertikale Gärten: Der Erdbeerturm ist eine tolle Möglichkeit, einen vertikalen Garten anzulegen. Du kannst auch andere Pflanzen wie Kräuter oder Salat in einem ähnlichen Turm anbauen.
Häufige Fehler und wie du sie vermeidest:
* Falsche Erde: Verwende unbedingt spezielle Erdbeererde. Normale Blumenerde ist oft zu nährstoffreich und kann zu Problemen führen.
* Staunässe: Achte auf eine gute Drainage, um Staunässe zu vermeiden. Staunässe kann zu Wurzelfäule führen.
* Zu wenig Sonne: Erdbeeren brauchen viel Sonne. Stelle den Turm an einen sonnigen Standort.
* Zu wenig Wasser: Gieße die Erdbeeren regelmäßig, besonders an heißen Tagen.
* Schädlinge: Kontrolliere die Erdbeeren regelmäßig auf Schädlinge und bekämpfe sie bei Bedarf.
Ich hoffe, diese Anleitung hilft dir dabei, deinen eigenen Erdbeerturm zu bauen. Es ist wirklich ein tolles Projekt und du wirst mit leckeren, selbstgepflückten Erdbeeren belohnt! Viel Spaß beim Gärtnern!
Conclusion
Creating your own DIY Strawberry Tower isn’t just a fun project; it’s a game-changer for anyone who loves fresh, homegrown strawberries. Imagine stepping outside your door and plucking perfectly ripe, juicy berries straight from your own vertical garden. This isn’t some far-off fantasy; it’s an achievable reality with a little effort and our simple guide.
Why is this DIY trick a must-try? Firstly, it maximizes space. Whether you have a sprawling garden or a tiny balcony, a strawberry tower allows you to grow a significant number of plants in a compact area. This is especially beneficial for urban gardeners or those with limited outdoor space. Secondly, it improves air circulation and sunlight exposure. By elevating the plants, you reduce the risk of fungal diseases and ensure that each strawberry receives ample sunlight, leading to sweeter, more flavorful fruit. Thirdly, it’s aesthetically pleasing. A well-constructed strawberry tower adds a touch of charm and visual interest to any outdoor space, transforming it into a vibrant and productive oasis.
Beyond the basic design, there are countless ways to customize your strawberry tower. Consider using different materials for the tower itself. Recycled pallets, stacked tires, or even repurposed plastic bottles can all be transformed into unique and eco-friendly structures. Experiment with different soil mixes to find the perfect blend for your local climate and strawberry variety. You can also incorporate companion plants like basil or marigolds to deter pests and attract beneficial insects. For a truly personalized touch, paint the tower in your favorite colors or add decorative elements like pebbles or shells.
Don’t be afraid to get creative and adapt the design to suit your own needs and preferences. The most important thing is to have fun and enjoy the process of creating your own thriving strawberry garden.
We wholeheartedly encourage you to try this DIY Strawberry Tower project. It’s a rewarding experience that will provide you with fresh, delicious strawberries for months to come. And the best part? You’ll have the satisfaction of knowing that you grew them yourself.
Once you’ve built your tower and harvested your first batch of strawberries, we’d love to hear about your experience! Share your photos, tips, and variations on social media using #DIYStrawberryTower. Let’s inspire others to embrace the joy of homegrown strawberries and create a community of passionate gardeners. Your insights could help someone else create their own successful and bountiful strawberry tower. So, get your hands dirty, unleash your creativity, and start building your own vertical strawberry paradise today! The taste of fresh, homegrown strawberries is waiting.
FAQ
What type of strawberries are best for a strawberry tower?
The best types of strawberries for a strawberry tower are everbearing and day-neutral varieties. Everbearing strawberries produce fruit throughout the growing season, offering a continuous harvest. Day-neutral strawberries are less sensitive to day length and will also produce fruit consistently. Some popular choices include:
* **Everbearing:** Albion, Seascape, Ozark Beauty
* **Day-Neutral:** Tristar, Tribute
These varieties tend to be more compact and produce well in containers, making them ideal for the confined space of a strawberry tower. Avoid June-bearing strawberries, as they produce one large crop in early summer and then stop fruiting for the rest of the year.
How often should I water my strawberry tower?
Watering frequency depends on several factors, including the weather, the type of soil you’re using, and the material of your tower. Generally, you should water your strawberry tower when the top inch of soil feels dry to the touch. During hot, sunny weather, this may be every day or even twice a day. In cooler, cloudier weather, you may only need to water every few days.
A good way to check is to stick your finger into the soil. If it feels dry, it’s time to water. When watering, make sure to saturate the soil thoroughly, allowing the water to drain out of the bottom of the tower. Avoid overwatering, as this can lead to root rot. Consider using a soaker hose or drip irrigation system for more efficient and consistent watering.
What kind of soil should I use for my strawberry tower?
The ideal soil for a strawberry tower is a well-draining, nutrient-rich potting mix. Avoid using garden soil, as it can be too heavy and compact, hindering drainage and root growth. A good potting mix will contain a blend of peat moss, perlite, and vermiculite. You can also amend the potting mix with compost or aged manure to provide additional nutrients.
Strawberries prefer slightly acidic soil, with a pH between 5.5 and 6.5. You can test the pH of your soil using a soil testing kit and adjust it accordingly. If your soil is too alkaline, you can add sulfur or peat moss to lower the pH.
How much sunlight do strawberry towers need?
Strawberry towers need at least 6-8 hours of direct sunlight per day to produce abundant fruit. Choose a location for your tower that receives full sun throughout the day. If you live in a particularly hot climate, you may need to provide some afternoon shade to protect the plants from scorching.
If you don’t have a sunny spot, you can supplement with grow lights. Position the grow lights about 12-18 inches above the plants and keep them on for 12-14 hours per day.
How do I fertilize my strawberry tower?
Strawberries are heavy feeders and require regular fertilization to produce abundant fruit. Start fertilizing your strawberry tower about a month after planting. Use a balanced fertilizer with an NPK ratio of 10-10-10 or 14-14-14. You can also use a fertilizer specifically formulated for strawberries.
Fertilize every 2-4 weeks during the growing season, following the instructions on the fertilizer package. Avoid over-fertilizing, as this can burn the plants. You can also supplement with organic fertilizers like compost tea or fish emulsion.
How do I protect my strawberry tower from pests and diseases?
Strawberries are susceptible to a variety of pests and diseases, including aphids, spider mites, slugs, snails, and fungal diseases. To protect your strawberry tower, take the following precautions:
* Inspect your plants regularly for signs of pests or diseases.
* Remove any infected leaves or fruit immediately.
* Use organic pest control methods like insecticidal soap or neem oil to control pests.
* Provide good air circulation to prevent fungal diseases.
* Water your plants in the morning to allow the foliage to dry before nightfall.
* Consider using companion plants like basil or marigolds to deter pests.
Can I grow other plants in my strawberry tower?
While the primary focus is strawberries, you can certainly incorporate other compatible plants into your strawberry tower. Herbs like basil, thyme, and oregano are excellent choices, as they can help deter pests and attract beneficial insects. Leafy greens like lettuce and spinach can also be grown in the lower tiers of the tower.
Avoid planting aggressive or sprawling plants that will compete with the strawberries for resources. Also, be mindful of the light and water requirements of the different plants you choose.
How do I overwinter my s
Creating your own DIY Strawberry Tower isn’t just a fun project; it’s a game-changer for anyone who loves fresh, homegrown strawberries. Imagine stepping outside your door and plucking perfectly ripe, juicy berries straight from your own vertical garden. This isn’t some far-off fantasy; it’s an achievable reality with a little effort and our simple guide.
Why is this DIY trick a must-try? Firstly, it maximizes space. Whether you have a sprawling garden or a tiny balcony, a strawberry tower allows you to grow a significant number of plants in a compact area. This is especially beneficial for urban gardeners or those with limited outdoor space. Secondly, it improves air circulation and sunlight exposure. By elevating the plants, you reduce the risk of fungal diseases and ensure that each strawberry receives ample sunlight, leading to sweeter, more flavorful fruit. Thirdly, it’s aesthetically pleasing. A well-constructed strawberry tower adds a touch of charm and visual interest to any outdoor space, transforming it into a vibrant and productive oasis.
Beyond the basic design, there are countless ways to customize your strawberry tower. Consider using different materials for the tower itself. Recycled pallets, stacked tires, or even repurposed plastic bottles can all be transformed into unique and eco-friendly structures. Experiment with different soil mixes to find the perfect blend for your local climate and strawberry variety. You can also incorporate companion plants like basil or marigolds to deter pests and attract beneficial insects. For a truly personalized touch, paint the tower in your favorite colors or add decorative elements like pebbles or shells.
Don’t be afraid to get creative and adapt the design to suit your own needs and preferences. The most important thing is to have fun and enjoy the process of creating your own thriving strawberry garden.
We wholeheartedly encourage you to try this DIY Strawberry Tower project. It’s a rewarding experience that will provide you with fresh, delicious strawberries for months to come. And the best part? You’ll have the satisfaction of knowing that you grew them yourself.
Once you’ve built your tower and harvested your first batch of strawberries, we’d love to hear about your experience! Share your photos, tips, and variations on social media using #DIYStrawberryTower. Let’s inspire others to embrace the joy of homegrown strawberries and create a community of passionate gardeners. Your insights could help someone else create their own successful and bountiful strawberry tower. So, get your hands dirty, unleash your creativity, and start building your own vertical strawberry paradise today! The taste of fresh, homegrown strawberries is waiting.
FAQ
What type of strawberries are best for a strawberry tower?
The best types of strawberries for a strawberry tower are everbearing and day-neutral varieties. Everbearing strawberries produce fruit throughout the growing season, offering a continuous harvest. Day-neutral strawberries are less sensitive to day length and will also produce fruit consistently. Some popular choices include:
* **Everbearing:** Albion, Seascape, Ozark Beauty
* **Day-Neutral:** Tristar, Tribute
These varieties tend to be more compact and produce well in containers, making them ideal for the confined space of a strawberry tower. Avoid June-bearing strawberries, as they produce one large crop in early summer and then stop fruiting for the rest of the year.
How often should I water my strawberry tower?
Watering frequency depends on several factors, including the weather, the type of soil you’re using, and the material of your tower. Generally, you should water your strawberry tower when the top inch of soil feels dry to the touch. During hot, sunny weather, this may be every day or even twice a day. In cooler, cloudier weather, you may only need to water every few days.
A good way to check is to stick your finger into the soil. If it feels dry, it’s time to water. When watering, make sure to saturate the soil thoroughly, allowing the water to drain out of the bottom of the tower. Avoid overwatering, as this can lead to root rot. Consider using a soaker hose or drip irrigation system for more efficient and consistent watering.
What kind of soil should I use for my strawberry tower?
The ideal soil for a strawberry tower is a well-draining, nutrient-rich potting mix. Avoid using garden soil, as it can be too heavy and compact, hindering drainage and root growth. A good potting mix will contain a blend of peat moss, perlite, and vermiculite. You can also amend the potting mix with compost or aged manure to provide additional nutrients.
Strawberries prefer slightly acidic soil, with a pH between 5.5 and 6.5. You can test the pH of your soil using a soil testing kit and adjust it accordingly. If your soil is too alkaline, you can add sulfur or peat moss to lower the pH.
How much sunlight do strawberry towers need?
Strawberry towers need at least 6-8 hours of direct sunlight per day to produce abundant fruit. Choose a location for your tower that receives full sun throughout the day. If you live in a particularly hot climate, you may need to provide some afternoon shade to protect the plants from scorching.
If you don’t have a sunny spot, you can supplement with grow lights. Position the grow lights about 12-18 inches above the plants and keep them on for 12-14 hours per day.
How do I fertilize my strawberry tower?
Strawberries are heavy feeders and require regular fertilization to produce abundant fruit. Start fertilizing your strawberry tower about a month after planting. Use a balanced fertilizer with an NPK ratio of 10-10-10 or 14-14-14. You can also use a fertilizer specifically formulated for strawberries.
Fertilize every 2-4 weeks during the growing season, following the instructions on the fertilizer package. Avoid over-fertilizing, as this can burn the plants. You can also supplement with organic fertilizers like compost tea or fish emulsion.
How do I protect my strawberry tower from pests and diseases?
Strawberries are susceptible to a variety of pests and diseases, including aphids, spider mites, slugs, snails, and fungal diseases. To protect your strawberry tower, take the following precautions:
* Inspect your plants regularly for signs of pests or diseases.
* Remove any infected leaves or fruit immediately.
* Use organic pest control methods like insecticidal soap or neem oil to control pests.
* Provide good air circulation to prevent fungal diseases.
* Water your plants in the morning to allow the foliage to dry before nightfall.
* Consider using companion plants like basil or marigolds to deter pests.
Can I grow other plants in my strawberry tower?
While the primary focus is strawberries, you can certainly incorporate other compatible plants into your strawberry tower. Herbs like basil, thyme, and oregano are excellent choices, as they can help deter pests and attract beneficial insects. Leafy greens like lettuce and spinach can also be grown in the lower tiers of the tower.
Avoid planting aggressive or sprawling plants that will compete with the strawberries for resources. Also, be mindful of the light and water requirements of the different plants you choose.
How do I overwinter my strawberry tower?
In colder climates, you’ll need to protect your strawberry tower from freezing temperatures. Here are a few options:
* Move the tower to a sheltered location, such as a garage or shed.
* Wrap the tower in burlap or blankets to insulate it.
* Mulch around the base of the plants with straw or leaves.
* Water the plants sparingly during the winter months.
In milder climates, you may not need to take any special precautions. However, it’s still a good idea to mulch around the base of the plants to protect them from frost.
How long will my strawberry tower last?
The lifespan of your strawberry tower depends on the materials you use and how well you maintain it. A well-constructed tower made from durable materials can last for several years. However, you may need to replace the soil and plants every few years to maintain optimal productivity. Regularly inspect your tower for signs of damage and make any necessary repairs. With proper care, your DIY Strawberry Tower can provide you with years of fresh, delicious strawberries.

Leave a Comment