
Grow Ananas Melons at Home? Absolutely! Imagine biting into a juicy, fragrant Ananas melon, bursting with sweetness, knowing you nurtured it from seed to fruit right in your own backyard. It’s not just a dream; it’s an achievable reality with a little know-how and some DIY spirit. For centuries, cultivating melons has been a cherished practice across various cultures, symbolizing abundance and prosperity. From ancient Egypt to the royal gardens of Europe, melons have held a special place in our culinary and horticultural history.
But why should you embark on this melon-growing adventure? Well, store-bought melons often lack the intense flavor and freshness of homegrown varieties. Plus, there’s immense satisfaction in nurturing a plant and reaping its delicious rewards. This DIY guide is your key to unlocking the secrets of successfully grow Ananas Melons at Home, even if you’re a complete beginner. I’ll share simple, effective tricks and hacks that will transform your garden into a melon paradise. Get ready to impress your friends and family with your homegrown Ananas melons – let’s get started!
Grow Your Own Pineapple Melon Paradise at Home!
Okay, melon lovers, listen up! I’m about to share my secrets to growing juicy, fragrant Pineapple Melons right in your own backyard (or even in containers!). It might sound intimidating, but trust me, with a little patience and these easy-to-follow steps, you’ll be enjoying homegrown melon goodness in no time.
What You’ll Need: The Essential Supplies
Before we dive in, let’s gather our supplies. Having everything ready will make the whole process smoother and more enjoyable.
* Pineapple Melon Seeds: Obviously! Make sure you get them from a reputable source to ensure good germination rates and healthy plants. Look for varieties that are well-suited to your climate.
* Seed Starting Trays or Small Pots: These are perfect for getting your seedlings off to a strong start.
* Seed Starting Mix: This is a light, sterile mix that provides the perfect environment for delicate seedlings. Don’t use regular garden soil for starting seeds!
* Larger Pots (if growing in containers): Choose pots that are at least 15-20 gallons in size. Melons need plenty of room for their roots to spread.
* Well-Draining Potting Mix (for containers): A good quality potting mix will provide the nutrients and drainage your melon plants need.
* Garden Soil (if planting in the ground): Amend your garden soil with compost or well-rotted manure to improve drainage and fertility.
* Compost or Well-Rotted Manure: This is essential for providing your melon plants with the nutrients they need to thrive.
* Fertilizer: A balanced fertilizer (like 10-10-10) or a fertilizer specifically formulated for melons will help your plants produce abundant fruit.
* Trowel or Garden Shovel: For planting and transplanting.
* Watering Can or Hose: For keeping your plants well-hydrated.
* Trellis or Support System (optional): Pineapple Melons can get quite heavy, so a trellis can help support the vines and keep the fruit off the ground.
* Gardening Gloves: To protect your hands.
* Row Covers (optional): To protect young plants from pests and frost.
Phase 1: Starting Your Seeds Indoors (Recommended)
Starting your seeds indoors gives you a head start on the growing season, especially if you live in a cooler climate. I highly recommend this method for the best results.
1. Prepare Your Seed Starting Trays: Fill your seed starting trays or small pots with seed starting mix. Gently press the mix down to remove any air pockets.
2. Sow the Seeds: Plant 2-3 seeds per cell or pot, about ½ inch deep.
3. Water Gently: Water the soil gently to moisten it. Avoid overwatering, which can lead to damping off (a fungal disease that can kill seedlings).
4. Provide Warmth and Light: Place the trays or pots in a warm location (around 70-80°F) and provide plenty of light. A sunny windowsill or a grow light will work well.
5. Keep the Soil Moist: Check the soil regularly and water as needed to keep it moist but not soggy.
6. Thin the Seedlings: Once the seedlings have emerged and have a couple of true leaves, thin them to one plant per cell or pot. Choose the strongest, healthiest seedling to keep.
Phase 2: Preparing Your Planting Area
Whether you’re planting in containers or in the ground, proper soil preparation is crucial for success.
For Container Gardening:
1. Choose the Right Container: As I mentioned earlier, you’ll need a large container (at least 15-20 gallons) with good drainage holes.
2. Fill with Potting Mix: Fill the container with a high-quality, well-draining potting mix.
3. Amend the Soil (Optional): You can add some compost or well-rotted manure to the potting mix to boost its fertility.
For In-Ground Planting:
1. Choose a Sunny Location: Pineapple Melons need at least 6-8 hours of sunlight per day.
2. Prepare the Soil: Dig a hole that is twice as wide and as deep as the root ball of your seedling.
3. Amend the Soil: Mix the soil you removed from the hole with compost or well-rotted manure. This will improve drainage, fertility, and soil structure.
4. Check the Drainage: Make sure the soil drains well. If the soil is heavy clay, you may need to add some sand or other amendments to improve drainage.
Phase 3: Transplanting Your Seedlings
Once your seedlings are strong and the weather is warm enough, it’s time to transplant them to their final growing location.
1. Harden Off the Seedlings: Before transplanting, you’ll need to harden off the seedlings. This means gradually exposing them to outdoor conditions over a period of 7-10 days. Start by placing them in a sheltered location for a few hours each day, gradually increasing the amount of time they spend outdoors.
2. Choose a Warm, Sunny Day: Transplant your seedlings on a warm, sunny day when the danger of frost has passed.
3. Carefully Remove the Seedlings: Gently remove the seedlings from their trays or pots, being careful not to damage the roots.
4. Plant the Seedlings: Plant the seedlings in the prepared holes or containers, spacing them about 2-3 feet apart.
5. Water Thoroughly: Water the seedlings thoroughly after planting.
6. Mulch Around the Plants: Apply a layer of mulch around the plants to help retain moisture, suppress weeds, and regulate soil temperature.
Phase 4: Caring for Your Pineapple Melon Plants
Now that your plants are in the ground (or in containers), it’s time to provide them with the care they need to thrive.
1. Water Regularly: Water your melon plants regularly, especially during hot, dry weather. Aim to keep the soil consistently moist but not soggy. Water deeply and less frequently, rather than shallowly and more often.
2. Fertilize Regularly: Fertilize your melon plants every 2-3 weeks with a balanced fertilizer or a fertilizer specifically formulated for melons. Follow the instructions on the fertilizer label.
3. Provide Support: As the vines grow, they may need support. You can use a trellis, stakes, or even a tomato cage to keep the vines off the ground. This will also help prevent the fruit from rotting.
4. Prune the Vines (Optional): Some gardeners prune their melon vines to encourage fruit production. You can prune off any suckers (small shoots that grow from the base of the plant) or any unproductive vines.
5. Watch Out for Pests and Diseases: Keep an eye out for common melon pests and diseases, such as aphids, squash bugs, and powdery mildew. Take action promptly if you notice any problems. Insecticidal soap or neem oil can be effective for controlling many pests. Fungicides can be used to treat fungal diseases.
6. Hand Pollination (If Necessary): If you’re not seeing a lot of fruit set, you may need to hand-pollinate the flowers. To do this, use a small paintbrush to transfer pollen from the male flowers to the female flowers. Female flowers have a small fruit behind the flower, while male flowers do not.
Phase 5: Harvesting Your Pineapple Melons
The most exciting part! Knowing when to harvest your Pineapple Melons is key to enjoying their delicious flavor.
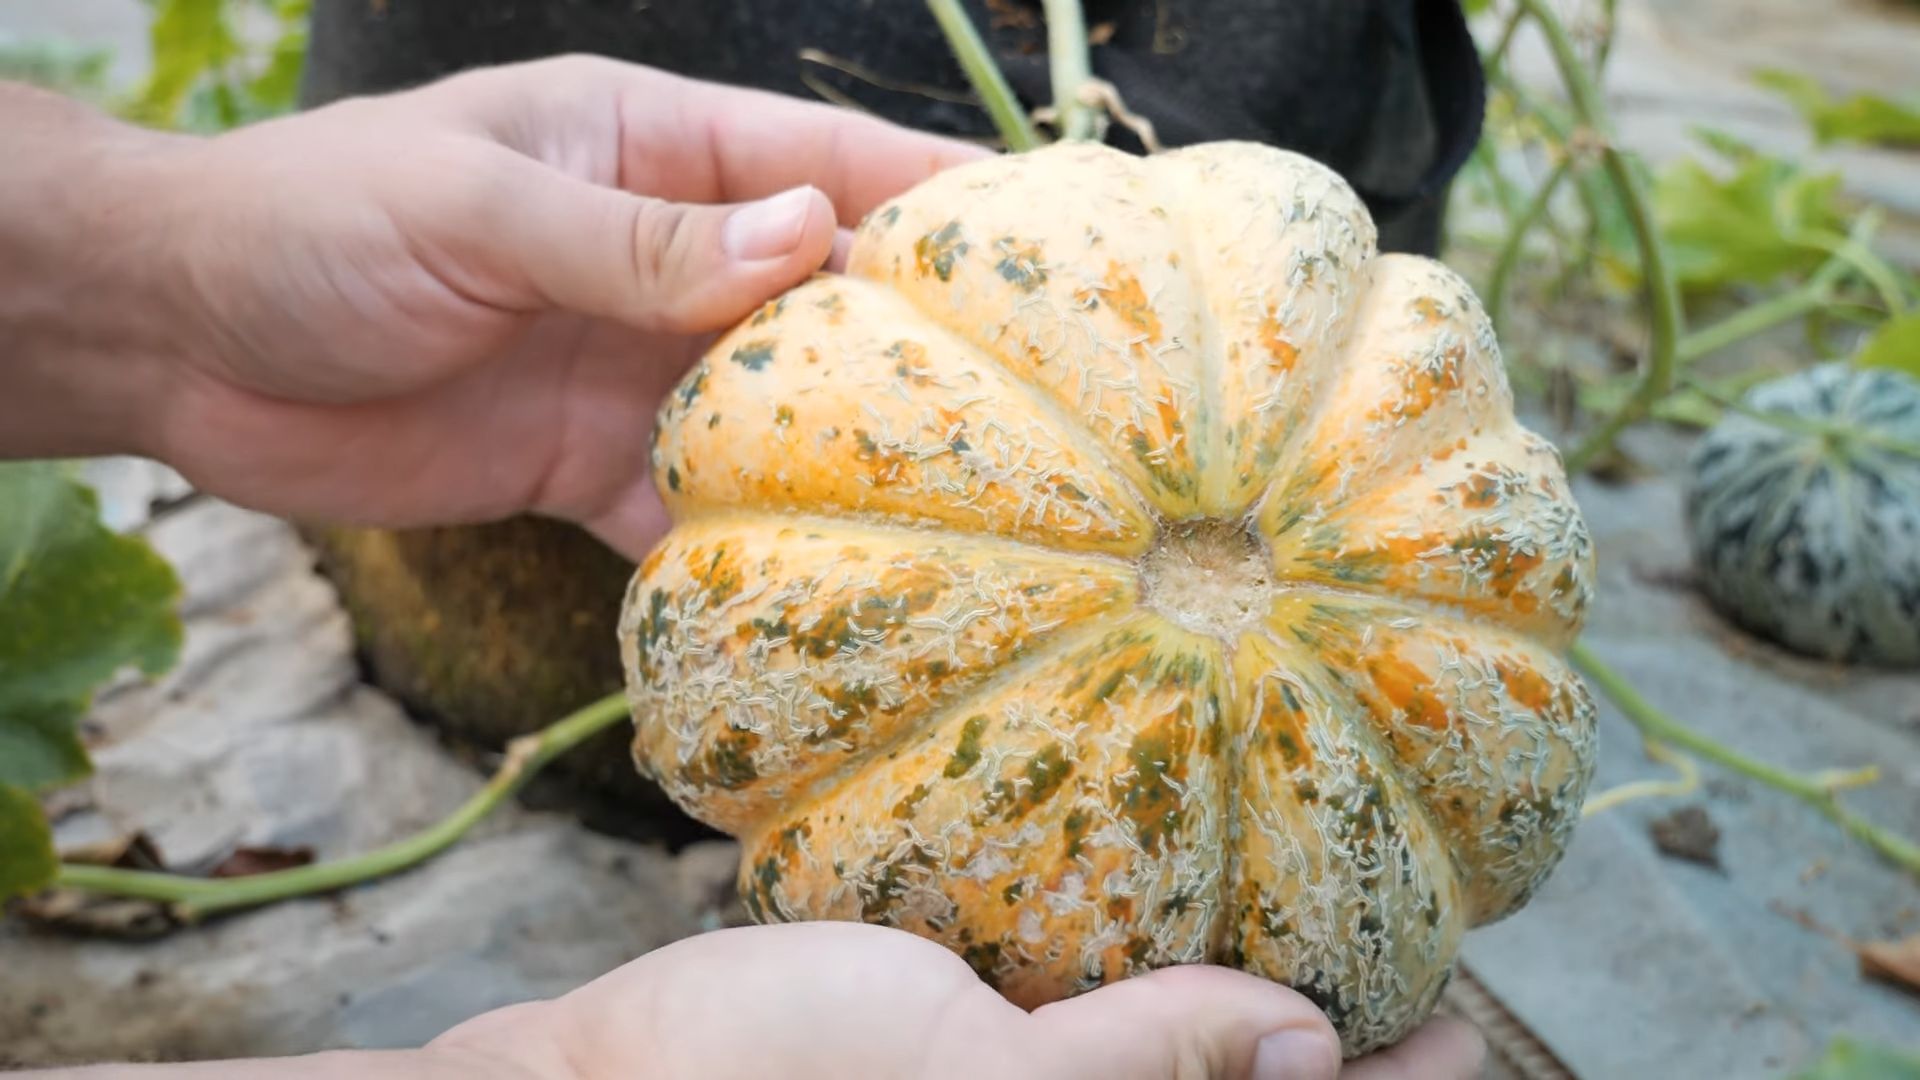
1. Check for Ripeness: Pineapple Melons are typically ready to harvest about 80-90 days after planting. Look for these signs of ripeness:
* Color Change: The skin of the melon will change from green to a yellowish-tan color.
* Fragrance: The melon will have a sweet, pineapple-like fragrance.
* Stem Slip: The stem will begin to separate easily from the melon.
* Sound: When you thump the melon, it should sound hollow.
2. Harvest Carefully: Use a sharp knife or pruning shears to cut the melon from the vine, leaving a short piece of stem attached.
3. Enjoy! Let the melon sit at room temperature for a few days to fully ripen. Then, chill it in the refrigerator and enjoy!
Troubleshooting Tips
* Poor Germination: Make sure your seeds are fresh and viable. Use a seed starting mix and keep the soil moist but not soggy. Provide adequate warmth and light.
* Yellowing Leaves: This could be a sign of overwatering, underwatering, nutrient deficiency, or disease. Check the soil moisture and adjust your watering accordingly. Fertilize your plants regularly.
* Lack of Fruit Set: This could be due

Conclusion
So, there you have it! Growing Ananas melons at home might seem like a tropical dream, but with a little patience, the right techniques, and this straightforward DIY approach, you can absolutely cultivate these fragrant, delicious fruits in your own backyard or even on a sunny balcony. Forget the expensive grocery store prices and often disappointing quality; imagine biting into a perfectly ripe, homegrown Ananas melon, bursting with sweetness and the satisfaction of knowing you nurtured it from seed to table.
This isn’t just about saving money; it’s about connecting with nature, understanding the growing process, and enjoying the unparalleled flavor of fresh, locally grown produce. The DIY method we’ve outlined simplifies the process, breaking down each step into manageable tasks, making it accessible even for beginner gardeners. From seed selection to pollination techniques, we’ve covered the essential elements to ensure your success in cultivating these unique melons.
Why is this DIY trick a must-try? Because it empowers you to control the quality of your food, reduces your environmental footprint by minimizing transportation, and provides a rewarding and educational experience. Plus, the taste of a homegrown Ananas melon is simply unmatched!
But don’t stop there! Experiment with different varieties of Ananas melons. Some are sweeter, some have a more pronounced aroma, and others are better suited for specific climates. Try growing them in raised beds for improved drainage, or consider using companion planting to deter pests naturally. You could even explore different trellising methods to maximize space and improve air circulation around the vines.
Consider grafting your Ananas melon onto a more vigorous rootstock for increased disease resistance and yield. This is a slightly more advanced technique, but it can significantly improve your chances of success, especially in challenging growing conditions. Another variation is to experiment with different soil amendments. Adding compost, aged manure, or even specific micronutrient blends can tailor the soil to the specific needs of your Ananas melons, resulting in healthier plants and more flavorful fruit.
We encourage you to embrace this DIY project and embark on your own Ananas melon growing adventure. Don’t be afraid to experiment, learn from your mistakes, and adapt the techniques to suit your specific environment and preferences. The journey is just as rewarding as the destination!
Now, we want to hear from you! Have you tried growing Ananas melons at home before? What challenges did you face, and what successes did you achieve? Share your experiences, tips, and photos in the comments below. Let’s create a community of Ananas melon enthusiasts and learn from each other. Your insights could be invaluable to other aspiring gardeners. So, grab your seeds, get your hands dirty, and start growing your own delicious Ananas melons today! We are confident that you will find the process rewarding and the results incredibly satisfying.
Frequently Asked Questions (FAQ)
What exactly is an Ananas melon?
An Ananas melon, also known as an pineapple melon, is a type of muskmelon prized for its sweet, aromatic flesh that resembles the flavor and fragrance of pineapple. It’s a relatively rare and sought-after melon variety, making it a rewarding challenge to grow at home. They are typically oval-shaped with a netted rind and a pale orange or yellow flesh.
How long does it take to grow Ananas melons from seed?
From seed to harvest, expect Ananas melons to take approximately 80-90 days. This timeframe can vary depending on your climate, growing conditions, and the specific variety you’re growing. Starting seeds indoors 4-6 weeks before the last expected frost can give you a head start.
What are the ideal growing conditions for Ananas melons?
Ananas melons thrive in warm, sunny locations with well-drained soil. They require at least 6-8 hours of direct sunlight per day. The ideal soil pH is between 6.0 and 6.8. Consistent watering is crucial, especially during fruit development. Protect young plants from frost and strong winds.
How often should I water my Ananas melon plants?
Water deeply and regularly, especially during hot, dry periods. Aim for about 1-2 inches of water per week. Avoid overhead watering, as this can promote fungal diseases. Drip irrigation is an excellent option for delivering water directly to the roots. Reduce watering as the melons ripen to concentrate their sweetness.
Do Ananas melons need pollination?
Yes, Ananas melons require pollination to produce fruit. Bees are the primary pollinators, so encourage their presence in your garden by planting pollinator-friendly flowers. If you notice a lack of bee activity, you may need to hand-pollinate the flowers. This involves transferring pollen from the male flowers to the female flowers using a small brush.
How do I know when my Ananas melon is ripe?
Several indicators suggest ripeness. The melon should have a fragrant aroma, the skin should change color slightly (usually from green to yellow or orange), and the stem should easily slip from the vine with a gentle tug. The blossom end of the melon should also feel slightly soft to the touch.
What are some common pests and diseases that affect Ananas melons?
Common pests include aphids, squash bugs, and vine borers. Diseases include powdery mildew, fusarium wilt, and anthracnose. Regularly inspect your plants for signs of pests or diseases and take appropriate action, such as using insecticidal soap or fungicide. Good air circulation and proper watering techniques can help prevent many diseases.
Can I grow Ananas melons in containers?
Yes, you can grow Ananas melons in containers, but you’ll need a large container (at least 20 gallons) with good drainage. Use a high-quality potting mix and provide adequate support for the vines. Container-grown melons may require more frequent watering and fertilization than those grown in the ground. Choose a compact variety for best results.
What kind of fertilizer should I use for Ananas melons?
Use a balanced fertilizer (e.g., 10-10-10) early in the growing season to promote healthy growth. Once the plants start to flower, switch to a fertilizer with a higher phosphorus content (e.g., 5-10-5) to encourage fruit development. Avoid over-fertilizing, as this can lead to excessive foliage growth and reduced fruit production.
How can I improve the sweetness of my Ananas melons?
Several factors contribute to the sweetness of Ananas melons. Ensure they receive plenty of sunlight, water them consistently, and fertilize them properly. Reduce watering as the melons ripen to concentrate their sugars. Allowing the melons to fully ripen on the vine will also enhance their sweetness.

Leave a Comment