
Grow Asparagus at Home: Your Guide to a Bountiful Harvest
Growing asparagus at home might sound intimidating, but I’m here to tell you it’s surprisingly achievable! This isn’t just about throwing some seeds in the ground; it’s about unlocking the secrets to a consistently delicious and abundant harvest right in your own backyard. Forget expensive grocery store prices and questionable origins – Grow Asparagus at Home and experience the unparalleled satisfaction of nurturing your own spears from seed to plate.
Asparagus boasts a rich history, cultivated for centuries and prized for its delicate flavor and nutritional value. From ancient Roman feasts to modern-day gourmet meals, this versatile vegetable has held a place of honor on tables worldwide. But what if I told you that you could cultivate this culinary treasure yourself, without needing acres of farmland? That’s the power of home gardening, and specifically, learning how to grow asparagus at home.
Why Grow Your Own Asparagus?
There are so many reasons to embark on this rewarding journey! Firstly, homegrown asparagus is incredibly flavorful, far surpassing the often-bland supermarket varieties. Secondly, you’ll have complete control over the growing process, ensuring your spears are free from pesticides and other potentially harmful chemicals. And finally, the sheer satisfaction of harvesting your own delicious asparagus is an unparalleled experience. It’s a connection to the land, a testament to your green thumb, and a delicious reward for your efforts. So, let’s dive in and discover the simple yet effective techniques to help you grow asparagus at home successfully!
Growing Your Own Asparagus: A Complete DIY Guide
Asparagus is a delicious and nutritious vegetable, and growing your own is surprisingly rewarding! This guide will walk you through the entire process, from seed to harvest. Be patient, though – asparagus takes a little time to establish, but the wait is worth it!
Phase 1: Planning and Preparation
- Choose your asparagus variety: Research different varieties to find one suitable for your climate and soil conditions. Consider factors like taste, yield, and disease resistance. Some popular choices include Mary Washington, Jersey Giant, and Purple Passion.
- Select a sunny location: Asparagus needs at least six hours of direct sunlight per day. Choose a spot in your garden that receives ample sun.
- Prepare the soil: Asparagus thrives in well-drained, sandy loam soil with a slightly acidic pH (6.5-7.0). Amend heavy clay soils with organic matter like compost or well-rotted manure to improve drainage. Test your soil’s pH using a home testing kit and adjust accordingly.
- Plan your planting area: Asparagus plants grow in dense clumps, so allow ample space between rows (at least 3-4 feet) and between plants within a row (12-18 inches). This ensures good air circulation and prevents overcrowding.
- Gather your supplies: You’ll need asparagus crowns (or seeds), a garden spade or shovel, a garden fork, compost or other organic matter, and a soil pH testing kit.
Phase 2: Planting Your Asparagus
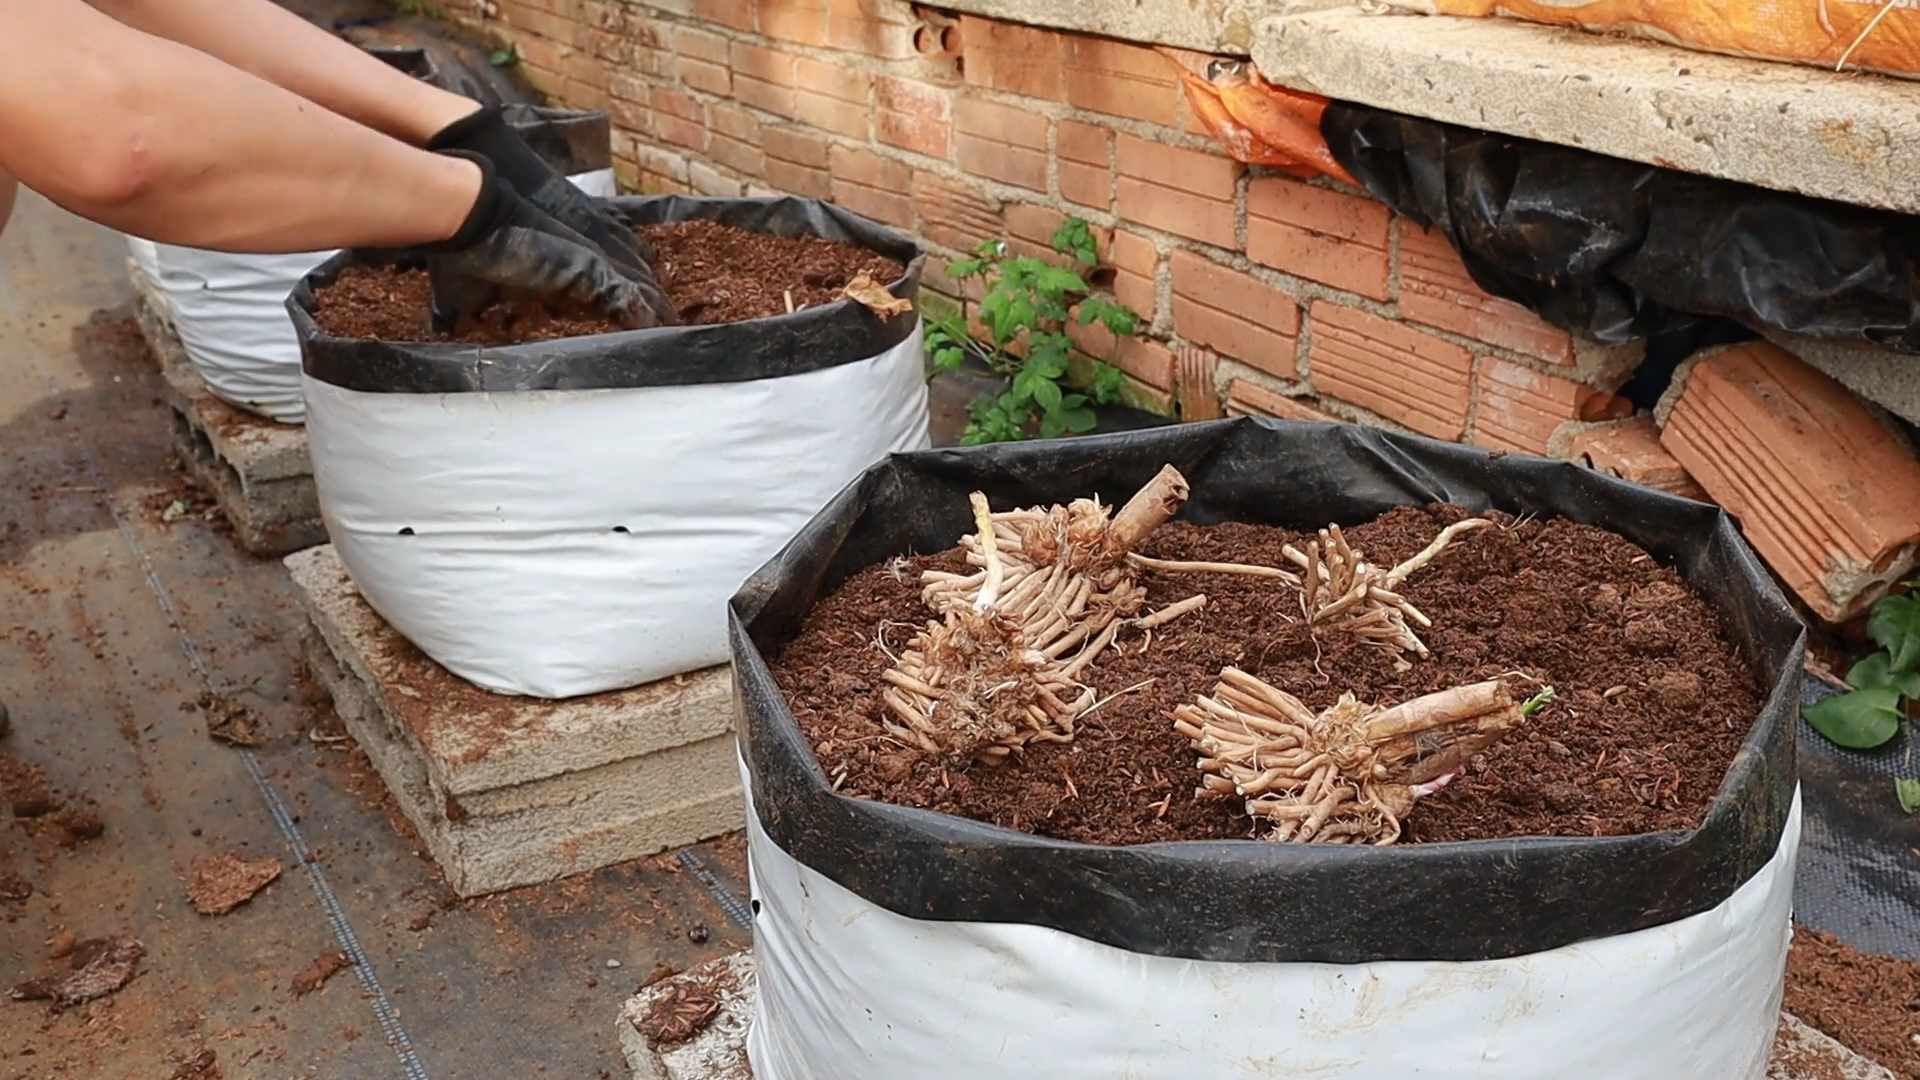
- Prepare the planting bed: Dig a trench about 12-18 inches deep and as long as needed for your asparagus rows. The width of the trench should be wide enough to comfortably accommodate the asparagus crowns.
- Amend the soil: Mix a generous amount of compost or well-rotted manure into the bottom of the trench. This provides essential nutrients for the developing plants.
- Plant the crowns: Carefully place the asparagus crowns in the trench, spacing them according to the recommended distance (12-18 inches apart). Make sure the crown’s roots are spread out and not bunched up.
- Backfill the trench: Gradually fill the trench with soil, ensuring the crowns are covered with about 4-6 inches of soil. Do not bury the crowns too deeply.
- Water thoroughly: After planting, water the area deeply to settle the soil and help the crowns establish themselves.
- Mulch the area: Apply a layer of mulch (such as straw or shredded leaves) around the plants to help retain moisture, suppress weeds, and regulate soil temperature.
Phase 3: Caring for Your Asparagus
- Weed regularly: Keep the area around your asparagus plants free of weeds, especially during the first year. Weeds compete with the asparagus for nutrients and water.
- Water consistently: Asparagus needs consistent moisture, especially during dry periods. Water deeply and regularly, aiming for about 1 inch of water per week.
- Fertilize annually: In the spring, apply a balanced fertilizer to provide essential nutrients for healthy growth. Follow the fertilizer’s instructions for application rates.
- Don’t harvest the first year: Allow the plants to establish a strong root system during their first year. Harvesting in the first year will weaken the plants and reduce future yields.
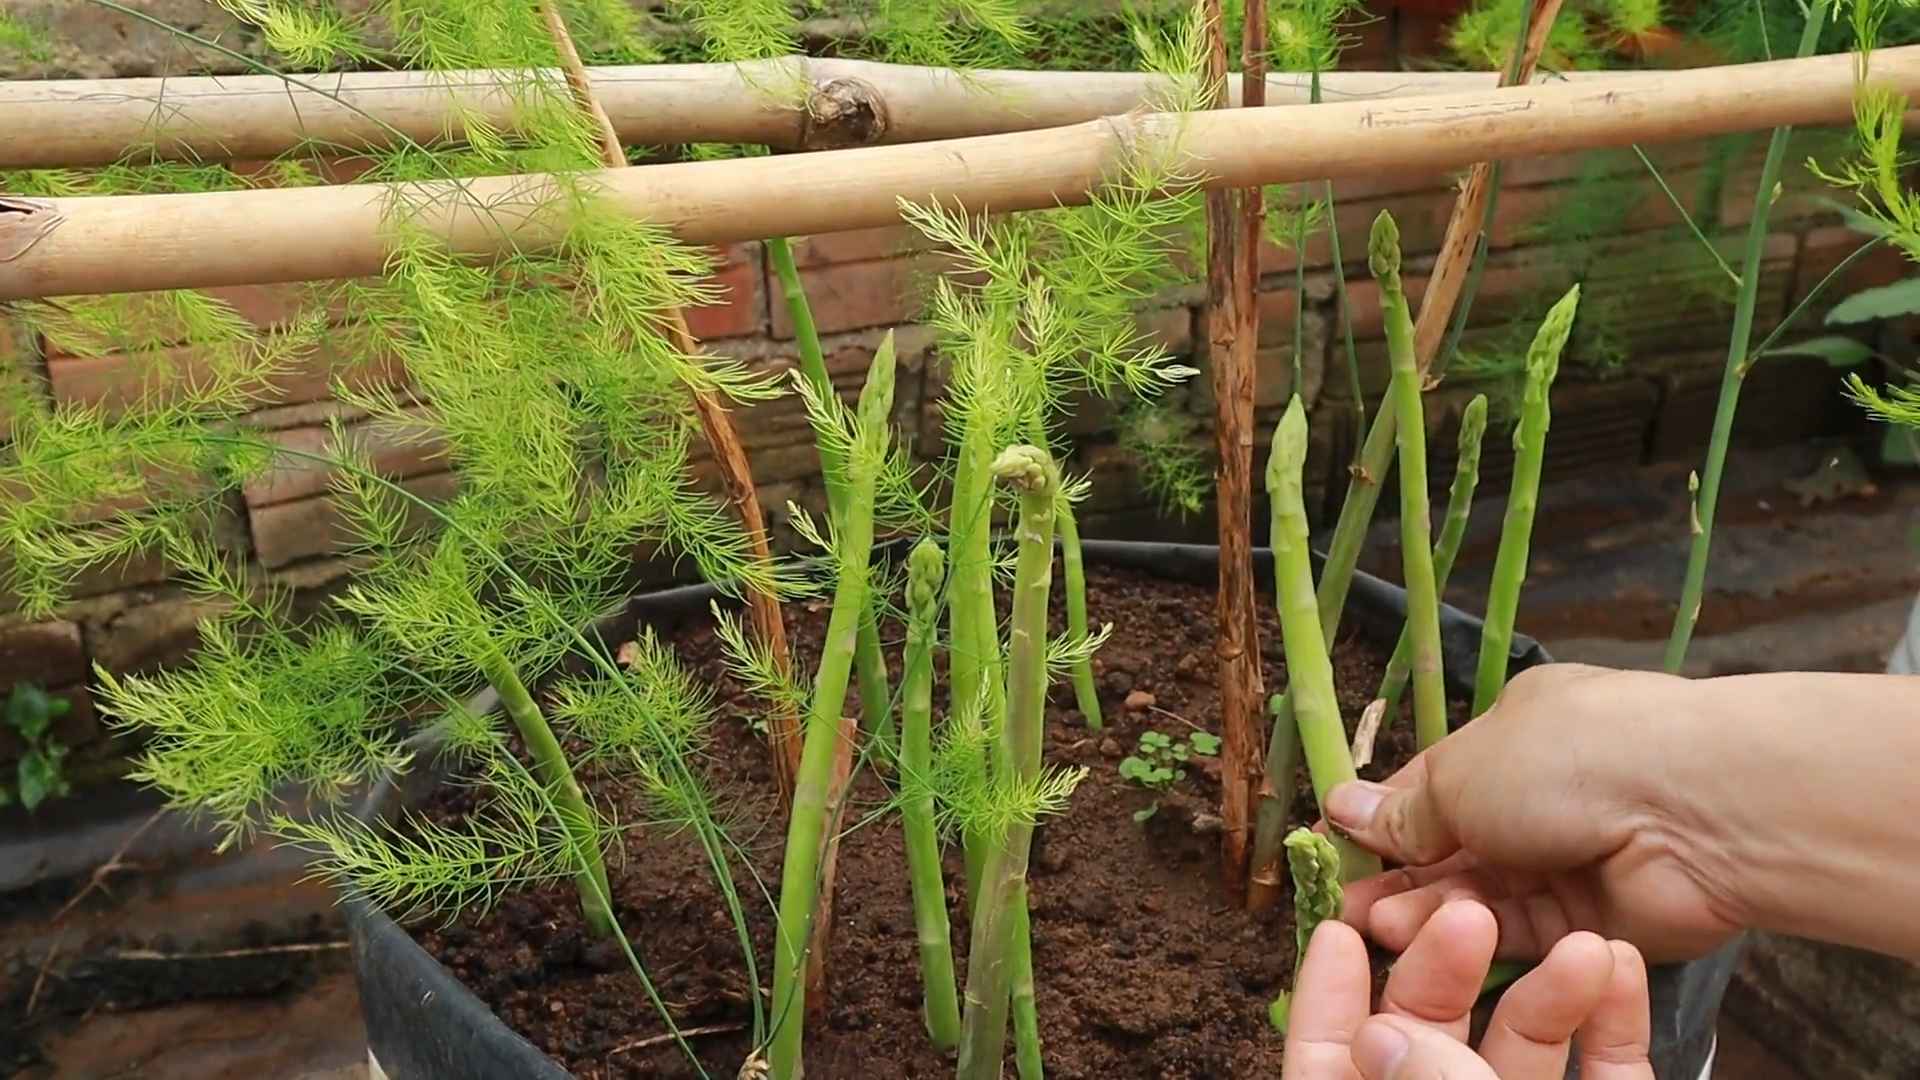
- Harvest in subsequent years: After the first year, you can begin harvesting asparagus spears. Harvest only when the spears are tender and about 6-8 inches tall. Use a sharp knife or asparagus knife to cut the spears at ground level.
- Harvest for a limited time: Limit your harvest to about 6-8 weeks each spring. This allows the plants to store energy for the next growing season.
- Pest and disease control: Monitor your asparagus plants for pests and diseases. Address any issues promptly using appropriate organic or chemical controls, following label instructions carefully.
Phase 4: Troubleshooting Common Problems
Problem: Poor Growth
Possible causes: Poor soil drainage, insufficient sunlight, nutrient deficiencies, or pest infestations.
Solutions: Improve soil drainage, relocate to a sunnier spot, fertilize appropriately, and control pests.
Problem: Few or No Spears
Possible causes: Over-harvesting, insufficient nutrients, drought stress, or disease.
Solutions: Limit harvesting, fertilize regularly, water consistently, and address any diseases.
Problem: Rust or other diseases
Possible causes: Poor air circulation, excessive moisture, or fungal pathogens.
Solutions: Ensure good spacing between plants, avoid overhead watering, and consider using a fungicide if necessary. Consult your local agricultural extension office for specific recommendations.
Phase 5: Winter Care
- Clean up the area: In late fall, after the foliage has died back, cut down the asparagus stalks to ground level.
- Apply a thick layer of mulch: Cover the area with a thick layer of mulch (at least 4-6 inches) to protect the crowns from freezing temperatures.
- Prepare for next year: With proper care, your asparagus patch will provide you with delicious spears for many years to come!
Remember, patience is key when growing asparagus. By following these steps and providing consistent care, you’ll be enjoying your homegrown asparagus in no time!
Conclusion
Growing your own asparagus at home is a truly rewarding experience, transforming your garden into a source of delicious, fresh spears. This DIY trick, focusing on proper planting and care, unlocks the secrets to a bountiful harvest. You’ll not only save money on grocery bills but also enjoy the unparalleled taste of homegrown asparagus, far superior to anything you’ll find in the supermarket. The initial effort is minimal compared to the years of delicious harvests to come. This method ensures healthy, vigorous plants that produce consistently, year after year. It’s a testament to the power of patience and the simple joys of nurturing life from seed to plate. Beyond the financial benefits and superior taste, there’s an undeniable satisfaction in knowing exactly where your food comes from and the pride in sharing your homegrown bounty with friends and family.
Don’t be intimidated by the idea of growing asparagus; this DIY method simplifies the process, making it accessible to even novice gardeners. The key is understanding the plant’s needs and providing the right conditions. With a little planning and consistent care, you’ll be enjoying your own delicious spears in no time. Experiment with different varieties to find your favorite – some are known for their thinner, more tender spears, while others boast thicker, heartier stalks. Consider the space you have available and choose a variety that suits your garden’s size and sun exposure. You can even explore companion planting, incorporating herbs or flowers that complement asparagus and deter pests.
Beyond the basic method outlined, there are numerous ways to personalize your asparagus patch. For instance, you can create raised beds for better drainage and soil control, particularly beneficial in areas with heavy clay soil. Mulching around the plants helps retain moisture and suppress weeds, reducing the amount of maintenance required. Consider using organic fertilizers to nourish your plants and avoid harsh chemicals. Regular weeding is crucial, especially in the early stages of growth, to prevent competition for nutrients and water. And remember, patience is key. Asparagus takes a couple of years to establish itself before producing a significant harvest, but the wait is absolutely worth it.
We strongly encourage you to embark on this rewarding journey of growing your own asparagus. Share your experiences, successes, and even your challenges with us and other gardening enthusiasts. Post pictures of your thriving asparagus patch on social media and use the hashtag #GrowAsparagusAtHome to connect with a community of like-minded gardeners. Let’s inspire each other and celebrate the simple pleasure of homegrown goodness. Your taste buds (and your wallet) will thank you!
Frequently Asked Questions
How long does it take to harvest asparagus after planting?
Asparagus requires patience. While you’ll plant the crowns in the spring, you won’t harvest any spears until the second year. The first year is all about establishing a strong root system. In the second year, you can begin harvesting, but limit it to a short season to allow the plant to build strength. From the third year onwards, you’ll enjoy a full harvest.
What type of soil is best for growing asparagus?
Asparagus thrives in well-drained, sandy loam soil that’s rich in organic matter. Amend heavy clay soils with compost or other organic materials to improve drainage. The soil pH should ideally be slightly acidic to neutral (6.5-7.5). A soil test can help determine your soil’s pH and nutrient levels, allowing you to make necessary adjustments.
How much sunlight does asparagus need?
Asparagus needs at least six to eight hours of direct sunlight per day. Choose a location in your garden that receives ample sunlight throughout the day. Partial shade during the hottest part of the day is acceptable, especially in hotter climates.
How often should I water my asparagus?
Consistent watering is crucial, especially during the establishment phase and during dry periods. Aim for deep, infrequent watering rather than shallow, frequent watering. Water deeply enough to moisten the soil to a depth of several inches. Mulching around the plants helps retain soil moisture and reduces the frequency of watering.
What are some common pests and diseases that affect asparagus?
Asparagus is relatively pest-resistant, but it can be susceptible to certain diseases and pests, including asparagus beetles, aphids, and rust. Regular inspection of your plants is important. Organic pest control methods, such as insecticidal soap or neem oil, can be effective against many common pests. Good garden hygiene, including removing plant debris, can help prevent the spread of diseases.
Can I grow asparagus in containers?
While asparagus prefers to grow in the ground, you can grow it in large containers, provided they are at least 18 inches deep and wide to accommodate the extensive root system. Choose containers with drainage holes to prevent waterlogging. You’ll need to water more frequently in containers than in the ground.
How do I harvest asparagus?
Harvest asparagus spears when they are about 6-8 inches tall and tender. Use a sharp knife or shears to cut the spears at ground level or just below the surface. Avoid harvesting spears that are too thick or woody. Limit your harvest to a few weeks in the spring to allow the plant to build strength for the next year.
What should I do with my asparagus after harvesting?
Asparagus is best enjoyed fresh. Store harvested spears in the refrigerator in a plastic bag for up to a week. You can also blanch and freeze asparagus for later use. Experiment with different recipes to enjoy your homegrown asparagus – from simple roasted spears to creamy asparagus soup.


Leave a Comment