
Grow Asparagus Year Round? Yes, you read that right! Imagine stepping into your garden in the dead of winter and harvesting fresh, tender asparagus spears. Sounds like a dream, doesn’t it? Well, it doesn’t have to be! For centuries, asparagus has been a prized vegetable, enjoyed by ancient Romans and Greeks for its delicate flavor and purported medicinal properties. Today, while most of us associate asparagus with springtime harvests, I’m here to let you in on some secrets to extend your asparagus season and even enjoy it year-round.
Let’s face it, waiting all year for that short asparagus season can be agonizing. This DIY guide is packed with simple, effective tricks and hacks that will empower you to grow asparagus year round, regardless of your climate. Whether you’re a seasoned gardener or just starting out, these tips will help you maximize your yield and enjoy fresh asparagus whenever you crave it. From choosing the right varieties to mastering indoor growing techniques, we’ll cover everything you need to know to become an asparagus-growing pro. So, grab your gardening gloves, and let’s get started on this exciting journey to year-round asparagus bliss!
Spargel das ganze Jahr über selbst anbauen: So geht’s!
Hallo liebe Gartenfreunde! Habt ihr euch jemals gewünscht, frischen Spargel nicht nur im Frühling, sondern das ganze Jahr über genießen zu können? Ich zeige euch, wie ihr das mit ein paar Tricks und Kniffen auch zu Hause schaffen könnt. Es ist zwar nicht ganz einfach, aber mit etwas Geduld und der richtigen Vorbereitung ist es absolut machbar!
Die Grundlagen: Was Spargel wirklich braucht
Bevor wir loslegen, ist es wichtig zu verstehen, was Spargel zum Wachsen benötigt. Spargel ist eine mehrjährige Pflanze, die eine Ruhephase im Winter braucht, um im Frühjahr wieder kräftig austreiben zu können. Das bedeutet, wir müssen diese Ruhephase künstlich simulieren, um eine ganzjährige Ernte zu ermöglichen.
* Licht: Spargel liebt die Sonne! Mindestens 6-8 Stunden direktes Sonnenlicht pro Tag sind ideal.
* Boden: Ein gut durchlässiger, sandiger Lehmboden ist perfekt. Staunässe mag Spargel überhaupt nicht.
* Temperatur: Spargel wächst am besten bei Temperaturen zwischen 18°C und 24°C.
* Wasser: Regelmäßige Bewässerung ist wichtig, besonders während der Wachstumsphase. Aber Achtung: Nicht zu viel!
* Nährstoffe: Spargel ist ein Starkzehrer und benötigt ausreichend Nährstoffe, besonders Stickstoff, Phosphor und Kalium.
Die Vorbereitung: Spargelpflanzen und Anzucht
Wir brauchen natürlich erstmal Spargelpflanzen. Ihr könnt entweder Spargelsamen aussäen oder vorgezogene Spargelpflanzen (sogenannte “Spargelsprossen”) kaufen. Ich empfehle euch, mit vorgezogenen Pflanzen zu starten, da das schneller geht und die Erfolgschancen höher sind.
* Spargelsamen aussäen (optional): Wenn ihr es von Grund auf versuchen wollt, könnt ihr Spargelsamen im Frühjahr in Anzuchtschalen aussäen. Die Keimung kann etwas dauern, also habt Geduld.
* Spargelsprossen kaufen: Achtet beim Kauf auf gesunde, kräftige Pflanzen mit gut entwickelten Wurzeln.
* Die richtige Sorte wählen: Es gibt verschiedene Spargelsorten, die sich in Geschmack und Erntezeitpunkt unterscheiden. Informiert euch, welche Sorte für eure Region am besten geeignet ist.
Die Anzucht im Topf: Der erste Schritt zur ganzjährigen Ernte
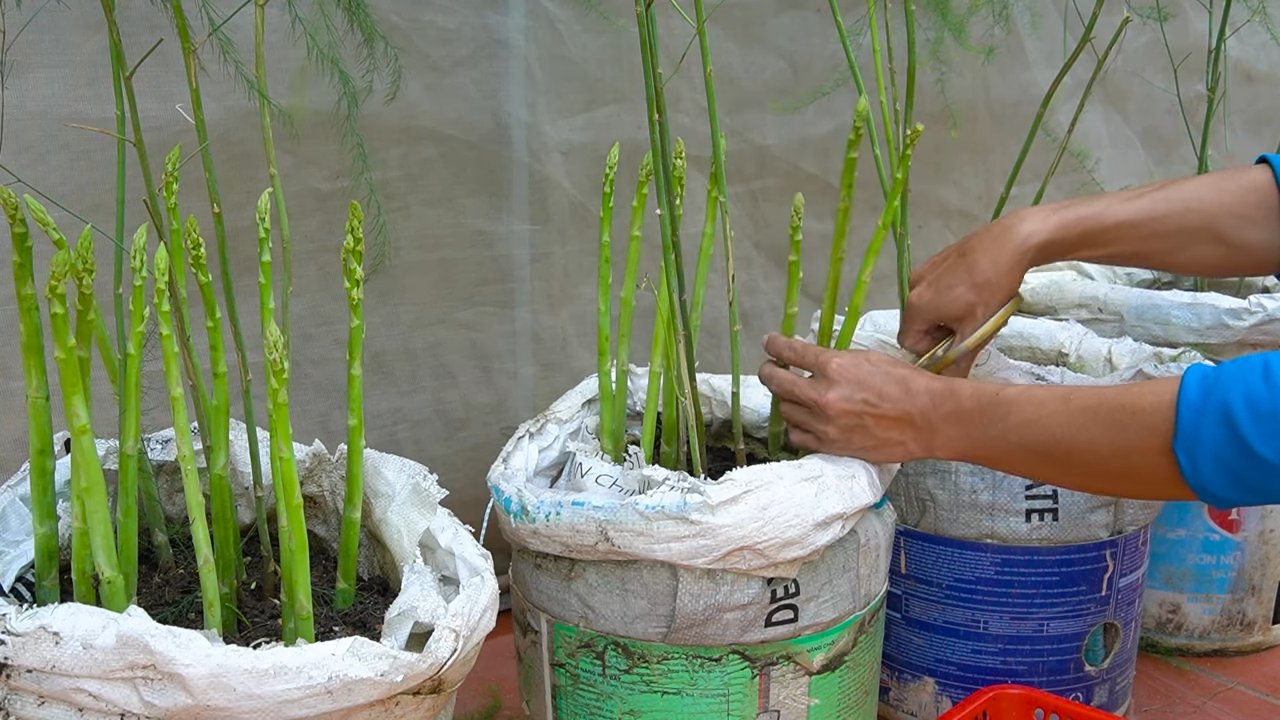
Da wir den Spargel das ganze Jahr über ernten wollen, müssen wir ihn in Töpfen anbauen. So können wir die Bedingungen (Licht, Temperatur) besser kontrollieren und die Ruhephase simulieren.
Benötigte Materialien:
* Große Töpfe (mindestens 30 Liter Fassungsvermögen)
* Gut durchlässige Blumenerde (am besten spezielle Spargelerde)
* Drainagematerial (z.B. Blähton oder Kies)
* Spargelsprossen
* Dünger (organisch oder mineralisch)
* Gießkanne
* Spaten oder Schaufel
Schritt-für-Schritt-Anleitung:
1. Töpfe vorbereiten: Füllt die Töpfe mit einer Schicht Drainagematerial, um Staunässe zu vermeiden.
2. Erde einfüllen: Füllt die Töpfe mit der Blumenerde, lasst aber noch etwas Platz nach oben.
3. Spargelsprossen pflanzen: Setzt die Spargelsprossen in die Töpfe. Die Wurzeln sollten gut bedeckt sein, aber die Triebspitzen sollten noch herausschauen. Achtet darauf, dass die Pflanzen genügend Abstand zueinander haben (ca. 20-30 cm).
4. Angießen: Gießt die Pflanzen gründlich an.
5. Düngen: Düngt die Pflanzen nach dem Anpflanzen mit einem organischen oder mineralischen Dünger. Beachtet dabei die Anweisungen auf der Verpackung.
6. Standort wählen: Stellt die Töpfe an einen sonnigen Standort.
Die Wachstumsphase: Pflege und Ernte
Während der Wachstumsphase ist es wichtig, den Spargel regelmäßig zu gießen und zu düngen. Achtet darauf, dass die Erde immer leicht feucht ist, aber nicht nass.
* Gießen: Gießt den Spargel regelmäßig, besonders bei trockenem Wetter.
* Düngen: Düngt den Spargel alle 2-3 Wochen mit einem organischen oder mineralischen Dünger.
* Unkraut entfernen: Entfernt regelmäßig Unkraut aus den Töpfen.
* Schädlinge und Krankheiten: Achtet auf Schädlinge und Krankheiten. Bei Bedarf könnt ihr biologische Pflanzenschutzmittel einsetzen.
Die Ernte:
Im ersten Jahr solltet ihr den Spargel noch nicht ernten, damit er sich gut entwickeln kann. Ab dem zweiten Jahr könnt ihr dann mit der Ernte beginnen.
1. Erntezeitpunkt: Der Spargel ist erntereif, wenn die Stangen ca. 20-25 cm lang sind und einen Durchmesser von ca. 1-2 cm haben.
2. Erntemethode: Stecht den Spargel mit einem speziellen Spargelstecher ca. 20 cm tief in den Boden und trennt die Stange ab. Alternativ könnt ihr den Spargel auch vorsichtig mit der Hand aus der Erde ziehen.
3. Nach der Ernte: Gießt und düngt die Pflanzen nach der Ernte, um sie für die nächste Wachstumsphase zu stärken.
Die Ruhephase: Den Winter simulieren
Um eine ganzjährige Ernte zu ermöglichen, müssen wir die Ruhephase im Winter künstlich simulieren. Das bedeutet, wir müssen die Pflanzen für einige Wochen in einen kühlen, dunklen Raum stellen.
1. Vorbereitung: Reduziert die Bewässerung und Düngung einige Wochen vor Beginn der Ruhephase.
2. Standortwechsel: Stellt die Töpfe in einen kühlen, dunklen Raum (z.B. Keller oder Garage). Die Temperatur sollte zwischen 0°C und 5°C liegen.
3. Bewässerung: Gießt die Pflanzen während der Ruhephase nur sehr wenig, um ein Austrocknen zu verhindern.
4. Dauer: Die Ruhephase sollte ca. 8-12 Wochen dauern.
5. Nach der Ruhephase: Stellt die Töpfe wieder an einen sonnigen Standort und beginnt mit der regelmäßigen Bewässerung und Düngung.
Der Kreislauf: Kontinuierliche Ernte
Um eine kontinuierliche Ernte zu gewährleisten, könnt ihr mehrere Töpfe mit Spargel anpflanzen und die Ruhephasen versetzt planen. So habt ihr immer einen Topf mit Spargel in der Wachstumsphase und einen Topf in der Ruhephase.
* Planung: Plant die Ruhephasen so, dass ihr immer frischen Spargel ernten könnt.
* Rotation: Wechselt die Töpfe regelmäßig zwischen Wachstumsphase und Ruhephase.
Zusätzliche Tipps und Tricks
* Mulchen: Mulcht die Töpfe mit Stroh oder Laub, um die Feuchtigkeit im Boden zu halten und Unkraut zu unterdrücken.
* Bodenverbesserung: Verbessert den Boden regelmäßig mit Kompost oder anderem organischen Material.
* Schutz vor Frost: Schützt die Pflanzen vor Frost, besonders im Frühjahr und Herbst.
* Geduld: Spargel braucht Zeit, um zu wachsen und zu gedeihen. Habt Geduld und gebt nicht auf!
Ich hoffe, diese Anleitung hilft euch dabei, euren eigenen Spargel das ganze Jahr über anzubauen. Es ist zwar etwas Arbeit, aber der Geschmack von frischem, selbst angebautem Spargel ist einfach unschlagbar! Viel Erfolg und guten Appetit!

Conclusion
So, there you have it! Growing asparagus year-round might seem like a gardener’s pipe dream, but with a little planning, the right techniques, and a touch of indoor ingenuity, you can enjoy the delicate flavor of freshly harvested asparagus even when the snow is falling outside. This DIY trick isn’t just about extending your harvest; it’s about taking control of your food supply, reducing your reliance on commercially grown produce, and experiencing the unparalleled satisfaction of nurturing your own food from seed to table.
Why is this a must-try? Because fresh asparagus, bursting with flavor and nutrients, is a culinary delight that shouldn’t be confined to a fleeting spring season. Imagine adding tender asparagus spears to your winter salads, stir-fries, or omelets, bringing a taste of sunshine to even the dreariest days. Beyond the flavor, growing your own asparagus allows you to avoid the pesticides and herbicides often used in commercial farming, ensuring that you’re feeding yourself and your family the healthiest possible food.
But the benefits don’t stop there. This project is a fantastic way to connect with nature, learn about plant life cycles, and develop your gardening skills. It’s a rewarding hobby that can bring joy and satisfaction to your life, while also providing you with a delicious and nutritious food source.
Ready to take your asparagus game to the next level?
Here are a few suggestions and variations to consider:
* Experiment with different varieties: While ‘Jersey Knight’ is a popular choice, explore other asparagus varieties that may be better suited to your specific climate and growing conditions. ‘Purple Passion’ offers a unique color and slightly sweeter flavor, while ‘Mary Washington’ is a classic heirloom variety known for its reliability.
* Hydroponic Asparagus: For a truly innovative approach, consider growing your asparagus hydroponically. This method eliminates the need for soil and can significantly accelerate growth.
* Succession Planting: Stagger your planting times to ensure a continuous harvest throughout the year. Start new seeds every few weeks to keep a steady supply of young asparagus plants ready to move indoors.
* Companion Planting: When growing asparagus indoors, consider companion plants like basil or parsley. These herbs can help deter pests and improve the overall health of your asparagus plants.
* Lighting Optimization: While grow lights are essential, experiment with different light spectrums and intensities to find the optimal conditions for your asparagus. Some growers have found that a combination of blue and red light promotes the best growth.
Don’t be afraid to get creative and adapt these techniques to your own unique circumstances. The beauty of DIY gardening is that it’s all about experimentation and learning.
We encourage you to try this DIY trick for growing asparagus year-round and share your experiences with us! Let us know what worked for you, what challenges you faced, and any tips or tricks you discovered along the way. Your feedback will help other gardeners succeed and contribute to a growing community of asparagus enthusiasts. Share your photos and stories on social media using #YearRoundAsparagus and let’s inspire others to embrace the joy of homegrown food.
Growing asparagus year-round is an investment in your health, your happiness, and your connection to the natural world. So, grab your seeds, prepare your soil, and get ready to enjoy the delicious taste of homegrown asparagus all year long!
Frequently Asked Questions (FAQ)
1. Is it really possible to grow asparagus year-round?
Yes, it is! While asparagus is traditionally a spring crop, with the right techniques, including indoor growing and careful planning, you can extend your harvest and enjoy fresh asparagus throughout the year. The key is to start seeds indoors, provide adequate light and nutrients, and maintain a consistent growing environment.
2. What are the best asparagus varieties for year-round growing?
‘Jersey Knight’ is a popular and reliable choice for indoor growing due to its disease resistance and high yield. ‘Purple Passion’ is another excellent option, offering a unique color and slightly sweeter flavor. ‘Mary Washington’ is a classic heirloom variety that is also well-suited to indoor cultivation. Ultimately, the best variety for you will depend on your personal preferences and growing conditions.
3. How much light do asparagus plants need indoors?
Asparagus plants require a significant amount of light to thrive indoors. Ideally, you should provide them with at least 14-16 hours of light per day using grow lights. LED grow lights are a good option as they are energy-efficient and provide a full spectrum of light. Position the lights close enough to the plants to ensure they receive adequate illumination, but not so close that they burn the foliage.
4. What type of soil is best for growing asparagus indoors?
Asparagus prefers well-draining soil that is rich in organic matter. A good mix would be equal parts of potting soil, compost, and perlite or vermiculite. This combination provides the necessary nutrients, drainage, and aeration for healthy root growth. Avoid using heavy clay soils, as they can become waterlogged and lead to root rot.
5. How often should I water my indoor asparagus plants?
Water your asparagus plants regularly, keeping the soil consistently moist but not waterlogged. Check the soil moisture level daily and water when the top inch feels dry to the touch. Avoid overwatering, as this can lead to root rot. During the dormant period, reduce watering frequency.
6. How do I fertilize my indoor asparagus plants?
Asparagus plants are heavy feeders and require regular fertilization. Use a balanced liquid fertilizer, such as a 10-10-10 formula, diluted to half strength. Fertilize every two weeks during the growing season. You can also amend the soil with compost or other organic matter to provide a slow-release source of nutrients.
7. How long does it take for asparagus to grow from seed?
Asparagus can take a while to mature. It typically takes about 2-3 years from seed to harvest. However, by starting seeds indoors and providing optimal growing conditions, you can potentially shorten this timeframe. Be patient and consistent with your care, and you will eventually be rewarded with a bountiful harvest.
8. How do I harvest asparagus spears?
Harvest asparagus spears when they are about 6-8 inches tall and about as thick as your finger. Use a sharp knife to cut the spears at ground level. Avoid cutting spears that are too thin, as they will not be as flavorful. Harvest regularly to encourage continued production.
9. How do I overwinter my asparagus plants indoors?
Asparagus plants require a dormant period each year to rest and rejuvenate. In the fall, gradually reduce watering and fertilization. Once the foliage turns yellow and dies back, cut it back to ground level. Move the plants to a cool, dark location, such as a basement or garage, for about 2-3 months. During this time, water sparingly to prevent the soil from drying out completely. In the spring, gradually reintroduce the plants to light and warmth, and resume regular watering and fertilization.
10. What are some common pests and diseases that affect asparagus?
Asparagus beetles are a common pest that can damage the foliage and spears. Handpick the beetles or use an insecticidal soap to control them. Asparagus rust is a fungal disease that can cause orange or brown spots on the foliage. Ensure good air circulation and avoid overhead watering to prevent rust. If rust does occur, treat with a fungicide.
11. Can I grow asparagus in containers?
Yes, asparagus can be grown in containers, but you will need to choose a large container that is at least 12 inches deep and wide to accommodate the plant’s extensive root system. Make sure the container has drainage holes to prevent waterlogging.
12. How do I know when my asparagus plants are ready to move outdoors?
If you plan to move your indoor-grown asparagus plants outdoors in the spring, wait until all danger of frost has passed. Gradually acclimate the plants to outdoor conditions by exposing them to increasing amounts of sunlight and wind over a period of several days.
13. What if my asparagus plants don’t produce spears?
There are several reasons why your asparagus plants may not be producing spears. They may be too young, not receiving enough light or nutrients, or experiencing stress from pests or diseases. Ensure that you are providing optimal growing conditions and be patient. It may take a few years for your plants to mature and begin producing spears.
14. Can I eat the asparagus ferns?
No, the asparagus ferns (the foliage) are not edible. Only the spears are edible. The ferns are important for the plant’s health, as they photosynthesize and provide energy for the roots.
15. Where can I find more information about growing asparagus?
There are many resources available online and in libraries that can provide more information about growing asparagus. Look for articles, books, and videos from reputable sources, such as university extension services and gardening organizations. You can also join online gardening forums and communities to connect with other asparagus growers and share tips and advice.


Leave a Comment