
Grow cabbage without a garden? Absolutely! I know it sounds like a gardening myth, but trust me, it’s entirely possible, and I’m here to show you how. For centuries, cabbage has been a staple in diets across the globe, from the hearty stews of Eastern Europe to the vibrant slaws of Asia. Its versatility and nutritional value have made it a beloved vegetable, but what if you lack the space for a traditional garden?
That’s where these ingenious DIY tricks come in! Many of us dream of fresh, homegrown produce, but are limited by apartment living, small yards, or even just a lack of suitable soil. This article is your answer. I’ll guide you through simple, effective methods to grow cabbage without a garden, utilizing containers, vertical gardening techniques, and even repurposed materials. Imagine the satisfaction of harvesting your own crisp, flavorful cabbage, knowing you nurtured it from seed to table, all without needing acres of land.
These hacks aren’t just about convenience; they’re about sustainability and accessibility. By learning how to grow cabbage without a garden, you’re reducing your reliance on store-bought produce, minimizing your carbon footprint, and gaining a deeper connection to the food you eat. So, let’s ditch the gardening myths and get our hands dirty (or not-so-dirty, depending on your chosen method!) as we embark on this exciting journey of urban gardening!
Kohl anbauen ohne Garten: Dein DIY-Guide für den Balkon
Hey Gartenfreunde! Du denkst, du brauchst einen riesigen Garten, um frischen, knackigen Kohl anzubauen? Falsch gedacht! Ich zeige dir, wie du auch auf dem kleinsten Balkon oder der Terrasse dein eigenes Kohlgemüse ziehen kannst. Es ist einfacher als du denkst und macht unglaublich viel Spaß!
Was du brauchst: Die Materialliste
Bevor wir loslegen, hier eine Liste mit allem, was du für dein Kohl-Anbau-Abenteuer benötigst:
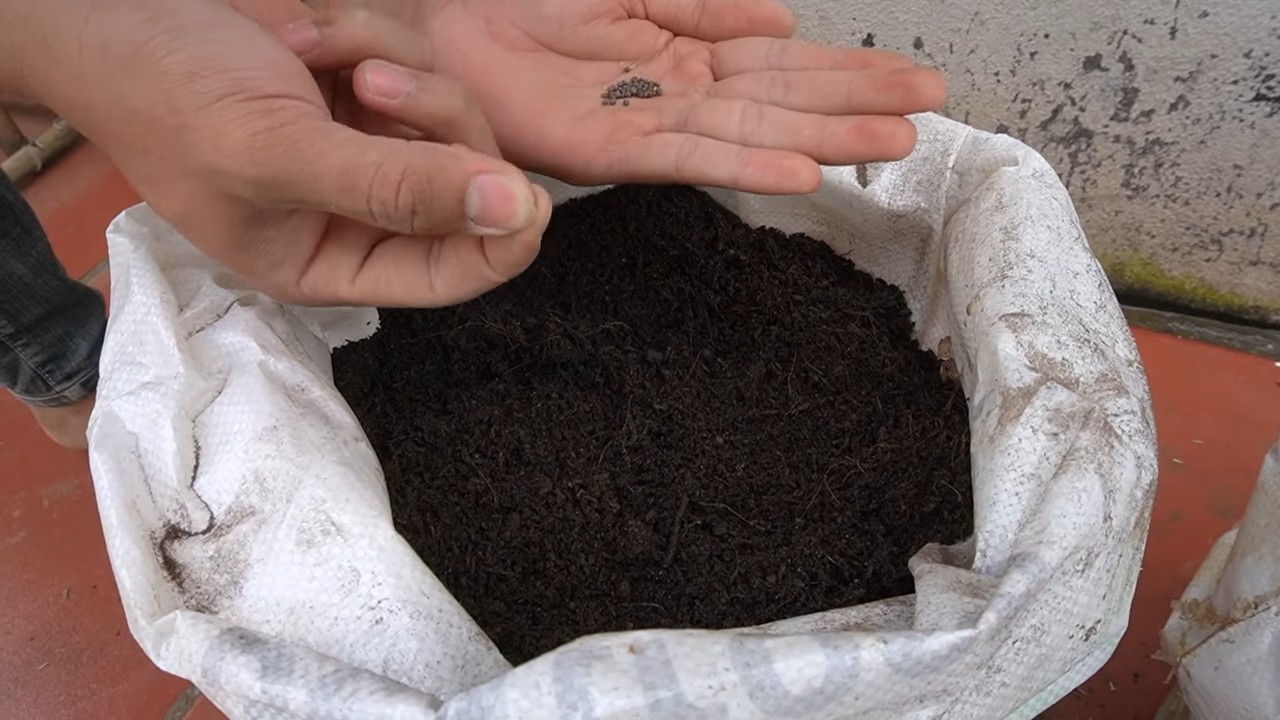
* Kohlsaatgut: Wähle eine Sorte, die für den Anbau in Töpfen geeignet ist. Frühkohl, Spitzkohl oder Rosenkohl sind gute Optionen. Achte auf die Angaben auf der Saatguttüte bezüglich der Größe der Pflanze.
* Anzuchttöpfe oder -schalen: Kleine Töpfe (ca. 5-7 cm Durchmesser) für die Voranzucht.
* Größere Töpfe oder Kübel: Mindestens 20 Liter Volumen pro Kohlkopf, besser mehr. Je größer, desto besser!
* Anzuchterde: Spezielle Erde für die Anzucht von Sämlingen. Sie ist nährstoffarm und locker.
* Pflanzerde: Hochwertige Blumenerde oder Gemüseerde für die größeren Töpfe. Du kannst auch deine eigene Erde mischen (siehe unten).
* Kompost: Reifer Kompost ist Gold wert für deine Kohlpflanzen! Er liefert wichtige Nährstoffe und verbessert die Bodenstruktur.
* Hornspäne oder organischer Dünger: Für die Langzeitversorgung deiner Pflanzen mit Nährstoffen.
* Gießkanne oder Gartenschlauch: Zum Bewässern deiner Kohlpflanzen.
* Pflanzschaufel: Zum Umtopfen und Einpflanzen.
* Schneckenkorn oder andere Schneckenabwehr: Kohl ist leider sehr beliebt bei Schnecken.
* Pflanzstäbe oder Rankhilfen (optional): Für Sorten, die etwas Unterstützung benötigen, wie z.B. Rosenkohl.
* Geduld und Liebe: Das Wichtigste überhaupt!
Die richtige Erde: Dein Kohl liebt es nahrhaft!
Kohl ist ein Starkzehrer, das heißt, er braucht viele Nährstoffe, um gut zu wachsen. Du kannst entweder fertige Gemüseerde kaufen oder deine eigene Mischung herstellen. Ich persönlich bevorzuge die zweite Variante, weil ich so genau weiß, was drin ist.
Hier ist mein Lieblingsrezept für Kohl-Erde:
* 1/3 Blumenerde
* 1/3 Kompost
* 1/3 Gartenerde (wenn vorhanden) oder Kokosfaser
Mische alles gut durch und füge noch eine Handvoll Hornspäne pro Topf hinzu. So haben deine Kohlpflanzen einen guten Start.
Phase 1: Die Voranzucht – Kleine Pflänzchen ganz groß
Die Voranzucht ist wichtig, damit deine Kohlpflanzen einen Vorsprung haben, bevor sie ins Freie kommen.
1. Aussaat: Fülle deine Anzuchttöpfe mit Anzuchterde. Drücke die Erde leicht an und säe 2-3 Samenkörner pro Topf aus. Bedecke die Samen mit einer dünnen Schicht Erde (ca. 0,5 cm) und gieße sie vorsichtig an.
2. Standort: Stelle die Töpfe an einen hellen und warmen Ort (ca. 18-20°C). Ein Fensterbrett ist ideal.
3. Feuchtigkeit: Halte die Erde feucht, aber nicht nass. Am besten sprühst du die Erde regelmäßig mit einer Sprühflasche an.
4. Keimung: Nach ca. 1-2 Wochen sollten die ersten Keimlinge zu sehen sein.
5. Pikieren: Sobald die Pflänzchen 2-3 echte Blätter haben (neben den Keimblättern), ist es Zeit zum Pikieren. Das bedeutet, dass du die schwächsten Pflänzchen entfernst und nur das stärkste Pflänzchen pro Topf behältst. Sei dabei vorsichtig, um die Wurzeln nicht zu beschädigen.
Phase 2: Umzug ins Freie – Ab in den großen Topf!
Sobald die Temperaturen steigen und keine Frostgefahr mehr besteht (meist ab Mitte Mai), können deine Kohlpflanzen ins Freie umziehen.
1. Vorbereitung der Töpfe: Fülle die größeren Töpfe oder Kübel mit deiner vorbereiteten Kohl-Erde. Lasse oben ca. 5 cm Platz.
2. Einpflanzen: Grabe ein Loch in die Erde, das groß genug ist, um den Wurzelballen der Kohlpflanze aufzunehmen. Setze die Pflanze vorsichtig ein und fülle das Loch mit Erde auf. Drücke die Erde leicht an.
3. Gießen: Gieße die Pflanzen gründlich an.
4. Standort: Stelle die Töpfe an einen sonnigen Standort. Kohl braucht mindestens 6 Stunden Sonne pro Tag.
5. Schneckenabwehr: Schütze deine jungen Kohlpflanzen vor Schnecken. Du kannst Schneckenkorn streuen oder einen Schneckenzaun um die Töpfe bauen. Es gibt auch natürliche Methoden, wie z.B. Kaffeesatz oder Eierschalen.
Phase 3: Pflege und Düngung – Damit dein Kohl prächtig gedeiht
Damit deine Kohlpflanzen gut wachsen und leckere Köpfe bilden, brauchen sie regelmäßige Pflege und Düngung.
1. Gießen: Gieße deine Kohlpflanzen regelmäßig, besonders an heißen Tagen. Die Erde sollte immer leicht feucht sein, aber nicht nass. Vermeide Staunässe.
2. Düngen: Kohl ist ein Starkzehrer und braucht regelmäßige Düngung. Beginne ca. 2-3 Wochen nach dem Einpflanzen mit dem Düngen. Verwende einen organischen Dünger oder Komposttee. Dünge alle 2-3 Wochen.
3. Ausgeizen (optional): Bei einigen Kohlsorten, wie z.B. Rosenkohl, ist es sinnvoll, die Seitentriebe (Geiztriebe) zu entfernen, damit die Pflanze ihre Energie in die Bildung der Rosenkohlknospen steckt.
4. Schädlinge und Krankheiten: Achte auf Schädlinge wie Kohlweißlinge, Blattläuse oder Erdflöhe. Bei Befall kannst du natürliche Schädlingsbekämpfungsmittel einsetzen. Auch Kohlhernie kann ein Problem sein. Achte auf eine gute Fruchtfolge und verwende resistente Sorten.
5. Unterstützung (optional): Bei Sorten wie Rosenkohl, die hoch wachsen, kann es sinnvoll sein, die Pflanzen mit Pflanzstäben oder Rankhilfen zu unterstützen, damit sie nicht umknicken.
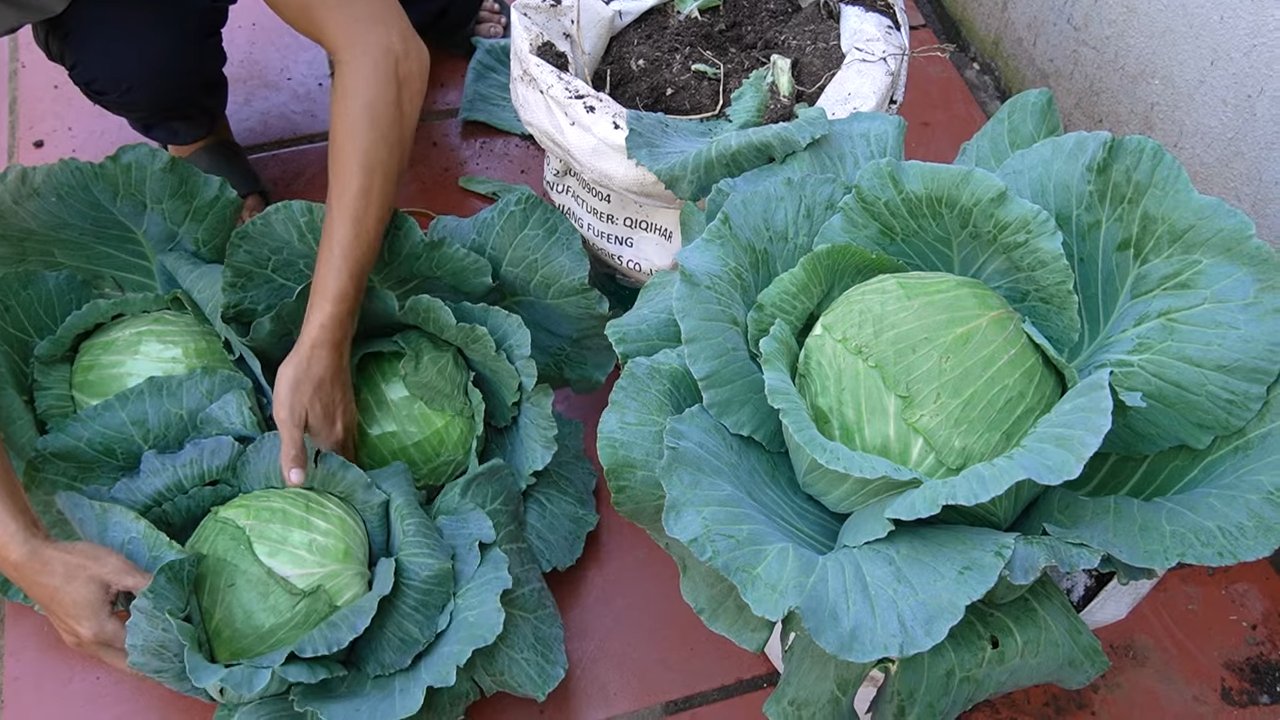
Phase 4: Die Ernte – Endlich frischer Kohl aus eigener Zucht!
Je nach Kohlsorte und Aussaatzeitpunkt kannst du nach einigen Monaten deinen eigenen Kohl ernten.
1. Erntezeitpunkt: Der richtige Erntezeitpunkt hängt von der Kohlsorte ab. Frühkohl kann schon nach 2-3 Monaten geerntet werden, während Rosenkohl etwas länger braucht. Achte auf die Angaben auf der Saatguttüte.
2. Erntemethode: Schneide den Kohlkopf mit einem scharfen Messer ab. Bei Rosenkohl kannst du die Knospen einzeln ernten, sobald sie fest und geschlossen sind.
3. Lagerung: Frischer Kohl hält sich im Kühlschrank einige Tage. Du kannst ihn auch einfrieren oder fermentieren, um ihn länger haltbar zu machen.
Extra-Tipps für deinen Kohl-Erfolg
* Sonniger Standort: Kohl liebt die Sonne! Je mehr Sonne, desto besser.
* Gute Drainage: Achte darauf, dass das Wasser gut ablaufen kann, um Staunässe zu vermeiden.
* Regelmäßiges Gießen: Kohl braucht viel Wasser, besonders an heißen Tagen.
* Regelmäßiges Düngen: Kohl ist ein Starkzehrer und braucht regelmäßige Düngung.
* Schutz vor Schädlingen: Schütze deine Kohlpflanzen vor Schnecken und anderen Schädlingen.
* Sortenwahl: Wähle Sorten, die für den Anbau in Töpfen geeignet sind.
* Geduld: Kohl braucht Zeit zum Wachsen. Sei geduldig und gib nicht auf!
Ich hoffe, dieser Guide hilft dir dabei, deinen eigenen Kohl
Conclusion
So, there you have it! Growing cabbage without a garden is not only possible, it’s surprisingly rewarding. We’ve explored a simple, effective method that allows you to enjoy fresh, homegrown cabbage even if you’re limited to a balcony, patio, or even a sunny windowsill. This DIY approach democratizes gardening, making it accessible to everyone, regardless of their living situation.
Why is this DIY trick a must-try? Because it empowers you to take control of your food source. You know exactly what goes into your cabbage – no mystery pesticides or questionable fertilizers. You get the satisfaction of nurturing a plant from seedling to harvest, and the unparalleled flavor of truly fresh produce. Plus, it’s a fantastic way to reduce your carbon footprint by minimizing transportation and packaging.
But the benefits don’t stop there. This method is incredibly versatile. Feel free to experiment with different varieties of cabbage. Red cabbage, Savoy cabbage, Napa cabbage – the possibilities are endless! You can also adjust the size of your container to suit your space and desired yield. Consider companion planting herbs like rosemary or thyme in the same container to deter pests and enhance the flavor of your cabbage. Another variation is to use different types of potting mix. Some gardeners prefer a mix with more compost for added nutrients, while others opt for a lighter mix with better drainage. The key is to find what works best for your specific environment and growing conditions.
Don’t be afraid to get creative with your container choices, too. While plastic pots are a practical option, you can also use repurposed items like old buckets, wooden crates, or even fabric grow bags. Just make sure your container has adequate drainage holes to prevent waterlogging.
We understand that venturing into the world of container gardening can seem daunting at first, but trust us, it’s easier than you think. With a little patience and attention, you’ll be harvesting your own delicious cabbage in no time. The key is consistent watering, adequate sunlight, and a watchful eye for any signs of pests or diseases.
Growing cabbage without a garden is more than just a gardening technique; it’s a lifestyle choice. It’s about connecting with nature, embracing sustainability, and enjoying the simple pleasures of homegrown food.
We wholeheartedly encourage you to give this DIY trick a try. Start small, learn as you go, and don’t be discouraged by setbacks. Gardening is a journey, not a destination. And most importantly, share your experience with us! We’d love to hear about your successes, your challenges, and any tips or tricks you’ve discovered along the way. Post photos of your cabbage plants, share your favorite recipes, and connect with other gardeners in our community. Together, we can make urban gardening a thriving movement. So, grab your seeds, your potting mix, and your container, and let’s get growing!
FAQ
Can I really grow cabbage in a container?
Absolutely! Cabbage is surprisingly well-suited to container gardening. As long as you provide it with the right conditions – adequate sunlight, well-draining soil, and consistent watering – it will thrive in a container. The key is to choose a container that is large enough to accommodate the plant’s root system and to select a cabbage variety that is appropriate for your climate.
What size container do I need for growing cabbage?
A good rule of thumb is to use a container that is at least 12 inches in diameter and 12 inches deep. This will provide enough space for the cabbage plant to develop a healthy root system. If you’re planning to grow multiple cabbage plants in the same container, you’ll need a larger container accordingly. Remember, bigger is generally better when it comes to container gardening.
What type of soil should I use for growing cabbage in a container?
Cabbage prefers well-draining, nutrient-rich soil. A good potting mix for container gardening is a blend of peat moss, perlite, and vermiculite. You can also add compost or other organic matter to improve the soil’s fertility and drainage. Avoid using garden soil in containers, as it can become compacted and prevent proper drainage.
How much sunlight does cabbage need?
Cabbage needs at least 6 hours of direct sunlight per day to thrive. If you don’t have a sunny spot in your garden or on your balcony, you can supplement with artificial light. Grow lights are a great option for indoor gardening and can help ensure that your cabbage plants get the light they need.
How often should I water my cabbage plants?
Cabbage plants need consistent moisture, but they don’t like to be waterlogged. Water your plants deeply whenever the top inch of soil feels dry to the touch. Avoid watering overhead, as this can promote fungal diseases. Instead, water at the base of the plant.
How do I fertilize my cabbage plants?
Cabbage is a heavy feeder, so it’s important to fertilize your plants regularly. Use a balanced fertilizer that is specifically formulated for vegetables. Follow the instructions on the fertilizer package for application rates and frequency. You can also use organic fertilizers like compost tea or fish emulsion.
What are some common pests and diseases that affect cabbage?
Some common pests that affect cabbage include cabbage worms, aphids, and flea beetles. You can control these pests with organic insecticides like neem oil or insecticidal soap. Common diseases that affect cabbage include black rot and clubroot. You can prevent these diseases by practicing good sanitation and avoiding overhead watering.
When is the best time to plant cabbage in a container?
The best time to plant cabbage depends on your climate. In general, you can plant cabbage in the spring or fall. If you live in a warm climate, you can plant cabbage in the winter. Be sure to check the specific planting dates for your region.
How long does it take for cabbage to mature?
Cabbage typically takes 60-100 days to mature, depending on the variety. You can harvest your cabbage when the head is firm and compact. Cut the head off at the base of the plant, leaving the outer leaves intact. These leaves will continue to produce smaller heads of cabbage.
Can I grow different varieties of cabbage in containers?
Yes, you can! Experiment with different varieties of cabbage to find your favorites. Red cabbage, Savoy cabbage, and Napa cabbage are all great options for container gardening. Just be sure to choose varieties that are appropriate for your climate and growing conditions.
What are some tips for success when growing cabbage in containers?
Here are a few additional tips for success:
* Choose a container that is the right size for your cabbage plants.
* Use a well-draining potting mix.
* Provide your plants with plenty of sunlight.
* Water your plants regularly.
* Fertilize your plants regularly.
* Protect your plants from pests and diseases.
* Harvest your cabbage when it is mature.
By following these tips, you can enjoy a bountiful harvest of fresh, homegrown cabbage, even without a traditional garden. Happy gardening!

Leave a Comment