
Grow Cantaloupe Successfully, even if you think you don’t have a green thumb! Have you ever bitten into a perfectly ripe, juicy cantaloupe and thought, “I wish I could grow these myself?” Well, you absolutely can! For centuries, cantaloupe has been a symbol of summer sweetness, enjoyed across cultures from its origins in Africa and Asia to becoming a beloved treat in gardens worldwide. But let’s be honest, sometimes getting that perfect cantaloupe from your own backyard feels like an impossible dream.
That’s where this DIY guide comes in. I’m going to share some simple, yet effective tricks and hacks that will dramatically increase your chances of harvesting delicious, homegrown cantaloupe. Forget complicated gardening jargon and endless hours of back-breaking labor. We’re talking about practical tips that anyone can implement, regardless of their experience level.
Why do you need these tricks? Because store-bought cantaloupe simply can’t compare to the flavor of a vine-ripened melon picked fresh from your garden. Plus, knowing you nurtured that sweet fruit from seed to table is incredibly rewarding. So, let’s dive in and discover how you can grow cantaloupe successfully and enjoy the taste of summer all season long!
Cantaloupe Anbau: Dein Leitfaden für eine süße Ernte
Hey Gartenfreunde! Ich liebe Cantaloupe-Melonen. Ihr süßer, saftiger Geschmack ist einfach unschlagbar, besonders an einem heißen Sommertag. Und rate mal was? Du kannst sie auch in deinem eigenen Garten anbauen! Es mag anfangs etwas einschüchternd wirken, aber mit ein wenig Planung und Geduld kannst du dich bald über deine eigene Ernte freuen. In diesem Artikel zeige ich dir Schritt für Schritt, wie du Cantaloupe-Melonen erfolgreich anbaust. Los geht’s!
Die Grundlagen: Was Cantaloupe zum Wachsen braucht
Bevor wir loslegen, lass uns kurz die Bedürfnisse dieser sonnenliebenden Früchte besprechen. Cantaloupe-Melonen sind wählerisch, aber wenn du ihnen gibst, was sie brauchen, werden sie dich mit einer reichen Ernte belohnen.
* Sonne: Cantaloupe-Melonen brauchen mindestens 6-8 Stunden direkte Sonneneinstrahlung pro Tag. Je mehr, desto besser!
* Boden: Sie bevorzugen gut durchlässigen, fruchtbaren Boden mit einem pH-Wert zwischen 6,0 und 6,8.
* Wasser: Regelmäßige Bewässerung ist wichtig, besonders während der Fruchtbildung. Achte aber darauf, Staunässe zu vermeiden.
* Wärme: Cantaloupe-Melonen sind wärmeliebend und gedeihen am besten bei Temperaturen zwischen 21°C und 35°C.
* Platz: Cantaloupe-Pflanzen brauchen viel Platz, da sie sich weit ausbreiten. Plane etwa 90-120 cm Platz pro Pflanze ein.
Schritt-für-Schritt-Anleitung zum Cantaloupe-Anbau
Jetzt, wo wir die Grundlagen kennen, können wir mit dem eigentlichen Anbau beginnen. Ich werde den Prozess in verschiedene Phasen unterteilen, um es übersichtlicher zu gestalten.
Phase 1: Vorbereitung – Der Grundstein für den Erfolg
Die Vorbereitung ist das A und O für eine erfolgreiche Cantaloupe-Ernte. Nimm dir also Zeit für diese Phase.
1. Wähle den richtigen Standort: Suche einen sonnigen Platz in deinem Garten mit gut durchlässigem Boden. Vermeide Standorte, an denen sich Wasser staut.
2. Bereite den Boden vor: Entferne Unkraut, Steine und andere Hindernisse. Lockere den Boden mit einer Grabegabel oder einem Kultivator auf.
3. Verbessere den Boden: Cantaloupe-Melonen lieben fruchtbaren Boden. Arbeite reichlich Kompost oder gut verrotteten Mist in den Boden ein. Das verbessert die Drainage, die Belüftung und den Nährstoffgehalt.
4. Teste den pH-Wert: Verwende ein Bodentestkit, um den pH-Wert des Bodens zu überprüfen. Wenn der pH-Wert zu niedrig ist (sauer), kannst du Kalk hinzufügen, um ihn zu erhöhen. Wenn er zu hoch ist (alkalisch), kannst du Schwefel hinzufügen, um ihn zu senken.
5. Baue Hügel (optional): In kühleren Klimazonen kann es hilfreich sein, Hügel für den Anbau zu bauen. Die Hügel erwärmen sich schneller und verbessern die Drainage. Forme einfach etwa 30 cm hohe und 60 cm breite Hügel.
Phase 2: Aussaat – Der Start ins Leben
Du hast zwei Möglichkeiten: Du kannst die Samen direkt ins Freiland säen oder sie in Innenräumen vorziehen. Ich bevorzuge die Voranzucht, da sie den Pflanzen einen Vorsprung verschafft.
1. Wähle die richtige Zeit: Cantaloupe-Melonen sind frostempfindlich. Säe die Samen erst, wenn keine Frostgefahr mehr besteht und der Boden sich auf mindestens 18°C erwärmt hat.
2. Voranzucht (empfohlen):
* Fülle kleine Töpfe oder Anzuchtschalen mit Anzuchterde.
* Säe 2-3 Samen pro Topf, etwa 1 cm tief.
* Gieße die Erde vorsichtig an.
* Stelle die Töpfe an einen warmen, hellen Ort (z.B. auf eine Fensterbank oder unter eine Pflanzenlampe).
* Halte die Erde feucht, aber nicht nass.
* Nach dem Auflaufen der Sämlinge (ca. 7-10 Tage) entferne die schwächsten Pflanzen, so dass nur eine kräftige Pflanze pro Topf übrig bleibt.
3. Direktsaat (möglich):
* Säe 3-4 Samen pro Pflanzstelle, etwa 2,5 cm tief.
* Halte die Erde feucht, aber nicht nass.
* Nach dem Auflaufen der Sämlinge entferne die schwächsten Pflanzen, so dass nur eine kräftige Pflanze pro Pflanzstelle übrig bleibt.
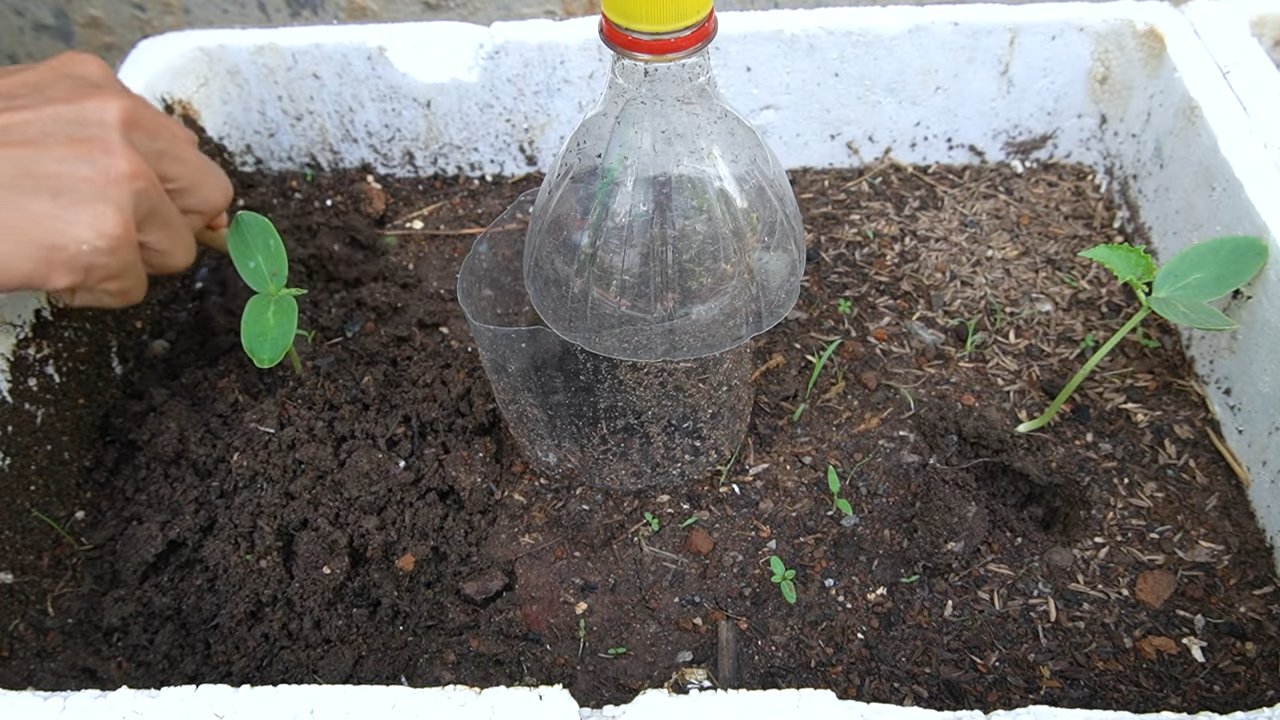
Phase 3: Auspflanzen – Raus in die Freiheit!
Sobald die Sämlinge kräftig genug sind (etwa 10-15 cm hoch) und keine Frostgefahr mehr besteht, können sie ins Freiland ausgepflanzt werden.
1. Härte die Sämlinge ab: Bevor du die Sämlinge ins Freiland pflanzt, solltest du sie abhärten. Stelle sie dazu für einige Tage tagsüber ins Freie und bringe sie nachts wieder herein. Das hilft ihnen, sich an die Bedingungen im Freien zu gewöhnen.
2. Pflanze die Sämlinge aus: Grabe Löcher, die etwas größer sind als die Wurzelballen der Sämlinge. Setze die Sämlinge vorsichtig in die Löcher und fülle sie mit Erde auf. Achte darauf, dass die Oberseite des Wurzelballens mit der Bodenoberfläche abschließt.
3. Gieße die Pflanzen an: Gieße die Pflanzen nach dem Auspflanzen gründlich an.
4. Mulche den Boden: Mulche den Boden um die Pflanzen herum mit Stroh, Holzhackschnitzeln oder anderem organischen Material. Das hilft, die Feuchtigkeit im Boden zu halten, Unkraut zu unterdrücken und den Boden kühl zu halten.
5. Schütze die Pflanzen (optional): In kühleren Klimazonen kannst du die Pflanzen mit einem Vlies oder Mini-Tunneln schützen, um sie vor Kälte und Schädlingen zu schützen.
Phase 4: Pflege – Liebe und Aufmerksamkeit
Nach dem Auspflanzen ist es wichtig, die Cantaloupe-Pflanzen gut zu pflegen, um eine reiche Ernte zu gewährleisten.
1. Bewässerung: Gieße die Pflanzen regelmäßig, besonders während der Fruchtbildung. Achte darauf, dass der Boden feucht, aber nicht nass ist. Vermeide es, die Blätter zu benetzen, da dies Pilzkrankheiten fördern kann. Am besten gießt du früh am Morgen, damit die Blätter tagsüber abtrocknen können.
2. Düngung: Dünge die Pflanzen alle 2-3 Wochen mit einem ausgewogenen Dünger. Befolge die Anweisungen auf der Verpackung. Du kannst auch organischen Dünger wie Komposttee oder Fischdünger verwenden.
3. Unkrautbekämpfung: Halte den Bereich um die Pflanzen herum unkrautfrei. Unkraut konkurriert mit den Cantaloupe-Pflanzen um Nährstoffe und Wasser.
4. Beschneidung (optional): Du kannst die Pflanzen beschneiden, um die Fruchtbildung zu fördern. Entferne dazu Seitentriebe, die keine Früchte tragen.
5. Schädlingsbekämpfung: Achte auf Schädlinge wie Blattläuse, Gurkenkäfer und Spinnmilben. Bekämpfe sie bei Bedarf mit natürlichen Methoden wie Neemöl oder Insektizidseife.
6. Krankheitsbekämpfung: Achte auf Krankheiten wie Mehltau und Fusarium-Welke. Sorge für eine gute Belüftung und vermeide es, die Blätter zu benetzen. Bei Bedarf kannst du Fungizide verwenden.
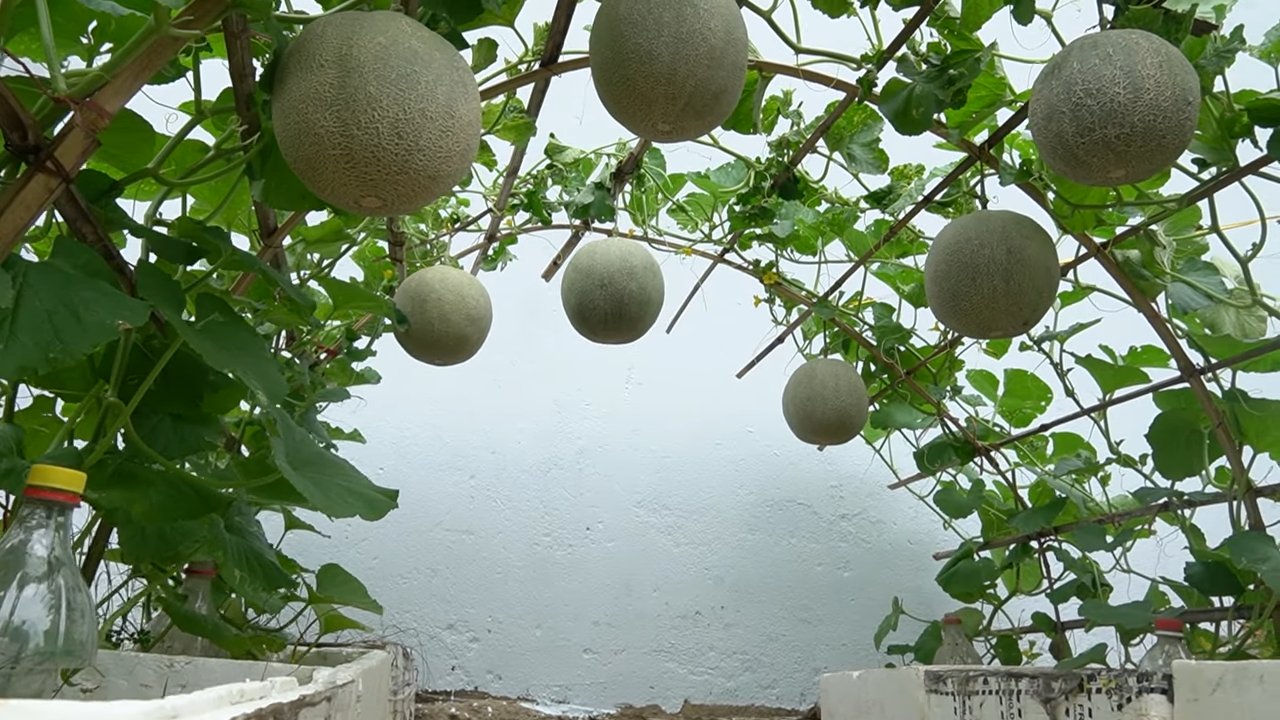
Phase 5: Ernte – Die Belohnung für deine Mühe
Die Ernte ist der aufregendste Teil des Cantaloupe-Anbaus!
1. Wann ernten: Cantaloupe-Melonen sind reif, wenn sie sich leicht vom Stiel lösen lassen. Du kannst auch auf folgende Anzeichen achten:
* Die Schale verfärbt sich von grün nach gelb oder orange.
* Die Schale wird weich und gibt leicht nach, wenn du sie drückst.
* Die Melone duftet süßlich.
Conclusion
So, there you have it! Mastering the art of growing cantaloupe successfully doesn’t require a green thumb blessed by the garden gods. It’s about understanding the plant’s needs, providing the right environment, and employing a few simple, yet effective, techniques. We’ve walked through everything from seed selection and soil preparation to pollination and pest control. Now, it’s time to put that knowledge into action and reap the sweet rewards of your labor.
Why is this DIY approach a must-try? Because store-bought cantaloupe, while convenient, often lacks the intense flavor and satisfying sweetness of a homegrown melon. Commercial growers often prioritize yield and shelf life over taste, picking the fruit before it’s fully ripe. By growing your own, you have complete control over the entire process, ensuring that your cantaloupe is harvested at its peak of ripeness, bursting with flavor and nutrients. Plus, there’s an undeniable satisfaction in nurturing a plant from seed to fruit, knowing that you played a direct role in creating something delicious and healthy.
But the journey doesn’t end here! Feel free to experiment with different varieties of cantaloupe. Perhaps you’d like to try growing a ‘Hales Best Jumbo’ for its classic flavor or a ‘Honey Rock’ for its exceptional sweetness. Consider using raised beds or containers if you have limited space or poor soil conditions. You can also explore companion planting, pairing your cantaloupe with beneficial herbs and flowers that attract pollinators and deter pests. For example, marigolds are known to repel nematodes, while basil can attract beneficial insects.
Don’t be afraid to get creative and adapt these techniques to your specific growing conditions and preferences. The beauty of gardening lies in its adaptability and the constant opportunity to learn and improve. Remember to monitor your plants regularly, paying close attention to their leaves, stems, and fruit. Early detection of problems is key to preventing serious issues and ensuring a bountiful harvest.
We are confident that with the information provided, you’ll be well on your way to enjoying a delicious harvest of homegrown cantaloupe. We encourage you to embrace the challenge, get your hands dirty, and experience the joy of growing your own food.
Now, we want to hear from you! Have you tried growing cantaloupe before? What challenges did you face? What tips and tricks have you discovered along the way? Share your experiences in the comments below. Your insights could be invaluable to other aspiring cantaloupe growers. And if you’re new to this, we’re eager to hear about your journey as you embark on this exciting adventure. Don’t forget to share photos of your cantaloupe plants and harvests! Let’s create a community of passionate gardeners who are dedicated to growing cantaloupe successfully and sharing their knowledge with others. Happy gardening!
Frequently Asked Questions (FAQ)
Q: How long does it take to grow cantaloupe from seed?
A: Growing cantaloupe from seed typically takes between 75 and 90 days, depending on the variety and growing conditions. Starting seeds indoors 3-4 weeks before the last expected frost can give you a head start. Remember to harden off the seedlings before transplanting them outdoors.
Q: What are the best soil conditions for growing cantaloupe?
A: Cantaloupe thrives in well-drained, fertile soil with a pH between 6.0 and 6.8. Amend the soil with compost or well-rotted manure before planting to improve drainage and nutrient content. Cantaloupe are heavy feeders, so ensure the soil is rich in organic matter.
Q: How much sunlight does cantaloupe need?
A: Cantaloupe requires at least 6-8 hours of direct sunlight per day to produce sweet, flavorful fruit. Choose a sunny location in your garden where the plants will receive ample sunlight throughout the growing season.
Q: How often should I water my cantaloupe plants?
A: Water cantaloupe plants deeply and regularly, especially during hot, dry weather. Aim to keep the soil consistently moist but not waterlogged. Water at the base of the plants to avoid wetting the foliage, which can increase the risk of fungal diseases. Reduce watering as the fruits begin to ripen to concentrate the sugars and enhance the flavor.
Q: How do I know when my cantaloupe is ripe?
A: Several indicators can help you determine when your cantaloupe is ripe. The skin will change color from green to a tan or yellowish hue. The stem will begin to crack and separate easily from the fruit. The blossom end of the cantaloupe will soften slightly and emit a sweet, musky aroma. Gently press on the blossom end; if it yields slightly, the cantaloupe is likely ripe.
Q: What are some common pests and diseases that affect cantaloupe?
A: Common pests that affect cantaloupe include aphids, squash bugs, cucumber beetles, and vine borers. Diseases include powdery mildew, downy mildew, and fusarium wilt. Regularly inspect your plants for signs of pests or diseases and take appropriate action, such as using insecticidal soap, neem oil, or fungicides. Good air circulation and proper watering techniques can help prevent many fungal diseases.
Q: Can I grow cantaloupe in containers?
A: Yes, you can grow cantaloupe in containers, but you’ll need to choose a large container (at least 20 gallons) and provide adequate support for the vines. Use a well-draining potting mix and fertilize regularly. Container-grown cantaloupe may require more frequent watering than those grown in the ground. Select a bush or compact variety for best results in containers.
Q: How do I encourage pollination of my cantaloupe flowers?
A: Cantaloupe relies on pollinators, such as bees, to produce fruit. Attract pollinators to your garden by planting flowering herbs and flowers near your cantaloupe plants. If pollination is poor, you can hand-pollinate the flowers by transferring pollen from the male flowers to the female flowers using a small brush.
Q: What are some good companion plants for cantaloupe?
A: Good companion plants for cantaloupe include marigolds, basil, oregano, and nasturtiums. Marigolds repel nematodes, while basil attracts beneficial insects. Oregano is said to improve the flavor of cantaloupe, and nasturtiums deter aphids. Avoid planting cantaloupe near potatoes, as they can compete for nutrients.
Q: How do I store cantaloupe after harvesting?
A: Store ripe cantaloupe in the refrigerator for up to 5 days. Cut cantaloupe should be stored in an airtight container to prevent it from drying out and absorbing odors from other foods. You can also freeze cantaloupe chunks for later use in smoothies or desserts.

Leave a Comment