
Grow Celery at Home, you say? Absolutely! Imagine stepping into your kitchen and snipping fresh, crisp celery stalks straight from your own garden. No more limp, store-bought celery that’s been sitting on the shelf for days. This isn’t just a dream; it’s a deliciously achievable reality with a few simple DIY tricks.
Celery, with its satisfying crunch and subtle flavor, has been cultivated for centuries. Originating in the Mediterranean, it was initially valued more for its medicinal properties than its culinary uses. Over time, however, it’s become a staple in kitchens worldwide, adding depth to soups, salads, and countless other dishes. But did you know that you can easily grow celery at home, even if you don’t have a sprawling garden?
Let’s face it, buying celery from the grocery store can be a gamble. Sometimes it’s fresh, other times it’s wilted and sad. Plus, it can be surprisingly expensive! That’s where our DIY guide comes in. We’ll show you easy and effective methods to cultivate your own thriving celery patch, saving you money and ensuring you always have fresh, flavorful celery on hand. Whether you’re a seasoned gardener or a complete beginner, these tips and tricks will empower you to enjoy the satisfaction of growing your own food. Get ready to ditch the store-bought stuff and embrace the joy of homegrown celery!
Zieh dein eigenes Staudensellerie zu Hause: Ein umfassender DIY-Leitfaden
Hey Gartenfreunde! Habt ihr euch jemals gefragt, ob ihr euer eigenes Staudensellerie zu Hause anbauen könnt? Die Antwort ist ein klares JA! Es ist einfacher als ihr denkt und super befriedigend, wenn ihr eure eigenen, knackigen Selleriestangen ernten könnt. In diesem Artikel zeige ich euch Schritt für Schritt, wie ihr das macht. Los geht’s!
Was du brauchst: Die richtige Ausrüstung und Vorbereitung
Bevor wir loslegen, stellen wir sicher, dass wir alles haben, was wir brauchen. Hier ist eine Liste der wichtigsten Dinge:
* Ein Staudensellerie-Strunk: Am besten einen frischen, aus dem Supermarkt. Achtet darauf, dass er eine gesunde Basis hat.
* Ein Glas oder eine Schale: Groß genug, um die Selleriebasis aufzunehmen.
* Wasser: Leitungswasser ist völlig ausreichend.
* Ein sonniger Platz: Ein Fensterbrett oder ein anderer Ort mit viel Licht ist ideal.
* Blumenerde: Gute, nährstoffreiche Blumenerde ist wichtig für das spätere Einpflanzen.
* Ein Topf: Ein Topf mit guter Drainage ist perfekt.
* Geduld: Sellerie braucht Zeit, um zu wachsen.
Phase 1: Die Selleriebasis zum Leben erwecken
Dieser erste Schritt ist entscheidend, um den Sellerie zum Wachsen zu bringen. Wir konzentrieren uns darauf, die Wurzelbildung anzuregen.
1. Sellerie vorbereiten: Schneidet den Staudensellerie etwa 5-7 cm vom unteren Ende ab. Das obere Ende könnt ihr natürlich für Suppen oder Salate verwenden! Achtet darauf, dass die Basis intakt bleibt.
2. Ins Wasser stellen: Platziert die Selleriebasis in eurem Glas oder eurer Schale. Füllt das Gefäß mit Wasser, sodass die Basis etwa zur Hälfte bedeckt ist. Achtet darauf, dass die inneren Stängel nicht im Wasser stehen, da sie sonst faulen könnten.
3. Sonniger Standort: Stellt das Glas mit der Selleriebasis an einen sonnigen Ort. Ein Fensterbrett ist perfekt. Sellerie liebt Licht!
4. Wasser wechseln: Wechselt das Wasser alle 1-2 Tage, um es frisch zu halten und die Bildung von Bakterien zu verhindern.
5. Geduld haben: Nach etwa 5-7 Tagen solltet ihr erste Wurzeln sehen. Es kann auch etwas länger dauern, also gebt nicht auf!
Phase 2: Einpflanzen in Erde
Sobald die Wurzeln gut entwickelt sind, ist es Zeit, den Sellerie in Erde zu pflanzen.
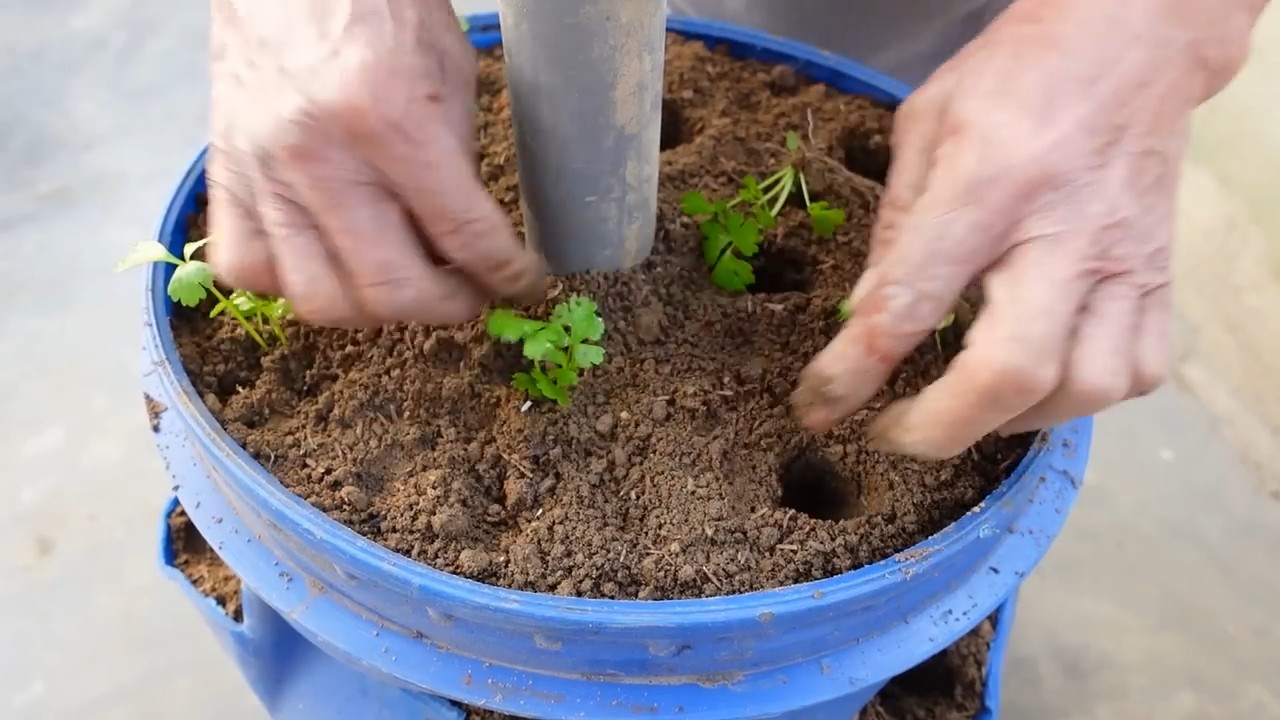
1. Topf vorbereiten: Füllt euren Topf mit Blumenerde. Lasst etwa 2-3 cm Platz bis zum Rand.
2. Sellerie einpflanzen: Macht ein kleines Loch in die Erde, groß genug für die Selleriebasis und die Wurzeln. Setzt den Sellerie vorsichtig ein und bedeckt die Wurzeln mit Erde. Achtet darauf, dass die Basis des Selleries knapp über der Erde liegt.
3. Angießen: Gießt den Sellerie nach dem Einpflanzen gut an. Die Erde sollte feucht, aber nicht durchnässt sein.
4. Sonniger Standort beibehalten: Stellt den Topf wieder an einen sonnigen Ort.
Phase 3: Pflege und Wachstum
Jetzt geht es darum, den Sellerie zu pflegen und ihm beim Wachsen zu helfen.
1. Regelmäßiges Gießen: Gießt den Sellerie regelmäßig, sodass die Erde immer feucht ist. Vermeidet Staunässe, da dies zu Wurzelfäule führen kann.
2. Düngen: Düngt den Sellerie alle 2-3 Wochen mit einem organischen Flüssigdünger. Das hilft ihm, kräftig zu wachsen.
3. Beobachten: Achtet auf Schädlinge oder Krankheiten. Sellerie kann von Blattläusen oder Schnecken befallen werden. Bei Bedarf könnt ihr natürliche Schädlingsbekämpfungsmittel verwenden.
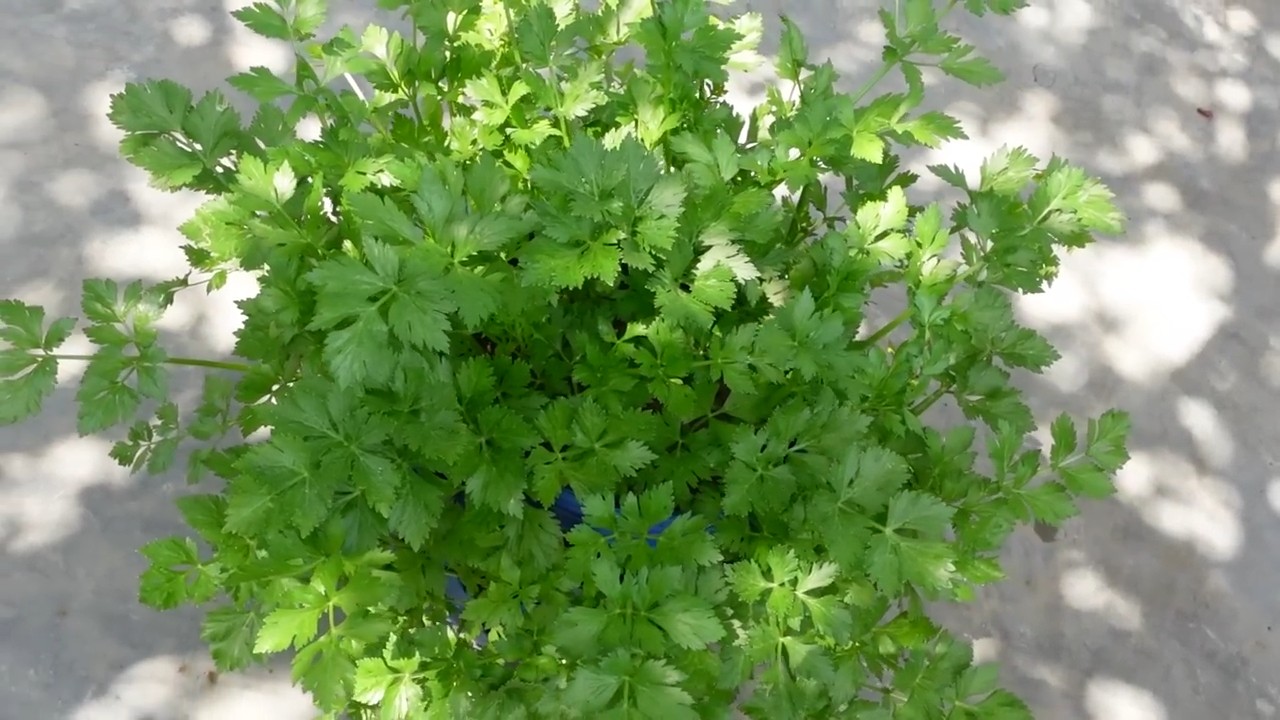
4. Ernten: Nach etwa 2-3 Monaten solltet ihr euren eigenen Staudensellerie ernten können. Schneidet die äußeren Stängel ab, wenn sie groß genug sind. Der Sellerie wird weiterwachsen und neue Stängel produzieren.
Zusätzliche Tipps und Tricks für den erfolgreichen Sellerieanbau
* Selleriesorten: Es gibt verschiedene Selleriesorten. Einige sind leichter anzubauen als andere. Informiert euch, welche Sorte für eure Region am besten geeignet ist.
* Bodenqualität: Sellerie bevorzugt einen nährstoffreichen, gut durchlässigen Boden. Ihr könnt eurer Blumenerde Kompost oder andere organische Materialien hinzufügen, um die Bodenqualität zu verbessern.
* Schädlinge und Krankheiten: Achtet auf Anzeichen von Schädlingen oder Krankheiten. Frühzeitiges Erkennen und Behandeln ist wichtig, um größere Probleme zu vermeiden.
* Sellerie bleichen: Um hellere, zartere Selleriestangen zu erhalten, könnt ihr den Sellerie bleichen. Das bedeutet, dass ihr die Stängel einige Wochen vor der Ernte mit Erde oder Pappe abdeckt, um sie vor Sonnenlicht zu schützen.
* Sellerie im Freien anbauen: Wenn ihr einen Garten habt, könnt ihr den Sellerie auch im Freien anbauen. Wählt einen sonnigen Standort mit gut durchlässigem Boden.
* Sellerie vermehren: Ihr könnt Sellerie auch aus Samen ziehen. Das ist etwas aufwendiger, aber es ermöglicht euch, verschiedene Sorten anzubauen.
* Sellerie lagern: Geernteten Sellerie könnt ihr im Kühlschrank lagern. Wickelt ihn in ein feuchtes Tuch oder eine Plastiktüte, um ihn frisch zu halten.
* Sellerie verwenden: Sellerie ist vielseitig einsetzbar. Ihr könnt ihn roh in Salaten essen, in Suppen und Eintöpfen verwenden oder ihn als Dip-Gemüse genießen.
Häufige Fehler vermeiden
* Zu wenig Licht: Sellerie braucht viel Licht, um zu wachsen. Stellt sicher, dass er an einem sonnigen Ort steht.
* Zu wenig Wasser: Sellerie braucht regelmäßige Bewässerung. Lasst die Erde nicht austrocknen.
* Staunässe: Vermeidet Staunässe, da dies zu Wurzelfäule führen kann.
* Falsche Erde: Verwendet gute, nährstoffreiche Blumenerde.
* Schädlinge ignorieren: Achtet auf Schädlinge und behandelt sie frühzeitig.
Warum Staudensellerie selbst anbauen?
Es gibt viele Gründe, warum es sich lohnt, Staudensellerie selbst anzubauen:
* Frischer und aromatischer: Selbst angebauter Sellerie schmeckt viel frischer und aromatischer als gekaufter.
* Nachhaltig: Ihr reduziert euren ökologischen Fußabdruck, indem ihr lokale Produkte anbaut.
* Gesund: Ihr wisst genau, was in eurem Sellerie steckt und könnt auf Pestizide verzichten.
* Befriedigend: Es ist ein tolles Gefühl, seine eigenen Lebensmittel anzubauen.
* Kostengünstig: Auf lange Sicht spart ihr Geld, wenn ihr euren eigenen Sellerie anbaut.
Fazit: Ran an den Sellerie!
Ich hoffe, dieser Leitfaden hat euch inspiriert, euren eigenen Staudensellerie zu Hause anzubauen. Es ist ein einfaches und lohnendes Projekt, das euch mit frischem, aromatischem Sellerie versorgt. Also, worauf wartet ihr noch? Holt euch einen Selleriestrunk und legt los! Viel Spaß beim Gärtnern!
Conclusion
So, there you have it! Growing celery at home from scraps isn’t just a fun experiment; it’s a sustainable way to reduce food waste, enjoy fresh, flavorful celery, and connect with the natural world. It’s a surprisingly simple process that yields impressive results, even for those without a green thumb. Forget buying bunches of celery that wilt in your crisper drawer – with a little patience and this easy DIY trick, you can have a continuous supply of crisp, homegrown celery right at your fingertips.
This method is a must-try for several reasons. First, it’s incredibly cost-effective. Instead of tossing the celery base, you’re essentially getting a second chance to enjoy the vegetable. Second, it’s environmentally friendly. By regrowing celery, you’re reducing your reliance on commercially grown produce, which often involves significant transportation and packaging. Third, it’s a rewarding experience. Watching your celery sprout and grow is a tangible reminder of the power of nature and your own ability to cultivate life.
But don’t stop there! Experiment with different varieties of celery. Try growing organic celery for an even healthier harvest. Once your celery is established in soil, you can also try different fertilizers to see which yields the best results. Some gardeners swear by compost tea, while others prefer a balanced liquid fertilizer. You can also adjust the amount of sunlight your celery receives to see how it affects its growth. Remember, gardening is all about experimentation and learning what works best for you and your environment.
Ready to embark on your celery-growing adventure? We encourage you to give this DIY trick a try. It’s a simple, rewarding, and sustainable way to enjoy fresh celery. And once you’ve harvested your first batch, don’t forget to share your experience with us! We’d love to hear about your successes, challenges, and any variations you’ve tried. Share your photos and tips in the comments below – let’s build a community of home celery growers! Let us know if you have any questions about how to grow celery at home.
Variations and Advanced Techniques
Beyond the basic method, there are several ways to enhance your celery-growing experience. Consider these options:
* Hydroponics: For a more advanced approach, try growing your celery in a hydroponic system. This method involves growing plants without soil, using nutrient-rich water solutions.
* Succession Planting: To ensure a continuous supply of celery, stagger your plantings. Start new celery bases every few weeks to have a steady harvest throughout the growing season.
* Companion Planting: Plant your celery alongside other vegetables that benefit from its presence. Celery is known to repel certain pests, making it a great companion for plants like cabbage and tomatoes.
Troubleshooting Tips
Even with the best intentions, you might encounter some challenges along the way. Here are a few troubleshooting tips to help you overcome common problems:
* Yellowing Leaves: This could be a sign of overwatering or nutrient deficiency. Adjust your watering schedule and consider adding a balanced fertilizer.
* Slow Growth: Celery needs plenty of sunlight to thrive. Ensure your plant is receiving at least six hours of direct sunlight per day.
* Pest Infestations: Keep an eye out for common garden pests like aphids and slugs. Treat infestations promptly with organic pest control methods.
Remember, growing celery at home is a journey, not a destination. Embrace the process, learn from your mistakes, and enjoy the satisfaction of harvesting your own fresh, homegrown celery.
FAQ
Why should I bother growing celery from scraps? Isn’t it easier to just buy it at the store?
While buying celery at the store is certainly convenient, growing celery from scraps offers several compelling advantages. First, it’s a fantastic way to reduce food waste. Instead of throwing away the celery base, you’re giving it a second life and getting more value from your purchase. Second, it’s a sustainable practice that reduces your reliance on commercially grown produce, which often involves significant transportation and packaging. Third, it’s a rewarding experience that connects you with the natural world and allows you to enjoy fresh, homegrown celery. Finally, the taste of freshly grown celery is often superior to store-bought varieties.
How long does it take to grow celery from scraps?
The time it takes to grow celery from scraps can vary depending on several factors, including the variety of celery, the growing conditions, and your climate. Generally, you can expect to see new growth within a week or two after placing the celery base in water. Once you transplant it to soil, it can take several months for the celery to fully mature. Be patient and provide your celery with the right conditions, and you’ll be rewarded with a bountiful harvest.
What kind of soil is best for growing celery?
Celery thrives in rich, well-drained soil that is high in organic matter. Amend your soil with compost or other organic materials before planting to improve its fertility and drainage. A slightly acidic to neutral soil pH (around 6.0 to 7.0) is ideal. You can test your soil pH with a simple soil testing kit.
How much sunlight does celery need?
Celery needs plenty of sunlight to thrive. Aim for at least six hours of direct sunlight per day. If you’re growing celery indoors, place it near a sunny window or use a grow light to supplement natural light. Insufficient sunlight can lead to slow growth and leggy plants.
How often should I water my celery?
Celery needs consistent moisture to grow well. Water your celery regularly, keeping the soil consistently moist but not waterlogged. Check the soil moisture regularly and water when the top inch feels dry to the touch. Avoid letting the soil dry out completely, as this can stress the plant and affect its growth.
What are some common problems when growing celery, and how can I fix them?
Some common problems when growing celery include yellowing leaves, slow growth, and pest infestations. Yellowing leaves can be a sign of overwatering, nutrient deficiency, or disease. Adjust your watering schedule, fertilize with a balanced fertilizer, and treat any diseases promptly. Slow growth can be caused by insufficient sunlight, poor soil, or lack of nutrients. Ensure your celery is receiving enough sunlight, amend your soil with compost, and fertilize regularly. Pest infestations can be treated with organic pest control methods, such as insecticidal soap or neem oil.
Can I grow celery indoors year-round?
Yes, you can grow celery indoors year-round, provided you provide it with the right conditions. Ensure your celery receives plenty of sunlight, either from a sunny window or a grow light. Maintain consistent moisture and fertilize regularly. You may also need to provide additional humidity, especially during the winter months when indoor air can be dry.
What can I do with the celery once it’s grown?
Once your celery is grown, the possibilities are endless! You can use it in salads, soups, stews, smoothies, and countless other dishes. Celery is a versatile vegetable that adds flavor and crunch to a wide variety of recipes. You can also use the celery leaves to make pesto or add them to salads for extra flavor.
Is it possible to grow celery from store-bought celery?
Yes, this guide focuses on how to grow celery from store-bought celery. The key is to use the base of the celery stalk, the part that is usually discarded. By placing this base in water, you can encourage it to sprout new roots and eventually grow into a new celery plant.
What if my celery base rots instead of growing roots?
Rotting is usually caused by bacteria or fungus. Make sure you are using clean water and change it every day or two. Also, ensure the base is not submerged too deeply – only the very bottom should be in the water. If rotting persists, try using a diluted hydrogen peroxide solution (1 part hydrogen peroxide to 10 parts water) to soak the base for a few minutes before placing it in fresh water.


Leave a Comment