
Grow Choi Sum at Home and unlock the secrets to fresh, delicious greens right at your fingertips! Have you ever dreamt of strolling into your backyard and harvesting vibrant, crisp Choi Sum for a stir-fry or a healthy side dish? Well, dream no more! This DIY guide is your passport to a thriving home garden, even if you’ve never held a trowel before.
Choi Sum, also known as Chinese flowering cabbage, has been a staple in Asian cuisine for centuries. Its tender stalks and delicate leaves offer a subtly sweet and slightly peppery flavor that elevates any meal. Beyond its culinary appeal, growing your own Choi Sum connects you to a rich agricultural heritage and provides a sense of accomplishment that’s hard to beat.
In today’s world, where access to fresh, organic produce can be challenging and expensive, learning how to grow Choi Sum at home is more important than ever. Imagine bypassing the grocery store lines and enjoying pesticide-free greens grown with your own loving care. This DIY project not only saves you money but also empowers you to control the quality and freshness of your food. Plus, it’s a fantastic way to de-stress, connect with nature, and add a touch of green to your living space. So, let’s dive in and discover the simple yet rewarding process of cultivating your own Choi Sum garden!
Choi Sum zu Hause anbauen: Dein DIY-Guide für knackiges Grün
Hey Gartenfreunde! Habt ihr Lust, euer eigenes knackiges Choi Sum direkt vor der Haustür anzubauen? Choi Sum, auch bekannt als Chinesischer Blätterkohl, ist super einfach anzubauen, wächst schnell und schmeckt einfach köstlich. In diesem Guide zeige ich euch Schritt für Schritt, wie ihr das hinbekommt – egal ob ihr einen Garten, einen Balkon oder nur ein sonniges Fensterbrett habt. Los geht’s!
Was du brauchst: Die Vorbereitung
Bevor wir loslegen, brauchen wir natürlich das richtige Equipment. Keine Sorge, es ist nichts Außergewöhnliches!
* Choi Sum Samen: Die gibt es in jedem gut sortierten Gartencenter oder online. Achtet auf frische Samen für eine bessere Keimrate.
* Anzuchterde: Spezielle Anzuchterde ist nährstoffarm und locker, ideal für die empfindlichen Keimlinge.
* Töpfe oder Anzuchtschalen: Je nachdem, ob ihr direkt ins Beet säen wollt oder lieber vorzieht.
* Gartenerde oder Pflanzerde: Für das spätere Umpflanzen oder Direktsäen ins Beet.
* Gießkanne oder Sprühflasche: Für die sanfte Bewässerung.
* Optional: Ein Mini-Gewächshaus oder eine durchsichtige Plastikhaube, um die Keimung zu beschleunigen.
* Optional: Flüssigdünger für Gemüse, um das Wachstum zu fördern.
Die Aussaat: Der Start in dein Choi Sum-Abenteuer
Die Aussaat ist der erste wichtige Schritt. Hier gibt es zwei Möglichkeiten: die Direktsaat ins Beet oder die Vorkultur in Töpfen. Ich persönlich bevorzuge die Vorkultur, weil ich so die kleinen Pflänzchen besser im Blick habe und sie vor Schnecken schützen kann.
Vorkultur in Töpfen:
1. Töpfe vorbereiten: Fülle deine Anzuchttöpfe (ca. 5-8 cm Durchmesser) mit Anzuchterde. Drücke die Erde leicht an.
2. Samen säen: Lege 2-3 Samen pro Topf auf die Erde. Choi Sum ist ein Lichtkeimer, das heißt, die Samen brauchen Licht zum Keimen. Bedecke sie also nur ganz leicht mit Erde (ca. 0,5 cm).
3. Bewässern: Befeuchte die Erde vorsichtig mit einer Sprühflasche. Die Erde sollte feucht, aber nicht nass sein.
4. Warm stellen: Stelle die Töpfe an einen warmen, hellen Ort. Ideal sind Temperaturen zwischen 15 und 20 Grad Celsius. Ein Mini-Gewächshaus oder eine Plastikhaube hilft, die Feuchtigkeit zu halten und die Keimung zu beschleunigen.
5. Geduld haben: Nach etwa 5-10 Tagen sollten die ersten Keimlinge zu sehen sein. Halte die Erde weiterhin feucht.
6. Pikieren: Sobald die Pflänzchen 2-3 echte Blätter haben (neben den Keimblättern), kannst du sie pikieren. Das bedeutet, du entfernst die schwächsten Pflänzchen aus jedem Topf, sodass nur noch eine kräftige Pflanze übrig bleibt.
Direktsaat ins Beet:
1. Beet vorbereiten: Lockere die Erde im Beet gut auf und entferne Unkraut. Arbeite etwas Kompost oder organischen Dünger ein, um den Boden anzureichern.
2. Saatrillen ziehen: Ziehe mit einem Stock oder einem Rechen Saatrillen im Abstand von ca. 20 cm.
3. Samen säen: Lege die Samen in die Saatrillen, ebenfalls im Abstand von ca. 2-3 cm. Bedecke sie leicht mit Erde (ca. 0,5 cm).
4. Bewässern: Gieße die Saatrillen vorsichtig an.
5. Geduld haben: Auch hier dauert es etwa 5-10 Tage, bis die ersten Keimlinge zu sehen sind.
6. Vereinzeln: Sobald die Pflänzchen etwas größer sind, solltest du sie vereinzeln, sodass sie genügend Platz zum Wachsen haben. Der Abstand zwischen den Pflanzen sollte etwa 15-20 cm betragen.
Die Pflege: Damit dein Choi Sum prächtig gedeiht
Choi Sum ist relativ pflegeleicht, aber ein paar Dinge solltest du beachten, damit deine Pflanzen gesund und kräftig wachsen.
1. Bewässerung: Choi Sum braucht regelmäßig Wasser, besonders während trockener Perioden. Die Erde sollte immer leicht feucht sein, aber Staunässe solltest du vermeiden. Gieße am besten morgens oder abends, um Verbrennungen durch die Sonne zu vermeiden.
2. Düngung: Choi Sum ist ein Starkzehrer und braucht ausreichend Nährstoffe. Dünge die Pflanzen regelmäßig mit einem Flüssigdünger für Gemüse. Beginne damit etwa 2-3 Wochen nach dem Umpflanzen oder Vereinzeln.
3. Unkrautbekämpfung: Halte das Beet oder die Töpfe unkrautfrei. Unkraut konkurriert mit dem Choi Sum um Nährstoffe und Wasser.
4. Schutz vor Schädlingen: Choi Sum kann von verschiedenen Schädlingen befallen werden, wie z.B. Schnecken, Erdflöhen oder Kohlweißlingen. Kontrolliere die Pflanzen regelmäßig und bekämpfe Schädlinge bei Bedarf mit geeigneten Mitteln. Gegen Schnecken helfen Schneckenkorn oder Schneckenzäune. Gegen Erdflöhe hilft es, die Pflanzen mit einem Vlies abzudecken.
5. Sonnenschutz: Choi Sum bevorzugt einen sonnigen Standort, aber in den heißen Sommermonaten kann zu viel Sonne zu Verbrennungen führen. Schütze die Pflanzen dann mit einem Schattiernetz oder stelle sie an einen halbschattigen Ort.
Das Umpflanzen: Wenn die Pflänzchen groß genug sind
Wenn du die Choi Sum-Pflänzchen vorgezogen hast, ist es irgendwann Zeit, sie ins Beet oder in größere Töpfe umzupflanzen.
1. Vorbereitung: Bereite das Beet oder die Töpfe vor, indem du die Erde lockerst und etwas Kompost oder organischen Dünger einarbeitest.
2. Pflanzen ausheben: Hebe die Choi Sum-Pflänzchen vorsichtig aus den Anzuchttöpfen. Achte darauf, die Wurzeln nicht zu beschädigen.
3. Pflanzen einsetzen: Setze die Pflänzchen im Abstand von ca. 15-20 cm ins Beet oder in die Töpfe. Die Oberkante des Wurzelballens sollte mit der Erdoberfläche abschließen.
4. Angießen: Gieße die Pflanzen nach dem Umpflanzen gründlich an.
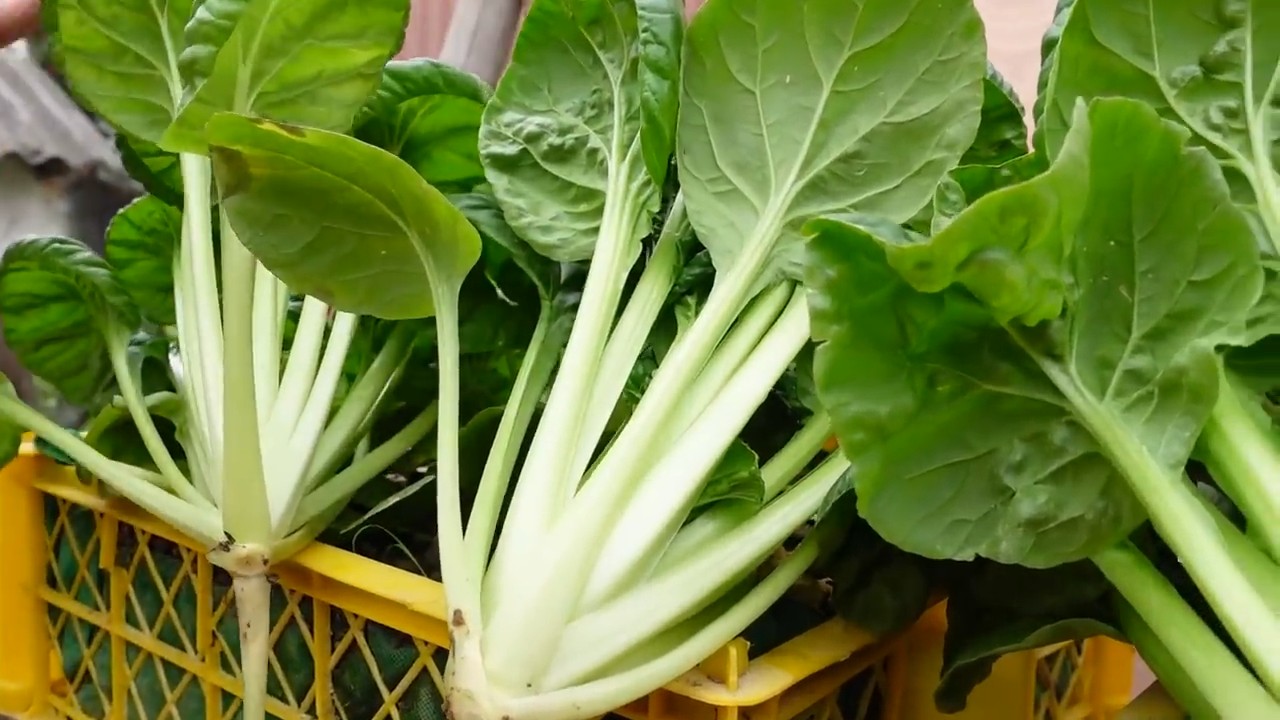
Die Ernte: Der Lohn deiner Mühe
Nach etwa 4-6 Wochen kannst du deinen selbst angebauten Choi Sum ernten.
1. Erntezeitpunkt: Ernte den Choi Sum, wenn die Stängel etwa 15-20 cm lang sind und die Blütenknospen noch geschlossen sind. Wenn die Blüten aufgehen, wird der Choi Sum bitter.
2. Erntemethode: Schneide die Stängel mit einem scharfen Messer oder einer Schere knapp über dem Boden ab. Du kannst auch nur einzelne Blätter ernten, dann wächst die Pflanze weiter.
3. Lagerung: Choi Sum ist nicht lange haltbar. Am besten verarbeitest du ihn direkt nach der Ernte. Im Kühlschrank hält er sich ein paar Tage, wenn du ihn in ein feuchtes Tuch einwickelst.
Tipps und Tricks für den erfolgreichen Anbau
* Regelmäßig säen: Um kontinuierlich Choi Sum ernten zu können, solltest du alle 2-3 Wochen neue Samen aussäen.
* Mulchen: Eine Mulchschicht aus Stroh oder Rasenschnitt hilft, die Feuchtigkeit im Boden zu halten und Unkraut zu unterdrücken.
* Fruchtfolge beachten: Baue Choi Sum nicht jedes Jahr am selben Standort an, um Krankheiten und Schädlingen vorzubeugen.
* Sortenvielfalt: Es gibt verschiedene Choi Sum-Sorten mit unterschiedlichen Farben und Formen. Probiere verschiedene Sorten aus, um deinen Favoriten zu finden.
* Blattläuse bekämpfen: Blattläuse können Choi Sum befallen. Spritze die Pflanzen mit einer Lösung aus Wasser und Schmierseife ab, um sie zu

Conclusion
So, there you have it! Growing your own Choi Sum at home is not only achievable, but it’s also incredibly rewarding. From the vibrant green leaves gracing your garden or balcony to the fresh, crisp flavor enhancing your meals, the benefits are undeniable. We’ve walked you through the process, demystifying each step and providing you with the knowledge to cultivate your own thriving Choi Sum patch.
But why is this DIY trick a must-try? Beyond the satisfaction of nurturing something from seed to table, growing your own Choi Sum offers a level of freshness and control you simply can’t get from store-bought produce. You know exactly what goes into your plants – no hidden pesticides or questionable practices. Plus, the taste is unparalleled. Imagine the subtle sweetness and delicate texture of freshly harvested Choi Sum, still warm from the sun, gracing your stir-fries, soups, or steamed dishes. It’s a culinary experience that elevates even the simplest meal.
And the possibilities don’t stop there! Feel free to experiment with different varieties of Choi Sum. Some boast a slightly spicier flavor, while others are known for their tender stems. You can also adjust your growing methods to suit your space and preferences. If you’re short on space, consider growing Choi Sum in containers on a sunny windowsill or balcony. For those with larger gardens, dedicate a small plot to this versatile vegetable and enjoy a continuous harvest throughout the growing season.
Consider companion planting to further enhance your Choi Sum’s growth and deter pests. Marigolds, for example, are known to repel nematodes and other harmful insects. Dill and chamomile can also attract beneficial insects that prey on pests.
Don’t be afraid to get creative with your Choi Sum recipes, too! While stir-fries are a classic, this vegetable is incredibly versatile. Try adding it to soups, salads, or even grilling it for a smoky flavor. The possibilities are endless!
Ultimately, growing your own Choi Sum is an investment in your health, your taste buds, and your connection to nature. It’s a simple yet profound way to bring a little bit of the garden into your home and enjoy the fruits (or rather, vegetables) of your labor.
We wholeheartedly encourage you to give this DIY trick a try. Start small, be patient, and don’t be afraid to experiment. The rewards are well worth the effort. And most importantly, we want to hear about your experience! Share your photos, tips, and recipes with us in the comments below. Let’s create a community of home gardeners who are passionate about growing their own fresh, delicious Choi Sum. Happy gardening!
Frequently Asked Questions (FAQ)
What is Choi Sum and what are its nutritional benefits?
Choi Sum, also known as Chinese flowering cabbage, is a leafy green vegetable belonging to the Brassica family, which also includes broccoli, cabbage, and kale. It’s characterized by its tender stems, dark green leaves, and small yellow flowers. Choi Sum is a nutritional powerhouse, packed with vitamins A, C, and K, as well as folate, calcium, and fiber. These nutrients contribute to overall health, supporting immune function, bone health, and digestive health. Vitamin C is a potent antioxidant, protecting cells from damage, while vitamin K plays a crucial role in blood clotting. The fiber content aids in digestion and helps regulate blood sugar levels. Incorporating Choi Sum into your diet is a delicious and easy way to boost your nutrient intake.
How long does it take to grow Choi Sum from seed?
Choi Sum is a relatively fast-growing vegetable, making it ideal for impatient gardeners. From seed to harvest, you can expect it to take approximately 4 to 6 weeks. The exact time frame will depend on factors such as the variety of Choi Sum, the growing conditions (temperature, sunlight, soil quality), and the time of year. Warmer temperatures generally promote faster growth. To ensure a continuous harvest, consider succession planting, sowing new seeds every 2 to 3 weeks. This will provide you with a steady supply of fresh Choi Sum throughout the growing season.
What are the best growing conditions for Choi Sum?
Choi Sum thrives in cool weather and prefers temperatures between 50°F and 70°F (10°C and 21°C). It requires at least 6 hours of sunlight per day, although it can tolerate partial shade, especially in hotter climates. The soil should be well-draining, fertile, and rich in organic matter. Amend the soil with compost or well-rotted manure before planting to improve its fertility and drainage. Choi Sum also needs consistent moisture, so water regularly, especially during dry spells. Avoid overwatering, as this can lead to root rot. A layer of mulch around the plants can help retain moisture and suppress weeds.
What are some common pests and diseases that affect Choi Sum, and how can I prevent them?
Like other members of the Brassica family, Choi Sum can be susceptible to certain pests and diseases. Common pests include aphids, cabbage worms, flea beetles, and slugs. Diseases include clubroot, downy mildew, and damping-off. To prevent pest and disease problems, practice good garden hygiene. Remove any plant debris from the garden regularly, and avoid overcrowding the plants. Companion planting can also help deter pests. For example, planting marigolds near Choi Sum can repel nematodes. If you notice any signs of pests or diseases, take action promptly. Handpick pests off the plants, or use insecticidal soap or neem oil to control infestations. For diseases, remove affected leaves and improve air circulation around the plants. Crop rotation can also help prevent soilborne diseases.
Can I grow Choi Sum in containers?
Yes, Choi Sum is well-suited for container gardening, making it a great option for those with limited space. Choose a container that is at least 6 inches deep and wide to allow the roots to develop properly. Use a high-quality potting mix that is well-draining and rich in organic matter. Ensure that the container has drainage holes to prevent waterlogging. Place the container in a sunny location that receives at least 6 hours of sunlight per day. Water regularly, and fertilize every 2 to 3 weeks with a balanced liquid fertilizer. Container-grown Choi Sum may dry out more quickly than plants grown in the ground, so check the soil moisture regularly and water accordingly.
How do I harvest Choi Sum?
Choi Sum is ready to harvest when the flower stalks are about 6 to 8 inches tall and the flower buds are still closed. You can harvest the entire plant by cutting it off at the base, or you can harvest individual leaves as needed. If you harvest individual leaves, the plant will continue to produce new leaves. Harvest in the morning, when the leaves are crisp and fresh. Wash the Choi Sum thoroughly before using it in your recipes.
How do I store Choi Sum after harvesting?
To store Choi Sum, wrap it loosely in a damp paper towel and place it in a plastic bag in the refrigerator. It will keep for up to a week. Avoid storing Choi Sum near ethylene-producing fruits, such as apples and bananas, as this can cause it to wilt more quickly. You can also blanch and freeze Choi Sum for longer-term storage. To blanch, immerse the Choi Sum in boiling water for 2 minutes, then transfer it to an ice bath to stop the cooking process. Drain well, and then freeze in airtight containers or freezer bags.
What are some delicious ways to cook with Choi Sum?
Choi Sum is a versatile vegetable that can be used in a variety of dishes. It’s commonly used in stir-fries, soups, and steamed dishes. It can also be grilled, sautéed, or added to salads. The entire plant, including the stems, leaves, and flowers, is edible. Choi Sum has a mild, slightly sweet flavor that pairs well with garlic, ginger, soy sauce, and sesame oil. Try adding it to your favorite stir-fry recipe, or use it as a substitute for spinach or kale in soups and salads. You can also steam it and serve it as a side dish with a drizzle of soy sauce and sesame oil.
Can I save seeds from my Choi Sum plants?
Yes, you can save seeds from your Choi Sum plants, but it’s important to note that Choi Sum is an open-pollinated plant, meaning that it can cross-pollinate with other members of the Brassica family. If you want to save true-to-type seeds, you’ll need to isolate your Choi Sum plants from other Brassicas during flowering. Allow the flower stalks to mature and dry on the plant. Once the seed pods are dry and brown, harvest them and extract the seeds. Store the seeds in a cool, dry place until you’re ready to plant them.
Leave a Comment