
Grow Enoki Mushrooms Kitchen: Imagine harvesting fresh, delicate Enoki mushrooms right from your own kitchen! Sounds like a gourmet dream, doesn’t it? Well, it’s more achievable than you might think. For centuries, these slender, snow-white fungi have been a staple in East Asian cuisine, adding a subtle, earthy flavor and unique texture to everything from hot pots to salads. But you don’t need a sprawling farm or specialized equipment to enjoy them.
In this DIY guide, I’m going to show you how to grow Enoki mushrooms kitchen, transforming a small corner of your home into a mini mushroom farm. Why bother with this project? Because store-bought Enoki can be expensive and often lack the freshness and flavor of homegrown varieties. Plus, there’s something incredibly satisfying about nurturing your own food from start to finish.
This isn’t just about saving money; it’s about connecting with nature, learning a new skill, and enjoying the unparalleled taste of freshly harvested mushrooms. So, grab your supplies, and let’s embark on this exciting journey together! I promise, you’ll be amazed at how easy and rewarding it is to cultivate these culinary gems in your own kitchen.
Growing Enoki Mushrooms at Home: A Fun DIY Project
Hey there, fellow mushroom enthusiasts! Ever wanted to try growing your own gourmet mushrooms right in your kitchen? Well, today’s your lucky day! I’m going to walk you through the process of cultivating Enoki mushrooms (Flammulina velutipes) at home. It’s a rewarding and surprisingly simple project, even for beginners. Get ready to impress your friends and family with your homegrown delicacies!
What You’ll Need
Before we dive in, let’s gather our supplies. You’ll need:
* Enoki Spawn: This is the most crucial ingredient! You can usually find Enoki spawn online or at specialty mushroom supply stores. Make sure it’s a reputable source to ensure healthy growth.
* Substrate: This is the food source for your mushrooms. I recommend using hardwood sawdust pellets (like those used for wood stoves or animal bedding). Avoid softwoods like pine or cedar. Alternatively, you can use a mixture of hardwood sawdust and wheat bran.
* Wide-Mouth Jars or Heat-Resistant Bags: These will be your growing containers. Quart-sized jars work well, or you can use autoclavable mushroom grow bags.
* Pressure Cooker or Autoclave: This is essential for sterilizing the substrate and preventing contamination. If you don’t have one, you can try a modified steaming method (more on that later, but pressure cooking is highly recommended).
* Isopropyl Alcohol (70%): For sanitizing your work area and tools.
* Spray Bottle: For misting the mushrooms.
* Gloves: To keep things sterile.
* Face Mask: To prevent contamination from your breath.
* Clean Work Area: A dedicated space that you can easily sanitize.
* Fruiting Chamber (Optional): A container to maintain humidity during fruiting. A clear plastic storage bin works great.
* Perlite or Vermiculite (Optional): For the fruiting chamber to help maintain humidity.
Preparing the Substrate
This is where we create the perfect environment for our Enoki friends to thrive.
1. Hydrate the Substrate: In a large container, mix the hardwood sawdust pellets with water. You want the substrate to be moist but not soaking wet. A good test is to squeeze a handful; it should clump together but not drip water. Aim for a moisture content of around 60%. If you’re using a sawdust/wheat bran mix, a ratio of 80% sawdust to 20% wheat bran is a good starting point. Add water gradually until you reach the desired moisture level.
2. Fill the Jars or Bags: Pack the hydrated substrate into your jars or bags. Leave about an inch of headspace at the top of the jar. If using bags, seal them with a heat sealer or tie them tightly with zip ties.
3. Sterilize the Substrate: This is the most critical step to prevent contamination.
* Pressure Cooker Method: Place the jars or bags in your pressure cooker. Add water according to your pressure cooker’s instructions. Pressure cook at 15 PSI for 90 minutes. Let the pressure cooker cool down completely before opening it.
* Steaming Method (Less Reliable): If you don’t have a pressure cooker, you can try steaming the jars or bags for at least 3 hours. However, this method is less effective at killing all contaminants, so your chances of success may be lower. Make sure the water doesn’t boil dry during the steaming process.
4. Cool Down: After sterilization, let the jars or bags cool down completely to room temperature before moving on to the next step. This is crucial to avoid killing the Enoki spawn.
Inoculating the Substrate
Now comes the fun part – introducing the Enoki spawn to its new home!
1. Sanitize Your Work Area: Thoroughly clean your work area with isopropyl alcohol. Wipe down all surfaces, including your gloves and any tools you’ll be using.
2. Sanitize Your Hands: Put on your gloves and spray them with isopropyl alcohol. Wear your face mask to prevent contamination from your breath.
3. Open the Spawn: Carefully open the Enoki spawn container.
4. Inoculate the Substrate: Using a sterilized spoon or knife, break up the spawn and distribute it evenly over the surface of the substrate in each jar or bag. Aim for about 5-10% spawn by weight of the substrate.
5. Seal the Containers: If you opened the jars, cover them with a breathable filter (like micropore tape or a coffee filter secured with a rubber band). If you used bags, reseal them with a heat sealer or zip tie.
Incubation
This is the period where the Enoki mycelium (the vegetative part of the fungus) colonizes the substrate.
1. Find a Dark, Cool Place: Place the inoculated jars or bags in a dark, cool place with a temperature between 65-75°F (18-24°C). A closet or cupboard works well.
2. Monitor Colonization: Check the jars or bags regularly for signs of colonization. You should see white, fluffy mycelium spreading throughout the substrate. This process usually takes 2-4 weeks.
3. Check for Contamination: Keep an eye out for any signs of contamination, such as green, black, or moldy spots. If you see any contamination, discard the affected jar or bag immediately to prevent it from spreading.
Fruiting
This is where the magic happens – the formation of the actual mushrooms!
1. Prepare the Fruiting Chamber (Optional): If you’re using a fruiting chamber, line the bottom with perlite or vermiculite and moisten it with water. This will help maintain humidity.
2. Introduce to Light and Cold: Enoki mushrooms require a significant temperature drop and exposure to light to trigger fruiting. Move the colonized jars or bags to a cooler location with a temperature between 45-55°F (7-13°C). A refrigerator is ideal, but a cool basement or garage can also work. Provide indirect light for about 12 hours a day.
3. Create Air Exchange: Enoki mushrooms also need fresh air exchange to fruit properly. If you’re using a fruiting chamber, open it a few times a day to allow fresh air to circulate. If you’re using jars, you can remove the filter and mist the mushrooms directly. If you’re using bags, cut a small slit in the bag to allow the mushrooms to emerge.
4. Maintain Humidity: Keep the humidity high by misting the mushrooms regularly with water. Avoid overwatering, as this can lead to mold growth.
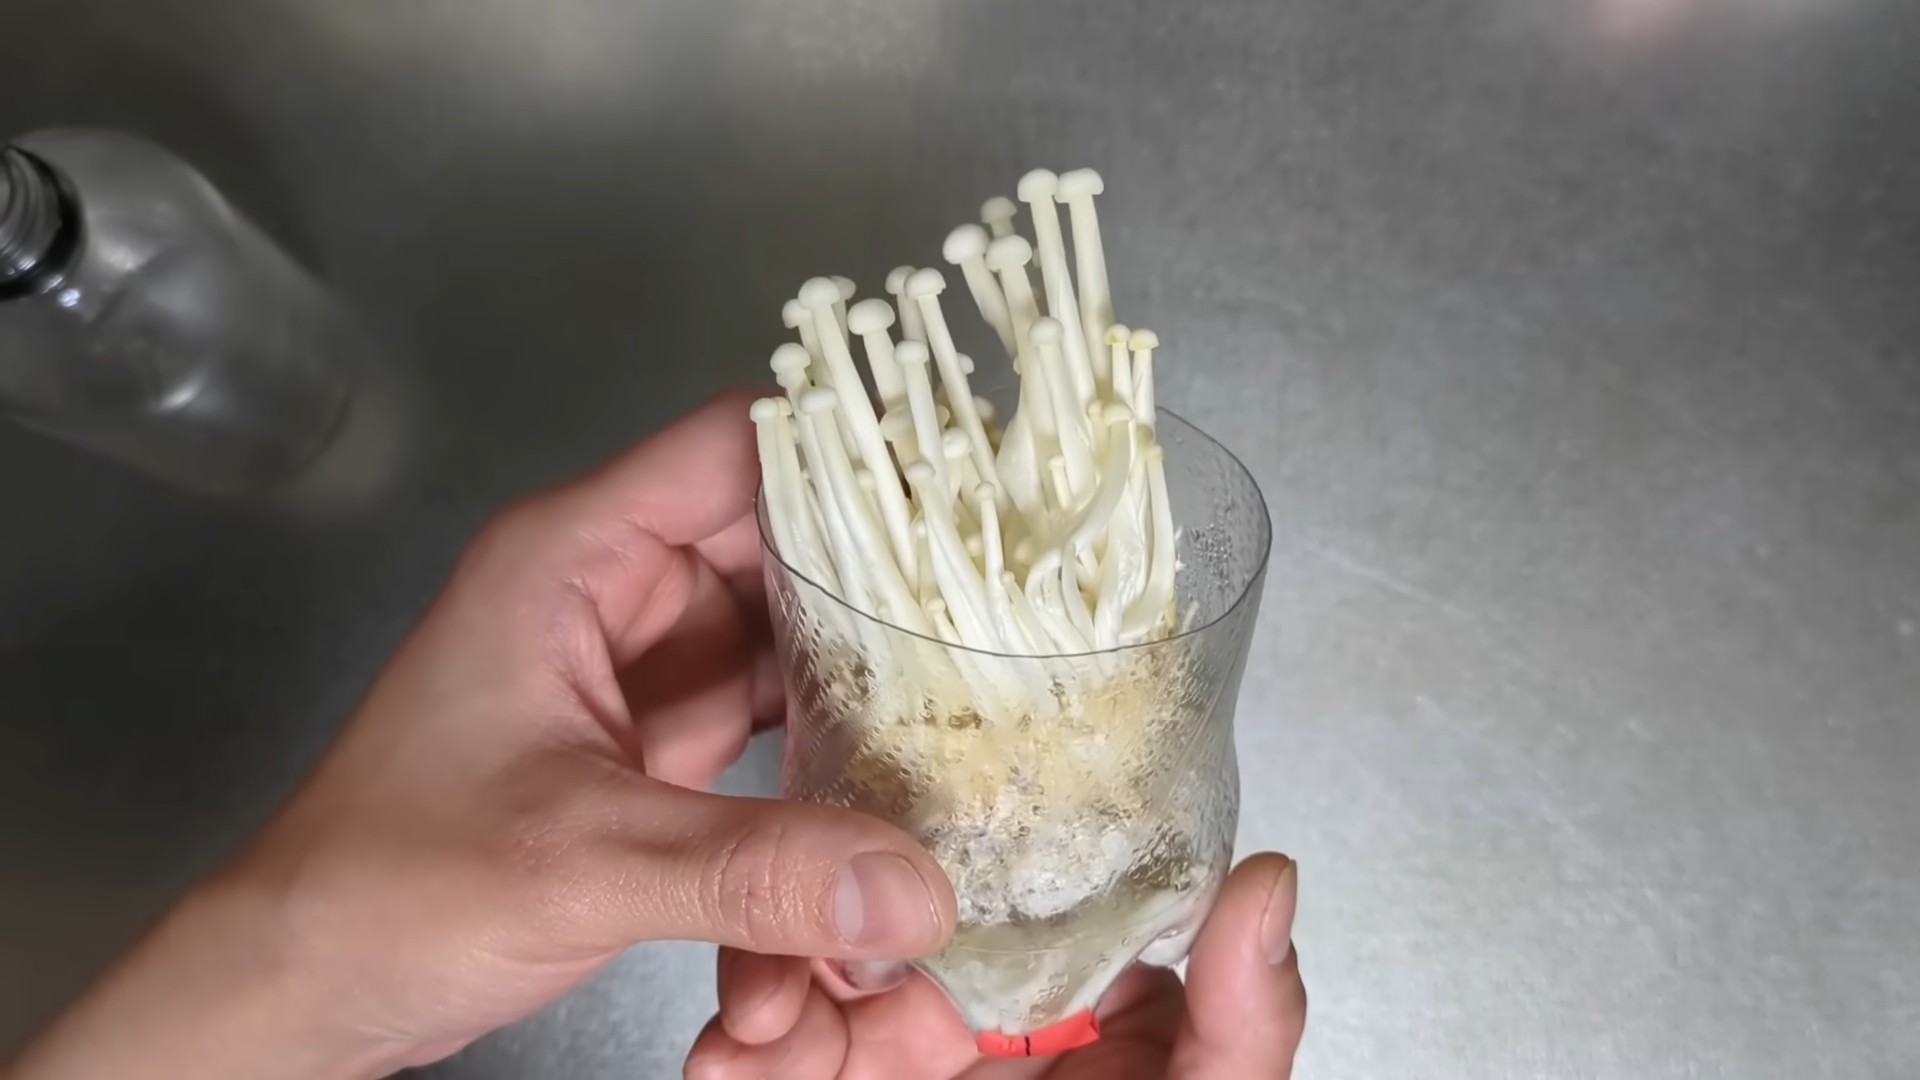
5. Watch Them Grow: Over the next few days to weeks, you’ll see tiny pinheads forming, which will eventually develop into long, slender Enoki mushrooms.
Harvesting
Congratulations, you’ve grown your own Enoki mushrooms!
1. Harvest When Mature: Harvest the mushrooms when they reach the desired size, usually when the caps are still small and tightly closed.
2. Cut at the Base: Using a clean knife or scissors, cut the mushrooms at the base of the cluster.
3. Enjoy Your Harvest: Your homegrown Enoki mushrooms are now ready to be enjoyed! They’re delicious in soups, stir-fries, and salads.
Second Flush (Optional)
You can often get a second flush of mushrooms from the same substrate.
1. Clean Up: After harvesting the first flush, remove any remaining mushroom stems from the substrate.
2. Rehydrate: Soak the substrate in cold water for 12-24 hours to rehydrate it.
3. Repeat Fruiting Steps: Return the substrate to the fruiting chamber and repeat the fruiting steps.
Troubleshooting
* Contamination: The most common problem is contamination. To prevent this, sterilize your substrate thoroughly and maintain a clean work environment.
* Slow Colonization: Slow colonization can be caused by low temperatures or insufficient spawn. Make sure the temperature is within the optimal range and use enough spawn.
* No Fruiting: If your mushrooms aren’t fruiting, make sure they’re getting enough light, cold, and fresh air exchange.
* Mold Growth: Mold growth can be caused by overwatering or poor air circulation. Avoid overwatering and ensure good air circulation.
Growing Enoki mushrooms at home is a fun and rewarding experience. With a little patience and attention to detail, you can enjoy fresh, delicious mushrooms right from your own kitchen. Happy growing!
Conclusion
So, there you have it! Growing your own Enoki mushrooms in your kitchen isn’t just a fun project; it’s a gateway to incredibly fresh, flavorful ingredients right at your fingertips. Forget those wilted, expensive bunches at the grocery store. With a little patience and this simple DIY trick, you can cultivate a continuous supply of these delicate, nutty mushrooms.
The beauty of this method lies in its accessibility. You don’t need a fancy lab or specialized equipment. Just a few readily available materials and a bit of dedication are all it takes to transform your kitchen into a mini mushroom farm. Think of the possibilities! Imagine adding freshly harvested Enoki to your ramen, stir-fries, or salads. The vibrant crunch and subtle sweetness will elevate your dishes to a whole new level.
But the benefits extend beyond just taste. Growing your own food, even something as small as Enoki mushrooms, connects you to the natural world in a profound way. It’s a reminder of the cycles of life and the magic of transformation. Plus, it’s a fantastic conversation starter! Imagine the looks of amazement when you tell your friends that you grew those delicious mushrooms yourself.
Don’t be afraid to experiment! Once you’ve mastered the basic technique, you can explore different substrates, lighting conditions, and even try adding small amounts of nutrient supplements to see how they affect the growth and flavor of your Enoki. Perhaps you’ll discover a unique variation that becomes your signature mushroom.
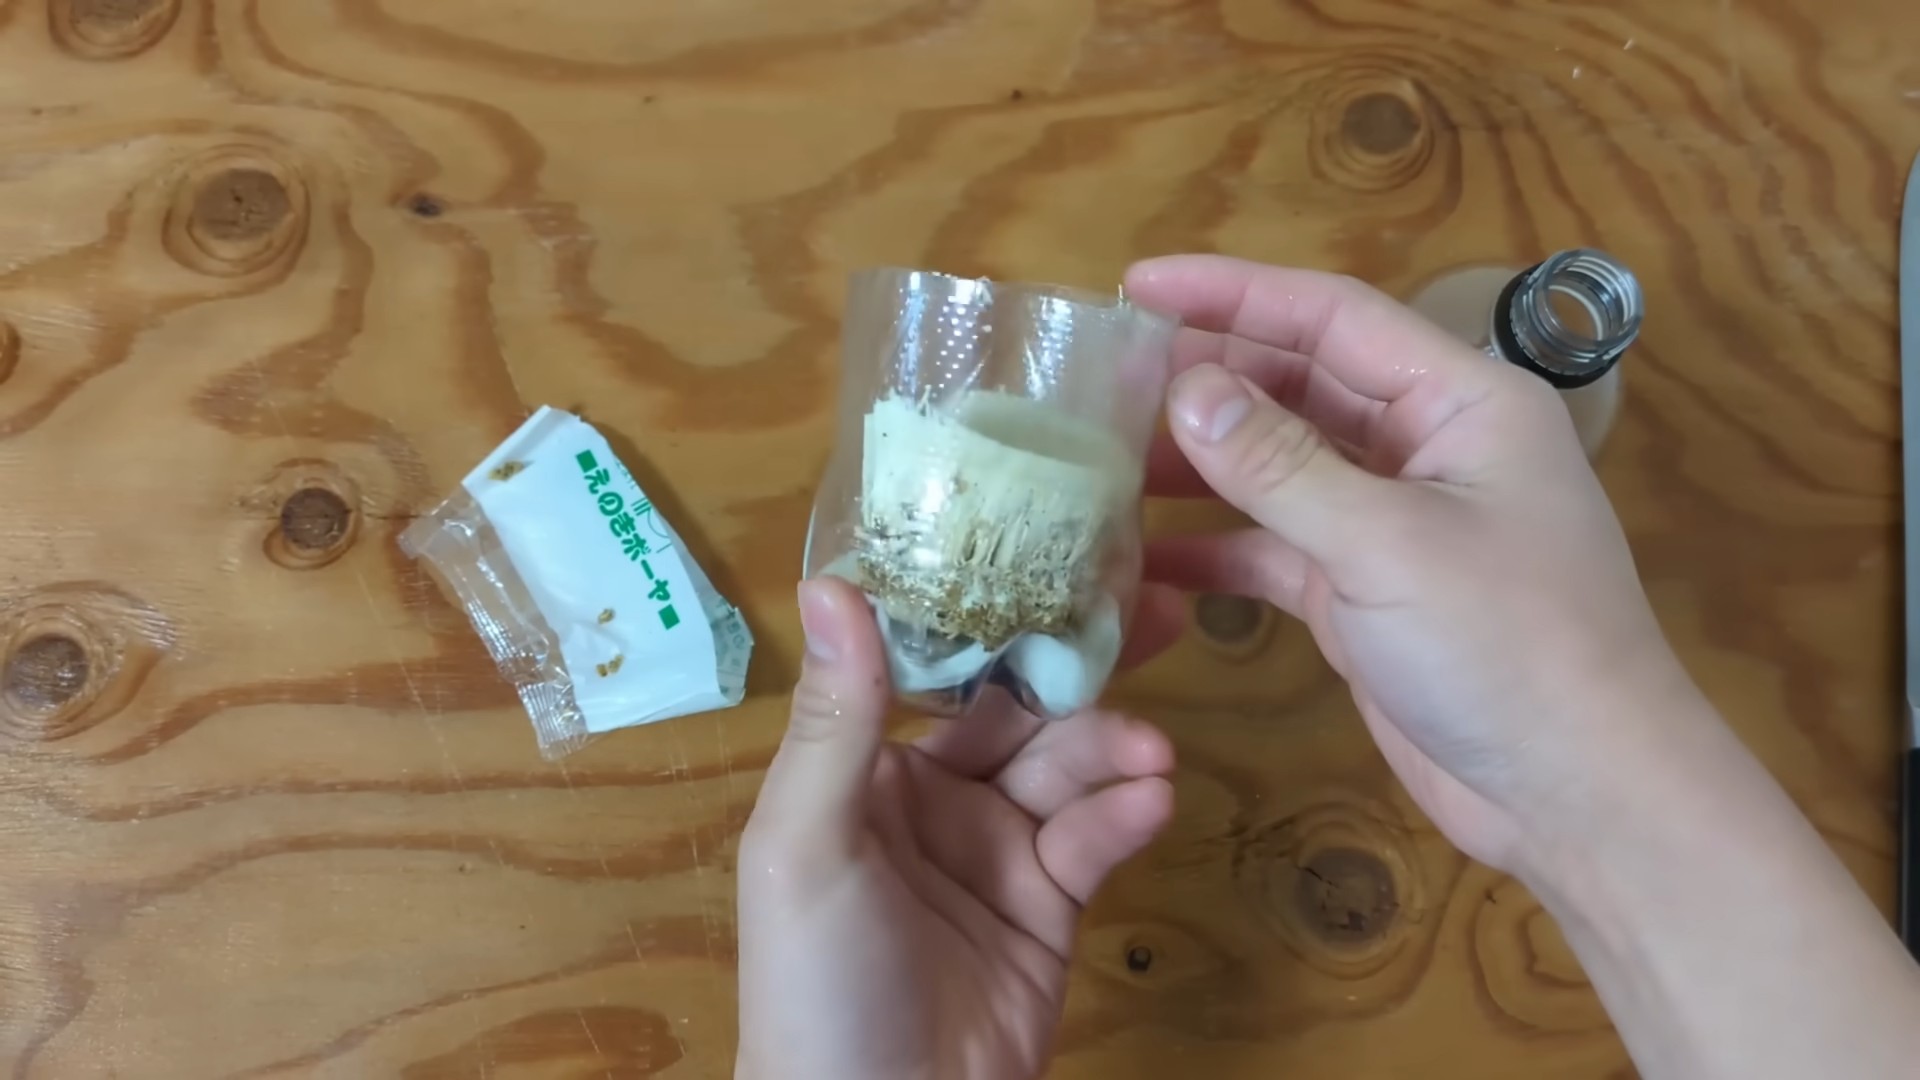
Consider using different types of containers. While a plastic bottle works well, you could also try glass jars or even repurposed food containers. Just make sure they’re clean and allow for proper ventilation. You can also experiment with different types of sawdust or wood chips in your substrate mix to see if it affects the flavor or texture of your home-grown Enoki mushrooms.
Another variation to consider is the lighting. While Enoki mushrooms don’t require a lot of light, providing them with a little bit of indirect sunlight or artificial light can help them develop a more vibrant color. Just be careful not to expose them to direct sunlight, as this can dry them out.
The key to success is consistency and observation. Keep a close eye on your mushrooms, monitor their growth, and adjust your methods as needed. Don’t be discouraged if your first attempt isn’t perfect. Learning takes time, and every mistake is an opportunity to improve.
We wholeheartedly encourage you to give this DIY Enoki mushroom growing trick a try. It’s a rewarding, educational, and delicious experience that you won’t soon forget. And most importantly, don’t forget to share your results with us! We’d love to see your photos, hear your stories, and learn from your experiences. Post your pictures and tips on social media using #HomeGrownEnoki or tag us in your posts. Let’s create a community of home mushroom growers and inspire others to embrace the joy of cultivating their own food. Happy growing!
Frequently Asked Questions (FAQ)
What exactly are Enoki mushrooms, and why should I grow them?
Enoki mushrooms (Flammulina velutipes) are long, thin, white mushrooms with small caps, known for their mild, slightly fruity flavor and crunchy texture. They are commonly used in Asian cuisine, particularly in soups, stir-fries, and salads. Growing them yourself ensures you have access to fresh, high-quality mushrooms free from pesticides and preservatives. Plus, it’s a fun and educational project!
What materials do I need to grow Enoki mushrooms at home?
The basic materials include:
* A clean plastic bottle or jar
* A substrate (sawdust, wood chips, or a mixture of both)
* Enoki mushroom spawn (available online or at specialty gardening stores)
* Water
* Rubbing alcohol (for sterilization)
* A spray bottle
How long does it take to grow Enoki mushrooms?
The entire process, from inoculation to harvest, typically takes 4-8 weeks. The colonization phase (when the mycelium spreads through the substrate) usually takes 2-4 weeks, and the fruiting phase (when the mushrooms start to grow) takes another 2-4 weeks.
What is the best environment for growing Enoki mushrooms?
Enoki mushrooms prefer cool, humid environments. The ideal temperature range is between 50-65°F (10-18°C). They also need high humidity (around 80-90%). You can maintain humidity by misting the mushrooms regularly with water or by placing a plastic bag over the container (making sure to provide ventilation).
How do I know when the Enoki mushrooms are ready to harvest?
Enoki mushrooms are ready to harvest when the caps are fully formed and the stems are about 4-6 inches long. The caps should be firm and white. To harvest, simply cut the mushrooms at the base of the stem with a clean knife or scissors.
Can I get multiple harvests from the same substrate?
Yes, you can usually get 2-3 harvests from the same substrate. After each harvest, mist the substrate with water and allow it to rest for a week or two before the next flush of mushrooms appears. The subsequent harvests may be smaller than the first.
What if my Enoki mushrooms don’t grow?
There could be several reasons why your Enoki mushrooms aren’t growing:
* **Contamination:** The substrate may be contaminated with mold or bacteria. Make sure to sterilize all materials thoroughly before starting.
* **Incorrect temperature:** The temperature may be too high or too low. Maintain the ideal temperature range of 50-65°F (10-18°C).
* **Insufficient humidity:** The humidity may be too low. Mist the mushrooms regularly with water or place a plastic bag over the container.
* **Poor substrate:** The substrate may not be suitable for Enoki mushrooms. Use a mixture of sawdust and wood chips.
* **Old spawn:** The mushroom spawn may be old or inactive. Purchase fresh spawn from a reputable source.
Are there any common problems I should watch out for?
The most common problems are contamination and pests. To prevent contamination, sterilize all materials thoroughly and maintain a clean environment. To prevent pests, keep the growing area clean and free from insects.
Can I use different types of wood for the substrate?
Yes, you can experiment with different types of wood, but hardwood sawdust is generally preferred. Avoid using treated wood, as it can be harmful to the mushrooms.
Is it safe to eat home-grown Enoki mushrooms?
Yes, it is safe to eat home-grown Enoki mushrooms as long as they are grown properly and are free from contamination. If you are unsure, it is always best to err on the side of caution and discard them.
How should I store harvested Enoki mushrooms?
Store harvested Enoki mushrooms in the refrigerator in a paper bag or a container lined with paper towels. They will typically last for about a week.
Can I grow Enoki mushrooms outdoors?
While it’s possible to grow Enoki mushrooms outdoors, it’s more challenging due to the difficulty of controlling the temperature and humidity. It’s generally easier to grow them indoors, where you can create a more controlled environment.
Where can I buy Enoki mushroom spawn?
Enoki mushroom spawn can be purchased online from various suppliers specializing in mushroom cultivation. You can also find it at some specialty gardening stores. Make sure to buy from a reputable source to ensure the quality of the spawn.
What are some creative ways to use my home-grown Enoki mushrooms?
Beyond the usual soups and stir-fries, try adding them to omelets, salads, or even using them as a garnish for grilled meats or fish. Their delicate flavor and crunchy texture make them a versatile ingredient that can add a unique touch to a variety of dishes. You can even pickle them for a tangy and flavorful snack.

Leave a Comment