
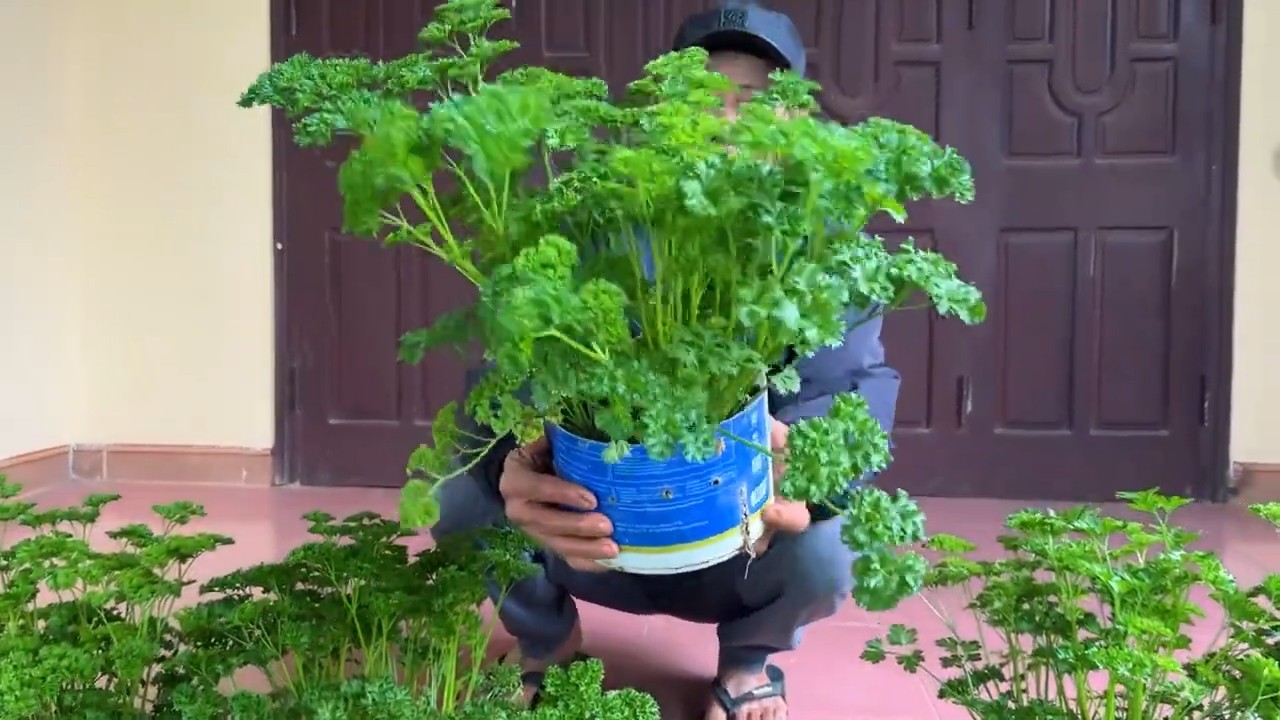
Grow Fresh Parsley Daily: Imagine stepping outside your door and snipping fresh, vibrant parsley to elevate your meals every single day. No more wilted bunches from the grocery store! This isn’t just a dream; it’s an achievable reality with a few simple home gardening tricks and DIY hacks. For centuries, parsley has been more than just a garnish. The ancient Greeks crowned victors with parsley wreaths, symbolizing triumph and celebration. The Romans used it medicinally, believing in its power to cleanse and invigorate.
Today, we might not be crowning athletes with it, but parsley’s culinary and health benefits remain undeniable. But let’s be honest, keeping parsley fresh and readily available can be a challenge. That’s where these DIY solutions come in. I’m here to share some easy, effective methods to ensure you grow fresh parsley daily, right in your own home, regardless of your gardening experience. Whether you have a sprawling garden or a tiny balcony, these tips will help you cultivate a thriving parsley patch and enjoy its fresh, herbaceous flavor whenever you desire. Say goodbye to store-bought parsley and hello to a constant supply of this versatile herb!
So einfach ziehst du täglich frische Petersilie!
Hey Leute! Ich liebe frische Kräuter, besonders Petersilie. Aber ständig zum Supermarkt rennen, wenn ich nur einen kleinen Bund brauche, nervt total. Deshalb habe ich mir eine super einfache Methode überlegt, wie ich täglich frische Petersilie ernten kann, ohne viel Aufwand. Und das Beste: Es ist viel günstiger, als ständig neue Kräuter zu kaufen! Ich zeige euch, wie ihr das auch hinbekommt.
Was du brauchst:
* Ein Bund frische Petersilie (am besten vom Markt oder aus dem Bioladen, die sind oft robuster)
* Ein scharfes Messer oder eine Schere
* Ein Glas oder eine Vase
* Wasser
* Ein durchsichtiger Plastikbeutel oder eine Plastikfolie
* Ein Gummiband oder eine Klemme
* Blumenerde
* Einen Topf mit Abzugslöchern (Größe hängt davon ab, wie viel Petersilie du gleichzeitig anpflanzen möchtest)
* Optional: Bewurzelungspulver (hilft den Stecklingen, schneller Wurzeln zu bilden)
Die Vorbereitung: Die Basis für deinen Petersilien-Garten
Bevor wir loslegen, ist es wichtig, die Petersilie richtig vorzubereiten. Das ist der Schlüssel zum Erfolg!
1. Petersilie auswählen und vorbereiten: Nimm deinen Bund Petersilie und suche die kräftigsten Stiele aus. Achte darauf, dass sie gesund aussehen und keine Anzeichen von Fäulnis oder Beschädigung aufweisen. Entferne die unteren Blätter von den Stielen, so dass etwa 5-7 cm des Stiels frei liegen. Diese Blätter würden sonst im Wasser faulen und die Bewurzelung behindern.
2. Stiele kürzen: Schneide die Stiele mit einem scharfen Messer oder einer Schere schräg an. Ein schräger Schnitt vergrößert die Oberfläche, wodurch die Stiele mehr Wasser aufnehmen können.
3. Bewurzelung im Wasserglas: Fülle das Glas oder die Vase mit frischem Wasser. Stelle die vorbereiteten Petersilienstiele hinein. Achte darauf, dass nur die Stiele im Wasser stehen und die Blätter nicht berührt werden. Wechsle das Wasser alle ein bis zwei Tage, um die Bildung von Bakterien zu verhindern.
4. Mini-Gewächshaus bauen: Stülpe den Plastikbeutel oder die Plastikfolie über das Glas, um ein Mini-Gewächshaus zu schaffen. Befestige den Beutel mit einem Gummiband oder einer Klemme am Glasrand. Das sorgt für eine höhere Luftfeuchtigkeit, was die Bewurzelung fördert. Stelle das Glas an einen hellen, aber nicht direkten Sonnenplatz. Direkte Sonne kann die Petersilie verbrennen.
Die Bewurzelung: Geduld ist gefragt!
Jetzt heißt es abwarten und Tee trinken (oder Petersilientee, wenn du schon welchen hast!). Die Bewurzelung dauert in der Regel ein bis zwei Wochen.
1. Kontrolle und Pflege: Überprüfe die Petersilie regelmäßig. Wechsle das Wasser alle ein bis zwei Tage und achte darauf, dass die Blätter nicht faulen. Wenn du Schimmel entdeckst, entferne die betroffenen Stiele sofort.
2. Wurzelbildung beobachten: Nach einigen Tagen solltest du die ersten kleinen Wurzeln sehen. Sei geduldig, es kann auch etwas länger dauern. Die Wurzeln sollten mindestens 1-2 cm lang sein, bevor du die Petersilie einpflanzt.
3. Optional: Bewurzelungspulver verwenden: Wenn du möchtest, kannst du die Stiele vor dem Einpflanzen in Bewurzelungspulver tauchen. Das fördert die Wurzelbildung zusätzlich.
Das Einpflanzen: Ab in die Erde!
Sobald die Wurzeln ausreichend entwickelt sind, ist es Zeit, die Petersilie einzupflanzen.
1. Topf vorbereiten: Fülle den Topf mit Blumenerde. Achte darauf, dass die Erde locker und gut durchlässig ist.
2. Petersilie einpflanzen: Mache kleine Löcher in die Erde und setze die bewurzelten Petersilienstiele vorsichtig hinein. Die Wurzeln sollten vollständig mit Erde bedeckt sein.
3. Angießen: Gieße die Petersilie nach dem Einpflanzen gründlich an. Achte darauf, dass die Erde feucht, aber nicht nass ist.
4. Standort wählen: Stelle den Topf an einen hellen, aber nicht direkten Sonnenplatz. Petersilie mag es hell, aber zu viel Sonne kann die Blätter verbrennen.
Die Pflege: Damit deine Petersilie prächtig gedeiht
Damit du lange Freude an deiner selbst gezogenen Petersilie hast, ist die richtige Pflege wichtig.
1. Gießen: Gieße die Petersilie regelmäßig, aber vermeide Staunässe. Die Erde sollte immer leicht feucht sein.
2. Düngen: Dünge die Petersilie alle zwei bis drei Wochen mit einem organischen Flüssigdünger. Das sorgt für kräftiges Wachstum und aromatische Blätter.
3. Ernten: Ernte die Petersilie regelmäßig, indem du die äußeren Blätter abschneidest. Das fördert das Wachstum neuer Blätter. Schneide die Stiele nicht zu tief ab, da die Petersilie sonst nicht mehr nachwächst.
4. Schädlinge und Krankheiten: Achte auf Schädlinge wie Blattläuse oder Spinnmilben. Bei Befall kannst du die Petersilie mit einem natürlichen Insektizid behandeln.
5. Überwintern: Petersilie ist zweijährig. Im ersten Jahr bildet sie Blätter, im zweiten Jahr blüht sie und stirbt dann ab. Du kannst deine Petersilie im Winter im Haus überwintern. Stelle sie an einen hellen, kühlen Ort und gieße sie sparsam.
Extra-Tipps für noch mehr Erfolg:
* Verschiedene Sorten: Probiere verschiedene Petersiliensorten aus, wie glatte oder krause Petersilie. Jede Sorte hat ihren eigenen Geschmack und ihre eigenen Vorlieben.
* Kombination mit anderen Kräutern: Pflanze deine Petersilie zusammen mit anderen Kräutern wie Schnittlauch oder Basilikum. Das spart Platz und sorgt für eine abwechslungsreiche Ernte.
* Petersilie trocknen: Wenn du zu viel Petersilie hast, kannst du sie trocknen. Binde die Stiele zu kleinen Bündeln zusammen und hänge sie an einem luftigen, dunklen Ort auf. Oder du verwendest einen Dörrautomaten.
* Petersilie einfrieren: Du kannst Petersilie auch einfrieren. Hacke sie fein und fülle sie in Eiswürfelbehälter. Fülle die Behälter mit Wasser oder Öl und friere sie ein. So hast du immer frische Petersilie zur Hand.
* Regelmäßiges Schneiden: Regelmäßiges Schneiden der Blütenstände verhindert, dass die Pflanze ihre Energie in die Blütenbildung steckt und fördert das Wachstum der Blätter.
Häufige Fehler vermeiden:
* Zu viel Gießen: Staunässe führt zu Wurzelfäule. Achte darauf, dass die Erde gut durchlässig ist und gieße nur, wenn die oberste Schicht trocken ist.
* Zu wenig Licht: Petersilie braucht viel Licht, um gut zu wachsen. Stelle sie an einen hellen Standort, aber vermeide direkte Sonneneinstrahlung.
* Falsche Erde: Verwende hochwertige Blumenerde, die gut durchlässig ist und ausreichend Nährstoffe enthält.
* Vernachlässigung: Kontrolliere deine Petersilie regelmäßig auf Schädlinge und Krankheiten und dünge sie regelmäßig.
Mit diesen Tipps und Tricks kannst du ganz einfach deine eigene Petersilie ziehen und täglich frische Kräuter ernten. Viel Spaß dabei! Ich hoffe, diese Anleitung hilft dir dabei, deinen eigenen kleinen Kräutergarten zu starten! Lass mich wissen, wie es bei dir klappt!

Conclusion
So, there you have it! Growing fresh parsley daily doesn’t have to be a chore or an expensive trip to the grocery store. With this simple DIY trick, you can have a constant supply of vibrant, flavorful parsley right at your fingertips. We’ve shown you how to coax those stubborn parsley seeds into sprouting, how to nurture your seedlings, and how to create the ideal environment for continuous growth.
Why is this a must-try? Because store-bought parsley often lacks the intense flavor and freshness of homegrown. Plus, think of the satisfaction of snipping your own herbs, knowing exactly where they came from and how they were grown. It’s a small step towards a more sustainable and flavorful lifestyle.
But don’t stop there! Experiment with different varieties of parsley. Curly parsley is a classic choice, but flat-leaf (Italian) parsley boasts a more robust flavor that many chefs prefer. You can even try growing both and see which you like best. Consider adding companion plants like tomatoes or carrots to your parsley container, as they can help deter pests and improve growth. Another variation is to use different types of containers. While we’ve focused on pots, you could also try growing parsley in raised beds or even directly in your garden. Just remember to provide adequate drainage and sunlight.
This DIY parsley growing method is not just about saving money; it’s about enhancing your culinary experience and connecting with nature. Imagine the delicious meals you’ll create, garnished with your own freshly grown parsley. From vibrant pesto to flavorful sauces and soups, the possibilities are endless.
We’re confident that you’ll find this DIY trick incredibly rewarding. It’s easy, cost-effective, and yields delicious results. So, grab your parsley seeds, gather your supplies, and get ready to embark on your own parsley-growing adventure.
Don’t be afraid to experiment and adapt the method to suit your specific environment and preferences. The key is to provide your parsley with plenty of sunlight, well-draining soil, and consistent moisture.
We’re eager to hear about your experiences! Share your parsley-growing journey with us in the comments below. Let us know what worked for you, what challenges you faced, and any tips you discovered along the way. Together, we can create a community of thriving parsley growers! We want to know if you were able to grow fresh parsley daily using our method.
Now, let’s address some frequently asked questions to ensure your parsley-growing success.
Frequently Asked Questions (FAQ)
1. How long does it take for parsley seeds to germinate?
Parsley seeds are notoriously slow to germinate. It can take anywhere from 2 to 4 weeks, or even longer, for them to sprout. This is why pre-soaking the seeds and using the paper towel method, as described in the article, is so crucial. Patience is key! Ensure the soil remains consistently moist during this period. Fluctuations in temperature can also affect germination rates, so try to keep the seeds in a warm, stable environment. If after four weeks you see no signs of life, consider starting with fresh seeds, as older seeds may have a lower germination rate.
2. What kind of soil is best for growing parsley?
Parsley thrives in well-draining, fertile soil. A good potting mix that’s rich in organic matter is ideal. You can also amend your existing soil with compost or aged manure to improve its drainage and nutrient content. Avoid heavy clay soils, as they can become waterlogged and lead to root rot. The ideal pH for parsley is between 6.0 and 7.0. You can test your soil’s pH using a soil testing kit available at most garden centers.
3. How much sunlight does parsley need?
Parsley needs at least 6 hours of sunlight per day to thrive. If you’re growing it indoors, place it near a sunny window or supplement with a grow light. Insufficient sunlight can result in leggy growth and reduced flavor. If you live in a particularly hot climate, some afternoon shade can be beneficial to prevent the leaves from scorching. Observe your parsley plants closely and adjust their location as needed to ensure they’re receiving adequate sunlight.
4. How often should I water my parsley?
Parsley needs consistent moisture, but it doesn’t like to be waterlogged. Water thoroughly when the top inch of soil feels dry to the touch. Avoid overhead watering, as this can promote fungal diseases. Instead, water at the base of the plant. During hot, dry weather, you may need to water more frequently. Check the soil moisture regularly and adjust your watering schedule accordingly.
5. How do I harvest parsley?
Harvest parsley by snipping off the outer stems near the base of the plant. This encourages new growth from the center. Avoid cutting off more than one-third of the plant at a time, as this can stress it. Regular harvesting will also help to keep your parsley plant bushy and productive. You can harvest parsley throughout the growing season, as needed.
6. Can I grow parsley indoors year-round?
Yes, you can grow parsley indoors year-round, provided you give it enough light and water. Place it near a sunny window or use a grow light to supplement natural light. Maintain consistent moisture and fertilize regularly with a balanced liquid fertilizer. Indoor parsley may not grow as vigorously as outdoor parsley, but it will still provide you with a steady supply of fresh herbs.
7. What are some common pests and diseases that affect parsley?
Parsley can be susceptible to aphids, spider mites, and parsley worms. Inspect your plants regularly for signs of infestation and take action promptly. You can often control pests with insecticidal soap or neem oil. Parsley is also susceptible to fungal diseases like powdery mildew and root rot. To prevent these diseases, ensure good air circulation, avoid overhead watering, and provide well-draining soil.
8. How do I fertilize my parsley?
Fertilize parsley every 2-3 weeks with a balanced liquid fertilizer. Follow the instructions on the fertilizer label. Avoid over-fertilizing, as this can lead to leggy growth and reduced flavor. You can also amend the soil with compost or aged manure to provide a slow-release source of nutrients.
9. Can I save parsley seeds for next year?
Yes, you can save parsley seeds for next year. Allow the parsley plant to flower and produce seeds. Once the seed heads are dry and brown, cut them off and allow them to dry completely indoors. Then, separate the seeds from the chaff and store them in an airtight container in a cool, dark, and dry place. Parsley seeds typically remain viable for 1-2 years.
10. My parsley is bolting (going to seed). What should I do?
Bolting is a natural process that occurs when parsley plants are exposed to high temperatures or long days. Once parsley bolts, the leaves become bitter. To delay bolting, provide your parsley with some afternoon shade and keep it well-watered. If your parsley has already bolted, you can still harvest the seeds for next year. Alternatively, you can simply replace the bolted plant with a new one.
11. Can I grow parsley from cuttings?
While it’s more common to grow parsley from seed, you can try propagating it from cuttings. Take a 4-6 inch cutting from a healthy parsley plant, removing the lower leaves. Dip the cut end in rooting hormone and plant it in a pot filled with moist potting mix. Cover the pot with a plastic bag to create a humid environment. Keep the soil moist and place the pot in a warm, bright location. It may take several weeks for the cutting to root.
12. Is it better to grow curly or flat-leaf parsley?
The choice between curly and flat-leaf parsley is largely a matter of personal preference. Curly parsley has a milder flavor and is often used as a garnish. Flat-leaf parsley (also known as Italian parsley) has a more robust flavor and is preferred by many chefs for cooking. Consider growing both varieties to have a wider range of flavors and textures to choose from.
13. Can I freeze parsley for later use?
Yes, you can freeze parsley for later use. Wash and dry the parsley thoroughly. Chop it finely and place it in ice cube trays. Fill the trays with water or olive oil and freeze. Once frozen, transfer the parsley cubes to a freezer bag. You can also freeze parsley by spreading it out on a baking sheet and freezing it until solid. Then, transfer the frozen parsley to a freezer bag. Frozen parsley will not have the same texture as fresh parsley, but it will still retain its flavor.
14. How can I use my homegrown parsley?
The possibilities are endless! Use it as a garnish for soups, salads, and main dishes. Add it to sauces, pesto, and dips. Use it to flavor omelets, frittatas, and quiches. Incorporate it into stuffings, marinades, and rubs. You can even use it to make parsley tea, which is said to have various health benefits. Let your creativity guide you and enjoy the fresh, vibrant flavor of your homegrown parsley.
Leave a Comment