
Grow Ginger at Home? Absolutely! Imagine stepping into your kitchen and harvesting fresh, zesty ginger straight from your own little garden. No more last-minute grocery runs or settling for lackluster, store-bought roots. This isn’t just a dream; it’s a deliciously achievable reality with our simple DIY guide!
Ginger, with its fiery flavor and incredible health benefits, has been cherished for centuries. Originating in South Asia, it has been used in traditional medicine and culinary practices across cultures. From soothing teas to flavorful stir-fries, ginger’s versatility is undeniable. But did you know that you can easily cultivate this amazing spice right in your own home?
In today’s fast-paced world, we’re all looking for ways to connect with nature and embrace a more sustainable lifestyle. Growing your own ginger is a fantastic way to do just that. Not only will you have a constant supply of fresh ginger, but you’ll also experience the joy and satisfaction of nurturing a plant from rhizome to harvest. Plus, it’s a fantastic conversation starter! I’m excited to share these easy-to-follow steps that will empower you to grow ginger at home, regardless of your gardening experience. Let’s get started and transform your space into a thriving ginger haven!
Ingwer zu Hause anbauen: Dein DIY-Leitfaden für eine aromatische Ernte
Hallo liebe Gartenfreunde! Habt ihr euch jemals gefragt, wie ihr diesen würzigen, gesunden Ingwer, den ihr so gerne in eurem Tee oder Curry verwendet, einfach selbst anbauen könnt? Ich zeige euch, wie es geht! Es ist einfacher als ihr denkt und macht unglaublich viel Spaß. Lasst uns gemeinsam in die Welt des Ingweranbaus eintauchen!
Was du brauchst: Die Zutaten für deinen Ingwer-Erfolg
Bevor wir loslegen, hier eine Liste der Dinge, die du benötigst. Keine Sorge, die meisten davon hast du wahrscheinlich schon zu Hause!
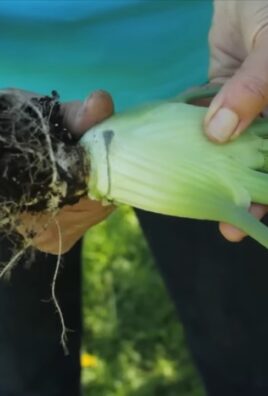
* Ein Ingwer-Rhizom: Am besten ein frisches, pralles Stück aus dem Supermarkt oder Bioladen. Achte darauf, dass es “Augen” hat – kleine Knospen, aus denen die Triebe wachsen werden. Bio-Ingwer ist oft die bessere Wahl, da er weniger wahrscheinlich mit Wachstumsinhibitoren behandelt wurde.
* Ein Gefäß: Ein Topf oder Behälter mit guter Drainage ist wichtig. Er sollte mindestens 30 cm breit und tief sein, damit sich der Ingwer gut entwickeln kann.
* Hochwertige Blumenerde: Eine gut durchlässige, nährstoffreiche Erde ist ideal. Du kannst auch deine eigene Mischung aus Blumenerde, Kompost und Perlit herstellen.
* Wasser: Klares, sauberes Wasser zum Gießen.
* Ein warmer, heller Standort: Ingwer liebt Wärme und indirektes Sonnenlicht.
* Geduld: Ingwer braucht Zeit zum Wachsen, also sei nicht entmutigt, wenn du nicht sofort Ergebnisse siehst.
Schritt-für-Schritt-Anleitung: So pflanzt du deinen Ingwer
Jetzt geht’s ans Eingemachte! Folge diesen Schritten, um deinen Ingwer erfolgreich zu pflanzen:
1. Das Ingwer-Rhizom vorbereiten:
* Wenn dein Ingwer-Rhizom mehrere “Augen” hat, kannst du es in kleinere Stücke schneiden. Achte darauf, dass jedes Stück mindestens ein oder zwei Augen hat.
* Lass die Schnittflächen ein paar Tage an der Luft trocknen, um Fäulnis vorzubeugen.
2. Den Ingwer einpflanzen:
* Fülle deinen Topf mit Blumenerde, lass aber etwa 5 cm Platz bis zum Rand.
* Lege das Ingwer-Rhizom horizontal auf die Erde, mit den Augen nach oben.
* Bedecke das Rhizom mit etwa 2-5 cm Erde.
* Gieße die Erde vorsichtig an, bis sie feucht, aber nicht durchnässt ist.
3. Den Ingwer pflegen:
* Stelle den Topf an einen warmen, hellen Ort, aber vermeide direkte Sonneneinstrahlung.
* Halte die Erde feucht, aber nicht nass. Gieße, wenn sich die oberste Erdschicht trocken anfühlt.
* Besprühe die Blätter regelmäßig mit Wasser, um die Luftfeuchtigkeit zu erhöhen.
* Dünge den Ingwer alle paar Wochen mit einem organischen Flüssigdünger.
Die Wachstumsphasen: Vom Trieb zur Ernte
Ingwer wächst nicht über Nacht. Hier ist, was du erwarten kannst:
* Keimung: Nach einigen Wochen (manchmal auch länger, je nach Temperatur) solltest du die ersten Triebe sehen, die aus der Erde sprießen.
* Wachstum: Die Triebe werden größer und entwickeln Blätter. Ingwer kann bis zu einem Meter hoch werden.
* Ernte: Nach etwa 8-10 Monaten kannst du deinen eigenen Ingwer ernten!
Erntezeit: So holst du dir deinen Ingwer
Die Ernte ist der aufregendste Teil! So gehst du vor:
1. Teilernte: Du kannst bereits nach ein paar Monaten kleine Stücke Ingwer ernten, indem du vorsichtig etwas Erde um die Pflanze herum entfernst und ein Stück des Rhizoms abschneidest. Die Pflanze wird weiterwachsen.
2. Volle Ernte: Wenn die Blätter gelb werden und absterben, ist es Zeit für die volle Ernte.
* Kippe den Topf vorsichtig aus und löse die Erde um das Ingwer-Rhizom herum.
* Wasche den Ingwer sauber und lass ihn trocknen.
* Lagere den Ingwer im Kühlschrank oder friere ihn ein.
Herausforderungen und Lösungen: Was tun, wenn’s nicht klappt?
Manchmal läuft nicht alles glatt. Hier sind einige häufige Probleme und wie du sie beheben kannst:
* Fäulnis: Wenn das Rhizom fault, ist die Erde wahrscheinlich zu nass. Reduziere das Gießen und sorge für eine bessere Drainage.
* Gelbe Blätter: Gelbe Blätter können ein Zeichen für Überwässerung, Unterdüngung oder zu wenig Licht sein. Überprüfe deine Pflege und passe sie entsprechend an.
* Keine Triebe: Wenn nach mehreren Wochen keine Triebe erscheinen, kann es sein, dass das Rhizom nicht lebensfähig ist oder die Temperatur zu niedrig ist. Versuche es mit einem neuen Rhizom und sorge für einen wärmeren Standort.
Zusätzliche Tipps und Tricks: Für den extra Ingwer-Kick
Hier sind noch ein paar Tipps, die dir helfen können, deinen Ingweranbau zu optimieren:
* Vorkeimen: Du kannst das Ingwer-Rhizom vorkeimen, indem du es in ein feuchtes Papiertuch wickelst und in einen Plastikbeutel legst. Stelle den Beutel an einen warmen Ort und warte, bis sich die ersten Triebe zeigen. Dann kannst du den Ingwer einpflanzen.
* Komposttee: Gieße deinen Ingwer regelmäßig mit Komposttee, um ihm zusätzliche Nährstoffe zu geben.
* Mulchen: Mulche die Erde um den Ingwer herum mit organischem Material wie Stroh oder Laub, um die Feuchtigkeit zu halten und Unkraut zu unterdrücken.
* Verschiedene Sorten: Es gibt verschiedene Ingwersorten mit unterschiedlichen Geschmacksrichtungen und Eigenschaften. Probiere verschiedene Sorten aus, um deinen Favoriten zu finden.
Ingwer in Hydrokultur: Eine alternative Anbaumethode
Wenn du keine Erde verwenden möchtest, kannst du Ingwer auch in Hydrokultur anbauen. Hierfür benötigst du ein Hydrokultursystem, Nährlösung und ein inertes Wachstumsmedium wie Blähton oder Kokosfasern. Die Vorgehensweise ist ähnlich wie beim Anbau in Erde, aber du musst die Nährlösung regelmäßig wechseln und den pH-Wert kontrollieren.
Ingwer als Zimmerpflanze: Ein grüner Hingucker
Auch wenn du keinen Garten hast, kannst du Ingwer als Zimmerpflanze anbauen. Stelle den Topf an einen hellen Ort und sorge für eine hohe Luftfeuchtigkeit. Ingwer ist nicht nur eine nützliche Pflanze, sondern auch ein dekorativer Hingucker.
Ingwer in der Küche: Vielseitig und gesund
Nach der Ernte kannst du deinen selbst angebauten Ingwer vielseitig in der Küche verwenden. Ob frisch gerieben im Tee, als Zutat in Currys und Suppen oder kandiert als süße Leckerei – Ingwer ist nicht nur lecker, sondern auch gesund. Er wirkt entzündungshemmend, verdauungsfördernd und kann bei Übelkeit helfen.
Ingwer vermehren: Für eine endlose Ingwer-Versorgung
Wenn du einmal erfolgreich Ingwer angebaut hast, kannst du ihn ganz einfach vermehren. Teile das Rhizom in mehrere Stücke und pflanze sie in separate Töpfe. So hast du bald eine endlose Ingwer-Versorgung!
Fazit: Dein eigenes Ingwer-Paradies
Ich hoffe, dieser Leitfaden hat dir geholfen, deinen eigenen Ingwer anzubauen. Es ist ein lohnendes Projekt, das dir nicht nur frischen Ingwer liefert, sondern auch Freude und Entspannung bringt. Viel Spaß beim Gärtnern! Und denk daran: Geduld ist der Schlüssel zum Erfolg. Bald wirst du deinen eigenen, aromatischen Ingwer ernten können.
Gutes Gelingen!
Conclusion
So, there you have it! Growing ginger at home is not only achievable, but it’s also a deeply rewarding experience that connects you to the food you eat in a tangible way. Forget those bland, store-bought rhizomes that have been sitting on shelves for weeks. Imagine the vibrant, spicy flavor of freshly harvested ginger, ready to elevate your culinary creations and soothe your senses.
This DIY trick is a must-try for several compelling reasons. First and foremost, it’s incredibly economical. A single piece of ginger from the grocery store can yield a bountiful harvest, saving you money in the long run. Secondly, you have complete control over the growing process, ensuring that your ginger is free from harmful pesticides and chemicals. This is especially important if you prioritize organic and sustainable living. Thirdly, and perhaps most importantly, growing your own ginger is simply fun! It’s a fascinating project that allows you to witness the miracle of nature firsthand.
But the possibilities don’t stop there. Feel free to experiment with different varieties of ginger. Explore the nuances of flavor between common ginger, galangal, or even turmeric, which thrives under similar conditions. Consider growing your ginger in a decorative pot to add a touch of greenery to your kitchen or balcony. You can also try different soil mixes to see which one yields the best results. Some gardeners swear by adding compost tea to their watering routine for an extra boost of nutrients.
Don’t be afraid to get creative and tailor the process to your specific environment and preferences. The beauty of DIY projects lies in their adaptability.
We wholeheartedly encourage you to embark on this ginger-growing adventure. It’s a simple yet profound way to connect with nature, enhance your culinary skills, and enjoy the unparalleled flavor of homegrown produce.
Once you’ve harvested your first batch of homegrown ginger, we’d love to hear about your experience! Share your tips, tricks, and triumphs in the comments below. Let’s create a community of ginger-growing enthusiasts and inspire others to embrace the joys of DIY gardening. Did you find a particularly effective method for sprouting the rhizome? Did you encounter any challenges along the way? Your insights could be invaluable to fellow gardeners.
So, grab a piece of ginger, prepare your pot, and get ready to experience the satisfaction of growing your own delicious and aromatic spice. Happy gardening!
Frequently Asked Questions (FAQ)
1. What kind of ginger should I use to start growing?
The best ginger to use for propagation is a plump, healthy-looking rhizome from your local grocery store or farmers market. Look for pieces that are firm, with visible “eyes” or buds. Organic ginger is often preferred, as it’s less likely to have been treated with growth inhibitors. Avoid ginger that is shriveled, moldy, or has soft spots. The fresher the ginger, the better your chances of successful sprouting. You can also source specific varieties of ginger online from reputable seed companies if you’re looking for something beyond the standard grocery store variety.
2. How long does it take for ginger to sprout?
Sprouting time can vary depending on several factors, including temperature, humidity, and the freshness of the ginger. Generally, you can expect to see sprouts emerge within 2 to 3 weeks. However, it could take longer, especially in cooler climates. To speed up the process, you can soak the ginger in warm water overnight before planting. Maintaining a consistently warm and humid environment is also crucial. Be patient, and don’t give up if you don’t see sprouts immediately.
3. What kind of soil is best for growing ginger?
Ginger thrives in well-draining, nutrient-rich soil. A good potting mix for ginger should be loose and airy, allowing for proper root development. You can create your own mix by combining equal parts of potting soil, compost, and perlite or vermiculite. The compost provides essential nutrients, while the perlite or vermiculite improves drainage and aeration. Avoid heavy clay soils, as they can become waterlogged and lead to root rot.
4. How much sunlight does ginger need?
Ginger prefers partial shade, especially in hot climates. Direct sunlight can scorch the leaves and damage the plant. Ideally, provide your ginger with 2 to 3 hours of morning sun or dappled shade throughout the day. If you’re growing ginger indoors, place it near a bright window that receives indirect sunlight. You can also use grow lights to supplement natural light, especially during the winter months.
5. How often should I water my ginger plant?
Water your ginger plant regularly, keeping the soil consistently moist but not waterlogged. Allow the top inch of soil to dry out slightly between waterings. Overwatering can lead to root rot, while underwatering can stunt growth. Adjust your watering schedule based on the weather and the humidity levels in your area. During hot, dry periods, you may need to water more frequently.
6. When is the best time to harvest ginger?
You can start harvesting ginger about 8 to 10 months after planting. The leaves will begin to turn yellow and die back, indicating that the rhizomes are mature. You can harvest the entire plant or selectively harvest pieces of ginger as needed. To harvest, gently dig around the plant and lift the rhizomes from the soil. Wash off any excess dirt and store the ginger in a cool, dry place.
7. Can I grow ginger indoors?
Yes, ginger can be successfully grown indoors, especially in colder climates. Choose a pot that is at least 12 inches deep and wide to accommodate the growing rhizomes. Provide adequate drainage and use a well-draining potting mix. Place the pot near a bright window that receives indirect sunlight or supplement with grow lights. Maintain a warm and humid environment by misting the plant regularly or using a humidifier.
8. What are some common problems when growing ginger?
Some common problems when growing ginger include root rot, pests, and nutrient deficiencies. Root rot is often caused by overwatering or poor drainage. To prevent root rot, ensure that your soil is well-draining and avoid overwatering. Pests such as aphids and spider mites can also attack ginger plants. Treat infestations with insecticidal soap or neem oil. Nutrient deficiencies can manifest as yellowing leaves or stunted growth. Fertilize your ginger plant regularly with a balanced fertilizer or compost tea.
9. Can I grow ginger in containers?
Absolutely! Growing ginger in containers is a great option, especially if you have limited space or live in a colder climate. Choose a container that is at least 12 inches deep and wide to allow for proper root development. Ensure that the container has drainage holes to prevent waterlogging. Use a well-draining potting mix and place the container in a location that receives partial shade.
10. How do I store harvested ginger?
Freshly harvested ginger can be stored in several ways. You can store it in the refrigerator for up to a few weeks by wrapping it in a paper towel and placing it in a plastic bag. You can also freeze ginger for longer storage. Peel the ginger and chop it into small pieces or grate it before freezing. Store the ginger in an airtight container or freezer bag. Another option is to pickle the ginger in vinegar or brine. Pickled ginger can be stored in the refrigerator for several months.
Leave a Comment