
Grow Melons Easily, you say? Absolutely! Imagine biting into a juicy, sun-ripened melon, bursting with flavor, knowing you nurtured it from a tiny seed right in your own backyard. That’s the magic we’re unlocking today! For centuries, melons have been symbols of abundance and sweetness, gracing tables from ancient Egypt to modern-day picnics. Their cultivation dates back thousands of years, a testament to humanity’s enduring love affair with these delicious fruits.
But let’s be honest, growing melons can sometimes feel like a gamble. Pests, diseases, and unpredictable weather can all conspire to thwart your efforts. That’s where these DIY tricks and hacks come in! I’m going to share some simple, yet incredibly effective, techniques that will dramatically increase your chances of a bountiful harvest.
Whether you’re a seasoned gardener or just starting out, these tips will empower you to grow melons easily and successfully. We’ll cover everything from soil preparation and seed starting to pest control and harvesting. Get ready to transform your garden into a melon paradise!
Grow Melons Like a Pro: My Foolproof DIY Guide
Hey there, fellow gardeners! I’m so excited to share my tried-and-true method for growing juicy, delicious melons right in your backyard. Forget those bland, store-bought melons – with a little know-how and some simple techniques, you can harvest your own sweet treats. This guide is packed with all the details you need, from seed to harvest. Let’s get started!
Choosing the Right Melon Variety
Before we dive into the nitty-gritty, let’s talk about choosing the right melon variety for your climate and space. Not all melons are created equal! Some thrive in hot, arid conditions, while others prefer a more temperate climate. Consider your growing zone and the amount of space you have available.
* Watermelons: These are the kings of summer! But they need a lot of space. Look for bush or compact varieties if you’re short on room. Some popular choices include ‘Sugar Baby’ (early maturing and compact) and ‘Crimson Sweet’ (classic flavor).
* Cantaloupes: These are a bit more manageable in terms of space. ‘Athena’ and ‘Hales Best Jumbo’ are reliable and flavorful options.
* Honeydew Melons: Similar to cantaloupes in terms of growing requirements. ‘Honey Globe’ is a popular choice.
* Specialty Melons: Don’t be afraid to experiment! There are tons of unique melon varieties out there, like Galia melons, Charentais melons, and even Korean melons.
Preparing the Soil: The Foundation for Success
Melons are heavy feeders, meaning they need nutrient-rich soil to thrive. Proper soil preparation is crucial for a bountiful harvest.
* Sunlight: Melons need at least 6-8 hours of direct sunlight per day. Choose a sunny spot in your garden.
* Soil Type: Melons prefer well-drained, sandy loam soil. Heavy clay soil can lead to root rot.
* Soil pH: Aim for a soil pH between 6.0 and 6.8. You can test your soil using a home test kit or send a sample to your local agricultural extension office.
* Amendments: Amend your soil with plenty of organic matter, such as compost, well-rotted manure, or leaf mold. This will improve drainage, aeration, and nutrient content.
Starting Seeds Indoors (Optional but Recommended)
Starting your melon seeds indoors gives them a head start, especially in cooler climates. I highly recommend this method for a longer growing season.
1. Timing: Start your seeds about 4-6 weeks before the last expected frost in your area.
2. Containers: Use peat pots or biodegradable pots to avoid disturbing the roots when transplanting.
3. Soil: Use a seed-starting mix.
4. Planting: Plant 2-3 seeds per pot, about ½ inch deep.
5. Watering: Keep the soil consistently moist but not soggy.
6. Warmth: Provide bottom heat using a heat mat to speed up germination.
7. Light: Once the seedlings emerge, provide them with plenty of light. A sunny windowsill or grow lights will work.
8. Thinning: Once the seedlings have their first true leaves, thin them to one strong seedling per pot.
Transplanting Seedlings Outdoors
Once the danger of frost has passed and the soil has warmed up, it’s time to transplant your melon seedlings outdoors.
1. Hardening Off: Before transplanting, harden off your seedlings by gradually exposing them to outdoor conditions for a week or two. Start by placing them in a sheltered spot for a few hours each day, gradually increasing the amount of time they spend outdoors.
2. Planting Time: Choose a cloudy day to transplant to minimize stress on the seedlings.
3. Spacing: Space watermelon plants 3-5 feet apart, cantaloupe and honeydew plants 2-3 feet apart.
4. Planting Depth: Plant the seedlings at the same depth they were growing in their pots.
5. Watering: Water the seedlings thoroughly after transplanting.
6. Mulching: Apply a layer of mulch around the plants to help retain moisture, suppress weeds, and regulate soil temperature. I like to use straw or shredded leaves.
Direct Sowing (Alternative to Starting Indoors)
If you live in a warm climate with a long growing season, you can direct sow melon seeds directly into the garden.
1. Timing: Sow seeds after the last expected frost and when the soil temperature is consistently above 70°F (21°C).
2. Planting: Plant seeds about 1 inch deep, spacing them according to the variety you’re growing.
3. Watering: Keep the soil consistently moist until the seeds germinate.
4. Thinning: Once the seedlings emerge, thin them to the strongest plant per spacing.
Watering and Fertilizing: Keeping Your Melons Happy
Melons need consistent watering and fertilization to produce a good crop.
* Watering: Water deeply and regularly, especially during hot, dry weather. Aim for about 1-2 inches of water per week. Avoid overhead watering, which can lead to fungal diseases. Drip irrigation is ideal.
* Fertilizing: Fertilize your melon plants every 2-3 weeks with a balanced fertilizer. Look for a fertilizer with a ratio of 10-10-10 or something similar. You can also use organic fertilizers like compost tea or fish emulsion. Once the fruits start to develop, switch to a fertilizer that is higher in potassium to promote sweetness.
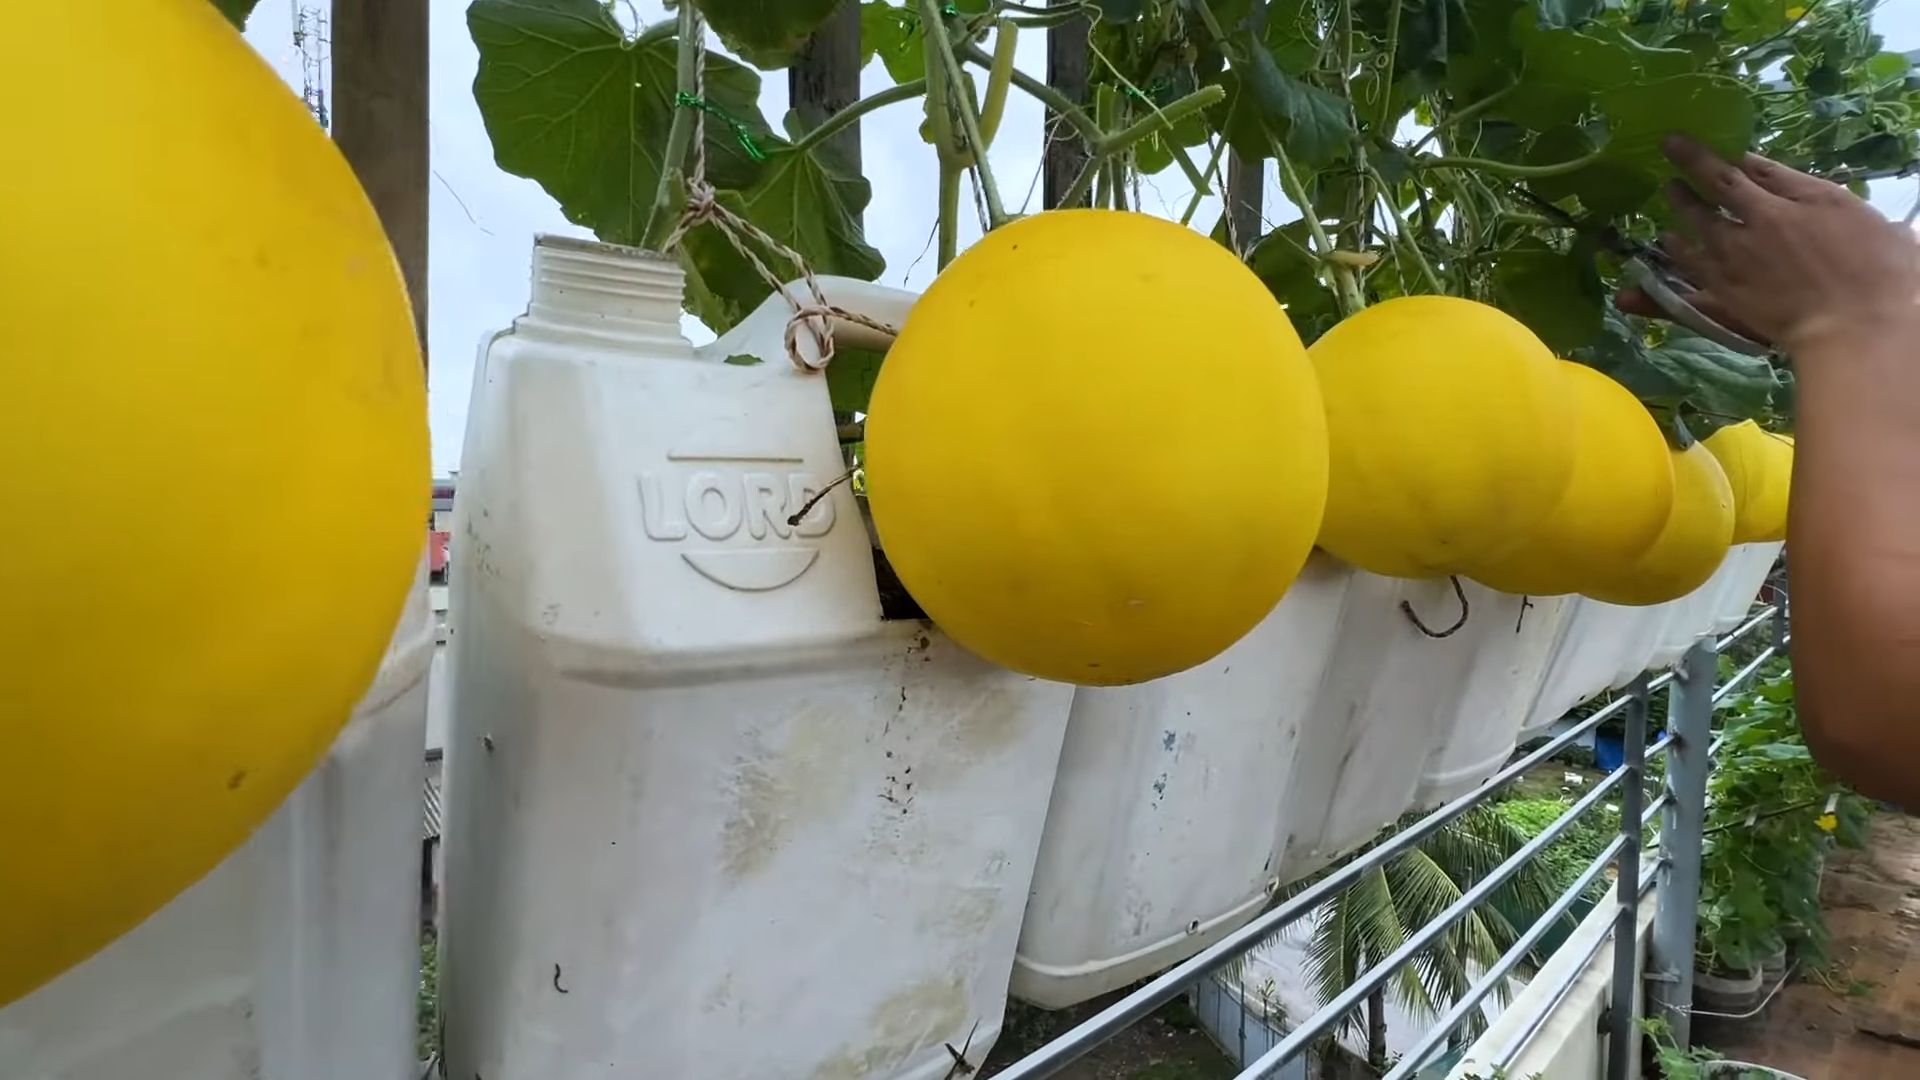
Supporting the Vines (Optional but Recommended)
Melon vines can be quite sprawling, so providing support can help keep the fruits off the ground and prevent rot.
* Trellising: Trellising is a great option for smaller melon varieties like cantaloupes and honeydews. Use a sturdy trellis and tie the vines to the trellis as they grow. You may need to support the fruits with slings made from pantyhose or netting.
* Straw Mulch: If you’re not trellising, spread a thick layer of straw mulch under the fruits to keep them off the ground.
Pest and Disease Control: Protecting Your Crop
Melons can be susceptible to various pests and diseases. Here’s how to protect your crop:
* Common Pests: Cucumber beetles, squash bugs, aphids, and vine borers.
* Control: Handpick pests, use insecticidal soap, or apply neem oil. Row covers can also help prevent pests from reaching your plants.
* Common Diseases: Powdery mildew, downy mildew, and fusarium wilt.
* Control: Provide good air circulation, avoid overhead watering, and apply fungicides if necessary. Choose disease-resistant varieties.
Pollination: Ensuring Fruit Set
Melons are pollinated by bees and other insects. If you’re not seeing many bees in your garden, you may need to hand-pollinate the flowers.
1. Identify Male and Female Flowers: Male flowers have a long, thin stem, while female flowers have a small, immature fruit at the base.
2. Hand-Pollinate: In the morning, use a small paintbrush to collect pollen from the male flower and transfer it to the female flower.
Harvesting: The Sweet Reward
Knowing when to harvest your melons is key to enjoying their full flavor.
* Watermelons: Look for a dry tendril closest to the fruit, a dull thud when you thump the melon, and a yellow spot on the underside where it rested on the ground.
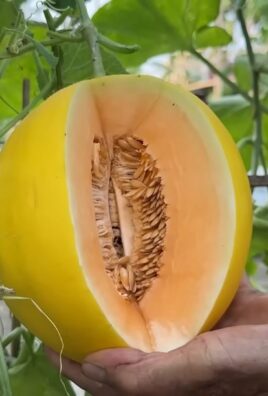
* Cantaloupes: The stem should slip easily from the fruit when it’s ripe. The melon should also have a fragrant aroma.
* Honeydew Melons: The skin should turn from green to creamy yellow. The melon should also feel slightly soft at the blossom end.
Enjoying Your Harvest: Savoring the Fruits of Your Labor
Congratulations! You’ve successfully grown your own melons. Now it’s time to enjoy the fruits of your labor. Slice them up and enjoy them fresh, add them to salads, or make refreshing melon juice. The possibilities are endless!
Troubleshooting: Common Problems and Solutions
Even with the best planning, things can sometimes go wrong. Here are some common problems and how to fix them:
* Poor Fruit Set: This could be due to lack of pollination. Try hand-pollinating the flowers.
* Small Fruits: This could be due to insufficient watering or fertilization. Make sure your plants are getting enough water and nutrients.
* Cracked Fruits: This could be due to inconsistent watering. Try to water regularly and avoid letting the soil dry out completely.
* Rotting Fruits: This could be due to fungal diseases or pests. Remove any
Conclusion
So, there you have it! Growing melons doesn’t have to be a daunting task reserved for seasoned gardeners with acres of land. This simple, yet effective DIY trick opens up the possibility of enjoying homegrown, juicy melons even if you’re working with limited space or facing challenging soil conditions. The secret lies in creating a nutrient-rich, well-draining environment that caters specifically to the needs of these sun-loving fruits.
Why is this a must-try? Because it drastically increases your chances of success. Forget battling poor soil, inconsistent watering, and the frustration of watching your melon vines struggle. This method provides a controlled and optimized environment, giving your melon plants the best possible start and a significant boost throughout their growing season. Imagine biting into a perfectly ripe, sweet melon that you nurtured from seed, knowing you played a crucial role in its deliciousness. That satisfaction alone is worth the effort!
But the beauty of this DIY trick is its adaptability. Feel free to experiment with variations to suit your specific needs and preferences. For instance, if you live in a particularly hot climate, consider adding a layer of mulch around the base of the plant to help retain moisture and regulate soil temperature. You could also incorporate companion planting, such as basil or marigolds, to deter pests naturally. If you’re growing vertically, ensure your support structure is sturdy enough to handle the weight of the mature melons. Different melon varieties may also benefit from slight adjustments to the soil mix or watering schedule, so do a little research on your chosen type.
Don’t be afraid to get creative and personalize this method to make it your own! The key is to provide your melon plants with the essentials: plenty of sunlight, consistent moisture, and nutrient-rich soil. By following these guidelines and adapting them to your specific circumstances, you’ll be well on your way to harvesting a bountiful crop of delicious, homegrown melons.
We are confident that this DIY approach to grow melons easily will transform your gardening experience. It’s a game-changer for both beginners and experienced gardeners alike. So, grab your seeds, gather your supplies, and get ready to embark on a rewarding journey of growing your own melons.
We’re eager to hear about your experiences! Did this trick work for you? What variations did you try? What challenges did you encounter, and how did you overcome them? Share your stories, tips, and photos in the comments below. Let’s create a community of melon-growing enthusiasts and learn from each other’s successes and failures. Happy gardening!
Frequently Asked Questions (FAQ)
What type of melons does this DIY trick work best for?
This method is generally effective for a wide variety of melon types, including watermelon, cantaloupe, honeydew, and even smaller varieties like Galia melons. However, keep in mind that different melon types have slightly different needs. For example, watermelons tend to be heavier feeders than cantaloupes, so you might need to supplement with additional fertilizer. Research the specific needs of your chosen melon variety for optimal results. Smaller melon varieties are generally easier to manage, especially if you’re growing them vertically.
How often should I water my melon plants using this method?
Watering frequency depends on several factors, including the weather, soil type, and the size of your container. As a general rule, aim to keep the soil consistently moist but not waterlogged. Check the soil moisture level regularly by sticking your finger about an inch into the soil. If it feels dry, it’s time to water. During hot, dry weather, you may need to water daily, while during cooler, wetter periods, you can reduce the frequency. Ensure the container has adequate drainage to prevent root rot. Drip irrigation or soaker hoses are excellent options for providing consistent moisture directly to the roots.
What kind of fertilizer should I use for my melon plants?
Melons are heavy feeders, so providing them with adequate nutrients is crucial for healthy growth and fruit production. A balanced fertilizer with a higher phosphorus content (the middle number on the fertilizer label) is generally recommended, especially during the flowering and fruiting stages. You can use a granular fertilizer or a liquid fertilizer, following the instructions on the product label. Organic options like compost tea or fish emulsion are also excellent choices. Avoid over-fertilizing, as this can lead to excessive foliage growth at the expense of fruit production.
How much sunlight do melon plants need?
Melons are sun-loving plants and require at least 6-8 hours of direct sunlight per day to thrive. Choose a location that receives ample sunlight throughout the day. If you’re growing melons in containers, you can move them around to ensure they get enough sun. Insufficient sunlight can result in poor fruit development and reduced sweetness.
How do I know when my melons are ripe?
Determining when a melon is ripe can be tricky, but there are a few telltale signs to look for. For watermelons, check the underside where it rests on the ground. It should have a creamy yellow spot. Also, thump the melon; a ripe watermelon will have a deep, hollow sound. For cantaloupes, the stem should slip easily from the vine when the melon is ripe. Honeydew melons will develop a slightly waxy feel and a sweet aroma. The best way to know for sure is to taste a small piece!
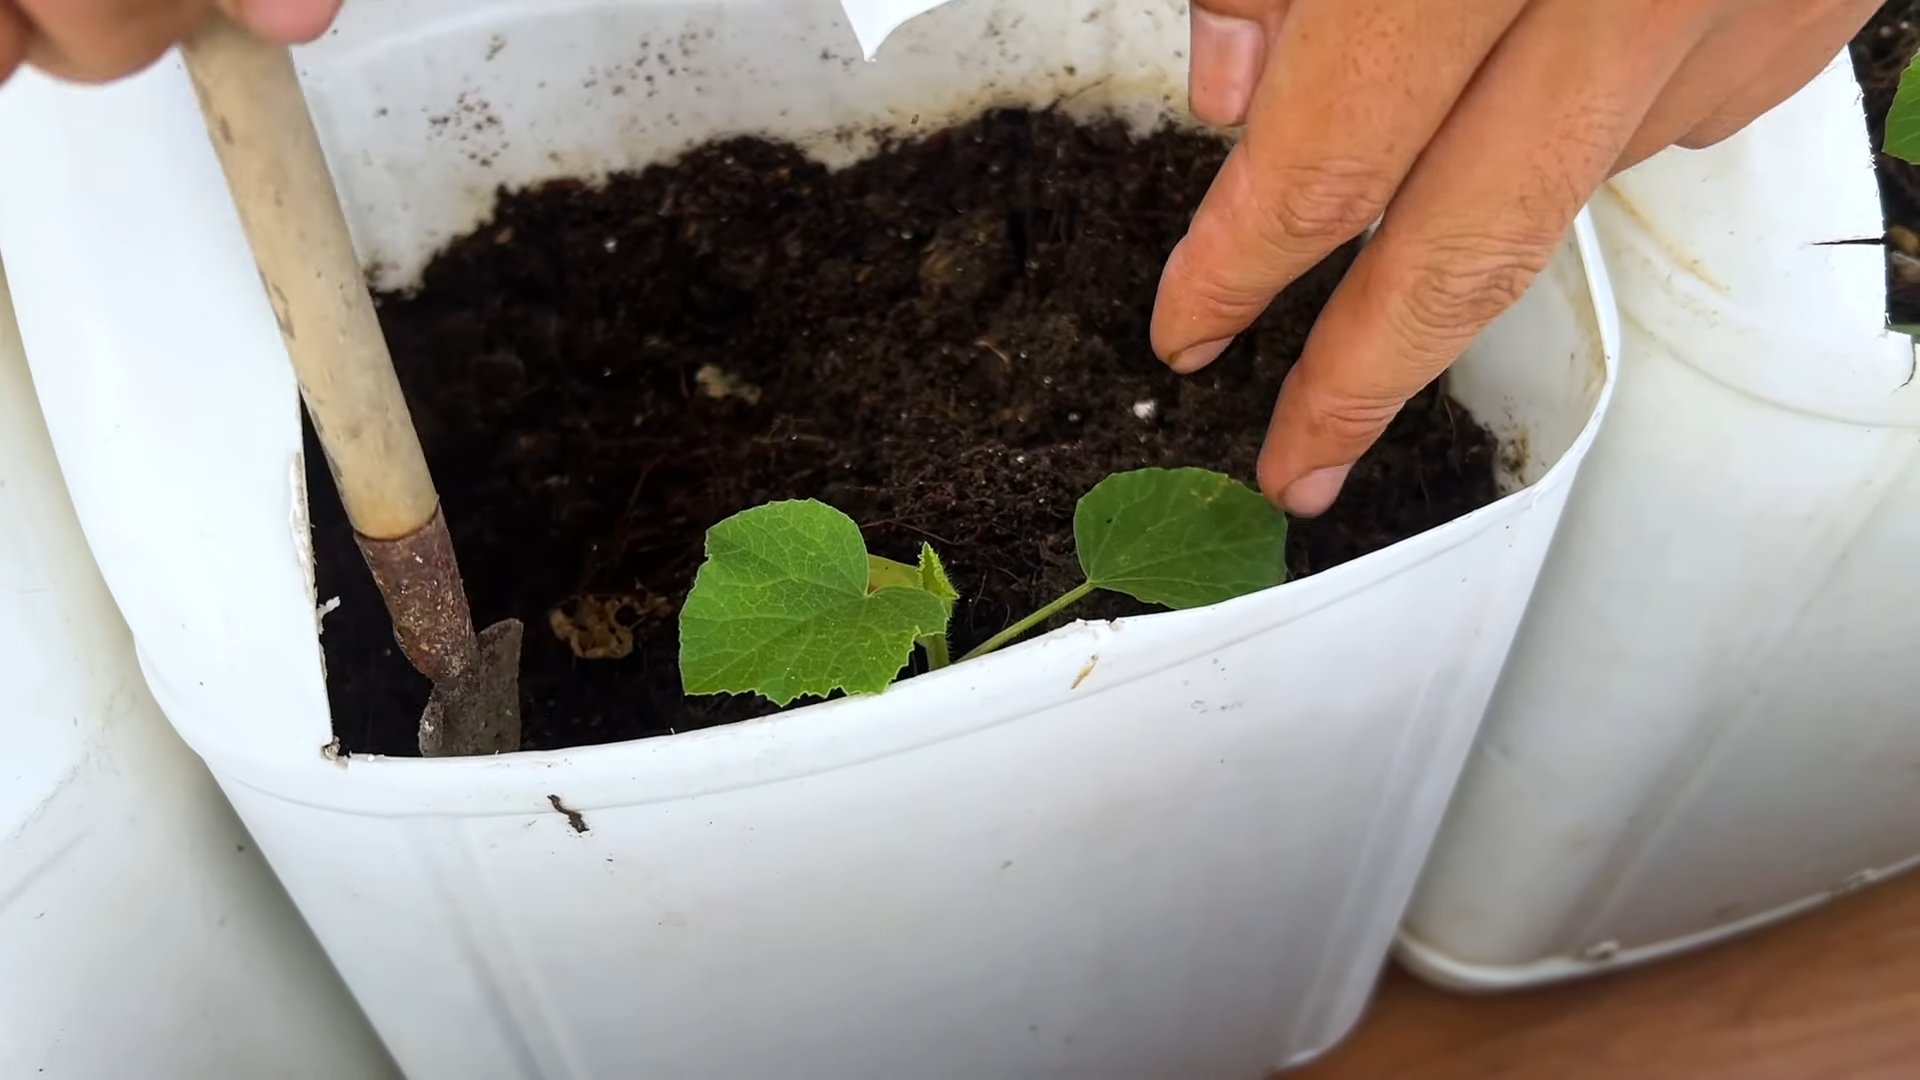
Can I grow melons in containers using this method?
Yes, absolutely! In fact, this DIY trick is particularly well-suited for container gardening. Choose a large container (at least 20 gallons) with good drainage. Use a high-quality potting mix and amend it with compost or other organic matter. Be sure to provide adequate support for the vines, such as a trellis or cage. Container-grown melons may require more frequent watering and fertilization than those grown in the ground.
What are some common pests and diseases that affect melon plants, and how can I prevent them?
Common pests that affect melon plants include aphids, squash bugs, and vine borers. Diseases include powdery mildew and fusarium wilt. To prevent these problems, practice good garden hygiene, such as removing plant debris and weeds. Use insecticidal soap or neem oil to control pests. Ensure good air circulation to prevent fungal diseases. Choose disease-resistant melon varieties whenever possible. Crop rotation can also help to prevent soilborne diseases.
How do I support the weight of the melons as they grow?
As melons grow larger, they can become quite heavy and may need support to prevent them from breaking off the vine. If you’re growing melons on a trellis, you can use slings made from pantyhose or netting to support the fruit. For melons growing on the ground, you can place them on a bed of straw or cardboard to protect them from rot and pests.
What if I don’t have access to all the ingredients for the soil mix?
Don’t worry if you can’t find all the exact ingredients listed for the soil mix. The key is to create a well-draining, nutrient-rich environment. You can substitute ingredients based on what’s available to you. For example, if you don’t have peat moss, you can use coconut coir. If you don’t have compost, you can use well-rotted manure. The important thing is to ensure that the soil is loose, airy, and contains plenty of organic matter.
How can I improve pollination for my melon plants?
Melons rely on pollinators, such as bees, to produce fruit. If you’re not seeing many bees in your garden, you can hand-pollinate the flowers. To do this, use a small paintbrush to transfer pollen from the male flowers to the female flowers. Female flowers have a small swelling at the base of the flower, which will eventually develop into a melon. You can also attract pollinators to your garden by planting flowers that they love, such as sunflowers, zinnias, and lavender.

Leave a Comment