
Grow mushrooms indoors? Absolutely! Imagine harvesting fresh, flavorful mushrooms right from your kitchen, adding a gourmet touch to your meals without ever stepping foot in a grocery store. Sounds like a dream, right? Well, it’s a dream that’s surprisingly easy to achieve with a few simple DIY tricks. For centuries, cultivating fungi has been a practice steeped in mystery and tradition, particularly in Eastern cultures where mushrooms are revered for their culinary and medicinal properties.
But you don’t need to be a seasoned mycologist to enjoy the fruits (or rather, fungi) of your labor. In today’s world, where sustainability and self-sufficiency are more important than ever, learning to grow mushrooms indoors is a fantastic way to reduce your carbon footprint, save money, and connect with nature. Plus, let’s be honest, it’s just plain cool! I’m going to show you some easy and effective DIY methods that will have you harvesting your own delicious mushrooms in no time. Get ready to transform a corner of your home into a thriving mushroom farm!

Growing Mushrooms Indoors: A Beginner’s Guide
Okay, so you want to grow mushrooms indoors? Awesome! It’s a surprisingly rewarding hobby, and you get delicious, fresh mushrooms out of it. Don’t be intimidated; it’s easier than you might think. I’m going to walk you through a simple method using a pre-made mushroom grow kit. This is the best way to start, trust me.
What You’ll Need
Before we dive in, let’s gather our supplies. The beauty of using a grow kit is that most of what you need is already included!
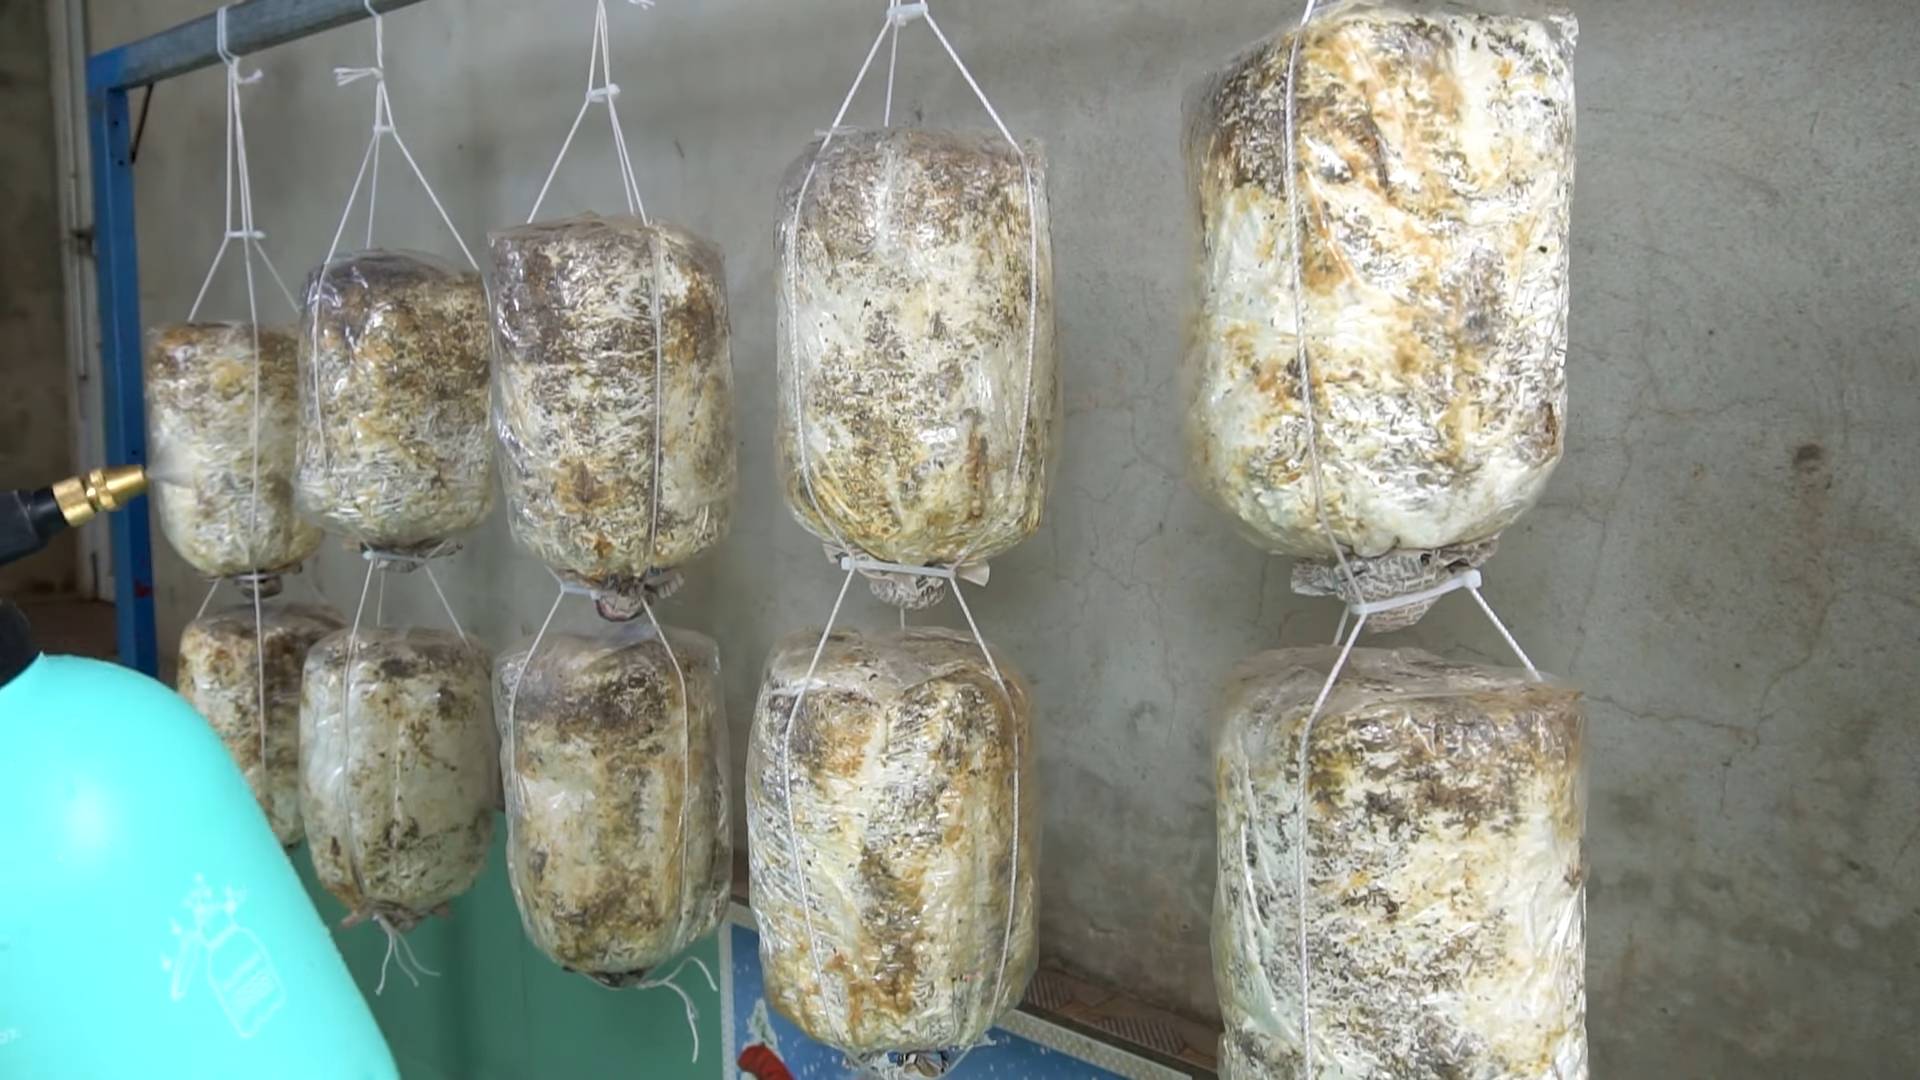
* Mushroom Grow Kit: This is the heart of the operation. You can find these online or at some garden centers. Oyster mushrooms are a great choice for beginners because they’re relatively easy to grow and quite forgiving. Make sure the kit is fresh and hasn’t been sitting on the shelf for too long.
* Spray Bottle: A clean spray bottle filled with distilled or filtered water. Tap water can sometimes contain chlorine, which isn’t ideal for mushroom growth.
* Clean Workspace: A clean table or counter where you can set up your kit. Hygiene is important to prevent contamination.
* Humidity Tent (Optional but Recommended): Many kits come with a humidity tent, which is essentially a clear plastic bag. If yours doesn’t, you can use a large, clear plastic bag or even a clear storage container.
* Thermometer (Optional): To monitor the temperature in your growing area.
* Paper Towels (Optional): For cleaning up any spills.
Choosing the Right Location
Location, location, location! Just like real estate, where you place your mushroom kit matters.
* Indirect Light: Mushrooms don’t need direct sunlight. In fact, direct sunlight can dry them out and even kill them. A spot with indirect light, like a north-facing window or a shaded area, is perfect.
* Consistent Temperature: Most mushroom varieties prefer temperatures between 60-75°F (15-24°C). Avoid placing your kit near drafts, heating vents, or air conditioners, as these can cause temperature fluctuations.
* Good Air Circulation: While you want to maintain humidity, you also need good air circulation to prevent mold growth. Don’t put your kit in a completely sealed environment.
* Away from Contaminants: Keep your kit away from areas where there’s a lot of dust, cleaning products, or other potential contaminants.
Setting Up Your Grow Kit
Alright, let’s get this show on the road!
1. Open the Kit Carefully: Gently open your mushroom grow kit. Be careful not to damage the substrate (the material the mushrooms will grow from).
2. Prepare the Substrate: Most kits require you to score or cut the plastic bag covering the substrate. Follow the instructions that came with your kit. This allows the mushrooms to emerge. Some kits might require you to soak the substrate in water for a period of time. Again, follow the specific instructions for your kit.
3. Place in Humidity Tent (If Applicable): If your kit came with a humidity tent, place the substrate block inside. If you’re using your own plastic bag or container, make sure it’s large enough to allow the mushrooms to grow without being cramped.
4. Position the Tent: Place the humidity tent in your chosen location, ensuring it meets the criteria we discussed earlier (indirect light, consistent temperature, good air circulation).
Maintaining Your Mushroom Grow Kit
This is where the daily care comes in. It’s not difficult, but consistency is key.
1. Misting: This is the most important part! You need to keep the substrate moist but not soaking wet. Mist the inside of the humidity tent and the substrate block with your spray bottle 2-3 times a day. The goal is to maintain a humid environment. You should see condensation forming on the inside of the tent. If the tent looks dry, mist more frequently. If there’s excessive water pooling at the bottom, mist less frequently.
2. Air Circulation: Even with the humidity tent, you need to provide fresh air. Open the tent or bag for a few minutes each day to allow for air exchange. This helps prevent mold growth.
3. Monitoring Temperature: If you have a thermometer, monitor the temperature inside the tent. Adjust the location of your kit if the temperature is consistently outside the ideal range (60-75°F).
4. Patience: Don’t get discouraged if you don’t see mushrooms right away. It can take a week or two for the first pins (tiny mushroom buds) to appear.
Harvesting Your Mushrooms
The moment you’ve been waiting for!
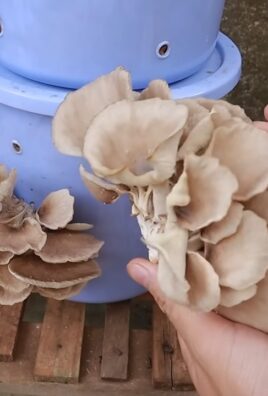
1. Timing: Harvest your mushrooms when the caps are fully formed but before they start to flatten out or drop spores (a powdery substance). For oyster mushrooms, this is typically when the caps are about 2-4 inches in diameter.
2. Harvesting Technique: Gently twist and pull the mushrooms from the substrate. You can also use a clean, sharp knife to cut them off at the base. Be careful not to damage the surrounding substrate.
3. Storage: Store your harvested mushrooms in a paper bag in the refrigerator. They should last for about a week.
Second Flush and Beyond
The good news is that you can usually get multiple flushes (harvests) from a single grow kit!
1. Soaking (Optional): After your first harvest, you can soak the substrate block in water for a few hours to rehydrate it. This can encourage a second flush. Some kits don’t require soaking, so check the instructions.
2. Repeat the Process: Return the substrate block to the humidity tent and continue misting and providing fresh air.
3. Subsequent Flushes: Subsequent flushes may be smaller than the first, but you can still get a decent yield.
Troubleshooting
Even with the best care, things can sometimes go wrong. Here are some common problems and how to address them:
* Mold Growth: If you see mold growing on the substrate, it’s usually a sign of poor air circulation or excessive moisture. Remove the moldy areas with a clean spoon or knife. Increase air circulation and reduce misting.
* Dry Substrate: If the substrate is dry, the mushrooms won’t grow properly. Increase misting and make sure the humidity tent is properly sealed.
* Small Mushrooms: If the mushrooms are small and stunted, it could be due to insufficient light, temperature fluctuations, or lack of nutrients. Adjust the location of your kit, maintain a consistent temperature, and consider adding a small amount of diluted fertilizer to the misting water (check your kit instructions first).
* No Mushrooms at All: If you don’t see any mushrooms after a few weeks, it could be due to a number of factors, including a bad kit, improper temperature, or insufficient moisture. Contact the supplier of your kit for assistance.
Understanding the Mushroom Life Cycle (Optional, but Interesting!)
While you don’t *need* to know this to grow mushrooms, understanding the basics of their life cycle can make the whole process even more fascinating.
* Spores: Mushrooms reproduce through spores, which are like tiny seeds.
* Mycelium: When spores land in a suitable environment, they germinate and form mycelium, a network of thread-like filaments. This is the white, fuzzy stuff you often see on the substrate.
* Pinning: As the mycelium matures, it forms tiny mushroom buds called pins.
* Fruiting: The pins develop into mature mushrooms, which release spores to start the cycle all over again.
Choosing Different Mushroom Varieties (Once You’re Comfortable)
Once you’ve mastered growing oyster mushrooms, you might want to try other varieties. Here are a few popular options:
* Shiitake: These have a rich, earthy flavor and are often grown on logs.
* Lion’s Mane: These have a unique, shaggy appearance and a delicate, seafood-like flavor.
* Cremini/Portobello: These are the same species, just at different stages of maturity. Cremini are smaller and younger, while portobello are larger and more mature.
Tips for Success
Here are a few extra tips to help you succeed in your mushroom-growing adventure:
* Read the Instructions Carefully: Every grow kit is different, so be sure to read the instructions that came with yours.
* Be Patient: Growing mushrooms takes time, so don’t get discouraged if you don’t see results immediately.
* Experiment: Don’t be afraid to experiment with different techniques and locations to find what works best for you.
* Have Fun! Growing mushrooms is a rewarding and fascinating hobby. Enjoy the process!
Safety First!
While growing mushrooms is generally safe, here are a few precautions to keep in mind:
* Wash Your Hands: Wash your hands thoroughly
Conclusion
So, there you have it! Growing mushrooms indoors might seem like a daunting task reserved for seasoned mycologists, but with this simple DIY trick, you can unlock the fascinating world of fungi cultivation right in your own home. We’ve demystified the process, breaking it down into manageable steps that even a complete beginner can follow. Forget expensive mushroom kits and unreliable store-bought varieties; this method empowers you to cultivate fresh, flavorful mushrooms whenever you desire.
Why is this DIY approach a must-try? Firstly, it’s incredibly cost-effective. You’re likely to have many of the necessary materials already lying around your house, significantly reducing the initial investment. Secondly, it’s a sustainable and eco-friendly way to enjoy your favorite fungi. By growing your own, you’re reducing your carbon footprint associated with transportation and packaging. Thirdly, and perhaps most importantly, it’s an incredibly rewarding experience. Witnessing the entire life cycle of a mushroom, from tiny pinheads to fully formed fruiting bodies, is a truly captivating process.
But the fun doesn’t stop there! This method is incredibly versatile, allowing you to experiment with different mushroom varieties. While we’ve focused on a beginner-friendly option, such as oyster mushrooms, you can easily adapt the technique to cultivate other species like shiitake, lion’s mane, or even the elusive enoki, depending on your local climate and availability of spawn. Consider experimenting with different substrates, too. While straw is a popular choice, you can also use coffee grounds, cardboard, or even hardwood sawdust to create a unique growing medium.
Don’t be afraid to get creative with your growing environment. While a dark, humid space is ideal, you can easily modify a closet, basement, or even a spare room to create the perfect mushroom haven. Consider using a humidifier to maintain optimal humidity levels, or invest in a small grow tent to create a controlled environment.
We understand that venturing into the world of indoor mushroom cultivation can be intimidating, but we encourage you to take the plunge. The satisfaction of harvesting your own homegrown mushrooms is unparalleled, and the knowledge you gain along the way is invaluable. This DIY trick is not just about growing food; it’s about connecting with nature, learning about the fascinating world of fungi, and empowering yourself to become a more self-sufficient and sustainable individual.
So, what are you waiting for? Gather your materials, follow our simple steps, and embark on your mushroom-growing adventure today! And most importantly, we want to hear about your experiences. Share your successes, your challenges, and your tips with us in the comments below. Let’s build a community of indoor mushroom enthusiasts and learn from each other’s journeys. Happy growing! Remember, mastering the art of how to grow mushrooms indoors is a journey, not a destination. Embrace the process, experiment with different techniques, and most importantly, have fun!
Frequently Asked Questions (FAQ)
What type of mushrooms are easiest to grow indoors using this method?
Oyster mushrooms are generally considered the easiest and most beginner-friendly option for indoor cultivation. They are fast-growing, relatively tolerant of environmental fluctuations, and produce abundant yields. Other good options for beginners include shiitake and wine cap mushrooms. However, the specific ease of growth can depend on the climate and availability of suitable spawn.
What is mushroom spawn, and where can I get it?
Mushroom spawn is essentially the “seed” of the mushroom. It’s a material that has been inoculated with mushroom mycelium, which is the vegetative part of the fungus. You can purchase mushroom spawn online from reputable suppliers specializing in mushroom cultivation. Local garden centers or agricultural supply stores may also carry spawn, especially during the growing season. Make sure to choose a reputable supplier to ensure the quality and viability of the spawn.
How long does it take to grow mushrooms indoors using this method?
The time it takes to grow mushrooms indoors can vary depending on the mushroom species, the growing conditions, and the quality of the spawn. Generally, oyster mushrooms can start fruiting within 2-3 weeks after the substrate has been fully colonized by the mycelium. Shiitake mushrooms may take longer, typically 2-3 months. Maintaining optimal humidity, temperature, and light levels will significantly impact the speed of growth.
What are the ideal growing conditions for indoor mushrooms?
Most mushrooms thrive in a dark, humid environment with good air circulation. The ideal temperature range varies depending on the species, but generally falls between 60-75°F (15-24°C). Humidity levels should be maintained at 80-90% to prevent the substrate from drying out. While mushrooms don’t require direct sunlight, they do need some indirect light to trigger fruiting. A simple fluorescent light or LED grow light can provide sufficient illumination.
How do I maintain the humidity levels in my mushroom growing environment?
Maintaining high humidity levels is crucial for successful mushroom cultivation. You can use a humidifier to increase the humidity in the growing area. Alternatively, you can mist the substrate and surrounding area with water several times a day. Enclosing the growing area in a plastic bag or container can also help to trap moisture. Make sure to provide adequate ventilation to prevent the buildup of stagnant air, which can lead to mold growth.
What if I see mold growing on my mushroom substrate?
Mold contamination is a common problem in mushroom cultivation. If you see mold growing on your substrate, it’s important to address it immediately to prevent it from spreading. In some cases, you may be able to remove the affected area with a clean knife or spoon. However, if the mold is widespread, it’s best to discard the entire substrate to avoid contaminating other grows. To prevent mold growth, ensure that your substrate is properly pasteurized or sterilized, maintain good air circulation, and avoid overwatering.
Can I reuse the substrate after harvesting mushrooms?
After harvesting a flush of mushrooms, you can often get subsequent flushes from the same substrate. Simply rehydrate the substrate by soaking it in water for a few hours, then return it to the growing environment. However, the yield of subsequent flushes will typically be lower than the first. Eventually, the substrate will become depleted of nutrients and will no longer produce mushrooms. At this point, you can compost the spent substrate and use it to enrich your garden soil.
Are there any safety precautions I should take when growing mushrooms indoors?
While most cultivated mushrooms are safe to eat, it’s important to properly identify the species before consuming them. Never eat wild mushrooms unless you are absolutely certain of their identity. When handling mushroom spawn and substrate, wear gloves to protect your skin from potential irritants. Maintain good hygiene practices to prevent the spread of bacteria and mold. If you have any allergies or sensitivities, consult with a doctor before consuming homegrown mushrooms.
What are some common problems that can occur when growing mushrooms indoors, and how can I troubleshoot them?
Some common problems include slow growth, stunted mushrooms, mold contamination, and insect infestations. Slow growth can be caused by low temperatures, insufficient humidity, or poor-quality spawn. Stunted mushrooms may be due to lack of light, inadequate ventilation, or nutrient deficiencies. Mold contamination can be prevented by proper pasteurization and hygiene. Insect infestations can be controlled with natural pesticides or by introducing beneficial insects. Researching the specific needs of the mushroom species you are growing will help you troubleshoot any problems that arise.
How do I know when my mushrooms are ready to harvest?
The ideal time to harvest mushrooms depends on the species. Oyster mushrooms are typically harvested when the caps are fully expanded and the edges are still slightly curled downwards. Shiitake mushrooms are harvested when the caps have flattened out and the gills are visible. It’s best to harvest mushrooms before they start to drop spores, as this can make them less flavorful and attractive. To harvest, simply twist or cut the mushrooms off the substrate at the base of the stem.

Leave a Comment