
Grow peanuts backyard? Absolutely! Imagine harvesting your own homegrown peanuts, roasted to perfection, and enjoyed fresh from your garden. It’s easier than you think, and this DIY guide will show you exactly how to make it happen. For centuries, peanuts have been a staple crop, originating in South America and spreading across the globe, becoming a beloved snack and a crucial ingredient in countless cuisines.
But why should you bother growing them yourself? Well, store-bought peanuts often lack the vibrant flavor of freshly harvested ones. Plus, knowing exactly where your food comes from and how it’s grown is incredibly rewarding. In this article, I’ll share my favorite tips and tricks for successfully cultivating peanuts right in your own backyard, even if you have limited space.
From selecting the right variety to understanding the unique growing requirements of peanuts, I’ll cover everything you need to know. Forget complicated gardening techniques; we’re focusing on simple, effective methods that anyone can use. So, get ready to roll up your sleeves and discover the joy of growing your own delicious, homegrown peanuts. Let’s grow peanuts backyard and enjoy the fruits (or rather, nuts!) of our labor!
Erdnüsse im eigenen Garten anbauen: Eine umfassende Anleitung
Hallo Gartenfreunde! Habt ihr euch jemals gefragt, ob man Erdnüsse auch im eigenen Garten anbauen kann? Die Antwort ist ein klares Ja! Es ist einfacher als man denkt und macht unglaublich viel Spaß. Ich zeige euch, wie ihr mit etwas Geduld und den richtigen Schritten eure eigenen Erdnüsse ernten könnt. Los geht’s!
Was ihr für den Erdnussanbau benötigt:
* Erdnuss-Samen: Am besten ungeröstete, rohe Erdnüsse aus dem Supermarkt oder Gartencenter. Achtet darauf, dass sie nicht behandelt wurden.
* Gartenboden: Lockere, gut durchlässige Erde ist ideal. Sandiger Lehmboden ist perfekt.
* Sonniger Standort: Erdnüsse lieben die Sonne! Mindestens 6-8 Stunden direkte Sonneneinstrahlung pro Tag sind wichtig.
* Gartengeräte: Spaten, Harke, Gießkanne oder Gartenschlauch.
* Kompost oder organischer Dünger: Für eine gute Nährstoffversorgung.
* Geduld: Erdnüsse brauchen Zeit zum Wachsen und Reifen.
Schritt-für-Schritt-Anleitung: Erdnüsse pflanzen
1. Die Erdnüsse vorbereiten:
* Zuerst müsst ihr die Erdnüsse aus ihren Schalen befreien. Das ist ein bisschen Arbeit, aber es lohnt sich!
* Weicht die Erdnusskerne dann für etwa 24 Stunden in lauwarmem Wasser ein. Das hilft ihnen, schneller zu keimen.
* Ich persönlich lasse die Erdnüsse gerne auf feuchtem Küchenpapier vorkeimen, bevor ich sie in die Erde setze. So sehe ich, welche Kerne wirklich keimfähig sind. Legt die Erdnüsse einfach auf das feuchte Papier, deckt sie mit einem weiteren feuchten Tuch ab und bewahrt sie an einem warmen Ort auf. Nach ein paar Tagen sollten sich kleine Wurzeln zeigen.
2. Den Boden vorbereiten:
* Wählt einen sonnigen Standort in eurem Garten. Erdnüsse brauchen viel Sonne, um gut zu wachsen.
* Lockert den Boden gründlich auf. Erdnüsse brauchen lockere Erde, damit ihre Fruchtansätze (die sogenannten “Pflöcke”) leicht in den Boden eindringen können.
* Mischt Kompost oder organischen Dünger unter die Erde. Erdnüsse sind zwar nicht die anspruchsvollsten Pflanzen, aber eine gute Nährstoffversorgung fördert das Wachstum.
* Achtet darauf, dass der Boden gut entwässert ist. Staunässe mögen Erdnüsse gar nicht.
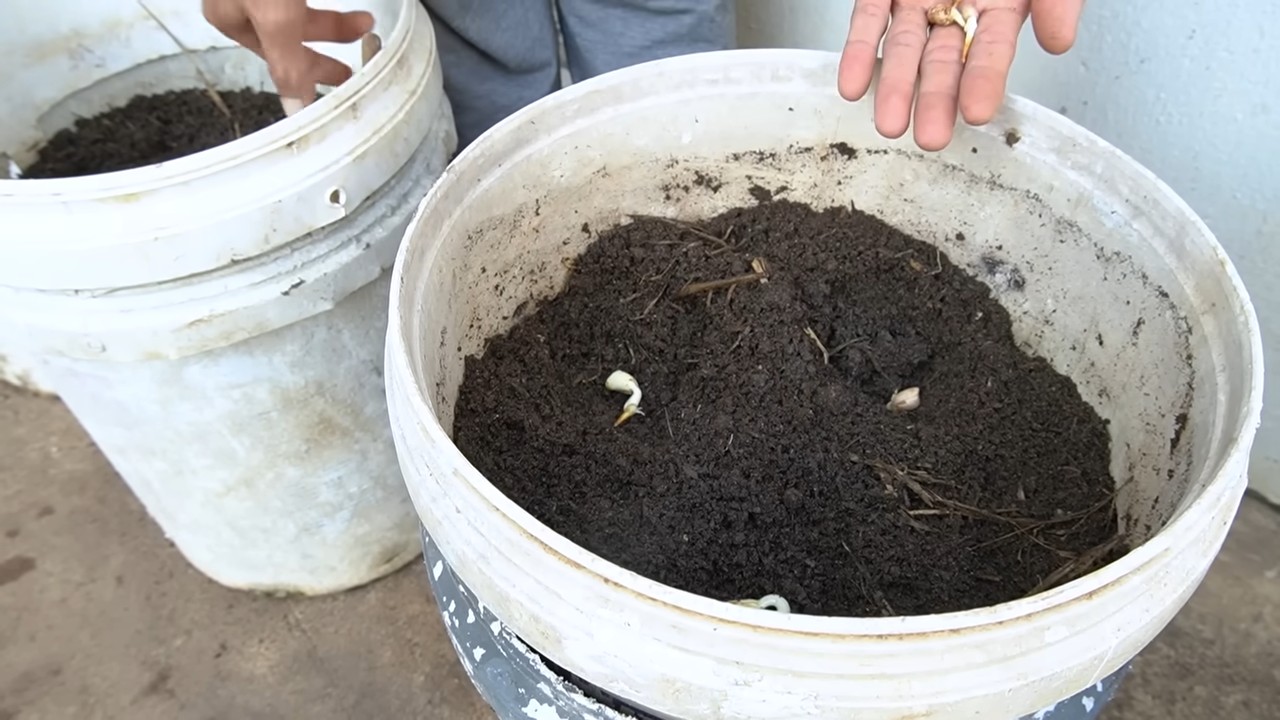
3. Die Erdnüsse pflanzen:
* Sobald keine Frostgefahr mehr besteht (in der Regel Mitte Mai), könnt ihr die Erdnüsse ins Freie pflanzen.
* Grabt kleine Löcher im Abstand von etwa 15-20 cm zueinander. Die Reihen sollten etwa 60-70 cm auseinander liegen.
* Legt in jedes Loch 2-3 Erdnusskerne (oder die vorgekeimten Kerne) und bedeckt sie mit etwa 3-5 cm Erde.
* Gießt die Erde vorsichtig an.
4. Die Erdnüsse pflegen:
* Haltet den Boden feucht, aber nicht nass. Regelmäßiges Gießen ist wichtig, besonders während der Blütezeit.
* Jätet regelmäßig Unkraut. Unkraut kann den Erdnüssen die Nährstoffe und das Licht wegnehmen.
* Häufelt die Pflanzen an, sobald sie etwa 15-20 cm hoch sind. Das fördert die Bildung der Fruchtansätze.
* Düngen ist in der Regel nicht notwendig, wenn ihr den Boden gut vorbereitet habt. Wenn die Pflanzen jedoch blass aussehen, könnt ihr einen organischen Dünger verwenden.
Die Blütezeit und die “Pflöcke”
Die Erdnusspflanze ist wirklich faszinierend! Sie blüht gelb und bildet nach der Befruchtung sogenannte “Pflöcke” aus. Diese Pflöcke sind eigentlich die Fruchtansätze, die sich in den Boden bohren und dort die Erdnüsse bilden. Es ist wichtig, dass der Boden locker ist, damit die Pflöcke leicht eindringen können.
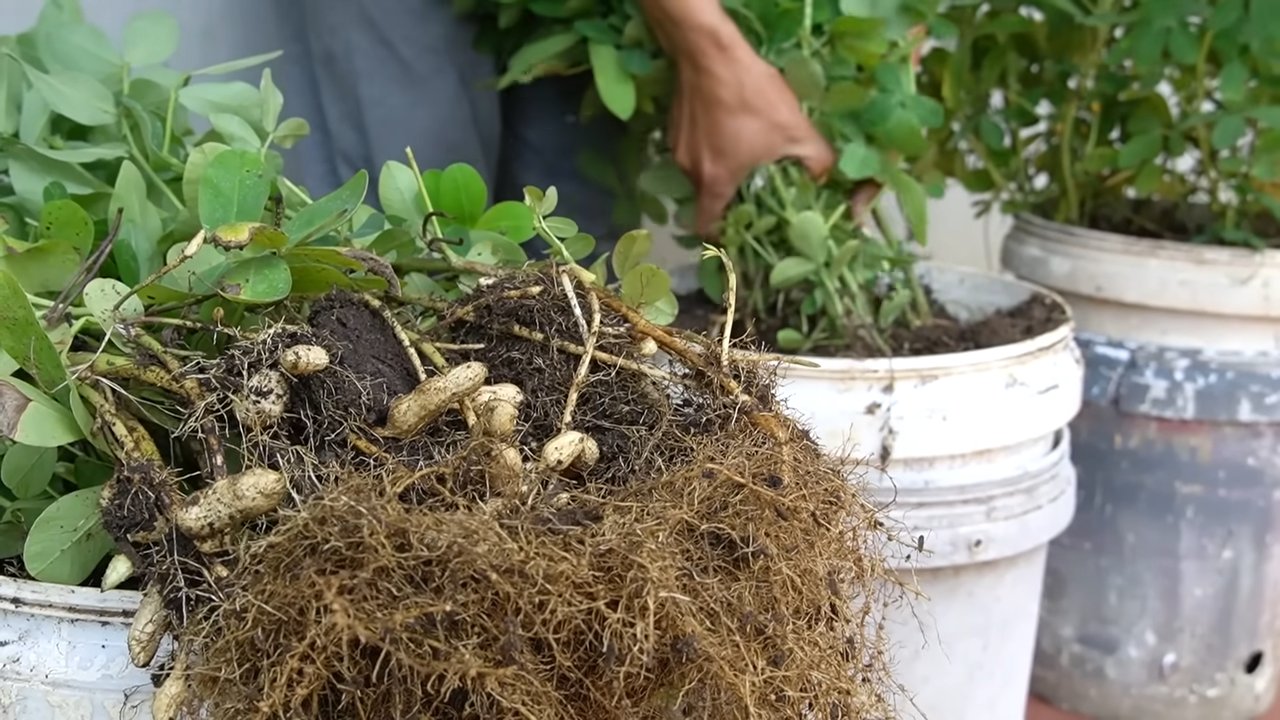
Die Ernte: Wann sind die Erdnüsse reif?
Die Erntezeit ist der spannendste Teil! Erdnüsse sind in der Regel etwa 4-5 Monate nach der Aussaat reif. Das ist meistens im September oder Oktober der Fall.
* Anzeichen für die Reife: Die Blätter der Pflanzen werden gelb und beginnen zu welken. Die Erdnussschalen sind hart und die Kerne im Inneren sind prall gefüllt.
* Die Ernte: Grabt die Pflanzen vorsichtig mit einer Grabegabel aus. Schüttelt die Erde ab und lasst die Erdnüsse an den Pflanzen hängen.
* Das Trocknen: Hängt die Pflanzen kopfüber an einem trockenen, luftigen Ort auf. Lasst sie dort für etwa 2-3 Wochen trocknen.
* Die Lagerung: Sobald die Erdnüsse trocken sind, könnt ihr sie von den Pflanzen trennen und in einem luftdichten Behälter aufbewahren.
Häufige Probleme und Lösungen
* Schlechte Keimung: Verwendet frische, ungeröstete Erdnüsse und weicht sie vor dem Pflanzen ein.
* Gelbe Blätter: Könnte ein Zeichen für Nährstoffmangel sein. Düngt mit einem organischen Dünger.
* Schädlinge: Erdnüsse sind relativ resistent gegen Schädlinge. Bei Bedarf könnt ihr biologische Schädlingsbekämpfungsmittel einsetzen.
* Krankheiten: Achten Sie auf eine gute Belüftung und vermeiden Sie Staunässe, um Pilzkrankheiten vorzubeugen.
Zusätzliche Tipps für den erfolgreichen Erdnussanbau
* Sortenwahl: Es gibt verschiedene Erdnusssorten. Informiert euch, welche Sorte für euer Klima am besten geeignet ist.
* Fruchtfolge: Baut Erdnüsse nicht jedes Jahr am selben Standort an. Das hilft, Krankheiten und Schädlinge zu vermeiden.
* Mulchen: Mulchen mit Stroh oder Heu hilft, den Boden feucht zu halten und Unkraut zu unterdrücken.
* Beobachtung: Beobachtet eure Pflanzen regelmäßig und reagiert auf Probleme, bevor sie sich verschlimmern.
Fazit
Erdnüsse im eigenen Garten anzubauen ist ein lohnendes Projekt, das nicht nur Spaß macht, sondern auch leckere und gesunde Erdnüsse liefert. Mit etwas Planung, Geduld und den richtigen Schritten könnt ihr eure eigene Erdnussernte genießen. Probiert es aus und lasst euch überraschen! Ich wünsche euch viel Erfolg und eine reiche Ernte!
Conclusion
So, there you have it! Growing peanuts in your own backyard is not only achievable, but it’s also a deeply rewarding experience. Forget the store-bought, often bland, and sometimes questionably sourced peanuts. Imagine the satisfaction of harvesting your own crop, knowing exactly where they came from and how they were grown. This DIY project transforms your garden into a source of fresh, flavorful, and healthy snacks.
But why is this DIY trick a must-try? It’s more than just about the peanuts themselves. It’s about connecting with nature, understanding the growing process, and enjoying the fruits (or rather, legumes) of your labor. It’s a fantastic educational opportunity for kids, teaching them about plant life cycles and where their food comes from. Plus, it’s a conversation starter! How many people can say they grow their own peanuts?
Beyond the novelty and educational aspects, growing your own peanuts allows for complete control over the growing process. You can choose organic methods, avoiding harmful pesticides and herbicides. You can select peanut varieties that are best suited to your local climate and soil conditions. And you can harvest them at their peak ripeness, ensuring the most flavorful and nutritious peanuts possible.
Don’t be afraid to experiment! Try different peanut varieties like Virginia, Spanish, or Runner, each offering a unique flavor profile and growth habit. Consider companion planting with herbs like basil or rosemary to deter pests and enhance the flavor of your peanuts. You can even try growing them in containers if you have limited space. The possibilities are endless!
Ready to embark on your peanut-growing adventure? We encourage you to give this DIY trick a try. It’s easier than you might think, and the rewards are well worth the effort. From planting the seeds to harvesting the bounty, every step of the process is filled with anticipation and excitement.
And once you’ve harvested your homegrown peanuts, the fun doesn’t stop there! Roast them, boil them, make peanut butter, or add them to your favorite recipes. The possibilities are endless. Share your harvest with friends and family, and watch their faces light up with delight as they taste the difference between homegrown and store-bought peanuts.
We’re confident that you’ll find growing peanuts in your backyard to be a truly enriching experience. So, grab your seeds, prepare your soil, and get ready to enjoy the delicious taste of homegrown peanuts.
Don’t forget to share your experiences with us! We’d love to hear about your successes, your challenges, and your favorite ways to enjoy your homegrown peanuts. Post photos of your peanut plants, share your tips and tricks, and inspire others to join the peanut-growing movement. Let’s create a community of backyard peanut farmers!
Variations and Suggestions
* Container Gardening: If you have limited space, growing peanuts in containers is a great option. Choose a large container with good drainage and use a well-draining potting mix.
* Different Varieties: Experiment with different peanut varieties to find your favorite. Virginia peanuts are known for their large size, while Spanish peanuts have a sweeter flavor.
* Companion Planting: Plant herbs like basil or rosemary near your peanuts to deter pests and enhance their flavor.
* Roasting: Roast your homegrown peanuts for a delicious and healthy snack. Simply spread them on a baking sheet and roast at 350°F (175°C) for 15-20 minutes, or until golden brown.
* Peanut Butter: Make your own homemade peanut butter using your homegrown peanuts. Simply roast the peanuts and then grind them in a food processor until smooth.
Frequently Asked Questions (FAQ)
What is the best time to plant peanuts?
The ideal time to plant peanuts is after the last frost, when the soil temperature has warmed to at least 65°F (18°C). This typically occurs in late spring or early summer. Planting too early can result in poor germination and stunted growth. In warmer climates with longer growing seasons, you may be able to plant peanuts earlier. Check your local weather conditions and soil temperatures to determine the best planting time for your area.
How much space do peanut plants need?
Peanut plants typically need about 6-12 inches of space between plants and 2-3 feet between rows. This allows for adequate airflow and sunlight penetration, which are essential for healthy growth and peanut production. If you’re growing peanuts in containers, choose a large container that is at least 12 inches in diameter and 12 inches deep. Overcrowding can lead to reduced yields and increased susceptibility to diseases.
What type of soil is best for growing peanuts?
Peanuts thrive in well-drained, sandy loam soil with a slightly acidic pH (6.0-6.5). Sandy loam soil provides good drainage, which is crucial for preventing root rot and other fungal diseases. The slightly acidic pH helps to make essential nutrients more available to the plants. If your soil is heavy clay, amend it with compost or other organic matter to improve drainage and aeration. Avoid planting peanuts in compacted or waterlogged soil.
How often should I water peanut plants?
Peanut plants need consistent moisture, especially during flowering and pod development. Water deeply and regularly, especially during dry periods. Aim to keep the soil consistently moist but not waterlogged. Avoid overhead watering, as this can increase the risk of fungal diseases. Drip irrigation is an excellent way to water peanut plants, as it delivers water directly to the roots. Reduce watering as the plants mature and the pods begin to ripen.
How long does it take for peanuts to mature?
Peanuts typically take 120-150 days to mature, depending on the variety and growing conditions. You’ll know your peanuts are ready to harvest when the foliage begins to yellow and the pods feel plump and full. To check for ripeness, dig up a few plants and examine the pods. The inside of the pods should be dark and the kernels should be fully developed.
What are some common pests and diseases that affect peanut plants?
Some common pests that affect peanut plants include aphids, spider mites, and nematodes. Common diseases include leaf spot, white mold, and root rot. To prevent pests and diseases, practice good garden hygiene, such as removing weeds and debris. Use organic pest control methods, such as insecticidal soap or neem oil, to control pests. Ensure good drainage to prevent root rot. Choose disease-resistant varieties whenever possible.
How do I harvest peanuts?
To harvest peanuts, dig up the entire plant, including the roots and pods. Gently shake off any excess soil and allow the plants to dry in the sun for a few days. This will help to cure the peanuts and improve their flavor. Once the plants are dry, you can remove the peanuts from the vines. Store the peanuts in a cool, dry place.
Can I grow peanuts indoors?
While it’s possible to grow peanuts indoors, it’s not ideal. Peanut plants need a lot of sunlight and space to thrive. If you do decide to grow peanuts indoors, choose a sunny location and provide supplemental lighting if necessary. Use a large container with good drainage and a well-draining potting mix. Be sure to pollinate the flowers by hand, as there may not be enough insects indoors to do the job.
Are peanuts actually nuts?
Despite their name, peanuts are not actually nuts. They are legumes, which are plants that produce pods containing seeds. Other legumes include beans, peas, and lentils. Peanuts are often referred to as nuts because they have a similar flavor and texture.
What are some ways to use homegrown peanuts?
There are countless ways to use homegrown peanuts! You can roast them, boil them, make peanut butter, add them to salads, stir-fries, or desserts. You can also use them to make peanut brittle, peanut sauce, or peanut flour. The possibilities are endless! Experiment with different recipes and find your favorite ways to enjoy your homegrown peanuts.

Leave a Comment